


Prepare your RDBMS
The following recommendations assume the implementation of conventional database tuning and performance measures. Actual results may vary on a system-by-system basis, based on the tuning expertise available and hardware and software selections. These recommendations are intended only as a guide and should not be implemented on a production system without extensive testing.
A fully qualified database administrator should assist with this preparation.
Note Micro Focus recommends that the Service Manager server be within reasonable proximity to the RDBMS. Utilizing a RDBMS for use with Service Manager Server over a WAN link is not recommended and will have negative impact on overall product performance.
Follow the instructions in this section to prepare your Relational Database Management System (RDBMS) prior to installing the Service Manager data.
Note Currently, only SQL Server and Oracle databases are supported for Service Manager.
Prepare a SQL Server database
To prepare a SQL Server database, follow these steps:
-
Meet general space requirements:
Place all Service Manager data in one or more dedicated table spaces within a single SQL Server instance. These table spaces must contain Service Manager data only. Multiple instances consume more system resources than a single-instance solution.
Allocate at least 1 GB of data space for a test system. The amount of space necessary for a production system depends on the amount of data that you need to store and your specific implementation.
-
Set the sorting of characters for localized systems and set the case sensitivity of the database.
Service Manager supports both case-sensitive and case-insensitive Microsoft SQL server. To use Service Manager in case-insensitive mode, you must select a case-insensitive collation on the SQL Server before installing Service Manager. You can specify the desired case-sensitivity for sort order during the creation of the database. Set the SQL Server database to the desired collation when you create it. Service Manager automatically detects the settings.
- To run in case-sensitive mode, pick a collation that ends with _BIN, such as Latin1_General_BIN.
- To run in case-insensitive mode, pick a collation that ends with _CI_AS, such as Latin1_General_CI_AS.
MS SQL Server collation support
Service Manager supports two types of collations :
- Those ending in some form of _BIN (binary)
- Those ending in some form of _CI_AS (case-insensitive, accent sensitive)
_BIN is used for case-sensitive collation, meaning both, comparisons ( WHERE NAME="ADMINISTRATOR") and sorting ( ORDER BY NAME) are case-sensitive. Collations ending in _CS_AS claim to be case-sensitive, but that only applies to comparisons. For sorting, they use a "dictionary order," which is essentially case-insensitive.
_CI_AS is the supported case-insensitive collation. It uses case-insensitive comparisons ( WHERE NAME="AdMinIstrator") and case-insensitive sorting. Do not use _CI_AI since Service Manager has no concept of accent insensitivity.
The sort order becomes important in the case of a combined SQL/IR search. In that case, IR has to match its own results with the results returned by SQL, and for that it assumes binary or case-insensitive sorted order.
Note that such queries might take place even if you do not know about them. For example in the Service Catalog, when ordering, a user enters an IR query, but the RAD appends a long non-IR query to it. This results in a mixed query.
The other aspect of the collation is the code page. The code page defines the code page of VARCHAR columns, NVARCHAR are always in UTF-16. "General" refers to the American default Windows code page, Win 1252.
Service Manager supports the following SQL Server code pages:
Code page Description 874 MS cp874 Thai 932 MS cp932 Japanese 936 MS cp936 Simplified Chinese 949 MS cp949 Korean 950 MS cp950 Traditional Chinese 1250 MS cp1250 Central European 1251 MS cp1251 Russian, Bulgarian, Serbian 1252 MS cp1252 Latin/Western European 1253 MS cp1253 modern Greek 1254 MS cp1254 Turkish 1255 MS cp1255 Hebrew 1256 MS cp1256 Arabic 1257 MS cp1257 Estonian, Latvian, Lithuanian 1258 MS cp12578 Vietnamese You can generate the list of all the code pages supported by Service Manager with the command,
sm -reportlanguages. Only those code pages that start with "mswin" are used in the context of SQL Server.If you are using an unsupported code page, you will see this warning in the log file:
W SQL Server uses a code page <nnn> unsupported by Service Manager which retrieved codepage <nnnn>.Note
If you have selected the Use Unicode Data Type option when configuring the Service Manager server, unicode sorting is used instead of collation sorting. For more information about the Use Unicode Data Type option, see Install and configure the Service Manager Server.
- Create server connections. Every Service Manager thread, foreground, or background, requires a connection to your RDBMS. Service Manager background processors require 17 connections to run. Make sure that you allocate enough connections for all of your users. For additional information, refer to your RDBMS vendor documentation.
-
Create a login ID and password for Service Manager to use to connect to your database.
Create a login ID and password for Service Manager to use to connect to your SQL Server database.
The login must have CREATE/ALTER/DROP TABLE authority for the target database. The CREATE/ALTER/DROP TABLE authority is only required during installation and creation of new Service Manager tables, and only if you allow Service Manager to issue the DDL to create tables and indexes. When Service Manager connects to your database using the login ID, tables are created in the default table space defined for that login ID.
Caution You must grant the DB account of the "sqllogin" SM parameter the privilege to create Stored Procedures and User Defined Functions.
-
Set up a connection to Service Manager:
Service Manager connects to the database through your RDBMS client. To set up the connection between the Service Manager application server and your RDBMS, know the name of the database and the login ID and password required to connect to the database server that you created above. The Service Manager initialization file, sm.ini, must be present in the Service Manager server RUN directory.
Set up connectivity to your SQL Server database
Follow these connectivity rules when you set up the connection to your SQL Server:
- Make sure that the database name you enter in the configuration tool corresponds to the ODBC Driver system data source.
- Configure the ODBC Driver data source as a System DSN. Set it up to use the following settings:
- SQL server authentication
- ANSI quoted identifiers
- ANSI nulls, paddings, and warnings
- Do not create the system DSN by using a 64-bit ODBC administrator. When Service Manager is installed on a 64-bit Windows system, create the System DSN entry for the ODBC Driver by launching odbcad32.exe from: C:\WINDOWS\SysWOW64.
Note Service Manager supports SQL Server AlwaysOn for SQL Server. AlwaysOn is a high availability solution for SQL Server databases. To support SQL Server AlwaysOn, Service Manager Server introduces the sqlalwayson:1 parameter and the SQMSSQLAO.ODBC.DLL file. To use this functionality, you must install Microsoft ODBC Driver 11 for SQL Server (or a later version) and configure a System DSN with this ODBC driver.
-
Set time zones for reporting:
If you plan to report on Service Manager data using your RDBMS tools, set the sqltz parameter in the sm.ini file. This is an optional parameter that the Service Manager server uses to control the storing of date and time values in the RDBMS. This parameter defines the time zone to use as a base for all date and time values. The time zone is specified as the name of the time zone record in the Service Manager tzfile table. The default time zone is Greenwich/Universal (GMT). For more information about using the sqltz parameter, see the System Configuration Parameters topic in the Service Manager Help.
Caution If you use different time zone settings, the dates contained in reports made by your RDBMS utility may be inaccurate.
- Set the Truncate Log On Checkpoint option for the target database on your SQL server. During initial system load, Service Manager places a high insert transaction load on your SQL server. Set the Truncate Log On Checkpoint option to prevent the transaction log from growing too large.
-
Create your SQL Server database with a code page that supports the character set of most of your data. To support multiple character sets, you can use Unicode data type (NVARCHAR, NCHAR, or NVARCHAR(MAX). For information about how to use the Unicode data type, see the Configure the Service Manager Server section below.
Caution If you choose a Western European code page, the system cannot store Eastern European or Asian characters in columns defined as VCHAR, CHAR, or TEXT data type. If you must store characters from different languages, consider using the Unicode data type, that is, NVARCHAR, NCHAR, or NVARCHAR(MAX).
Prepare an Oracle database
Oracle Transparent Application Failover (TAF) enables database clients to switch the connection to surviving nodes in an Oracle Real Application Cluster (RAC) without re-establishing the database connection or setting up necessary session properties in the event of a failure of an instance.
All supported Service Manager server versions perform similar session recovery operations within the application. When Service Manager detects a connection failure, it attempts to reestablish the connection, set up necessary session properties, and repeat the failed transactions. Service Manager retries the connection for one minute. If the database is in an Oracle RAC configuration, this should allow time for failover and reconnection to another available instance.
Since similar failover functionality is available within Service Manager, the product has not been modified to run in an Oracle TAF configuration.
Caution Using Service Manager in combination with Oracle TAF could cause connectivity issues. Do not run Service Manager in an Oracle TAF configuration.
To prepare an Oracle database, follow these steps:
-
Meet general space requirements:
Place all Service Manager data in a dedicated table space within a single Oracle instance. This table space must contain Service Manager data only. Multiple instances consume more system resources than a single-instance solution.
Allocate at least 1 GB of data space for a test system. The amount of space necessary for a production system depends on the amount of data that you need to store and your specific implementation.
-
Set the sorting of characters for localized systems.
Note Setting the sorting of characters in Service Manager is dependent on the settings defined within the back-end database or client connections to these databases. Please check with your company's Database Administrator when setting up your Service Manager database to ensure you have the correct settings for the native language(s) that will be used within Service Manager.
Database vendors provide different options for these settings and continue to add/modify settings for languages around the world. Refer to the technical documentation provided by the database vendor for more information and recommendations on the correct localization settings. For additional information, search the vendor documentation for the following terms.
- Globalization Support
- Oracle client installation globalization - Create server connections. Every Service Manager thread, foreground, or background, requires a connection to your RDBMS. Service Manager background processors require 17 connections to run. Make sure that you allocate enough connections for all of your users. For additional information, refer to your RDBMS vendor documentation.
-
Create a login ID and password for Service Manager to use to connect to your database.
Create a login ID and password for Service Manager to use to connect to your Oracle server. When you log on to Service Manager, it creates a table in the default table space defined for that login ID. The login ID must have the following privileges:
-
Connect
-
Create, Alter, Drop a table
-
Create, Alter, Drop an index
-
Select on v_$parameter
-
Alter Session Privileges
You can provide these privileges to an Oracle user by using the following oracle statements:
create user <smadmin> identified by <smadmin> defaulttablespace <users> quota unlimited on <users>;grant connect, resource, select on v_$parameter to <smadmin>;- CREATE/ALTER/DROP TABLE privileges are only required during installation and creation of new Service Manager tables if you allow Service Manager to issue the DDL to create tables and indexes.
- You must grant the DB account of the "sqllogin" SM parameter the privilege to create Stored Procedures and User Defined Functions.
-
-
Set the case sensitivity of the database.
Service Manager supports case-insensitivity for Oracle 11.2.0.3 and later. For earlier versions of Oracle, Service Manager requires a case-sensitive database. Click the appropriate task below for instructions on setting case-sensitivity.
Set case-sensitivity on a new Oracle database
- While creating a new Oracle instance, choose All Initialization Parameters and modify the parameters.
- Set the case-sensitivity for the NLS_SORT and NLS_COMP parameters:
- For a case-sensitive database, set NLS_SORT and NLS_COMP to BINARY.
- For a case-insensitive database, set NLS_SORT to BINARY_CI and set NLS_COMP to LINGUISTIC.
-
In Service Manager, run the following SQL statement to verify that the parameters are in effect:
select parameter, value from nls_instance_parameters; - Make sure that the values for NLS_SORT and NLS_COMP match your selection in Step b.
Change an existing case-sensitive Oracle database with Service Manager data to be case-insensitive
- Back up all Service Manager data.x
-
Run the following command:
sm -system_unload -system_directory:<path to where you want to store the Service Manager data unload files> -
Log in to Oracle as a sys admin user, and issue the following statements to set NLS_SORT to BINARY_CI and NLS_COMP to LINGUISTIC:
alter system set NLS_SORT=BINARY_CI SCOPE=SPFILE;alter system set NLS_COMP=LINGUISTI CSCOPE=SPFILE;create pfile from spfile; -
Shut down and restart the Oracle instance.
Note If you are running Oracle on parallel servers, be sure to replicate the parameter file to all instances of Oracle.
- Drop all Service Manager tables.
-
In Service Manager, run the following SQL statement to verify that the parameters are in effect:
select parameter, value from nls_instance_parameters; - Make sure that the values for NLS_SORT and NLS_COMP match your selection in Step b.
-
Remove groupname, sqldebug, and any other debugging parameters from the sm.ini file, and then run the following command:
sm -system_load -system_directory:<path to the Service Manager data unload files> -
Validate the case-insensitive unique indexes.
During the initial system load, Service Manager creates a set of case-insensitive indexes for each table, based on the keys in that table. When the sqldebug:1 parameter is in the sm.ini file, Service Manager logs these indexes the first time it reads a table. You can review the settings created for each table by viewing the sm.log file.
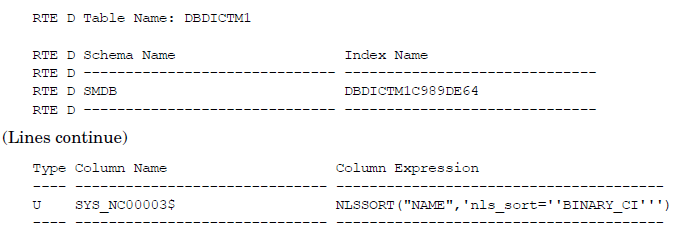
The case-insensitive unique indexes should be as Oracle function-based indexes where the Column Expression is
NLSSORT("<field name>",'nls_sort=''BINARY_CI''').Follow these steps to verify that the case-insensitive unique indexes are created with the correct column expression:
- Set sqldebug:1 in the sm.ini file, located in the <SM_install_location>\Server\RUN directory.
- Start Service Manager.
-
Check the sm.log file in the <SM_install_location>\Server\logs directory. The following entry in the log file indicates that the Oracle instance is set to case-insensitive and that you connected to it successfully:
RTE I Oracle server settings for language, territory and character set:AMERICAN_AMERICA.AL32UTF8 (AL16UTF16)RTE I OCI Client settings for language, territory and character set:AMERICAN_AMERICA.AL32UTF8 (UTF16)....RTE I Oracle instance setting for NLS_SORT is set to BINARY_CIRTE I Oracle instance setting for NLS_COMP is set to LINGUISTIC...RTE I Oracle session is set up in CASE INSENSITIVE modeThe following information in the log file indicates that the Dbdict table has an index, DBDICTM1C989DE64, with a key called "NAME", which is case-insensitive:
-
Set up a connection to Service Manager:
Service Manager connects to the database through your RDBMS client. To set up the connection between the Service Manager application server and your RDBMS, know the name of the database and the login ID and password required to connect to the database server that you created above. The Service Manager initialization file, sm.ini, must be present in the Service Manager server RUN directory.
To set up connectivity to your Oracle database, follow these steps:
-
Install the Oracle client on your Service Manager server machine.
Note Service Managerrequires a 32-bit Oracle Client library, which can be found in the Oracle 64-bit Client installation directory or Oracle 32-bit Instant Client directory. Visit the Oracle site to download the proper Oracle client for the platform where you plan to run the Service Manager server.
- Configure a connection to the Oracle server in the tnsnames.ora file. Define the database name.
- On UNIX systems, the tnsnames.ora file is located in $ORACLE_HOME/network/admin or can be specified using the TNS_ADMIN environment variable.
- On Windows systems the tnsnames.ora file is located in the Oracle Home [%ORACLE_HOME%/network/admin] directory.
-
For Oracle 11.1 or above only, disable ADR tracing by turning off the diag_adr_enabled parameter in the sqlnet.ora file: diag_adr_enabled=OFF. ADR tracing is enabled by default.
Note An Oracle bug ("Multi Threaded OCI Client Dumps Core After Reconnecting To Database") is triggered when ADR tracing is enabled. Once this bug is triggered, the Service Manager server will crash every time when setting up a connection to the Oracle server.
- Specify the name of the Oracle database connection in the sqldb parameter in the sm.ini file. You can do this after you install the Service Manager Server by running the Configuration tool and specifying the database name you provided in the tnsnames.ora file.
-
-
Set time zones for reporting:
If you plan to report on Service Manager data using your RDBMS tools, set the sqltz parameter in the sm.ini file. This is an optional parameter that the Service Manager server uses to control the storing of date and time values in the RDBMS. This parameter defines the time zone to use as a base for all date and time values. The time zone is specified as the name of the time zone record in the Service Manager tzfile table. The default time zone is Greenwich/Universal (GMT). For more information about using the sqltz parameter, see the System Configuration Parameters topic in the Service Manager Help.
Caution If you use different time zone settings, the dates contained in reports made by your RDBMS utility may be inaccurate.
- Set Oracle table spaces. Most tables on an Oracle server hold less than 50 KB of data. Service Manager sets the initial storage space size when creating the SQL tables. When manually creating a new Oracle instance, follow these guidelines:
- Create the database with a block size of 8 KB or a multiple thereof.
- Create a separate table space for the Service Manager data, and make this the default table space for the Service Manager user.
- Set the TEMPORARY table space for the Service Manager user to an appropriate temporary table space.
-
Set your UNIX environment variable for Oracle:
- Find the path to your Oracle client’s 32-bit shared libraries.
-
Set the UNIX environment variable as shown in the following examples. In these examples, the path to the Oracle client shared libraries is set relative to the Oracle environment variable $ORACLE_HOME.
- C shell:
setenv LD_LIBRARY_PATH $LD_LIBRARY_PATH:$ORACLE_HOME/lib32 - Korn shell:
export LD_LIBRARY_PATH=$LD_LIBRARY_PATH:$ORACLE_HOME/lib32
Note For Linux, you must set the LD_LIBRARY_PATH variable.
- C shell:
-
Create your Oracle database with a UTF-8 code page. All data passed from Service Manager to the Oracle client is encoded in UTF-8; using a UTF-8-based Oracle database reduces the overhead of converting data and prevents the loss of special characters.


