


Replace the Service Manager Service Portal generated SSL certificates
Service Manager Service Portal requires HTTPS (HTTP over SSL) for client browsers. Configuring HTTPS between Service Manager Service Portal and the Service Manager Server is optional but recommended. Third-party or corporate CA-signed certificates should be used in production systems; however, self-signed certificates generated by Service Portal can be used in non-production systems.
Important Although Service Manager Service Portal-generated certificates can be configured during installation and used in production, we recommend that you configure trusted certificates from a Certificate Authority (CA). Some organizations issue certificates that are signed by a corporate CA and some organizations get certificates from a trusted third-party CA, such as VeriSign.
This section explains how to replace the previously Service Manager Service Portal-generated SSL certificates with CA-signed SSL certificates.
Note The Service Manager Service Portal-generated SSL certificates are created and configured by using the /opt/hp/propel-install/propel-ssl-setup.sh auto command when installing Service Manager Service Portal.
-
In the following instructions,
$PROPEL_VM_HOSTNAMErepresents the fully qualified domain name of the Service Manager Service Portal host. You can set this as an environment variable with the following command on the Service Manager Service Portal host:# export PROPEL_VM_HOSTNAME=`hostname --fqdn` -
The password is “changeit” for the Service Manager Service Portal global Java keystore
(/usr/lib/jvm/java-1.8.0/jre/lib/security/cacerts) -
The password is “propel2014” for the Service Manager Service Portal keystore
(/opt/hp/propel/security/.keystore)
Preparation
Before performing these instructions and replacing the Service Manager Service Portal-generated certificates, make sure an SSL configuration between the Service Manager Service Portal host and a Service Manager supplier (endpoint) system works correctly. If you experience problems after replacing the SSL certificates, this will help you troubleshoot SSL issues.
Replace Service Manager Service Portal-Generated SSL Certificates
The instructions in this chapter are written for IT organizations that require both a CA-signed root certificate and an intermediate certificate. If your IT organization requires only a root certificate, you can simplify the instructions
Perform the following steps to replace the previously Service Manager Service Portal-generated SSL certificates with CA-signed SSL certificates.
root on the Service Manager Service Portal host. (The default password is “propel2015” for the root user.)-
Stop the Service Manager Service Portal services:
# propel stop -
Backup the current Service Manager Service Portal SSL directories:
# cp -rp /opt/hp/propel-install/ssl-tmp /opt/hp/propel-install/ssl-tmp.backup
# cp -rp /opt/hp/propel/security /opt/hp/propel/security.backup -
Initialize the SSL working directory:
# cd /opt/hp/propel-install
# ./propel-ssl-setup.sh init
By default, the SSL working directory is
/opt/hp/propel-install/ssl-tmp.Note This re-creates the
/opt/hp/propel-install/ssl-tmpdirectory and removes all previous files. -
Obtain your IT organization's CA certificates for use by Service Manager Service Portal. Your IT organization can provide only a root certificate or both a root and an intermediate certificate. The instructions in this step are written for having both a root and an intermediate certificate. Considerations for the certificates are:
- They must be in PEM format.
- PEM certificates usually have extensions such as
.pem,.crt,.cer, and.key. -
They must be Base64 encoded ASCII files and contain:
"
-----BEGIN CERTIFICATE-----"and
"
-----END CERTIFICATE-----"lines.
- Copy the root certificate as
CA.crtand the intermediate certificate asintermediate.crtto the/opt/hp/propel-install/ssl-tmpdirectory. -
Merge both certificates in the
/opt/hp/propel-install/ssl-tmpdirectory:# cd /opt/hp/propel-install/ssl-tmp
# cat CA.crt intermediate.crt > rootPlusIntermediate.crt
-
Back up the existing Service Manager Service Portal global Java keystore:
# cd /usr/lib/jvm/java-1.8.0-openjdk/jre/lib/security
# cp cacerts cacerts.backup -
Import the root certificate (
CA.crt) into the Service Manager Service Portal global Java keystore# keytool -importcert -file /opt/hp/propel-install/ssl-tmp/CA.crt
-alias <CA_ALIAS> -trustcacerts -keystore cacertsWhere <
CA_ALIAS> is the CA alias you specify. The password is "changeit" for the global Java keystore. -
Import the intermediate certificate (
intermediate.crt) into the Service Manager Service Portal global Java keystore# keytool -importcert -file /opt/hp/propel-install/ssl-tmp/intermediate.crt
-alias <INT_ALIAS> -trustcacerts -keystore cacertsWhere <
INT_ALIAS> is the intermediate alias you specify.Tip You can verify that the global Java keystore contains your CA certificates:
# keytool -list -keystore cacerts –storepass changeit | grep <ALIAS>Where <
ALIAS> is either the CA alias or the intermediate alias you specified in steps 6 and 7. -
Generate the Certificate Signing Request (CSR) and Server Private Key pair:
# cd /opt/hp/propel-install
# ./propel-ssl-setup.sh generateSigningRequest <SUBJECT>
Where
SUBJECTis the signing request subject in the slash-separated form. "CN" must be the last field in the subject and contain the fully qualified hostname of the Service Manager Service Portal host. Enclose the subject in double quotes, such as:
"/C=US/ST=CA/L=San Jose/O=StartUpCompany/
OU=Software/CN=mypropelserver.example.com"Note The private key password ("propel2014") is automatically created by the
propel-ssl-setup.shscript.This command creates two new directories and four new files
/opt/hp/propel-install/ssl-tmp/$PROPEL_VM_HOSTNAME/directory/opt/hp/propel-install/ssl-tmp/$PROPEL_VM_HOSTNAME/out/directory/opt/hp/propel-install/ssl-tmp/hostnamesfile/opt/hp/propel-install/ssl-tmp/$PROPEL_VM_HOSTNAME/private.key.pemfile/opt/hp/propel-install/ssl-tmp/$PROPEL_VM_HOSTNAME/propel_host.key.csrfile/opt/hp/propel-install/ssl-tmp/$PROPEL_VM_HOSTNAME/out/propel_host.key.rsafileTip You can skip step 9 and step 10 if you already have your certificate signed by CA. You just need to replace the
private.key.pem,propel_host.key.csr, andpropel_host.key.rsafiles in the directory listed above. -
You can verify the content of your CSR by pasting its text in here:
https://ssltools.websecurity.symantec.com/checker/views/csrCheck.jsp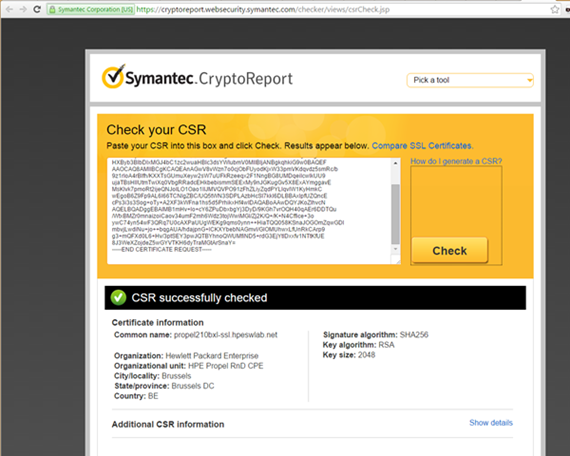
- Send the CSR containing the public key to your CA. This is a process specific to your company, and network administrators should know how to accomplish this. Ask for the certificate to be delivered in PEM format. If it is not, you can convert formats with the
opensslcommand. -
After the certificate has been received from the CA, copy the new host certificate to:
/opt/hp/propel-install/ssl-tmp/$PROPEL_VM_HOSTNAME/out/propel_host.crtIf you need to extract the host certificate from a PEM file, you can extract the text beginning with "
-----BEGIN CERTIFICATE-----" and ending with "-----END CERTIFICATE-----"The following is an example:
[root@SGDLITVM034 out]# pwd
/opt/hp/propel-install/ssl-tmp/sgdlitvm034.domain.com/out
[root@SGDLITVM034 out]# cat propel_host.crt
-----BEGIN CERTIFICATE-----
MIIDgTCCAmkCCQDg9YGbj/CV+jANBgkqhkiG9w0BAQUFADCBhzELMAkGA1UEBhMC
VVMxCzAJBgNVBAgTAkNBMRIwEAYDVQQHEwlTYW4gRGllZ28xDTALBgNVBAoTBEhQ
U1cxDDAKBgNVBAsTA0JUTzEaMBgGA1UEAxMRc2VydmVyLmRvbWFpbi5jb20xHjAc
BgkqhkiG9w0BCQEWD3VzZXJAZG9tYWluLmNvbTAeFw0xNjA5MjIwNTM3MzNaFw0x
OTA5MjIwNTM3MzNaMH0xCzAJBgNVBAYTAlVTMQswCQYDVQQIDAJDQTERMA8GA1UE
BwwIU2FuIEpvc2UxFzAVBgNVBAoMDlN0YXJ0VXBDb21wYW55MREwDwYDVQQLDAhT
b2Z0d2FyZTEiMCAGA1UEAwwZU0dETElUVk0wMzQ5LmhwZXN3bGFiLm5ldDCCASIw
DQYJKoZIhvcNAQEBBQADggEPADCCAQoCggEBAMLljL+tzjZHGzK1gHaZDNBvMXUt
kJPq+J73yqnaigIY/O1q0i1zWttqZJt8pju2BSlvQ517x4POr9pGAyDM7A0KqdsP
tGMGQ07U8gaX2fyZl+t9yBeg3fgrQ1cgqmIlrxuFx+o8GeBjSZJn6MO+BeWjLRWr
5PB1J0izBG3garSLL0jn+knV3i3M/BEB17bhmn5tETghC04cvZO5BaLkiRklbST4
Yt+rBjDBlhGS9eHVDuiQ1zzrAvtbGZLW4Mzss/nWvmkN55kfakdsYqYCe9m8mLKv
LZTZeFfoo7xoS+hGbSdZnXFRKIXOr+vA981KDrlLtgOZ+oOyvgpcFlm1LvUCAwEA
ATANBgkqhkiG9w0BAQUFAAOCAQEAb2TglwIa95V9k58b4z5mkpscb0Hkg7zGiIc3
E16AmNbNlZ/qVebnAM3gheAbD9V3ebQ61WQgJYYv7JzDiGcU5RhevSd7XJuuqm+p
0EuwDwLtalFKcETxtUv+/F5p1TmsdkBXBwVlFSElYQ/oaKxH2dPX7U15TF2gdMeM
2S7adpfLqX/yFod5pqjp0nU20iSsCzml7AR+enp3J257OngqhmnfMYLc4P+4iI0d
hC3nTqdi2nudSp0s0UJSghK4BTFURd3UxEropfCB5GC5oebIEnrrKfp5imZ9quM3
voGo4FaGVWLOMr+fc+QmfP82R4cP4Bl0ZmwNCeGdFIbj9objVg==
-----END CERTIFICATE-----
[root@SGDLITVM034 out]#
-
View the SSL certificate signing algorithm.
Note We recommend reviewing the certificate-signing algorithm used and ensuring that strong encryption is used. For example, SHA1 is sometimes used, and instead, stronger algorithms such as SHA256 should be used.
To view a certificate’s signing algorithm, execute the following command:
# keytool –printcert –file <SSL-CERTIFICATE> | grep –i algorithm
For example:
# keytool –printcert –file /opt/hp/propel/security/propel_host.crt | grep algorithm
Signature algorithm name: SHA256withRSA
#
-
Validate the host certificate and the CA match:
# openssl verify -verbose -CAfile
/opt/hp/propel-install/ssl-tmp/rootPlusIntermediate.crt
/opt/hp/propel-install/ssl-tmp/$PROPEL_VM_HOSTNAME/out/propel_host.crt
You should see the following message:
/opt/hp/propel-install/ssl-tmp/$PROPEL_VM_HOSTNAME/out/propel_host.crt: OKCaution Do not proceed if you see any error messages. The CA and certificate must match. Restore the Service Manager Service Portal host's files that were backed up in previous steps (2 and 5) and restart this procedure if necessary.
-
Create the certificate and the keystores:
# cd /opt/hp/propel-install/
# ./propel-ssl-setup.sh finish
The results of the
propel-ssl-setup.sh finishscript resemble the following example:[root@SGDLITVM034 hp]# ls -la /opt/hp/propel-install/overlay/*/security /opt/hp/propel-install/overlay/_ALL_HOSTS_/security: total 8 drwxr-x---. 2 root root 43 Sep 21 10:57 . drwxr-x---. 3 root root 21 Sep 21 10:57 .. -rw-r-----. 1 root root 1627 Sep 22 13:54 CA.crt -rw-r-----. 1 root root 2169 Sep 22 13:54 propel.truststore /opt/hp/propel-install/overlay/sgdlitvm034.domain.com/security: total 24 drwxr-x---. 2 root root 4096 Sep 21 10:57 . drwxr-x---. 3 root root 21 Sep 21 10:57 .. -rw-r--r--. 1 root root 2285 Sep 22 13:54 .keystore -rw-r-----. 1 root root 2904 Sep 22 13:54 propel_host.chain.crt -rw-r--r--. 1 root root 1277 Sep 22 13:39 propel_host.crt -rw-r--r--. 1 root root 1679 Sep 22 11:41 propel_host.key.rsa -rw-r--r--. 1 root root 2689 Sep 22 13:54 propel_host.pfx
-
Move all the created files,
intermediate.crt, androotPlusIntermediate.crtinto their final locations:Theyescommands preceding thecpcommands automatically sends a "y" when prompted to overwrite an existing file.# cd /opt/hp/propel-install/overlay/_ALL_HOSTS_/security
# yes | cp -p * /opt/hp/propel/security
# cd /opt/hp/propel-install/overlay/$PROPEL_VM_HOSTNAME/security
# yes | cp -p * /opt/hp/propel/security
# yes | cp -p .keystore /opt/hp/propel/security
# cp /opt/hp/propel-install/ssl-tmp/rootPlusIntermediate.crt
/opt/hp/propel/security/rootPlusIntermediate.crt
# cp /opt/hp/propel-install/ssl-tmp/intermediate.crt
/opt/hp/propel/security/intermediate.crtThe following is an example:
[root@SGDLITVM034 security]# ls -la
total 36
dr-xr-x---.  2 propel propel 4096 Sep 21 11:12 .
drwxr-xr-x. 36 propel root   4096 Sep 21 11:14 ..
-r--r-----.  1 propel propel 1627 Sep 22 14:00 CA.crt
-r--r-----.  1 propel propel 2285 Sep 22 13:54 .keystore
-r--r-----.  1 propel propel 2904 Sep 22 13:54 propel_host.chain.crt
-r--r-----.  1 propel propel 1277 Sep 22 13:39 propel_host.crt
-r--r-----.  1 propel propel 1679 Sep 22 11:41 propel_host.key.rsa
-r--r-----.  1 propel propel 2689 Sep 22 13:54 propel_host.pfx
-r--r-----.  1 propel propel 2169 Sep 22 13:54 propel.truststore
- Make sure the
CA.crtandintermediate.crtfiles are in the/opt/hp/propel/securitydirectory on the Service Manager Service Portal host. (They should have already been copied in step 14 above.) -
Import the intermediate certificate (
intermediate.crtfile) into the Service Manager Service Portal truststore:# cd /opt/hp/propel/security # keytool -importcert -file intermediate.crt -keystore propel.truststore -trustcacerts
Tip The password is "propel2014" for the Service Manager Service Portal truststore.
-
Update the
app.jsonfiles on the Service Manager Service Portal VM with the following commands:# cd /opt/hp/propel # sed -i -e's!/opt/hp/propel/security/CA.crt!/opt/hp/propel/security/CA.crt,/opt/hp/propel/security/intermediate.crt!' $(find . -print | grep app.json)
-
Update the Identity Management (IdM)
*.jsonfiles on the Service Manager Service Portal VM with the following commands:# cd /opt/hp/propel/idmAdmin/conf # sed -i -e's!/opt/hp/propel/security/CA.crt!/opt/hp/propel/security/CA.crt,/opt/hp/propel/security/intermediate.crt!' $(find . -print | grep endpoint.json) # sed -i -e's!/opt/hp/propel/security/CA.crt!/opt/hp/propel/security/CA.crt,/opt/hp/propel/security/intermediate.crt!' $(find . -print | grep idm.json)
Update RabbitMQ
-
Edit the
/etc/rabbitmq/rabbitmq.configfile so that thecacertfileproperty has either the single root certificate (CA.crtfile) or both the root and intermediate certificates (rootPlusIntermediate.crtfile) specified. The following is an example of using both certificates: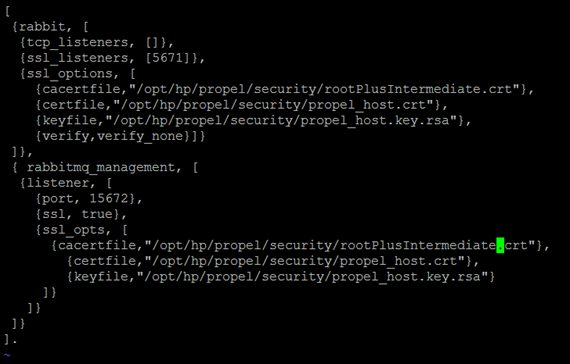
-
Restart RabbitMQ and clean up its log files
systemctl stop rabbitmq-server
rm -rf /var/log/rabbitmq/*
systemctl start rabbitmq-server
- Make sure there are no errors in the
/var/log/rabbitmq/rabbit@<PROPEL_HOST_SHORTNAME>.logfile.
Tip Next, if you need to configure SSL between Service Manager and Service Manager Service Portal, go to (Optional) Configure two-way SSL between SMSP and Service Manager; otherwise go to Add Service Manager as a supplier.


