


Configure FIPS mode in the Windows Client
Once you have enabled FIPS mode on the Service Manager (SM) Server side, you need to enable FIPS mode in the Windows Client and test if the Windows Client can connect to the SM Server successfully.
Prerequisites
Before you proceed, make sure of the following:
-
You have already configured the Windows Client's JRE for FIPS mode. For details, see the Windows Client section in Configure Java for FIPS mode.
Note FIPS mode requires the following jar files:
- cryptojce-x.x.x.jar
- cryptojcommon-x.x.x.jar
- jcmFIPS-x.x.x.jar
These files can be found in the following folder of the out-of-box Windows Client installation:
<Service Manager installation path>\Client\plugins\com.hp.ov.sm.client.thirdparty_9.xx.xxxx. You do not need to copy them from somewhere else to the Windows Client. -
You have already generated a CA certificates file and a client keystore for the Windows Client host. For details, see Generate FIPS validated certificates for the SM Server and other components.
- The CA certificates file: \certs\smcacerts.p12
- The Windows Client keystore file: \key\sun-sun-<Windows Client host FQDN>.p12 (for example, sun-sun-winhost.mycompany.net.p12)
- You have enabled FIPS mode on the SM Server side. For details, see Configure FIPS mode in the Server.
Steps to enable FIPS mode in the Windows Client
To configure FIPS mode in the Windows Client, follow these steps:
-
Copy the CA certificates file and client keystore file to a directory on the Windows Client host:
- smcacerts.p12
- sun-sun-<Windows Client host FQDN>.p12
For example, copy them to the C:\testing folder.
Tip As a best practice, you can copy certificate files to the <Windows client installation path>\plugins\com.hp.ov.sm.client.common_x.xx folder.
-
Configure the Windows Client preferences.
- Start the Windows client, and click Window > Preferences > Service Manager > Security.
-
Select the FIPS Mode checkbox.
A message appears, indicating that you need to restart the Windows Client to continue.
Click OK to exit the message window.
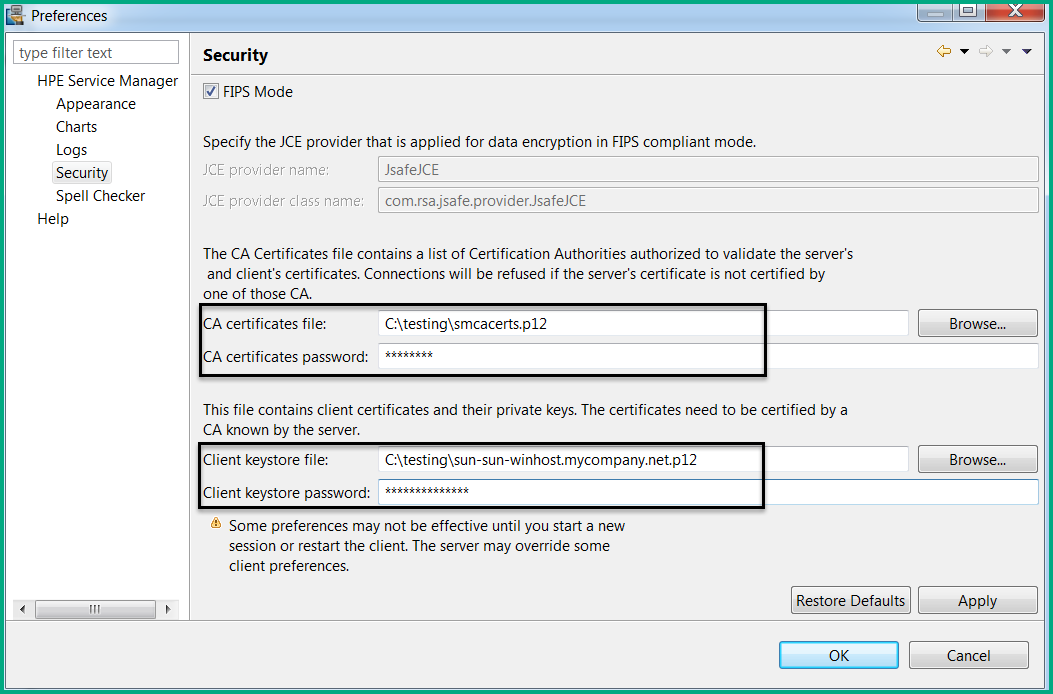
Because the Windows Client is hardcoded to use the RSA BSAFE JsafeJCE provider for FIPS mode, you no longer need to specify a cryptographic provider. For this reason, the following parameters are disabled (grayed out) when the FIPS Mode option is selected:
- JCE provider name
- JCE provider class name
Tip These parameters are used to specify a third-party Java Cryptography Extension (JCE) provider when the Windows Client is running in non-FIPS mode (that is, when the FIPS Mode check box is not selected).
Note that the following parameters are also disabled at this point, because a restart of the Windows Client is needed after the FIPS Mode option is enabled. After a restart, these parameters will be available to configure in the Preferences window.
- CA certificates password
- Client keystore password
The following screenshot illustrates the Preferences window when FIPS Mode is selected.

Click OK again to exit the Preferences window.
Close the Windows Client.
- Restart the Windows Client.
- Click Window > Preferences > Service Manager > Security.
-
Configure the parameters as described in the following.
Click Browse to enter the CA certificates file, and then enter the password in the CA certificates password field.
Click Browse to enter the client keystore file, and then enter the password in the Client keystore password field.
Click Apply, and then click OK twice.
-
Click File to open your client connection, and do the following to verify the SM Server and Windows Client have FIPS mode enabled correctly:
- Select the Use Login/Password option on the Connection tab.
-
Check that the Use SSL Encryption option on the Advanced tab is selected and grayed out.
Note When the FIPS Mode option is enabled, the Windows Client is forced to use SSL encryption.
- Enter your user name and password.
- In the Server host name field, enter the fully qualified domain name (FQDN) of the SM Server.
- In the Server port number field, enter the HTTP port (for example, 13080) of the SM Server.
- Click Connect.
If FIPS mode has been successfully enabled in the SM Server and Windows Client, you should be successfully logged in.
Next step:


