


How to Map the CI Type’s Attributes to Web Service Fields
The integration uses the Service Manager Adapter to transform UCMDB CI attributes to web services objects recognized by Service Manager. The Service Manager Adapter Service Manager Adapter uses XSL transformation files to convert UCMDB queries into a properly formatted Service Manager web services messages. Out-of-the-box, each integration query has a corresponding XSL transformation file. In addition, each attribute you enable for synchronization from Advanced layout settings requires its own entry in the XSL transformation file.
If you want to add a CI type to the integration, you must create a matching XSL transformation file that defines how the Service Manager Adapter transforms each CI type into a Service Manager web service object. See Integration queries for information about which CI types each query manages. In order to create a proper XSL mapping, you must be familiar with the service and object names Service Manager publishes as Web services. See the Service Manager help for information on publishing tables and columns as Web service objects.
The following steps illustrate creating an XSL transformation file for the rdbmsData query described in previous sections.
To map a CI type’s attributes to web service fields:
- Log in to UCMDB with an administrator account.
- Navigate to Data Flow Management > Adapter Management.
- Click the Create New Resource button
 .
. - Select New Configuration File.
- Select the ServiceManagerAdapter9.41 package.
- Enter the full file name: <AdapterID>/<filename>. For example, ServiceManagerAdapter9.41/rdbms_push.xslt.
- Copy the content of an existing XSL transformation file (for example,
runningsoftware_push.xslt) to the new XSL transformation file. - Find the CI type definition element in the new file. The CI type definition element uses the following format:
<xsl:template match="/CI_type_name">
CI_type_nameis the name of CI type in the UCMDB system.The following is an example from the
runningsoftware_push.xsltfile:<xsl:template match="/running_software">
- Update the CI type name to match the CI type you want to add to the integration. For example, create the following CI type definition element to add the database CI type to the integration.
<xsl:template match="/sm_rdbms">
- Add or update table naming elements as needed. By default, UCMDB sends CI attribute data to the Service Manager device table. If you want to send CI attributes to one of the join tables of device, you must add an element to specify the table name using the format <file.table_name>. For example, you do not need to specify an additional jointable to define a database CI type since Service Manager does not use a separate jointable to manage database CI types.
- Find the elements that transform UCMDB CI attributes into Service Manager web service fields. The CI attribute transformation elements use the following format:
<xsl:for-each select="@CI_attribute_name">
<WSFieldName><xsl:value-of select="."/></WSFieldName>
</xsl:for-each>
@CI_attribute_name is the name of attribute in the UCMDB system.
WSFieldName is the name of a web service field published by the Service Manager system.
The following figures show an example. CI attributes in runningsoftware_push.xslt shows one CI attribute named product_name is mapped to a web service field with a caption of ApplicationName; Mapping CI attributes in the ucmdbRunningSoftware web service object shows the web service field name and caption defined in the ucmdbRunningSoftware web service object; Mapping CI attributes in the UCMDB RunningSoftware CI type shows how the product_name attribute is mapped in the RunningSoftware CI type in UCMDB.
See the following screenshot for CI attributes in
runningsoftware_push.xslt: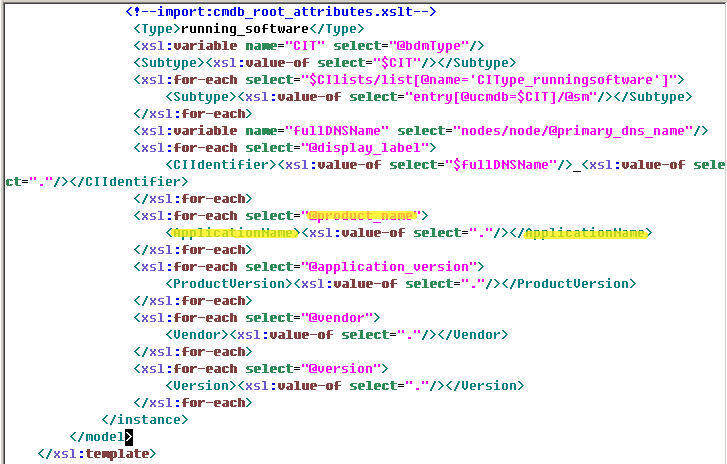
Refer to the following screenshot to map CI attributes in the
ucmdbRunningSoftwareweb service object: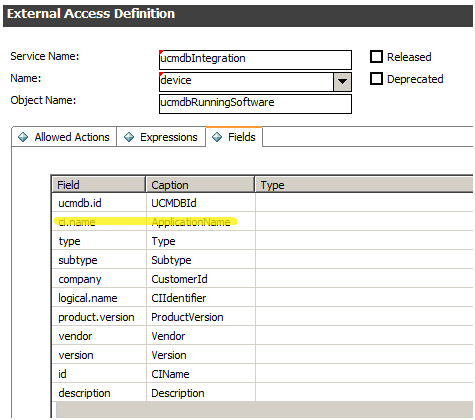
Refer to the following screenshot to map CI attributes in the UCMDB
RunningSoftwareCI type: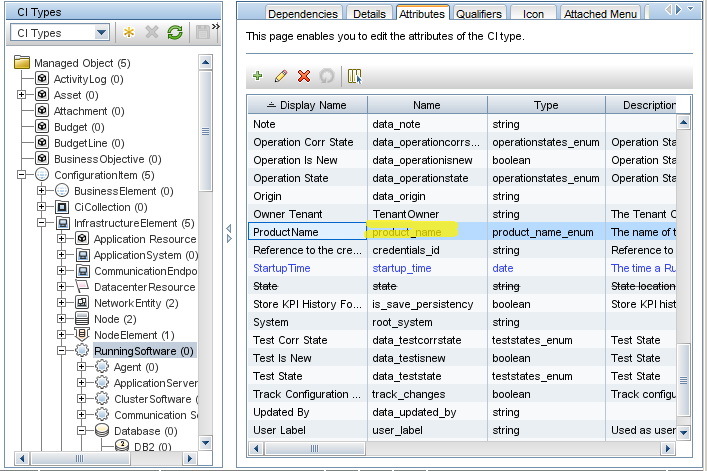
- Add or update CI attribute transformation elements for each CI attribute you want to add to the integration. For example, create the following XSL transformation elements for the database CI type.
Sample XSL transformation elements for database CIs UCMDBattribute Sample transformation elements port <xsl:for-each select="@port">
<Port><xsl:value-of select="."/></Port>
</xsl:for-each>
database_dbsid <xsl:for-each select="@database_dbsid">
<DBInstance><xsl:value-of select="."/></DBInstance>
</xsl:for-each>
description <xsl:for-each select="@description">
	<Description><xsl:value-of select="."/>
</Description>
</xsl:for-each>
New attribute mappings in
rdbms_push.xsltare illustrated in the following screenshot: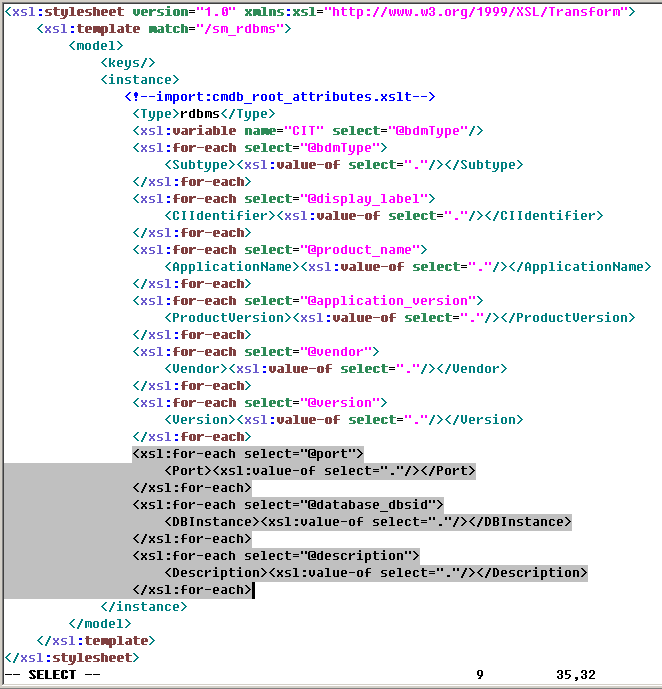
- Save the new XSL transformation file.
Note When you create/edit and then save a configuration file in Adapter Management, UCMDB automatically restarts the adapter with the new configuration file.


