


Set up a trust relationship between IdM and ADFS
To enable SAML SSO for Service Manager Service Portal, you need to set up a trust relationship between the following entities:
- The service provider: Micro Focus Identity Manager (IdM)
- The identity provider: Microsoft ADFS
Note In this section, <Service Manager Service Portal installation directory> represents the Service Manager Service Portal root directory, which is /opt/hp/propel/ by default.
Task 1: Configure the SAML keystore in IdM
The IdM SAML key store is defined in two configuration files:
-
<Service Manager Service Portal installation directory>/idm-service/idm-service.war/WEB-INF/spring/applicationContext-saml.xml
Note This file defines a set of SAML keystore variables.
-
<Service Manager Service Portal installation directory>/idm-service/idm-service.war/WEB-INF/spring/applicationContext.properties
Note The variables defined in applicationContext-saml.xml are declared in this file.

Tip In a testing environment, you can use the default SAML keystore without the need for manual configuration.
In a production environment, you need to generate a new SAML keystore, and only the applicationContext.properties file needs to be updated with new SAML keystore settings.
-
Generate a SAML keystore.
Private keys (with either self-signed or CA-signed certificates) are used to digitally sign SAML messages and encrypt their content, and in some cases for SSL/TLS Client authentication of your service provider application. SAML Extension ships with a default private key in the samlKeystore.jks file with the alias apollo, which can be used for initial testing, but for security reasons should be replaced with your own key in early development stages.
If your IdP (for example, ADFS) does not require keys signed by a specific certification authority, you can generate your own self-signed key using the keytool Java utility, by running commands that resemble the following:
# cd /<Service Manager Service Portal Installation Directory>/idm-service/idm-service.war/WEB-INF/classes/security
# keytool -genkey -keyalg RSA -alias <Choose Your Alias> -keystore samlKeystore.jks -storepass <Choose Your Password> -validity 1080 -keysize 2048
These example commands use the following arguments:
-
keyalg: Specifies a signature algorithm.
In generating a public/private key pair, the signature algorithm (-sigalg) is derived from the algorithm of the underlying private key:
- If the underlying private key is of type "DSA", the -sigalg option defaults to "SHA1withDSA".
- If the underlying private key is of type "RSA", the -sigalg option defaults to "SHA256withRSA".
- If the underlying private key is of type "EC", the -sigalg option defaults to "SHA256withECDSA".
- alias: Specifies an alias for this keystore file (do not use “apollo” as it already exists in the system).
- keystore: Specifies a filename and location for this keystore file.
-
storepass: Specifies a password for the keystore file. This is the password that is used to protect the keystore file.
- validity: Specifies a number of days that this keystore will be valid for (1080 = 3 years)
- keysize: Specifies a number of bits for the key ("2048" means a 2048-bit RSA key will be generated)
See the following figure for an example.

Note Ensure the CN value is the host name of the Service Manager Service Portal (IdM) server. This is the first question (“What is your first and last name ?”).
-
- If you did not generate the SAML keystore in the <Service Manager Service Portal Installation Directory>/idm-service/idm-service.war/WEB-INF/classes/security directory, copy the samlKeystore.jks that you generated to this directory.
-
Encrypt the SAML keystore passwords using the encryption tool provided by IdM:
# cd /<Service Manager Service Portal Installation Directory>/cryptoUtil
# $JAVA_HOME/bin/java -jar cryptoUtil-cli-1.0.4.jar encrypt <Password>
The following figure shows an example.
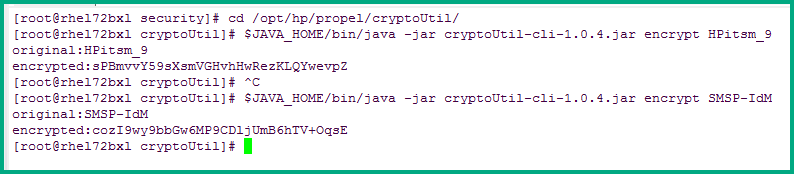
The java command in this step returns encrypted text for the specified password.
- Configure the SAML keystore in applicationContext.properties.
In a text editor, open the applicationContext.properties file, which is stored in the <Service Manager Service Portal Installation Directory>/idm-service/idm-service.war/WEB-INF/spring folder.
Update the SMAL keystore file parameters:
idm.saml.keystore.type: keep the default value (jks).idm.saml.keystore: use the value defined as -keystore samlKeystore. It is assumed that the keystore is stored in the <Service Manager Service Portal Installation Directory>/idm-service/idm-service.war/WEB-INF/classes/security directory.idm.saml.keystore.password: use the password that you specified in the previous step (-storepass <Choose Your Password>).idm.saml.keystore.defaultKey.name: use the key alias that you specified: -alias <Choose Your Alias>.idm.saml.keystore.defaultKey.password: use the password value that you entered at the end of the keystore creation. This password is linked to the key (alias) that you added to the keystore. It is different to the storepass value, unless you pressed Return at the end of the keystore creation process. In that case, it is the same as the keystore password (storepass).
Encrypt the SAML keystore password and key values.
First, use the following commands to get an encrypt value of each password or key value:
# cd /<Service Portal Installation Directory>/cryptoUtil
# $JAVA_HOME/bin/java -jar cryptoUtil-cli-1.0.4.jar encrypt <Password>
Then, use the encrypted value to replace the password information to the right of the equal sign ("="), and make sure that each encrypted value is preceded by ENC without any separating spaces and is enclosed in round brackets. Also, ensure that there is no blank space at the end of the value.
The following is an example configuration:
# SAML Configuration
idm.saml.keystore.type=jks
idm.saml.keystore=classpath:security/samlKeystore.jks
idm.saml.keystore.password = ENC(sPBmvvY59sXsmVGHvhHwRezKLQYwevpZ)
idm.saml.keystore.defaultKey.name = ENC(cozI9wy9bbGw6MP9CDljUmB6hTV+OqsE)
idm.saml.keystore.defaultKey.password = ENC(sPBmvvY59sXsmVGHvhHwRezKLQYwevpZ)
Task 2: Export the ADFS certificates
Download the certificates from the ADFS server and transfer them to the Service Manager Service Portal server. The following are detailed steps to implement this task.
Note To use this method of exporting certificates, you need to log in to the ADFS server.
- Log in to the ADFS server.
-
Find the certificates on the "AD FS Management" MMC snap-in under AD FS > Service > Certificates.
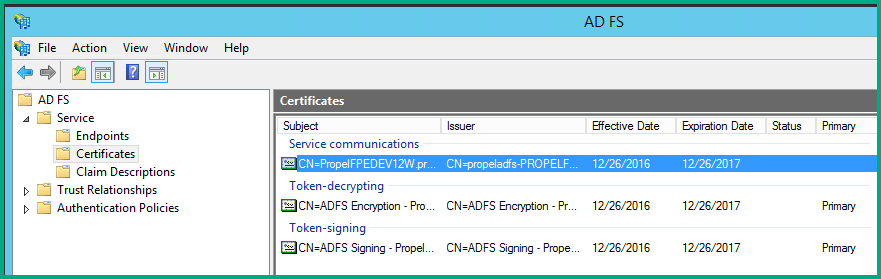
There should be three certificates: one for service communications, one for token-decrypting, and one for token signing.
-
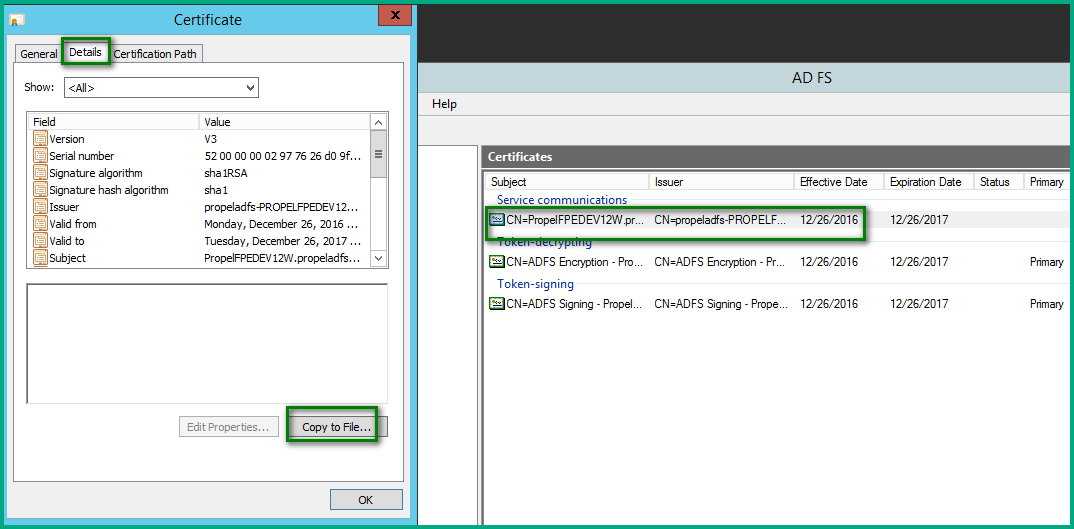
Right-click the first certificate, select View Certificate, go to the Details tab, and then click the Copy to File button.
Click Next.

-
Select the No, do not export private key radio button, and then click Next.

-
Use the default DER format, and then click Next.

-
Specify the export file name, and then click Next.

-
Click Finish to finish the export.

-
Repeat the previous steps for the other two certificates.
You should have three ADFS certificates:

Task 3: Import the ADFS certificates into the IdM SAML keystore
Import the three certificates to the IdM SAML key store located in /<Service Manager Service Portal Installation Directory>/idm-service/idm-service.war/WEB-INF/classes/security/samlKeystore.jks.
-
Run the following command for each of the three certificates:
# keytool -v -importcert -file <certificate filename> -keystore samlKeystore.jks -alias <certificate alias>
-
Verify that each certificate has been imported, using the
listcommand for keytool:# keytool -list -keystore samlKeystore.jks
The following figure shows an example.

Task 4: Enable SAML in the IdM configuration
Perform the following steps to enable SAML in IdM.
-
Activate the SAML context configuration.
- Open the <Service Manager Service Portal Installation Directory>/idm-service/idm-service.war/WEB-INF/web.xml file in a text editor.
-
Remove the lines (<!-- and -->) that comment out the contents of the START SAML / END SAML comments.

-
Activate the "SAML Web SSO with HP SSO" section.
- Open the <Service Manager Service Portal Installation Directory>/idm-service/idm-service.war/WEB-INF/spring/applicationContext-security.xml file in a text editor.
-
Uncomment all the lines that comment out the contents of the
START SAML Web SSO with HP SSO/END SAML Web SSO with HP SSOcomments, as shown in the following figure.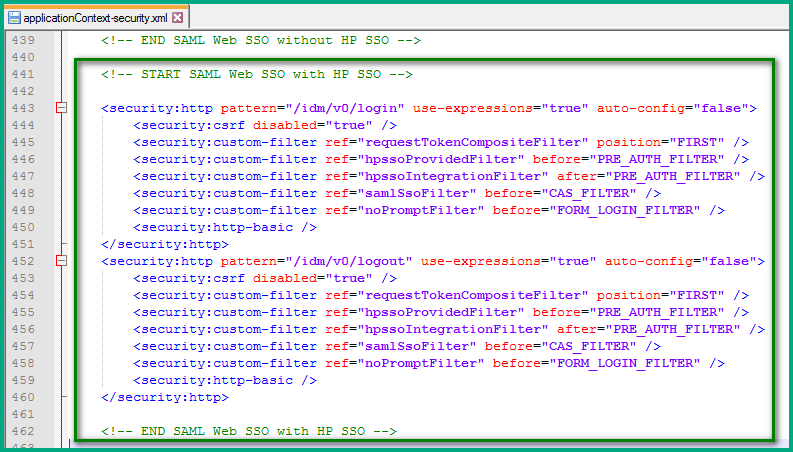
-
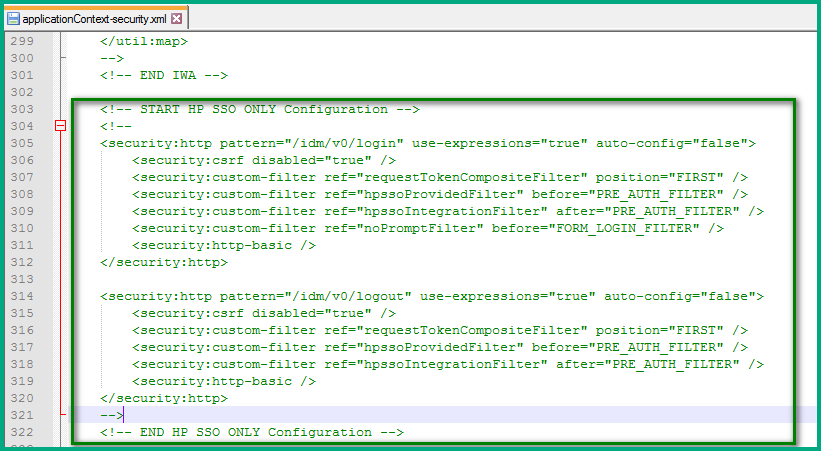
Comment out the /idm/v0/login and /idm/v0/logout section.
If the /idm/v0/login and /idm/v0/logout blocks are enabled in the "<!-- START HP SSO ONLY Configuration -->" section of the <Service Manager Service Portal Installation Directory>/idm-service/idm-service.war/WEB-INF/spring/applicationContext-security.xml file, they should be commented out.
In the event that two filters contain the same pattern, IdM will generate an error in the IdM logs that resembles the following:
2017-01-12 17:32:20,478 [main] ERROR org.springframework.web.context.ContextLoader - Context initialization failedorg.springframework.beans.factory.BeanCreationException: Error creating bean with name 'org.springframework.security.filterChainProxy': Invocation of init method failed; nested exception is java.lang.IllegalArgumentException: The FilterChainProxy contains two filter chains using the matcher Ant [pattern='/idm/v0/login']. If you are using multiple <http> namespace elements, you must use a 'pattern' attribute to define the request patterns to which they apply.That means that only one pattern='/idm/v0/login' can be active.
-
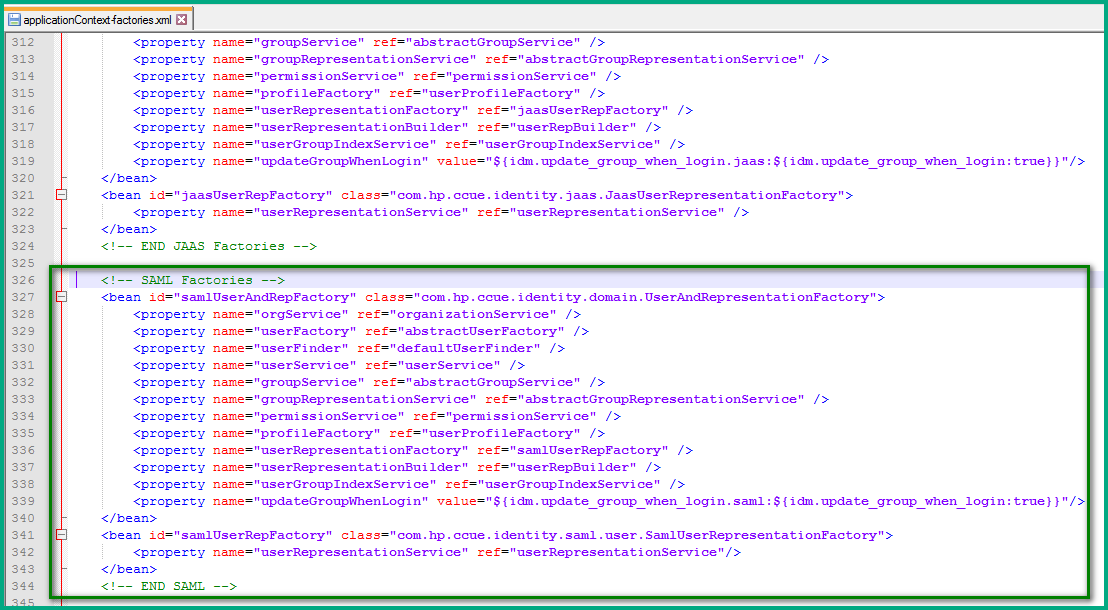
Enable SAML factories.
Ensure that the SAML factories are enabled in the <Service Manager Service Portal Installation Directory>/idm-service/idm-service.war/WEB-INF/spring/applicationContext-factories.xml file. They should be enabled by default.
-
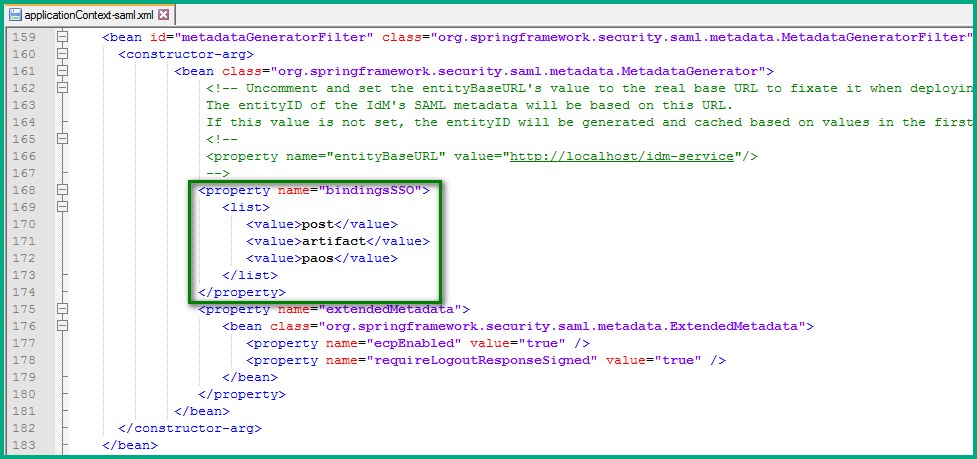
Enable POST/artifact binding.
Enable POST/artifact binding in the <Service Manager Service Portal Installation Directory>/idm-service/idm-service.war/WEB-INF/spring/applicationContext-saml.xml file. It should be enabled by default.
-
Restart IdM.
Run the following command to restart the IdM service:
# systemctl restart idm
Note After the IdM service is restarted, closely monitor /var/log/propel/idm/idm.log and make sure no errors are displayed.
Task 5: Install the Service Manager Service Portal CA and host certificate in ADFS
This task will import the Service Manager Service Portal host and CA certificate into the IdP (ADFS) to create a bidirectional trust between the SP and IdP.
-
Install the Service Manager Service Portal CA certificate from the Service Manager Service Portal server in the Trusted Root Certification Authorities store on the ADFS server.
The CA.crt file is stored in the <Service Manager Service Portal Installation Directory>/security directory on the Service Manager Service Portal server. Copy it to the ADFS server and import it by using Internet Explorer (RDP access to the ADFS server is needed):
- Launch Internet Explorer and select the Tools menu or sprocket icon in the tool bar.
- Select Internet Options, go to the Content tab, and then click the Certificates button.
- Click the Import button, and then follow the wizard.
- Enter the filename of the certificate (the CA certificate in this case).
- Select the certificate store ("Place all certificates in the following store") and browse for “Trusted Root Certification Authorities”.
- Trust the certificate if a security warning is displayed.
- Finish running the wizard.
-
Install the Service Manager Service Portal host SSL certificate from the Service Manager Service Portal server in the Trusted Root Certification Authorities store on the ADFS server.
The propel_host.crt file is stored in the <Service Manager Service Portal Installation Directory>/security directory on the Service Manager Service Portal server.
Follow the steps for importing the CA certificate (see the previous step), but select the Service Manager Service Portal server's host SSL/TLS certificate and allow the wizard to choose the “Trusted Root Certification Authorities” certificate store. Trust the certificate if a security warning is displayed.
Tip The following error message may be displayed: “The underlying Connection was closed: Could not establish trust relationship for the SSL/TLS secure channel.” This means that you need to install both the Service Manager Service Portal host SSL/TLS and CA certificates from the Service Manager Service Portal server in the Trusted Root Certification Authorities store on the ADFS server.
Task 6: Import the IdM SAML metadata into ADFS
This task will import the SAML metadata of the SP (IdM) into the IdP (ADFS) to add IdM as a Relying Party Trust in ADFS.
-
Download spring_saml_metadata.xml.
IdM has a single metadata resource that applies to all organizations:
https://<your Service Manager Service Portal server>:9600/idm-service/saml/metadata
Note Before you can launch this URL, you need to access the Provider organization to obtain an IdM token that gives you sufficient rights to download the metadata.
-
Open https://<your propel server>:9000/org/Provider, and log in as an admin.
- Change the URL to https://<your Service Manager Service Portal server>:9600/idm-service/saml/metadata, and then download the spring_saml_metadata.xml file.
-
-
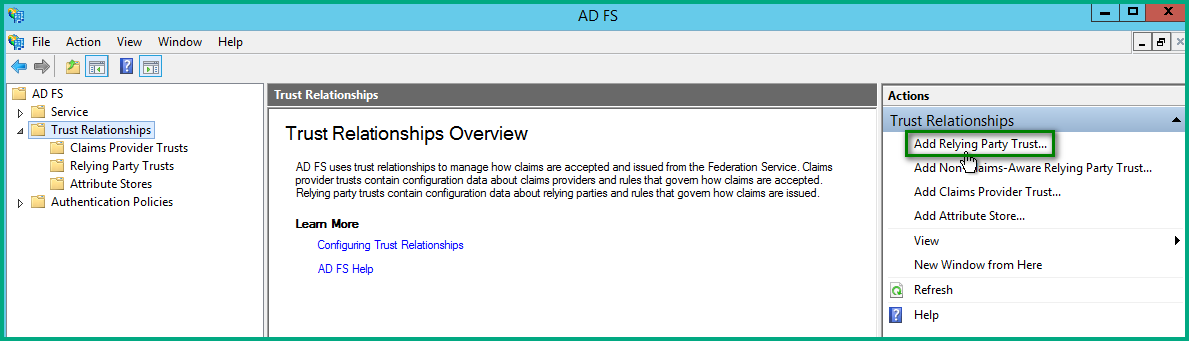
Import spring_saml_metadata.xml into ADFS.
In the ADFS Management MMC snap-in, under AD FS > Trust Relationships, select Add Relying Part Trust in the Actions pane to launch the wizard.
A popup window opens. Click Start to launch the wizard.

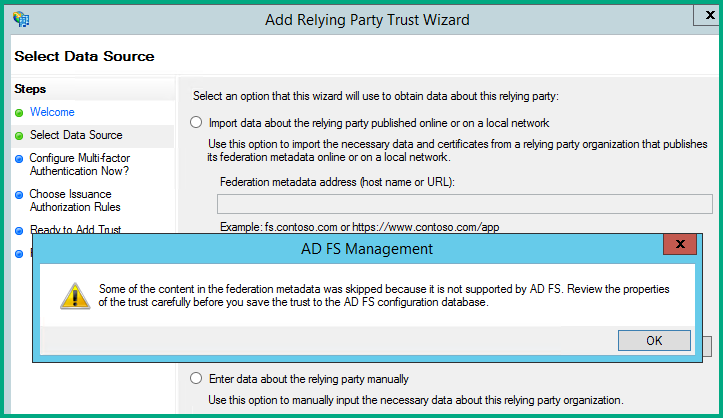
Select Import data about the relying party from a file, select the spring_saml_metadata.xml file created earlier, and then click Next.

The wizard may warn you that some of metadata content is not supported. You can safely ignore this warning and click OK.
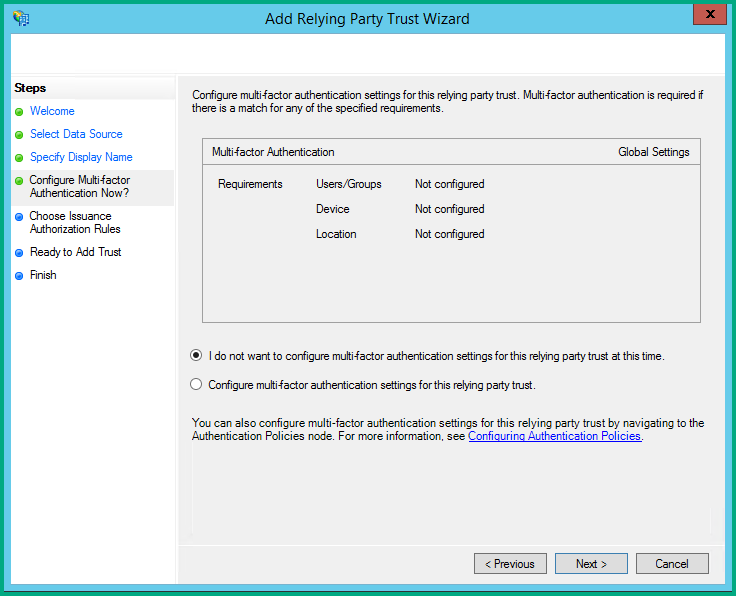
Enter a display name and notes.

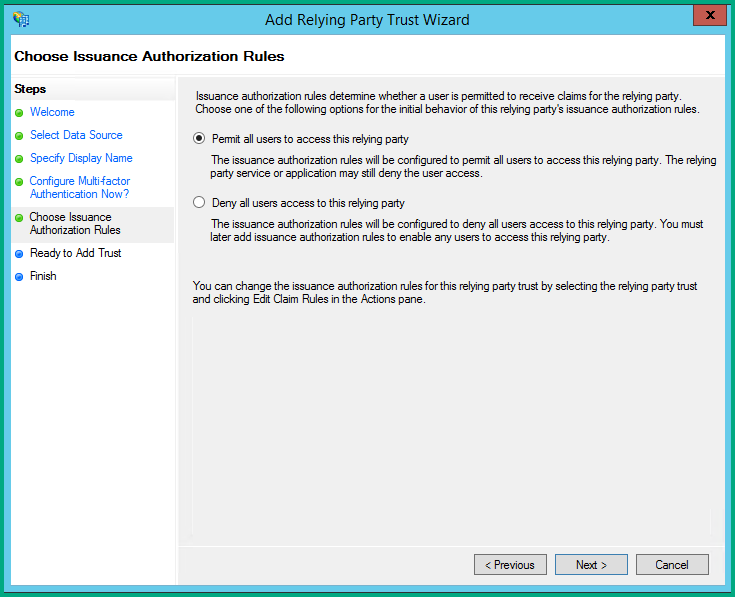
Keep the default setting in the following screen, and then click Next.
Keep the default setting in the following screen, and then click Next.
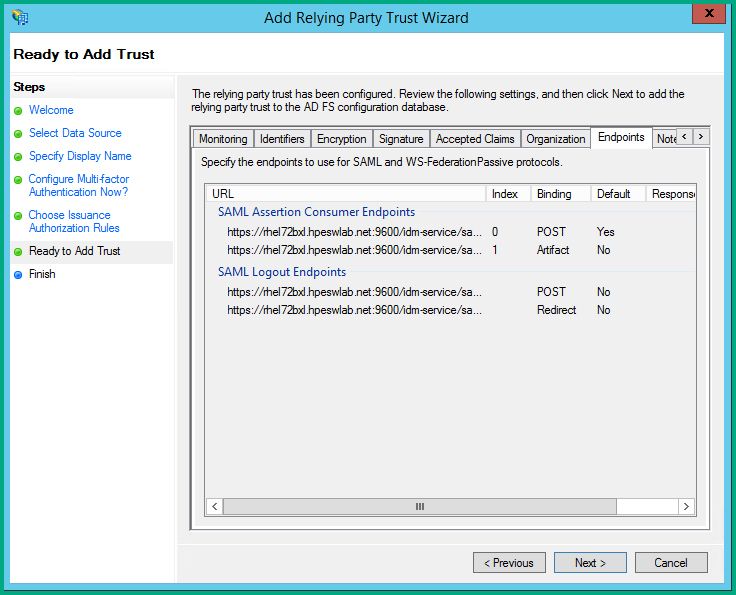
In the "Ready to Add Trust" section, make sure that the Endpoints tab contains multiple endpoint values. If not, verify that your metadata.xml was generated with HTTPS protocol URLs. Then, click Next.
Clear the Open the Edit Claim Rules option, and then close the wizard.

Tip ADFS Claim Rules are discussed in Configure the ADFS SAML token.
-
Restart the ADFS service.
Note After adding a relying party trust, you must restart the ADFS service.
Next step
Create a SAML configuration for your organization.
Related topics


