


Upgrade Service Manager Collaboration
Important Collaboration versions earlier than 9.41 (which are based on the legacy Enterprise Collaboration Server) are no longer supported. If you are upgrading from the legacy EC based Collaboration, no backup is needed and only data migration is needed.
Note You must upgrade the chat server to version 9.60 if you have upgraded the Service Manager server to 9.60.
Upgrade the chat server
Follow these steps to upgrade the chat server to 9.60:
- Stop your existing Openfire.
-
Open a DOS command prompt. Navigate to the ChatServer\bin directory (for example, C:\Program Files (x86)\Micro Focus\Service Manager 9.60\ChatServer\bin), and then run the openfire-service /uninstall command to remove the original Openfire service.
- Rename the existing Openfire folder.
-
Make a backup of the following items:
- <Openfire_Home>\conf\crowd.properties
- <Openfire_Home>\conf\openfire.xml
- <Openfire_Home>\conf\security.xml
- <Openfire_Home>\plugins\lwssoplugin\lwssofmconf.xml
- <Openfire_Home>\lib\ojdbc-xxxx.jar (the JDBC driver if you copied it to this folder before)
-
<Openfire_Home>\resources\security\client.truststore
-
<Openfire_Home>\resources\security\keystore
-
<Openfire_Home>\resources\security\truststore
- Any other customizations that you made
- Save the chat server installer from the Service Manager 9.60 installation package to your computer.
- Navigate to the C:\Program Files (x86)\Micro Focus\Service Manager 9.60 folder and create a new directory called ChatServer.
- Extract the chat-server-9.60.zip file to the ChatServer folder.
- Copy the files that are backed up in step 4 to the corresponding directories in the ChatServer folder.
-
Open a DOS command prompt. Navigate to the C:\Program Files (x86)\Micro Focus\Service Manager 9.60\ChatServer\bin folder, and then run openfire.bat. The chat server is updated automatically.

Tip You can also add the new chat server service to Windows services by running the install-service.bat command.
(Optional) Open the HTTP port for the chat server
Follow these steps:
-
Browse to the <Openfire_Home>\conf directory, and then open openfire.xml with a text editor.
-
Update the HTTP port as illustrated below:

- Save your changes and close this file.
-
Access https://localhost:9091 and log on to the Administraton Console page.
-
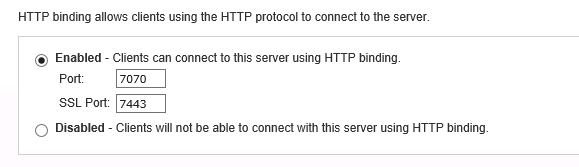
Go to Server > Server Settings > HTTP Binding, and then fill the HTTP port as illustrated below:
-
Save your changes and then restart the chat server.
Upgrade the chat service
Follow these steps to upgrade the chat service to 9.60:
- Stop your existing chat service.
-
Open a DOS command prompt. Navigate to the ChatService\bin directory (for example, C:\Program Files (x86)\Micro Focus\Service Manager 9.60\ChatService\bin), and then run the nssm remove HpeSmChatService command to remove the original chat service.
- Rename the existing chat service folder.
-
Make a backup of the following items:
-
< ChatService _Home>\conf\ app.properties
-
< ChatService _Home >\conf\config.yml
-
< ChatService _Home >\conf\<xxxx.keystore>
-
< ChatService _Home >\conf\<xxxx_cacerts>
- Any other customizations that you made
-
- Save the chat service installer from the Service Manager 9.60 installation package to your computer.
- Navigate to the C:\Program Files (x86)\Micro Focus\Service Manager 9.60 folder and create a new directory called ChatService.
- Extract the chat-service-9.60.zip file to the ChatService folder.
-
Copy the files that are backed up in step 4 to the corresponding directories in the ChatService folder.
Note If you have not make any customizations to the previous config.yml file, you can use the new config.yml file directly. Otherwise, you must compare these two versions and copy your customizations from the backup to the new config.yml file.
-
Open a DOS command prompt. Navigate to the C:\Program Files (x86)\Micro Focus\Service Manager 9.60\ChatService\bin folder, and then run install-service.bat. The chat service is updated automatically.
-
Go to Windows services to start the chat service.
-
Log on to Service Manager as a system administrator, and then click System Administration > Ongoing Maintenance > Collaboration Service Desk Chatbot.
-
Click Search, and then click Publish AIML for every virtual agent.
Upgrade the chat UI
Follow these steps to upgrade the chat UI to 9.60:
-
Before deploying the new chat UI, make a backup of the following item:
- <chatui>\conf\env.js
- Delete or uninstall the existing chatui.war file.
- Clear the cache of your web application server.
- Deploy the new chatui-9.60.war file. For details, see
- Copy the file that is backed up in step 1 to the corresponding directory in the Chatui folder.
- Restart the web application server.


