Searching the Help
To search for information in the Help, type a word or phrase in the Search box. When you enter a group of words, OR is inferred. You can use Boolean operators to refine your search.
Results returned are case insensitive. However, results ranking takes case into account and assigns higher scores to case matches. Therefore, a search for "cats" followed by a search for "Cats" would return the same number of Help topics, but the order in which the topics are listed would be different.
| Search for | Example | Results |
|---|---|---|
| A single word | cat
|
Topics that contain the word "cat". You will also find its grammatical variations, such as "cats". |
|
A phrase. You can specify that the search results contain a specific phrase. |
"cat food" (quotation marks) |
Topics that contain the literal phrase "cat food" and all its grammatical variations. Without the quotation marks, the query is equivalent to specifying an OR operator, which finds topics with one of the individual words instead of the phrase. |
| Search for | Operator | Example |
|---|---|---|
|
Two or more words in the same topic |
|
|
| Either word in a topic |
|
|
| Topics that do not contain a specific word or phrase |
|
|
| Topics that contain one string and do not contain another | ^ (caret) |
cat ^ mouse
|
| A combination of search types | ( ) parentheses |
|
- Deploy Service Manager Collaboration with HTTP
- Task 1: Enable LW-SSO on the Service Manager server
- Task 2: Enable LW-SSO on the Service Manager web tier
- Task 3: Test LW-SSO with the Service Manager web tier
- Task 4: Install Java for the chat server
- Task 5: Deploy the chat server
- Task 6: Deploy the chat service
- Task 7: Deploy the End User Chat UI
- Task 8: Deploy and configure the web server
- Task 9: Define the display of the End User Chat UI for ESS portal
- Task 10: Define the display of the End User Chat UI for Service Portal
- Task 11: Configure LW-SSO for the chat server
- Task 12: Configure LW-SSO for the chat service
- Task 13: Enable Service Manager Collaboration
- Task 14: Select a portal for End User Chat
- Task 15: Integrate with Microsoft Skype for Business
- Task 16: Migrate data from EC
Task 6: Deploy the chat service
In this task, you will install the chat service for End User Chat.
Note To enable Collaboration with LDAP, comment the follow line in sm.ini and then restart the Service Manager server:
ldapauthenticateonly:1
Follow these steps:
- Save the chat service installer sm9.60.xxxx_ChatMSVC.zip from Service Manager installation package to the same computer on which the chat server was deployed.
-
Log on to your Openfire Administration Console.
-
Click the User/Groups tab and create an Openfire user. For example:
User name: publishadmin
Password: admin123
-
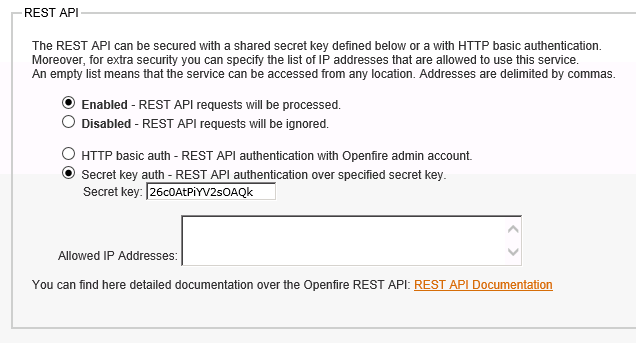
To enable the virtual agent, click Server > Server Settings > REST API. Enable REST API and record the secret key auth.

- Save your changes, and then restart the Openfire chat server.
-
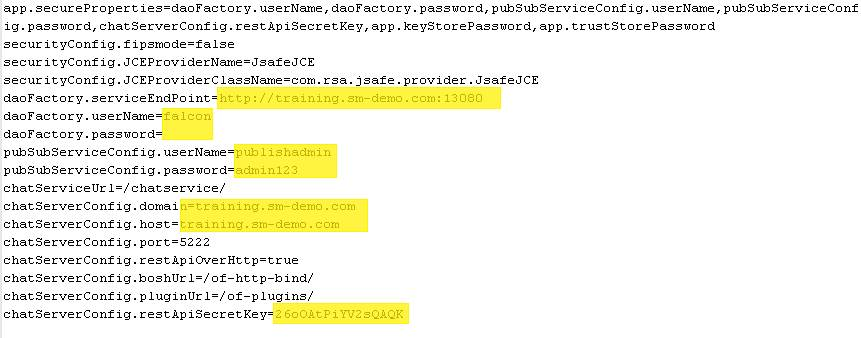
Extract sm9.60.xxxx_ChatMSVC.zip to C:\Program Files (x86)\Micro Focus\Service Manager 9.60\ChatService, and then open conf\app.properties with a text editor.
-
Update the related parameters:

Parameter Description daoFactory.serviceEndPoint The Service Manager server’s URL. daoFactory.username The Backend user name for chat service to access Service Manager.
Important The backend user must be an SM user with the "system administrator" privilege and the “RESTful API” capability.
daoFactory.password The daoFactory user password. pubSubServiceConfig.userName The user name created in step 3. pubSubServiceConfig.password The user password created in step 3. chatServerConfig.domain The domain user filled during install chat server. chatServerConfig.host The chat server computer name or IP. chatServerConfig.restApiSecretKey The secret key you recorded in step 4. - Save your changes and close this file.
- To install the chat service as a Windows service, open a DOS command prompt and change the directory to C:\Program Files (x86)\Micro Focus\Service Manager 9.60\ChatService\bin.
-
Run the install-service.bat command to install the Service Manager chat service as a Windows service.
Note We recommend using 64-bit Java because 32-bit Java may have potential performance limitations. However, if you are working with 32-bit Java, follow these steps so that the Service Manager chat service Windows service can start successfully:
-
Open C:\Program Files (x86)\Micro Focus\Service Manager 9.60\ChatService\bin\startup.bat with a text editor.
-
Update the memory setting as follows:
SET CHAT_SVC_JVM_OPTIONS=-XX:ThreadStackSize=256 -Xms512m -Xmx1024m - Save your changes and close this file.
-
Open C:\Program Files (x86)\Micro Focus\Service Manager 9.60\ChatService\bin\ install-service.bat with a text editor.
-
Update the
ThreadStackSizememory setting toThreadStackSize=256 -Xms512m -Xmx1024m. - Save your changes and close this file.
You can run nssm edit HpeSmChatService to edit the corresponding configurations after the Windows service is installed.
Tip To remove this Windows service, run the nssm remove HpeSmChatService command.
-


