


How to Map the CI Type's Attributes to Web Service Fields
The integration uses the Service Manager Adapter to transform Service Manager web services objects to Universal CMDB CI attributes. The Service Manager Adapter uses XSL transformation files to convert a properly formatted Service Manager web services messages into Universal CMDB CI. Out-of-the-box, each integration query has a corresponding XSL transformation file. In addition, each attribute you want to populate to Universal CMDB requires its own entry in the XSL transformation file.
If you want to add a CI type to the integration, you must create a matching XSL transformation file that defines how the Service Manager Adapter transforms each Service Manager web service field into a CI type. In order to create a proper XSL mapping, you must be familiar with the service and object names that Service Manager publishes as Web services. For information on publishing tables and columns as Web service fields, see Service Manager Web Services.
To create an XSL transformation file for the SM RDBMS CI type, which is described in previous sections:
- Log in to UCMDB as an administrator.
- Navigate to Data Flow Management > Adapter Management.
- Click the Create new resource button
 .
. - Select New Configuration File.
- Select the ServiceManagerAdapter9.41 package.
- Enter the full file name using this format: <AdapterID>/<filename>. For example,
ServiceManagerAdapter9.41/rdbms_population.xslt. - Copy the content of an existing XSL transformation file to use it as a template to create the new transformation file. For example, copy the content of
business_service_population.xsltto the new file. - Find the web service response name definition element, which uses the following format:
<xsl:template match="/SM_WEBSERVICE_RESPONSE_NAME">
SM_WEBSERVICE_RESPONSE_NAMEis the name of web service response in the Service Manager system.The following figure shows an example of Web Service response definition in
business_service_population.xslt:
- Update the web service response name to match the response name that you want to add to the integration. For example, you can create the following CI type definition element to add the database response of retrieve object list to the integration.
<xsl:template match="/RetrieveucmdbRDBMSListResponse">
- Find the Universal CMDB CI type definition element, which uses the following format:
<ci class="UCMDB_CI_TYPE_NAME">
UCMDB_CI_TYPE_NAMEis the CI type name in the Universal CMDB System.The following figure shows an example CI type definition in
business_service_population.xslt: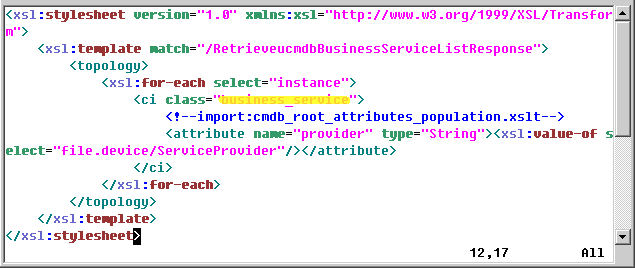
- Update the Universal CMDB CI type definition name to match the name you want to add to the integration. For example, create the following CI type definition element to add the database response of retrieve object list to the integration.
<ci class="sm_rdbms">
Note Do not use any variables in the CI type definition name. The CI type definition name must be a fixed value.
- Find the elements that transform Service Manager web service fields into Universal CMDB CI attributes. The CI attribute transformation elements use the following format:
<attribute name="UCMDB_CI_attribute_name" type="UCMDB_CI_attribute_type" ignoreCIIfEmpty="true">
<xsl:value-of select="SMAttributeName "/></attribute>
UCMDB_CI_attribute_nameis the name of the CI attribute in the Universal CMDB system.UCMDB_CI_attribute_typeis the type of the CI attribute in the Universal CMDB system that this integration supports. Currently the following types are supported: String, StringList, Integer, Long, Double, Boolean, IPAddress, Date, Float, and IntList.ignoreCIIfEmptyis a parameter that specifies whether or not to ignore the CI during population if this attribute has an empty value (true: ignore; false: not ignore).Note
- A StringList is a list of strings separated by a semicolon (;). For example, str1;str2;str3. An IntList is a list of integers separated by a semicolon (;). For example, 1;2;3.
- For information about setting a time zone and date format for the Date type, see How to Update the Time Zone and Date Format for the Integration Adapter.
SMAttributeNameis the name of a web service attribute published by the Service Manager system.See the following figure for an example of CI attributes in
business_service_population.xslt: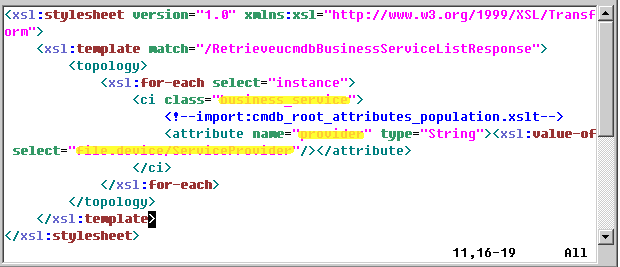
Refer to the following screenshot to match CI attributes in the Universal CMDB
BusinessServiceCI type: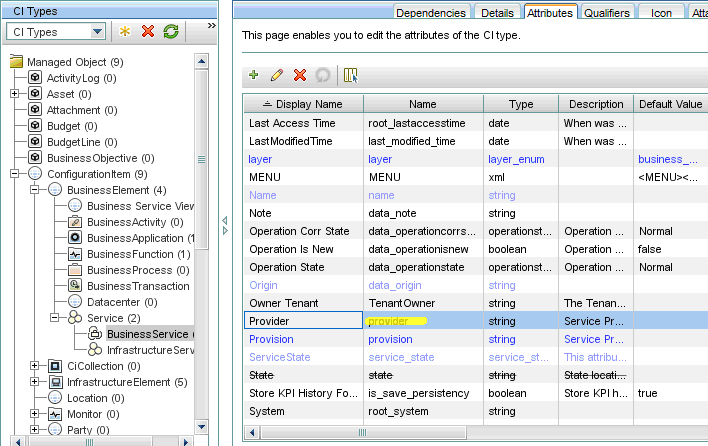
Refer to the following screenshot to match CI attributes in the Service Manager
ucmdbBusinessServiceweb service: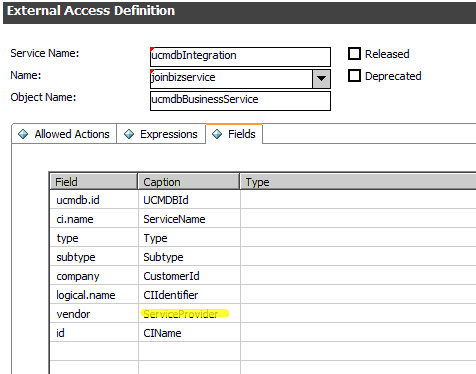
- In the SM RDBMS population example, there are no sub items of a CI. If you want to populate the sub items of a CI, for example, to populate the IP addresses of a computer together with the computer CI, you need to add a “link” element under the “ci” element. A link transformation element uses the following format:
<link direction="Link_Direction" linkType="UCMDB_Link_Type">
<ci class="UCMDB_SUB_CI_TYPE_NAME">
      <attribute name="UCMDB_CI_attribute_name" type="UCMDB_CI_attribute_type">
<xsl:value-of select="SMAttributeName "/></attribute>
      <attribute name="UCMDB_CI_attribute_name2" type="UCMDB_CI_attribute_type2">
<xsl:value-of select="SMAttributeName 2"/></attribute>
</ci>
</xsl:for-each>
</link>
Link_Directionis the direction between a parent CI and sub CI. The supported directions are:- outgoing: The link direction is from an upstream CI to the current downstream CI (for example, from node to ip_address).
- incoming: The link direction is from a downstream CI to the current upstream CI.
UCMDB_Link_typeis the relationship type in the Universal CMDB system.The following figures show the out-of-the-box configurations for populating the Computer CI together with its IP addresses:
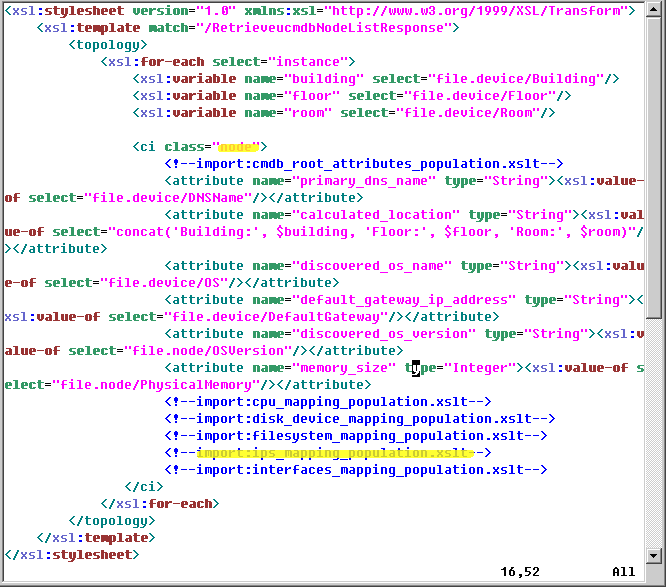
Link definition in the import xslt file (
ips_mapping_population.xslt) is illustrated in the following screenshot:
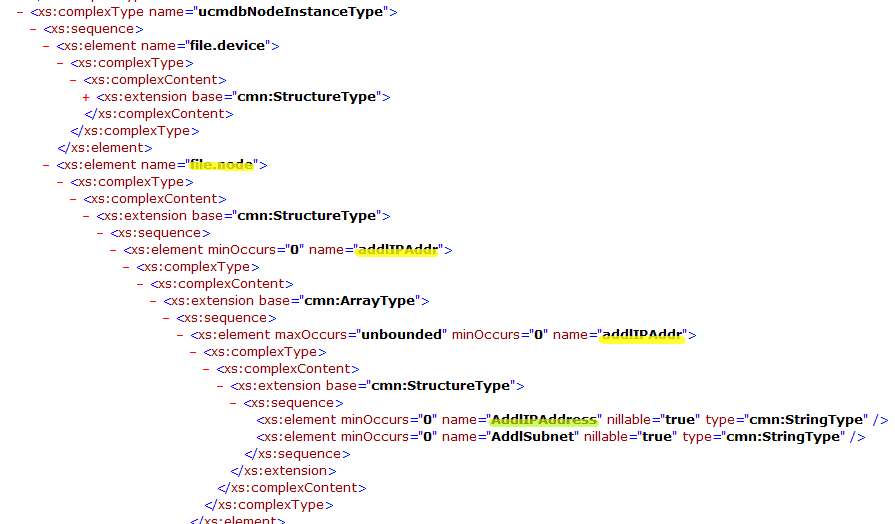
Refer to the following screenshot to match CI attributes and links in the Service Manager WSDL(http://<SM server>:<port>/SM/7/ucmdbNode.wsdl):
Refer to the following screenshot to match CI links in UCMDB at the TQL level:

Note The figure above is provided only to give you a graphic view of how relevant CIs are stored in UCMDB. You do not need to create the query, since the population feature does not require it.
Refer to the following screenshot to match CI type and attributes in the UCMDB CI Type (
IpAddress):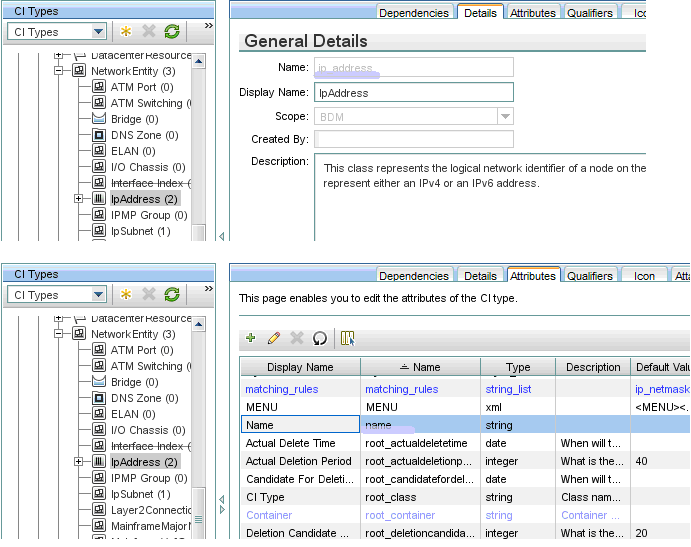
- Add or update the CI attribute transformation elements for each CI attribute you want to add to the integration. For example, you can use the following XSL transformation elements for the database CI type.
Sample XSL transformation elements for database CIs UCMDB attribute
Sample transformation elements
discovered_product_name <attribute name="discovered_product_name" type="String"> <xsl:value-of select="file.device/CIIdentifier"/></attribute>
product_name <attribute name="product_name" type="String"> <xsl:value-of select="file.device/ApplicationName"/></attribute>
application_version <attribute name="application_version" type="String"> <xsl:value-of select="file.device/ProductVersion"/></attribute>
vendor <attribute name="vendor" type="String"> <xsl:value-of select="file.device/Vendor"/></attribute>
version <attribute name="version" type="String"> <xsl:value-of select="file.device/Version"/></attribute>
dbinstance <attribute name="dbinstance" type="String"> <xsl:value-of select="file.rdbms/DBInstance"/></attribute>
port <attribute name="port" type="String"> <xsl:value-of select="file.rdbms/Port"/></attribute>
description <attribute name="description" type="String"> <xsl:value-of select="file.rdbms/Description"/></attribute>
Attribute mappings in
rdbms_population.xsltare illustrated in the following screenshot: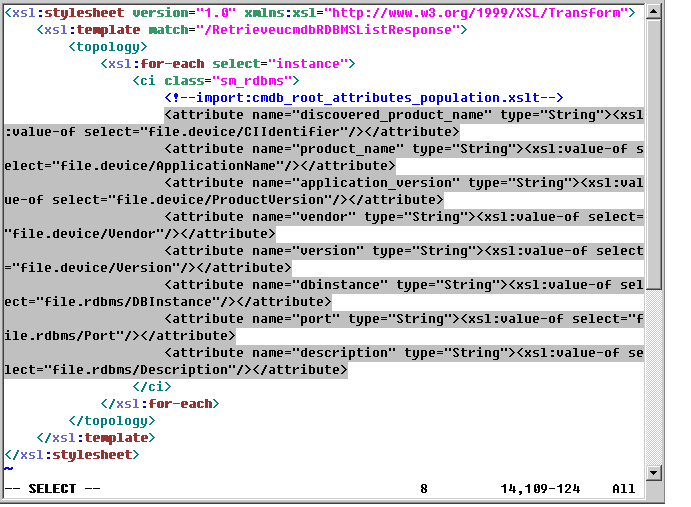
- Save the XSL transformation file.
Note When you create/edit and then save a configuration file in Adapter Management, UCMDB automatically restarts the adapter with the new configuration file.


