


Example: enabling CAC sign-on
This example assumes that you are using Tomcat as your web application server and Apache as your web server.
Prerequisites
Before you proceed, make sure you have met the following prerequisites:
-
Your organization has already a Common Access Card (CAC) security system in place; each Service Manager user owns a CAC card that
stores the user's personal certificate ("user certificate") and you have downloaded your organization's CAC root CA certificate.
Your CAC root CA certificate refers to the root CA certificate that signs the user certificates stored in the CACs. Later, you will need to:
- copy it to your web tier host and specify its location in the
RootCertPathparameter. See Task 3: Configure the web tier to use CAC sign-on. - import it to your Tomcat trust store (this is required only when you have Tomcat deployed without Apache). See Task 6: Configure your web application server to use SSL.
- copy it to your Apache server and configure it in your Apache's SSL configuration file. See Task 7: Configure the web server to use SSL.
- let users import it to their web browser. See Task 9: Configure web browsers to enable web client users to use CAC.
- copy it to your web tier host and specify its location in the
- You have Keytool and OpenSSL installed on a machine on which you will generate SSL certificates.
Configuration Tasks
To enable CAC sign-on in your Service Manager system, complete the following tasks.
Task 1: Enable required SSL encryption and trusted clients.
Enable required SSL encryption between the SM server and Windows and web clients. For details, see Example: Enabling required SSL encryption and trusted clients.
Note This example uses ssl_reqClientAuth:2; however, CAC sign-on also allows the use of ssl_reqClientAuth:1. For more information, see Requirements for CAC sign-on.
When the configuration is complete, verify that you can log in to the web client as usual and log in to Windows client with SSL encryption.
Task 2: Enable CAC sign-on in the SM server.
Set required parameters in the server configuration file (sm.ini). For details, see Requirements for CAC sign-on.
Task 3: Configure the web tier to use CAC sign-on.
- Stop the web application server running the web tier.
- Copy your CAC root certificate (s) to a directory on your web tier host. For example: <webtier>/WEB-INF/
-
Set the following parameter values in the web tier's
web.xmlfile.Parameter Value isCustomAuthenticationUsedfalseCACLogintrue - Configure your web application server to use CAC as the trusted authentication source.
- Navigate to the
<web tier installation direcotry>\WEB-INF\classesfolder, and open theapplication-context.xmlfile in a text editor. Search for the following string:
<sec:filter-chain pattern="/**" filters="securityContextPersistenceFilter,anonymousAuthFilter"/>Replace the search string with the following text to use CAC authentication as your trusted authentication source:
<sec:filter-chain pattern="/**" filters="securityContextPersistenceFilter,cacFilter,anonymousAuthFilter"/>Note If you also want to enable lightweight single sign-on (LW-SSO) for integrations, add
cacFilterfollowed bylwSsoFilter, as shown in the following:<sec:filter-chain pattern="/**" filters="securityContextPersistenceFilter,cacFilter,lwSsoFilter,anonymousAuthFilter"/>Be aware that CAC sign-on can only work with outgoing LW-SSO (LW-SSO from SM to another product). For information about how to enable LW-SSO in the web tier, see Configure LW-SSO in the Service Manager Web tier.
Note If you enable both TSO and CAC sign-on in the same web tier, CAC sign-on takes precedence.
Uncomment the following lines:
<bean id="cacFilter" class="com.hp.ov.sm.client.webtier.cac.CACPreAuthenticationFilter">
<property name="authenticationManager">
<ref bean="authenticationManager"/>
</property>
<property name="defaultRole">
<value>ROLE_PRE</value>
</property>
<property name="cacProps">
<ref bean="cacConfiguration"/>
</property>
</bean>
<bean id="cacConfiguration" class="org.springframework.beans.factory.config.PropertiesFactoryBean">
<property name="location"><value>classpath:cacconf.properties</value></property>
</bean>
- Save the file.
- Navigate to the
-
Configure CAC authentication in the web tier's
cacconf.propertiesfile.- Open
<web tier installation path>\WEB-INF\classes\cacconf.propertiesin a text editor. -
Specify the following parameters.
Parameter Default Description certificateFieldExtractDNSubject.CNThis parameter specifies a unique attribute in the user certificate that the web application server extracts as a Distinguished Name (DN) and sends to the SM server as the user's user name.
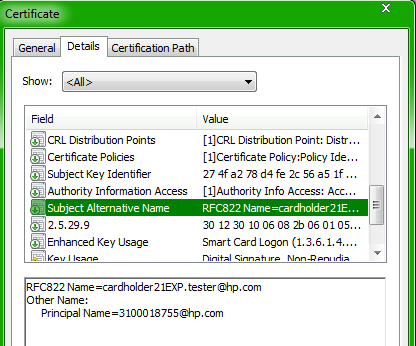
You can specify a Subject attribute in this parameter. By default, the Subject CN attribute (the certificate owner’s Common Name) is extracted as the user's DN.
You can also specify this parameter as one of the following Subject Alternative Name (SAN) sub-attributes: RFC822 Name, and Other Name (see the figure below).
-
If using a sub-attribute of Other Name, specify the parameter in this format:
SAN_OTHERNAME.<Alias>, where<Alias>is a name that you specify for the sub-attribute. The user certificate's SAN Other Name value that binds to the OID will be extracted as the DN. For example, if you use Other Name's Principal Name sub-attribute (also known as UPN, which should be mapped to OID "1.3.6.1.4.1.311.20.2.3"), you can specify the following value (where PrincipalName is an alias for Principal Name):certificateFieldExtractDN=SAN_OTHERNAME.PrincipalNameTip As a best practice, avoid including white spaces in alias names. For example, for Principal Name, specify
PrincipalNameorPNas an alias.Note Next, you will specify a mapping between the alias and object ID (OID) of the specified sub-attribute of SAN Other Name, by using the certificateOIDMapping parameter.
-
If using the RFC822 Name sub-attribute, specify the following value:
certificateFieldExtractDN=SAN.RFC822
Examples:
certificateFieldExtractDN=Subject.EcertificateFieldExtractDN=SAN_OTHERNAME.PrincipalNamecertificateOIDMapping(empty) This parameter specifies a mapping between the
<Alias>you specified incertificateFieldExtractDNand an OID. Specify the parameter in this format:<Alias>:<OID>.For example, for SAN's Principal Name, specify this mapping:
certificateOIDMapping=PrincipalName:1.3.6.1.4.1.311.20.2.3
validationStrategy(empty) This parameter specifies how the web application server verifies each user certificate.
You can specify a combination of the following values, each of which represents a checking method:
1: Check the revocation status of the user certificate using a local Certificate Revocation List (CRL).2: Check the revocation status of the user certificate using an online CRL.3: Check the revocation status of the user certificate using the Online Certificate Status Protocol (OCSP).4: Check if the user certificate is of the Smart Card type.
Pay attention to the following:
- You cannot leave this parameter empty.
- If you specify more than one value, separate them with a comma. In this case, all specified checking methods are used in the sequence they are listed in the parameter.
-
You must specify at least one of the following values: 1, 2, and 3. If you do not do so, users will not be able to log in; instead, they will see a message in their browser that states "An error has occurred"; in the meantime, an error message will occur in the web application server's
sm.logfile. - Smart Card checking (value 4) is mandatory for CACs, because CACs are smart cards.
- You can configure CRL or OCSP checking either in your web server or in this parameter, but not in both.
Example:
validationStrategy=3,4RootCertPath(empty) This parameter specifies the file path (either absolute or relative) to the issuer's CA certificate.
Note The issuer's CA certificate refers to the root CA certificate that signs the user certificates stored in the CACs (also referred to as the "CAC root CA certificate" in this document). If you need to specify multiple CAC root CA certificates, use a comma to separate them.
Example:
RootCertPath=/WEB-INF/HPCAB.cer,/WEB-INF/HPCA.cerCRLDownloadURL(empty) Specifies the URL that identifies the location of your online certificate revocation list (CRL).
You can leave this parameter empty, and then the CRL Distribution Point from the user certificate being validated is retrieved at runtime, which might cause a slightly slower performance; however, if FIPS mode is enabled in the web client (see FIPS mode), you must explicitly specify this parameter (cannot leave it empty).
If your root CA has multi-level intermediate CAs:
If your root CA certificate specified in
RootCertPathhas multi-level intermediate CA certificates, you should either specify the multi-level CRLs of the root CA and intermediate CA certificates (comma-separated), or leave the parameter empty.Examples:
CRLDownloadURL=http://onsitecrl.example.com/LatestCRL.crlCRLDownloadURL=http://onsitecrl.example.com/LatestCRL.crl,http://onsitecrl.example.com/IntermediateCRL.crl
OCSPResponderURL(empty)
Specifies the URL that identifies the location of the OCSP responder. By default, this parameter is not specified, and the OCSP responder location is retrieved from the user certificate being validated.
If you specify multiple root CA certificates:
If you specify multiple root CA certificates in
RootCertPath, you must leaveOCSPResponderURLempty. In this case, the OCSP Responder URL stored in the user certificate being validated is retrieved instead during runtime.Example:
OCSPResponderURL=http://ocsp.example.net:80CRLStoreLocation(empty) Specifies the location of your local CRL.
Note This parameter also supports multi-level intermediate CRLs (comma-separated).
Examples:
CRLStoreLocation=/WEB-INF/classes/LatestCRL.crl
CRLStoreLocation=/WEB-INF/classes/LatestCRL.crl,/WEB-INF/classes/IntermediateCRL.crl
-
-
Specify other parameters as needed.
Note The validation strategy you specified determines which parameters are required, recommended or optional (see the following table).
Method How to Enable Parameters Local CRL checking validationStrategy=1RootCertPath(Mandatory)CRLStoreLocation(Mandatory)
Online CRL checking validationStrategy=2RootCertPath(Mandatory)CRLDownloadURL(Recommended): If it is not specified, the default URL stored in the user certificate is used.CRLRefreshScheduler(Optional): This parameter specifies an interval at which the online CRL stored in the browser cache is refreshed. The default is 1440 minutes.
OCSP checking validationStrategy=3RootCertPath(Mandatory)OCSPResponderURL(Recommended): If it is not specified, the default URL stored in the user certificate is used.OCSPServerCertPath(Optional): This parameter specifies the file path to the OCSP server CA certificate. If it is not specified, theRootCertPathis used as the certificate for the OCSP server.
Smart Card checking validationStrategy=4No other parameters are required.
To ensure greater security, Smart Card checking is required for CAC cards, which are smart cards.
-
Save the file.
The following is an example configuration of the
cacconf.propertiesfile.certificateFieldExtractDN=Subject.CN
certificateOIDMapping=PrincipalName:1.3.6.1.4.1.311.20.2.3
validationStrategy=2
RootCertPath=/WEB-INF/CA.cer
CRLRefreshScheduler=1440
CRLDownloadURL=http://onsitecrl.verisign.com/myCompany/LatestCRL.crl
CRLStoreLocation=
OCSPResponderURL=
OCSPServerCertPath=
- Open
-
If a proxy is needed to access your OCSP responder URL or online CRL URL, configure a proxy in your web application server (in this example, Tomcat). You can use either of the following approaches depending on your Tomcat installation.
To configure a proxy using the Configure Tomcat shortcut:
- From your operating system's Start menu, click All Programs > <Apache Tomcat> > Configure Tomcat.
-
On the Java tab, append your proxy configuration lines to the Java Options text box. For example:
-Dhttp.proxyHost=<Proxy Server FQDN>
-Dhttp.proxyPort=<Proxy Server Port, for example, 8080>
-Dhttp.nonProxyHosts="<Service Manager Server Host FQDN>|<Tomcat Server Host FQDN>"
To configure a proxy using the
catalina.batfile:- Open the
<Tomcat>/bin/catalina.batfile in a text editor. -
Add the following lines:
set JAVA_OPTS=%JAVA_OPTS%
-Dhttp.proxyHost=<Proxy Server FQDN>
-Dhttp.proxyPort=<Proxy Server Port, for example, 8080>
-Dhttp.nonProxyHosts="<Service Manager Server Host FQDN>|<Tomcat Server Host FQDN>"
- Save the
catalina.batfile.
Task 4: Configure each Windows client to use SSL.
When CAC sign-on is enabled for the server and web client, the Windows client must run in SSL mode.
Do the following for each Windows client:
- Make sure that you have already configured SSL connection between the server and the Windows client. See Task 1: Enable required SSL encryption and trusted clients.
-
Open a client connection.
- On the Advanced tab, select Use SSL Encryption, and click Apply.
Task 5: Connect your web application server to the web server.
In this example, you need to connect Tomcat to Apache using the mod_jk module. Refer to the Apache and Tomcat documentation for detailed instructions, and in particular be sure to configure the following settings:
-
In the
httpd.conffile, uncomment the following lines:#LoadModule ssl_module modules/mod_ssl.so
#Include conf/extra/httpd-ssl.conf
#include conf/mod_jk.conf
-
Add the following lines in the
httpd-ssl.conffile:JkMountCopy On
SSLOptions +ExportCertData +StdEnvVars
-
Enable the following settings in the
mod_jk.conffile, to pass the user certificate from Apache to Tomcat at runtime.JkExtractSSL On
JkHTTPSIndicator HTTPS
JkSESSIONIndicator SSL_SESSION_ID
JkCERTSIndicator SSL_CLIENT_CERT
JkEnvVar SSL_CLIENT_CERT SSL_CLIENT_CERT
JkOptions +ForwardSSLCertChain
Task 6: Configure your web application server to use SSL.
Note This task is required only when you do not have a web server (Apache or IIS) deployed; if your web application server is connected to a web server , skip to Task 7: Configure the web server to use SSL.
CAC sign-on requires two-way SSL connection between the web application server and the user's browser. For information on configuring two-way SSL on your web application server, see your web application server documentation.
Example: Configure Tomcat to Use SSL
The following example assumes that you already have one root CA certificate that signs the user certificates stored in CACs and the root CA certificate is available (this root CA certificate is also referred to as the "CAC root CA certificate").
-
Generate a truststore file (for example,
truststore.jks) for the Tomcat server.Caution Be sure to use the web tier host's fully qualified domain name (FQDN) as the Common Name (CN).
-
Import your CAC root CA certificate to the Tomcat server truststore file.
The CAC root CA certificate (
CAC_ca.crt) is the root CA certificate that signs the user certificates stored in the CACs. Run the following command to perform the import:keytool -import -v -file CAC_ca.crt -alias rootca -keystore truststore.jks –storepass 123456
- Generate a server certificate (
server.p12) for the Tomcat server.- Generate a key pair (public and private keys).
Create a certificate signing request (
.csr) from the key pair.openssl req -new -out server-req.csr -key server.key –config openssl.cnf
Send the request to an external CA to get it signed.
Note You can also create a private CA and self-sign the request.
For example, suppose you have installed and set up a Microsoft Active Directory Certificate Service (ADCS). You can send the request to this CA as described in the following:
- Open your ADCS URL in your browser:
http://<host>/certsrv. - Select the Request a certificate task, and then click the advanced certificate request link.
- Select the Submit a certificate request by using a base-64-encoded CMC or PKCS #10 file... option.
- Open the
server-req.csrin a text editor, and copy its entire content. - Paste the request content to the Base-64-encoded certificate request box, and then click Submit.
- After the CA signs the request, download the signed server certificate and save it as
server.crt. - Download the ADCS root CA certificate, and save it as
root.crt. Users will need to import this root CA certificate into their browser.
- Open your ADCS URL in your browser:
Convert the signed server certificate to PKCS12 type (from
server.crttoserver.p12).openssl pkcs12 -export -clcerts -in server.crt -inkey server.key -out server.p12
- Copy the Tomcat server truststore (
truststore.jks) and certificate (server.p12) to a local folder, for example, Tomcat's/conf/sslfolder. -
In the Tomcat configuration file (
/conf/server.xml), configure SSL for CAC sign-on.-
Uncomment the following lines.
<!--
<Connector port="8443" protocol="HTTP/1.1" SSLEnabled="true"
maxThreads="150" scheme="https" secure="true"
clientAuth="false" sslProtocol="TLS" />
-->
- Change
clientAuth="false"toclientAuth="true". -
Add the
keystoreFileandtruststoreFilesettings.This section now should look like the following:
<Connector port="8443" protocol="HTTP/1.1" SSLEnabled="true"
maxThreads="150" scheme="https" secure="true"
clientAuth="true" sslProtocol="TLS"
keystoreFile="../conf/ssl/server.p12" keystorePass="changeit" keystoreType="PKCS12"
truststoreFile="../conf/ssl/truststore.jks" truststorePass="123456" truststoreType="JKS"/>
- Save your changes.
-
- Restart Tomcat.
Task 7: Configure the web server to use SSL.
CAC sign-on requires two-way SSL authentication between the web server/web application server and the user's browser.
For more information on configuring two-way SSL on your web server (Apache or IIS), see your web server documentation.
Example: Configure Apache 2.2 to Use SSL
The following steps assume that you have already established a connection between Apache (the web server) and Tomcat (the web application server). See Task 5: Connect your web application server to the web server.
- Create a certificate and a key for the Apache server (
server.crt, andserver.key).- Generate a key pair (public and private keys).
Create a certificate signing request (
.csr) from the key pair.openssl req -new -out server-req.csr -key server.key –config openssl.cnf
Send the request to an external CA to have it signed.
Note You can also create a private CA and self-sign the request.
For example, suppose you have installed and set up a Microsoft Active Directory Certificate Service (ADCS). You can send the request to this CA as described in the following:
- Open your ADCS URL in your browser:
http://<host>/certsrv. - Select the Request a certificate task, and then click the advanced certificate request link.
- Select the Submit a certificate request by using a base-64-encoded CMC or PKCS #10 file... option.
- Open the
server-req.csrin a text editor, and copy its entire content. - Paste the request content to the Base-64-encoded certificate request box, and then click Submit.
- After the CA signs the request, download the signed server certificate and save it as
server.crt. - Download the ADCS root CA certificate, and save it as
root.crt. Users will need to import this root CA certificate into their browser.
- Open your ADCS URL in your browser:
When this step is complete, you have got the Apache server certificate (
server.crt) and server key (server.key), as well as the external CA root certificate (root.crt). Users will need to import theroot.crtto their browser (see Task 9: Configure web browsers to enable web client users to use CAC.). - Copy your Apache
server.crtandserver.keyto a folder. For example:<Apache installation folder>/conf/ssl. - Copy your CAC root CA certificate (
CAC_ca.crt) to the same folder. -
Uncomment the following line in the
httpd.conffile.#LoadModule ssl_module modules/mod_ssl.so
-
Configure the
\extra\httpd-ssl.conffile as follows:SSLEngine On
SSLCipherSuite ALL:!ADH:!EXPORT56:RC4+RSA:+HIGH:+MEDIUM:+LOW:+SSLv2:+EXP:+eNULL
SSLCertificateFile "<Apache installation folder>/conf/ssl/server.crt"
SSLCertificateKeyFile "<Apache installation folder>conf/ssl/server.key"
SSLCertificateChainFile "<Apache installation folder>conf/ssl/CAC_ca.crt"
SSLCACertificatePath "<Apache installation folder>/conf/ssl"
SSLCACertificateFile "<Apache installation folder>/conf/ssl/CAC_ca.crt"
SSLVerifyClient require
SSLVerifyDepth 2
Task 8: Create operator records for CAC users.
The web server extracts information from the user certificate based on the certificateFieldExtractDN value defined in the <web tier installation path>\WEB-INF\classes\cacconf.properties file.
You must create an operator record for each CAC user. The configuration varies depending on whether Lightweight Directory Access Protocol (LDAP) is enabled on the SM server or not.
If LDAP is not enabled for the SM server
For each CAC user certificate, create an operator record whose Login Name (operator.name) field has the same value as the distinguished name (DN) value in the certificate.
See the following table for an example, which indicates that you need to create an operator record whose Login Name is the email address stored in the user certificate.
| In the cacconf.properties file | In the user certificate | In the operator record |
|---|---|---|
|
certificateFieldExtractDN=Subject.E (DN=certificate owner's email address) |
Subject.E=jack.smith@mycompany.com | Login Name=jack.smith@mycompany.com |
If LDAP is enabled for the SM server
Configure LDAP mapping for the operator and contacts tables, and make sure that the operator.name and contacts.operator.id fields are mapped to the same LDAP attribute that corresponds to the certificate attribute defined in certificateFieldExtractDN.
The following table lists the fields in the operator and contacts tables that you must map to an LDAP attribute.
Note The LDAP attribute names here are provided only as an example, which may differ from your actual mappings. In this example, both of the name field in the operator table and the operator.id field in the contacts table are mapped to the sAMAccountName attribute, which corresponds to the user certificate attribute defined in certificateFieldExtractDN.
| File Name | Field Name | LDAP Attribute Name |
|---|---|---|
operator
|
contact.name
|
cn
|
full.name
|
cn
|
|
name
|
sAMAccountName
|
|
contacts
|
contact.name
|
cn
|
first.name
|
givenName
|
|
full.name
|
cn
|
|
last.name
|
sn
|
|
operator.id
|
sAMAccountName
|
For details about LDAP configuration, see the Service Manager LDAP Best Practices Guide, available at:
https://softwaresupport.softwaregrp.com/group/softwaresupport/search-result/-/facetsearch/document/KM1010774
Task 9: Configure web browsers to enable web client users to use CAC.
Before a user can log on with a CAC, the CAC root CA certificate(s), the root CA certificate generated during your web server (or web application server) SSL configuration, as well as the user's personal certificate must be installed in the user's browser.
When users insert their CACs, the browser automatically loads their personal certificates. Users only need to manually install the root CA certificates in their browser.
As an example, the following describes how users do so in Internet Explorer.
- Click Tools > Internet Options > Content > Certificates.
- Click Import to import your CAC root CA certificate (
CAC_ca.crt) to the Trusted Root Certification Authorities certificate store. - Similarly, import the root CA certificate (
root.crt) you generated during your web server (or web application server) SSL configuration.
Task 10: Test your CAC sign-on setup.
- Start the Service Manager server, the web server and the web application server (in this example, Apache and Tomcat).
- Verify that you can log in to the web client with your CAC.
Open the web tier login URL in your browser:
http://<Your Apache Host FQDN>:<port>/<webtier>/index.do
or if you have no Apache but only Tomcat deployed:
http://<Your Tomcat Host FQDN>:<port>/<webtier>/index.do
The system prompts you to select a certificate from a list of the certificates installed in your browser.
Insert your CAC. The browser automatically loads your personal certificate.
Note At your first CAC login, a browser refresh might be needed to make your personal certificate appear in the list.
Select your personal certificate from the list.
Enter your CAC PIN when prompted.
Service Manager automatically logs you in.
CAC sign-on is now successfully set up in your web tier.
-
Verify that you can log in to the Windows client through SSL encryption.
- Start the Windows client, and check that the Use SSL Encryption option is enabled.
-
Enter a valid username and password to log in.
Service Manager logs you in successfully. Two-way SSL is successfully set up in your Windows client.
Now, your CAC sign-on setup is complete.
Related topics


