


Upgrade to Service Manager 9.60 Smart Analytics on Windows
If you have installed an earlier version of Smart Analytics, follow the instructions in this section to upgrade your Smart Analytics to SM 9.60 Smart Analytics.
To upgrade your Smart Analytics, follow these steps:
-
Before you upgrade your Smart Analytics, complete these tasks:
- Make sure that all the index tasks are finished.
-
Stop and then delete all the Smart Analytics services.
Note To delete a service, run
sc delete "SERVICE_NAME"in the command window. - Back up all the Smart Analytics files.
-
Obtain the Smart Analytics installer for Windows.
-
Unpack the .zip file and then double-click the setup application (
setupSmartAnalyticsWindowsX64.exe). - Read the introduction, and then click Next.
- Read the License Agreement. To continue the installation, select I accept the terms of the License Agreement, and then click Next.
- Select Upgrade, and then click Next.
- Review the message on the Preparation for Upgrade dialog box, and then click Next.
-
Specify the version of Smart Analytics installed by selecting either of the following options, and then click Next:
- Smart Analytics 9.40 or former
- Smart Analytics 9.41
- Smart Analytics 9.50 or later
-
Continue with prompted upgrade steps, which vary based on the Smart Analytics version you selected in Step 8.
Smart Analytics 9.40 or former
If you selected Smart Analytics 9.40 or former, continue with these steps:
-
Choose the current architecture of the Smart Analytics installed:
- Standalone
- Distributed
-
Specify the IP address of the machine on which you have installed Service Manager server.
You need to specify the IP addresses (or host names) of the Service Manager servers that are permitted to send administrative and query actions to the Smart Analytics servers. Use commas to separate multiple addresses (do not use a space before or after a comma).
Note use a valid FQDN or IP address for the server address. Do not use the localhost or 127.0.0.1.
-
Select the components that you want to upgrade. The servers that are available for upgrade vary depending on the Smart Analytics architecture you specified:
Note
- For Smart Analytics components which were installed in the same root folder, upgrade them at the same time in a single upgrade process. Otherwise, components may not be uninstalled completely when you uninstall Smart Analytics.
-
Upgrade the components separately by performing the upgrade process multiple times under the following conditions:
- Your current version of Smart Analytics is 9.34
- The Smart Analytics components to be upgraded are installed in different parent folders or physical machines
Architecture Components Available for Upgrade Standalone IDOL Server
Image Server
Distributed Smart Analytics Proxy
Content Server
Image Server
Image Proxy Server
-
Specify the parent folder where the selected Smart Analytics components are installed, and then click Next.
Note
- If you are upgrading the Smart Analytics proxy server, the parent folder should include the IDOL folder.
- If you are upgrading a distributed content server, the folder should be the parent of the content folder.
-
Follow the on-screen steps to configure the components you selected. Click Next after each step.
Note The number of copies (that is, the value of Replicas plus one) must be no more than the number of child servers. If you create more copies than there are child servers, DIH does not start.
- Review the pre-installation summary, and then click Install. If you want to change your configuration, click Previous.
Smart Analytics 9.41
If you selected Smart Analytics 9.41, continue with these steps:
- Specify the parent folder where the current Smart Analytics is installed, and then click Next.
- The installer automatically detects and lists which components have been installed. Review the detected components, and then click Next.
- Specify content folder names as needed. By default, the installer automatically specifies all the content folder names.
- Specify image server folder names as needed. By default, the installer automatically specifies all the image server folder names.
- Review the message that Smart Analytics is ready to upgrade, and then click Next.
- Check the pre-installation summary, and then click Install. If you want to change your configuration, click Previous.
Smart Analytics 9.50 or later
If you selected Smart Analytics 9.50 or later, continue with these steps:
- Specify the parent folder where the current Smart Analytics is installed, and then click Next.
- The installer automatically detects and lists which components have been installed. Review the detected components, and then click Next.
- Specify content folder names as needed. By default, the installer automatically specifies all the content folder names.
- Specify image server folder names as needed. By default, the installer automatically specifies all the image server folder names.
- Review the message that Smart Analytics is ready to upgrade, and then click Next.
- Check the pre-installation summary, and then click Install. If you want to change your configuration, click Previous.
-
- Wait for the upgrade to complete, and then click Done.
Post-upgrade actions
Perform the following actions after you upgrade your Smart Analytics:
-
When the installation is complete, check the Start.bat and Stop.bat files under the <Smart Analytics Installation>/Scripts folder for any commands that start or stop services not on your local machine. Delete or comment out such commands and then add
sc start "[Service Name of your previous content]"orsc stop "[Service Name of your previous content]"as needed. -
If you upgrade from Service Manager 9.41 to Service Manager 9.60, you need to do full re-index of Catalog_Library after you upgrade to Smart Analytics 9.60.
-
If you upgraded from Smart Analytics 9.40 or earlier versions to Smart Analytics 9.60, then during the upgrade process, the existing configuration files would be renamed to
<component name>-old.cfg. After you finish the upgrade, compare it with the new configuration file. If there is any customized change made in the previous .cfg file and it is still valid, manually add it back to the new .cfg file. - If you upgraded from Smart Analytics 9.40 or earlier versions to Smart Analytics 9.60, you need to re-index the Hot Topic Analytics data. However, do not start a training for Smart Ticket.
-
If you upgraded from a distributed Smart Analytics from 9.41 or earlier to Smart Analytics 9.60, add the following lines before the
[actions]section in the <Smart Analytics Installation>/Content#/Content#.cfg file for the system to clean up expired documents://--------------------------- Schedules ----------------------// //expire and compact data everyday [Schedule] Expire=TRUE ExpireTime=23:00 ExpireInterval=24:00
Note With this configured, the system automatically deletes all the expired documents at 23:00 every day. By default, the expiration date for documents is set to 365 days.
-
If you upgraded from a standalone Smart Analytics with version 9.34 to Smart Analytics 9.60, comment out the
[License]section in the <ImageServer1>/imageserver1.cfg file, and then add the following:[Modules]Enable=ocr -
If you upgraded from a standalone Smart Analytics from 9.40 or earlier to Smart Analytics 9.60, you need to manually modify the following configuration in the <SmartAnalytics>/IDOL/IDOLServer.cfg file:
-
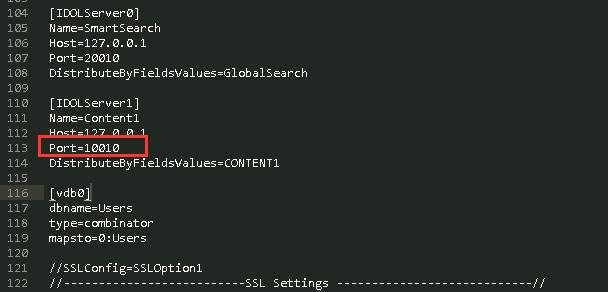
If you upgraded a distributed Smart Analytics proxy server with version 9.40 or earlier to Smart Analytics 9.60, the previous configuration files would be renamed to
<component name>-old.cfg, and you need to manually modify the following configurations in the <SmartAnalytics>/IDOL/IDOLServer.cfg file:Configurations after upgrade Configurations in your previous file (<component name>-old.cfg) You need to modify the value to VirtualDatabases=1 VirtualDatabases=<x> VirtualDatabases=<x> [vdb0]
dbname=Users
type=combinator
mapsto=0:Users
[VDB0]
DbName=News
Type=Combinator
MapsTo=0:News
Do not change
[VDB<x>]
DbName=my_database
Type=Combinator
MapsTo=<y>:my_database
Note The number of x starts from 1.
[VDB<x>]
DbName=my_database
Type=Combinator
MapsTo=<y+1>:my_database
- You must add the VDB configurations by their number sequence.
- There may be other content between two VDB configuration sections.
- Make sure the total number of the VDB configuration sections equals to the number specified in the VirtualDatabases parameter.
- There is no difference if you use the upper or lower case for the section name of [VDB<x>].
[DistributionIDOLServers] Number=2 [DistributionIDOLServers] Number=<x> [DistributionIDOLServers] Number=<x+1> [IDOLServer0]
Name=SmartSearch
Host=127.0.0.1
Port=20010
DistributeByFieldsValues=GlobalSearch
Do not change [IDOLServer1]
Name=Content1
Host=127.0.0.1
Port=
DistributeByFieldsValues=CONTENT1
[IDOLServer<x>]
Host=12.3.4.56
Port=20010
DistributeByFieldsValues=CONTENT<x>
Note The number of x starts from 0.
[IDOLServer<x+1>]
Name=Content<x+1>
Host=12.3.4.56
Port=20010
DistributeByFieldsValues=CONTENT<x+1>
Note
- You must add the IDOL server configurations by their number sequence.
- Make sure the total number of the IDOL server configuration sections equals to the number specified in the [DistributionIDOLServers] Number parameter.
-
If you upgrade from Smart Analytics 9.41 to Smart Analytics 9.60, you need to manually modify the following configuration sections:
In the <SmartAnalytics>/IDOL/IDOLServer.cfg file:
Existing configurations You need modify the configuration to [IndexQueue] IndexQueueInitialSize=10240 IndexQueueMaxHistorySize=500 IndexQueueMaxPendingItems=10240 [SetDateFields] // Fields containing the document date Property=DateFields PropertyFieldCSVs==*/DREDATE,*/DREDATE_*,*/DATE,*/DATE_*,*/*_DATE,*/*_TIME [Logging] LogExpireAction=compress LogOldAction=move LogMaxSizeKBs=20480
[IndexQueue]
IndexQueueInitialSize=10240
IndexQueueMaxHistorySize=10240
IndexQueueMaxPendingItems=0

[SetDateFields]
// Fields containing the document date
Property=DateFields
PropertyFieldCSVs=*/DREDATE,*/DREDATE_*,*/DATE,*/DATE_*,*/*_DATE,*/*_TIME,*/MODIFIED_EPOCH,*/LASTMODIFIED

[Logging]
LogExpireAction=Day
LogMaxOldFiles=7
LogOldAction=delete
LogMaxSizeKBs=102400
In the <SmartAnalytics>/Level2proxy/IDOLServer.cfg file:
Existing configurations You need modify the configuration to [Server] [IndexQueue] IndexQueueInitialSize=10240 IndexQueueMaxHistorySize=500 IndexQueueMaxPendingItems=10240 [Logging] LogExpireAction=compress LogOldAction=move LogMaxSizeKBs=20480
[Server]
//store index data on disk only when the index cache is full or when the MaxSyncDelay(120 seconds by default) is reached.
DelayedSync=TRUE

[IndexCache]
IndexCacheMaxSize=102400


[IndexQueue]
IndexQueueInitialSize=10240
IndexQueueMaxHistorySize=10240
IndexQueueMaxPendingItems=0

[Logging]
LogExpireAction=Day
LogMaxOldFiles=7
LogOldAction=delete
LogMaxSizeKBs=102400
In the <SmartAnalytics>/Content<x>/Content<x>.cfg file:
Existing configurations You need modify the configuration to [IndexQueue] IndexQueueInitialSize=10240 IndexQueueMaxHistorySize=500 IndexQueueMaxPendingItems=10240 [SetDateFields] // Fields containing the document date Property=DateFields PropertyFieldCSVs=*/DREDATE,*/DREDATE_*,*/DATE,*/DATE_*,*/*_DATE,*/*_TIME [SetMatchFields] PropertyFieldCSVs=*/*_MATCH,*/EDK_*,*/*_MATCH_INDEX, */*_MATCH_WEIGHT*,*/*_BOOLEAN [Logging] LogExpireAction=compress LogOldAction=move LogMaxSizeKBs=20480 [LanguageTypes] GenericTransliteration=TRUE Transliteration=false
//The amount of memory to allocate to store the most commonly occurring terms. (using 500MB as term cache here, recommended range is 10240 to 2048000. )
[TermCache]
TermCachePersistentKB=512000

//--------------------------- Schedules ----------------------//
//expire and compact data everyday
[Schedule]
Expire=TRUE
ExpireTime=23:00
ExpireInterval=24:00

[IndexQueue]
IndexQueueInitialSize=10240
IndexQueueMaxHistorySize=10240
IndexQueueMaxPendingItems=0

[SetDateFields]
// Fields containing the document date
Property=DateFields
PropertyFieldCSVs=*/DREDATE,*/DREDATE_*,*/DATE,*/DATE_*,*/*_DATE,*/*_TIME,*/MODIFIED_EPOCH,*/LASTMODIFIED

[SetMatchFields]
PropertyFieldCSVs=*/*_MATCH,*/EDK_*,*/*_MATCH_INDEX, */*_MATCH_WEIGHT*,*/*_BOOLEAN,*/IMPORTMAGICEXTENSION

[Logging]
LogExpireAction=Day
LogMaxOldFiles=7
LogOldAction=delete
LogMaxSizeKBs=102400

[LanguageTypes]
GenericTransliteration=TRUE
Transliteration=true
After you modify the configurations, restart all related Smart Analytics components of which such configuration are modified. Then, on the machine where level2proxy is located, reload updated configuration files dynamically and regenerate match index by visiting the following URLs :
-
Reload updated configuration files dynamically:
http://localhost:20011/DRERESET -
Regenerate the match fields:
http://localhost:20011/DREREGENERATE?Type=MatchWait for a few minutes for the regeneration to complete.
-
-
If you have installed Portal Content in Smart Analytics 9.50 or Smart Analytics 9.51, you need to manually modify the following configuration sections:
In the <SmartAnalytics>/IDOL/IDOLServer.cfg file:
Existing configurations You need modify the configuration to //The following parameter is required for the DAH if mirrormode is set to false VirtualDatabases=<x>
//The following parameter is required for
the DAH if mirrormode is set to false
VirtualDatabases=<x+1>
Add the following configuration:
[vdb<x>]
dbname=SearchHistory
type=combinator
mapsto=2:SearchHistory
Note
- You must add the VDB configurations by their number sequence.
- There may be other content between two VDB configuration sections.
- Make sure the total number of the VDB configuration sections equals to the number specified in the VirtualDatabases parameter.
- There is no difference if you use the upper or lower case for the section name of [VDB<x>].
In the <SmartAnalytics>/Content-SMSP/Content-SMSP.cfg file:
Existing configurations You need modify the configuration to [Databases] NumDBs=<x>
[Databases]
NumDBs=<x+1>
Add the following configuration:
[Database<x>]
Name=SearchHistory
-
After upgrade to Smart Analytics 9.60, you need to manually add
*/TITLE_INDEXto the following files if you have scaled out the Content server:- <SmartAnalytics>/Content2/Content2.cfg
- <SmartAnalytics>/Content3/Content3.cfg
- <SmartAnalytics>/IDOL/IDOLServer.cfg
You also need to modify the scaled content to add
*/TITLE_INDEX.Existing configurations You need modify the configuration to [SetTitleFields] // The one field per document that is to be stored as the autn:title value Property=TitleFields PropertyFieldCSVs=*/DRETITLE,*/TITLE,*/DRETITLE_WEIGHT*, */TITLE_WEIGHT*
[SetTitleFields] // The one field per document that is to be stored as the autn:title value Property=TitleFields PropertyFieldCSVs=*/DRETITLE,*/TITLE,*/DRETITLE_WEIGHT*, */TITLE_WEIGHT*,*/TITLE_INDEX


