


How to Add the CI Type to Service Manager
Before creating a new Service Manager CI type, you should determine if there are any existing CI types in your Service Manager system that provide the CI attributes you want. In most cases, you can reuse the existing CI types for the integration.
You can add a new CI type to Service Manager by using the Visual Mapping tool in UCMDB, which means you do not have to log out of UCMDB and then log in to Service Manager.
The following steps illustrate how to create a new CI type called RDBMS.
Note This example is provided only as an illustration of the steps. The best practice is to reuse the existing Service Manager CI type RunningSoftware to map with UCMDB CI type SM RDBMS.
- Log in to UCMDB as an administrator.
- Open an existing XML mapping file (SM Computer Push 2.0.xml, for example) with the Visual Mapping tool editor.
- Select the Root node in the External Class Model panel, and click the Add New CI Type to External Class Model icon.
-
Enter parameter values as follows.
Name: rdbms
Description: CI type for RDBMS
table: smrdbms
subtype: Oracle, SQL Server
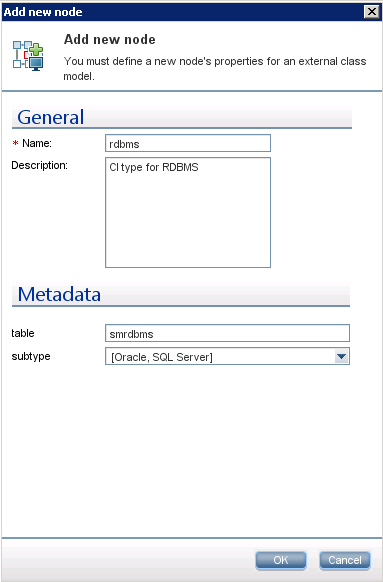
- Click OK.
-
Click OK again to confirm the CI type creation. The CI type is automatically created in Service Manager, as shown in the following figure.
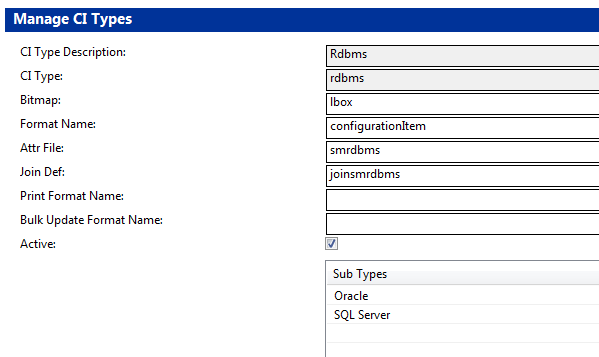
What happens on the Service Manager (SM) side?
All relevant SM objects (DBDICT, JoinDef, Web Service API, DEM Rule, and so on) for the new CI type are automatically created on the SM side, except the format. The new CI type will use configurationItem as the default format.
If you want to use custom formats in SM for the new CI type, you have to create them manually. You can create the formats in Forms Designer based on existing view forms and bulk update forms. To access Forms Designer in Service Manager, type fd in the command line or navigate to Tailoring > Forms Designer. For more information about creating forms in Service Manager, see the Service Manager online help and the Tailoring Best Practices.


