


Configure search filters for the full calendar
The Calendar Filter Mapping feature enables users to manage filtered views of Service Manager Calendar, so that Service Manager Calendar displays only information of their interest.
Before users can do so, you, as an administrator, should configure filter mapping through the Calendar Filter Mapping form. This form is accessible from System Administration > Ongoing Maintenance > Calendar Administration > Calendar Filter Mappings. The following table describes the sections of this form.
| Section | Description |
|---|---|
| Header | This section includes a description and data modification information of the filter mapping record. |
| Filter Fields Configuration |
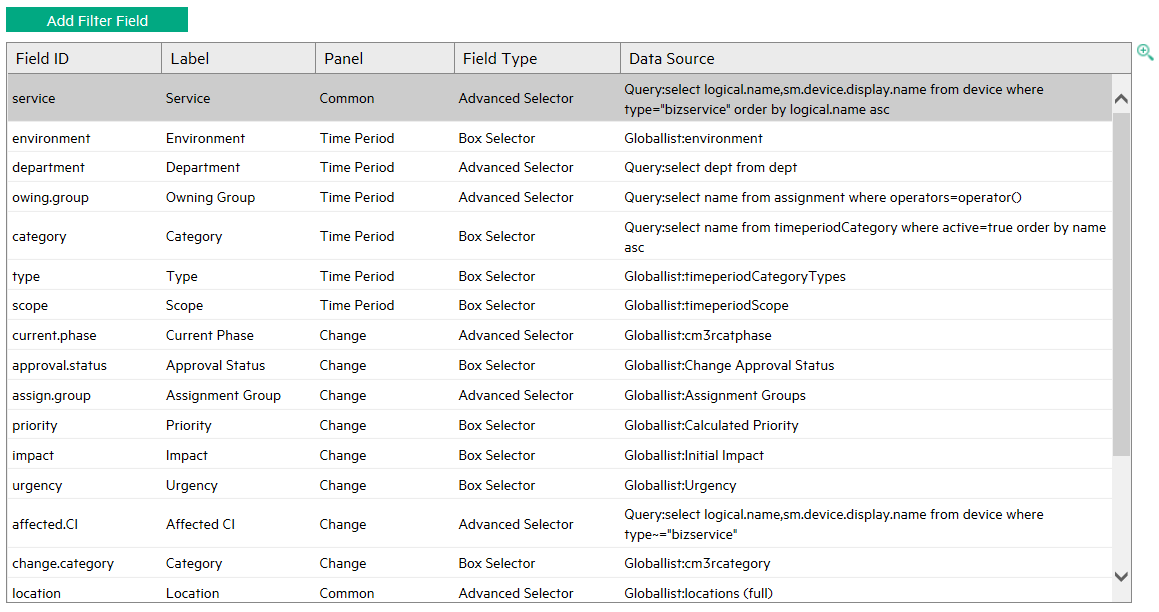
This section specifies the fields for the filter form in the calendar, and maps the fields in the filter form to a real field in the database. A list of specified fields appear on the Add Filter Field window, which is accessible from the filter area of the calendar. The following figure is an example of the Add Filter Field window.
Each panel represents an object. Fields that appear on the Common panel are those configured for all available objects. |
| Embedded Calendar Configuration |
This section specifies the filters for displaying the correct records in the embedded calendar when the calendar is displayed initially. The predefined filters are executed as soon as you launch the embedded calendar. With this filter setting, you can configure a query to display other related records in the calendar. |
Example: Configure search filters for the full calendar
Before proceeding with this configuration task, make sure that you have already completed the following tasks:
This example assumes that you have already configured a calendar mapping record for Time Period and Change. In this example, you will define filter fields and field mappings for each object so as to filter which related records are displayed on the full calendar.
-
Click System Administration > Ongoing Maintenance > Calendar Administration > Calendar Filter Mappings to open the Calendar Filter Mapping form.
- In the Header section, type a description in the Description field (optional).
-
In the Filter Fields Configuration section, add filter fields and field mappings.
-
Click Add Filter Fields to open the Calendar Filter Field form. By default, the Active option is selected.
Note Only active filter fields are used for filtering.
-
Complete the fields on this form.
Field Description Field ID Type a unique identification name for the field. This internal ID is used for filter mapping in the next step.
Example:
Change ID.Label Type a display name for the field ID. This field is mandatory.
Example:
Change ID.Panel Select a panel from the list. This is the name of a tab of the Add Filter Fields window, which is displayed when you click the Add Filter Fields button. The list includes the following panels:
- Time Period
- Common
-
Objects specified in the Available Objects for Calendar Mapping field (Calendar Administration > Calendar Settings).
Example:
Change.Sequence This is the order in which the field is displayed in the Add Filter Fields window.
Example:
1.Field Type Select a field type to define the layout of the values of the field on the filter form. The following types are supported:
- Text: Allows you to enter a text string as a value for the field.
-
Box Selector: Allows you to select a value for the field using a list of check boxes.
Note We recommend that you use this type for a field that has no more than 10 values. Displaying a large number of values in a Box Selector may cause usability issues.
- Advanced Selector: Allows you to select one or more values for the field from a list of available values.
-
Date Time: Allows you to specify a date/time or date/time range value for the field.
Example:
Advanced Selector.Data Source Type This field is available only when the Field Type is Box Selector or Advanced Selector. The following types are supported:
- Global List
- RAD Expression
-
Query
Data Source Value This field is available only when the Data Source Type is Global List or RAD Expression.
- Global List: Specifies the global list to store the value list and display list.
-
RAD Expression: Specifies a RAD expression that returns a JSON object that contains the value list and display list. The format of the returned JSON object is as follows:
{"values":["value1","value2"], "labels":["display1", "display2"]}
Below is an example RAD expression:
jscall("CalendarFieldValueJSCall.getMyAssignmentGroupOperators")
Query Configuration These settings are available only when the Data Source Type is Query. It specifies a query against the data in a field of a table, which retrieves a value list and display list for the field.
- File: the name of the table to be queried. For example,
device. - List Field: the name of the field that stores the value list. For example,
logical.name. -
Display Field: the name of the field that stores the display list. If it is specified, the calendar displays the values of this field for users to select from. For example,
id.If it is not specified, the calendar uses the List Field instead.
- Limiting SQL: a condition of the query. For example,
type="bizservice". - Sort By: the name of the sort-by field of the query results. If it is not specified, the List Field is used.
Multiple Select This option is available only when the Data Source Type is Box Selector.
Select this option if the filter field supports the selection of multiple values.
Extended Values
Extended Labels
An additional user-defined list of values and their display labels. The labels are displayed at the top of the list of values to select for the filter field.
For example, you can define the following extended value and label for the Time Period module so that each user can choose to display only time period records valid for the user's own department.
- Extended Value:
$lo.dept - Extended Label:
My department
-
Click Save. An ID is automatically assigned to the filter field.
- Click Add Field Mappingto open the Calendar Field Mapping form.
- Select a module and a mapping field, and click Save to add the calendar filter field mapping. By default, the Active option selected.
- If needed, continue to follow step d and step e to map this field to multiple modules.
- Click Save & Exit.
-
-
If needed, continue to follow step 1 to step 3 to add multiple fields to the filter form.
Tip If you want to specify a filter field for multiple modules (for example, a filter field for
affected.itemin Change andaffected.servicesin Time Period), you can specify the field for the Common panel, and then add mappings for each relevant module. - Save the calendar filter mapping.
Now, you have completed your calendar configurations. Next, you can test your calendar. See Test your calendar.
Related topics
Calendar Administration
Full calendar and embedded calendar
Calendar security area and role
Release Control Calendar
Enable or disable the calendar
Configure calendar settings
Display an embedded calendar on an incident form, an interaction form, or a problem form
Display records from an application module in the calendar
Localize a filter field
Test your calendar


