


How to Create an Integration Point in UCMDB
A default UCMDB installation already includes the ServiceManagerEnhancedAdapter9.41 package. To use the integration package, you must create an integration point that lists the connection properties for the integration.
Caution For data population, this integration supports the use of only one probe for your Service Manager system. Do not run population jobs on different probes by setting up multiple integration points with different probes for your Service Manager system. Only one probe is allowed for one Service Manager system.
To create an integration point, follow these steps:
- Log in to UCMDB as an administrator.
- Add the integration user account that you created in Service Manager.
- Click Administration > Users and Roles.
- Click the Add New User icon
 .
. - For User Name and Password, type the user name and password that you created in Service Manager. See How to Create an Integration User Account.
- Click Next, and then select Admin from the Role List .
- Click Finish. The integration user account is added.
- Navigate to Data Flow Management > Integration Studio. UCMDB displays a list of existing integration points.
- Click the New Integration Point icon .
UCMDB displays a New Integration Point properties window.
- Complete the integration and adapter property fields as described in the following table.
Field name Is required? Description Integration Name Yes Type the name (unique key) of the integration point. For example, sm_integration. Integration Description No Type a description for the integration point. Adapter Yes Select HP Software Products / Micro Focus Products > Service Manager > ServiceManagerEnhancedAdapter9.41.
Is Integration Activated Yes Enable this option to indicate the integration point is active.
Hostname/IP
Yes Type the hostname or IP address of the Service Manager server.
For example, localhost.
Port Yes Type the communications port of the Service Manager server. For example, 13080. URL Override No This field value (if any) supersedes the Hostname/IP and Port settings described above.
Use this field If you want UCMDB to connect to Service Manager in any combinations of the following ways:
- Connect to Service Manager over HTTPS or over both HTTP and HTTPS
- Connect to multiple Service Manager server nodes (horizontally scaled environment)
- Connect to one single Service Manager server node through multiple ports (vertically scaled environment)
For more information, see Push in Clustered Environments.
Type one or more Service Manager web services URLs (separated by a semicolon) in this field.
Each URL must use this format:
http(s)://<hostname>:<port>/SM/9/restThe following are two example values of this field:
https://localhost:13443/SM/9/resthttp://localhost:13080/SM/9/rest;
https://localhost:13443/SM/9/rest;
http://smfpe04:13080/SM/9/rest
Credentials ID
Yes Click Generic Protocol, click the Add icon to add the integration user account that you created, and then select it. This account must exist in both Service Manager and UCMDB. See How to Create an Integration User Account.
Data Flow Probe Yes Select the name of the Data Flow Probe used to run population jobs. You should have already added the data flow probe for the integration after installing UCMDB. See Integration Requirements. - Click Test Connection to make sure that a successful connection has been established.
- Click OK.
The integration point is created and its details are displayed.
- Click the Federation tab, and complete the following configuration.
- In Supported and Selected CI Types, select the following CI types as needed from ItProcessRecord:
- Incident
- Problem
- Request for Change
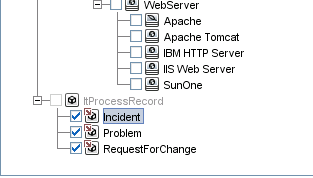
- For each CI type you selected (Incident, Problem, or RequestForChange), select Retrieve CIs of selected CI Type for CI Type Retrieval Mode.
- In Supported and Selected CI Types, select the following CI types as needed from ItProcessRecord:
- Click the Population and Data Push tabs to view the default integration job details.
Note UCMDB creates several default population and data push jobs when creating an integration point. If needed, you can create a new job for the integration point. For information about creating integration jobs, see How to Define Data Push Jobs in UCMDB and How to Define Population Jobs in UCMDB.
- Click the Save Integration Point icon
 .
.


