


Create SM Operational Reports
Suppose you might want to create a report that displays the details of all open incident records, and also the contact information of the contacts who reported the incidents. Complete the following tasks to create a report with data extracted from the probsummarym1 table and the contactsm1 table:
- Add an ODBC capability word
- Start the legacy listener
- Create an operational report
- Design layout of the report
Add an ODBC capability word
-
Start the Service Manager server.
- Open a command prompt and navigate to
<Service Manager installation path>\Server\RUN. - Type
sm.exe, and then press Enter. The Service Manager server is started.
- Open a command prompt and navigate to
-
Start the Service Manager client.
- Open a command prompt and navigate to
<Service Manager installation path>\Client. - Type
ServiceManager.exe, and then press Enter. The Service Manager client is started. -
Log on to Service Manager with a system administrator account.
- Type
operatorin the Service Manager Command Line, and then press Enter. The Operator utility opens. -
Type the login name of the specified operator in the Login Name field, and then click Search.
-
Click the Startup tab, type
ODBCin the Execute Capabilities table, and then click Save.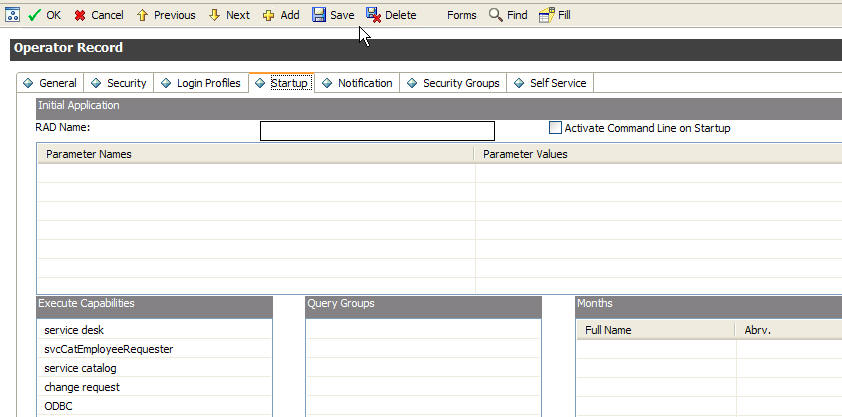
Start the legacy listener
- Open a command prompt and navigate to
<Service Manager installation path>\Server\legacyintegration\RUN. - Type
Scenter.exe -listener:12670 -RPCReadOnly. - Press Enter. Scenter.exe is started.
Note
- For more information about starting the legacy listener, see Start the legacy listener.
- With the logical name solution, some logical names are mapped to display names. However, the logical names are still used in the generated report because the legacy listener does not use the mapping between logical and display names.
Create an operational report
- Start Crystal Reports, and then click New Report
 on the Standard toolbar. The Standard Report Creation Wizard opens.
 - Expand the Create New Connection folder, and then double-click ODBC (RDO).
-
Select sc_report_odbc from Data Source Name, and then click Next.
Note If sc_report_odbc is not available in the list of Data Source Name, check whether ODBC Driver is correctly installed and configured.
-
In the User ID field, type the login name of the specified operator with ODBC Execute Capability as specified in Task 1, and then click Finish.
Note User ID is case sensitive.
- In the Standard Report Creation Wizard, expand the sc_report_odbc folder and select tables that may be used in your report from the Available Data Sources box to the Selected Tables box using the left (corresponds to left on the screen) and right arrows (corresponds to right on the screen). In this example, select tables of probsummarym1 and contactsm1.
- Click Next to go to the Link page of the wizard.
-
Click Clear Links to remove all the default links between the two tables.
Note The default links between the fields of the tables you selected indicate that the data of the fields are the same in these tables. For example, the contact.name field in the
probsummarym1table contains the same data as the contact.name field in the contactsm1 table. You need to clear all links before establishing new links. -
Select contact.name from the
probsummarym1table, drag and drop to the contact.name in thecontactsm1table. A new link is set up.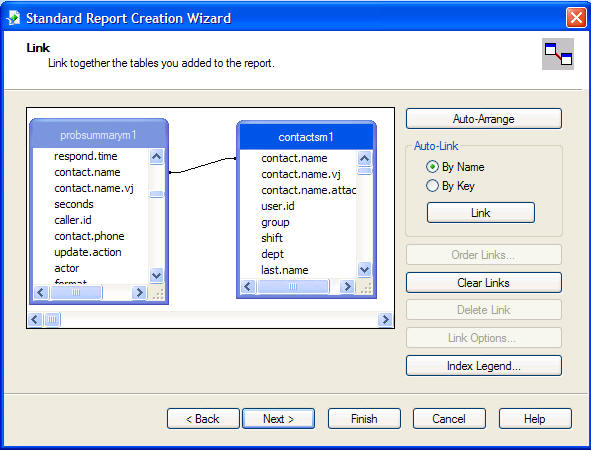
Note If you want to modify the Join Type, Enforce Join and Link Type of a link, click the link you create, click Link Options, and then select options as needed.
- Click Next to go to the Fields page of the wizard.
- Select fields you want to display in the report using the left (corresponds to left on the screen) and right arrow (corresponds to right on the screen), and then click Next.
-
(Optional) Customize your report on the next three pages of the wizard (you can also skip any of the pages).
- Group the data in the report on the Grouping page.
- Select a subset of information to display on the Record Selection page.
- Choose a template for your report on the Template page.
- Click Finish. The Crystal Reports Preview page opens.
Design layout of the report
- Click the Design tab to switch to the Crystal Reports Design page.
-
On the Crystal Reports Design page, adjust the size and position of fields and rename the field headers (also as column headers in the report).
Note For advanced report designing, see Crystal Reports online help.
- Go to File > Save to save all modifications that you have made.


