


Configure Smart Analytics for high availability
This section provides instructions for you to configure Service Manager Smart Analytics for high availability.
Overview
To reduce potential down time, it is recommended that you configure Smart Analytics for high availability. The following diagram is an example architecture of Smart Analytics configured for high availability: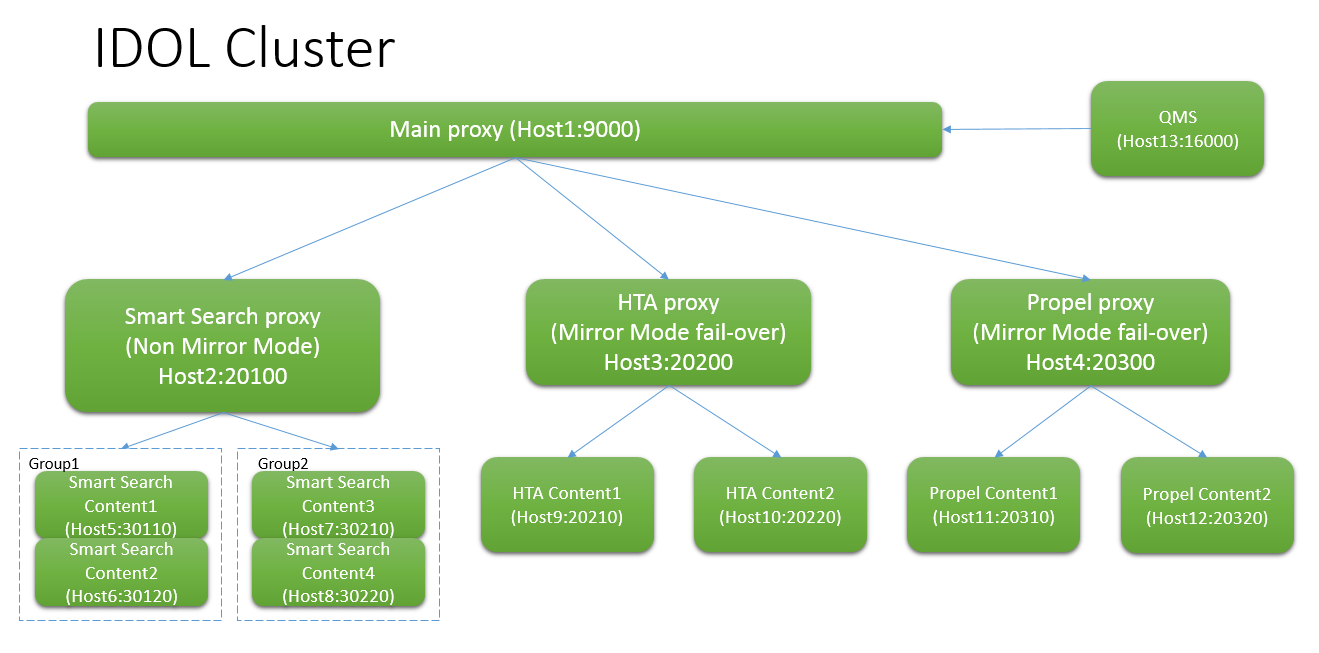
In this diagram:
- Propel content2 is the failover content of Propel Content1 and vice versa.
- Smart Search content2 is the fail-over content of Smart Search content1 and vice versa.
- HTA content2 is the fail-over content of HTA content1 and vice versa.
Note
- Smart Search data is distributed among groups, while content servers in a group are mirrored to each other as fail over backup. For better index and query performance, it is suggested to store no more than 3 million records for each content server. You can adjust the number of groups accordingly to fit actual scenarios. For example, if Smart Search would have 9 million records, at least 3 groups should be used for Smart Search, which means 6 content servers in total used as Smart Search content servers.
- Propel and QMS are only supported as of Smart Analytics 9.50.
- You can configure high availability for all contents or contents of a specific component only, for example, Smart Search contents.
- The ports are provided only for reference. You can change the ports by modifying the corresponding configuration files.
- You can locate the proxy and QMS servers on the same machine or different machines. However, it is recommended that the rest content servers be located on different machines. For example, Host 1, 2, 3, 4 and 13 in the diagram can be the same machine, while Host 5-12 different ones.
Configuration steps
To configure Smart Analytics for high availability as depicted in the diagram, follow these steps:
-
Install and configure the proxies for high availability as needed.
In the diagram, Smart Analytics uses four proxies to organize its contents: one main proxy and three level 2 proxies under the main proxy.
Install and configure main proxy
- Install the main proxy by running the Smart Analytics installer.
- Select Advanced Install.
- From the Install Template drop-down list, select Customize.
- Select the Proxy Server Components check box with the other check boxes unchecked.
- Follow the on-screen instructions to finish the install.
-
Once the installation is complete, modify the .\IDOL\IDOLServer.cfg file so that main proxy locates its three level 2 proxy servers, as shown below:
Main proxy setting:
……
[DistributionIDOLServers]
Number=3

[IDOLServer0]
Name=SmartSearch
Host=Host2
Port=20100
DistributeByFieldsValues=GlobalSearch

[IDOLServer1]
Name=Content1
Host=Host3
Port=20200
DistributeByFieldsValues=CONTENT1

[IDOLServer2]
Name=Content-Propel
Host=Host4
Port=20300
DistributeByFieldsValues=PROPEL
……
Install and configure the three Level 2 proxies: Smart search proxy, HTA proxy and Propel proxy
-
From the Main proxy installation location, copy the level2proxy folder to each of the three locations where you plan to set up the level 2 proxies. The three level 2 proxies can use the same or different hosts.
Note Copy the “level2proxy” folder to two other locations if you plan to use the original “level2proxy” as one of the three level 2 proxies.
-
Modify the corresponding configuration files of the level 2 proxies, as shown below:
-
Smart search proxy:
Modify the < Smart Search Proxy directory>\IDOLServer.cfg file so that the proxy locates its four content servers and arranges them as two groups with non-mirror mode, as shown below
Smart Search Proxy setting:
……
[DistributionSettings]
mirrormode=false
//DistributeOnBatch=true //To send documents in batches
//DIH settings:
DistributeByReference=true
UseConsistentHashing=true
//DAH setting:
SimpleCombinatorMode=true
DistributionMethod=0

[ConsistentHashing]
//number of virtual nodes
VirtualNodes=4096
//The number of copies (that is, the value of Replicas plus one) must be smaller than number of DistributionIDOLServers.
Replicas=0

//This section is equivalent to the [engines] section in the DAH and DIH standalone configuration
[DistributionIDOLServers]
Number=2

[IDOLServer0]
Host=Host5,Host6
Port=30110,30120
……
[IDOLServer1]
Host=Host7,Host8
Port=30210,30220
……
-
HTA proxy:
Modify the <HTA proxy directory>\IDOLServer.cfg file so that the proxy locates its two content server as mirror mode, as shown below:
HTA proxy setting:
……
[DistributionSettings]
mirrormode=true
//DistributeOnBatch=true //To send documents in batches
//DIH settings:
//DistributeByReference=true
//UseConsistentHashing=true
//DAH setting:
//SimpleCombinatorMode=true
DistributionMethod=0

//[ConsistentHashing]
//number of virtual nodes
//VirtualNodes=4096
//The number of copies (that is, the value of Replicas plus one) must be smaller than number of DistributionIDOLServers.
//Replicas=0

//This section is equivalent to the [engines] section in the DAH and DIH standalone configuration
[DistributionIDOLServers]
Number=2

[IDOLServer0]
Host=Host9
Port=20210
……
[IDOLServer1]
Host=Host10
Port=20220
……
-
Propel proxy:
Modify the <Propel proxy directory>\IDOLServer.cfg file so that the proxy locates its two content server as mirror mode, as shown below:
Propel proxy setting:
……
[DistributionSettings]
mirrormode=true
//DistributeOnBatch=true //To send documents in batches
//DIH settings:
//DistributeByReference=true
//UseConsistentHashing=true
//DAH setting:
//SimpleCombinatorMode=true
DistributionMethod=0

//[ConsistentHashing]
//number of virtual nodes
//VirtualNodes=4096
//The number of copies (that is, the value of Replicas plus one) must be smaller than number of DistributionIDOLServers.
//Replicas=0

//This section is equivalent to the [engines] section in the DAH and DIH standalone configuration
[DistributionIDOLServers]
Number=2

[IDOLServer0]
Host=Host11
Port=20310
……
[IDOLServer1]
Host=Host12
Port=20320
……
-
-
Install and configure failover content servers by using the Smart Analytics installer or copying existing ones from the Smart Analytics installation, as described below:
Install four content servers for Smart Search on four machines by performing either of the following:
- On each of four machines, run the Smart Analytics installer and select Advanced Install. After that, from the Install Template drop-down list, select Distributed Content Server, and then select the Content Server check box.
- From the Smart Analytics installation directory, copy the Content2/Content3, modules and langfiles folders, as well as the synonym.txt file to each of the four machines. Then, re-modify the configuration files for all the four content servers by correcting the ports and the related file location paths of modules, langfiles and synonym.txt.
Install two content servers for HTA on two machines by performing either of the following:
- On each of four machines, run the Smart Analytics installer and select Advanced Install. After that, from the Install Template drop-down list, select Distributed Content Server, and then select the Content Server check box.
- From the Smart Analytics installation directory, copy the Content1, modules and langfiles folders, as well as the synonym.txt file to each of the two machines. Then, re-modify the configuration files for both content servers by correcting the ports and the related file location paths of modules, langfiles and synonym.txt.
Install two content servers for Service Manager Service Portal on two machines by performing either of the following:
- On each of two machines, run the Smart Analytics installer and select Advanced Install. After that, from the Install Template drop-down list, select Distributed Content Server, and then select the Content Server check box.
- From the Smart Analytics installation directory, copy the Content-SMSP, modules and langfiles folders, as well as the synonym.txt file to each of the two machines. Then, re-modify the configuration files for both content servers by correcting the ports and the related file location paths of modules, langfiles and synonym.txt.


