Searching the Help
To search for information in the Help, type a word or phrase in the Search box. When you enter a group of words, OR is inferred. You can use Boolean operators to refine your search.
Results returned are case insensitive. However, results ranking takes case into account and assigns higher scores to case matches. Therefore, a search for "cats" followed by a search for "Cats" would return the same number of Help topics, but the order in which the topics are listed would be different.
| Search for | Example | Results |
|---|---|---|
| A single word | cat
|
Topics that contain the word "cat". You will also find its grammatical variations, such as "cats". |
|
A phrase. You can specify that the search results contain a specific phrase. |
"cat food" (quotation marks) |
Topics that contain the literal phrase "cat food" and all its grammatical variations. Without the quotation marks, the query is equivalent to specifying an OR operator, which finds topics with one of the individual words instead of the phrase. |
| Search for | Operator | Example |
|---|---|---|
|
Two or more words in the same topic |
|
|
| Either word in a topic |
|
|
| Topics that do not contain a specific word or phrase |
|
|
| Topics that contain one string and do not contain another | ^ (caret) |
cat ^ mouse
|
| A combination of search types | ( ) parentheses |
|
- How to Add a CI Attribute to the Integration for Data Push
- How to Add the CI Attribute to the UCMDB Class Model
- How to Add the CI Attribute to the Query Layout
- How to Add the CI Attribute to the Service Manager Table
- How to Create a Web Service Field to Support the CI Attribute
- How to Add a Managed Field to Support the CI Attribute
- How to Map the CI Attribute to a Web Service Field
How to Add a CI Attribute to the Query Layout
To add a CI attribute to the integration, you must add this attribute to the layout setting from the query that synchronizes the CI type. You must know what CI type contains the CI attributes you want to add to the integration.
Keep a list of the attributes that you enable, because you will need to create a matching XSL transformation for each attribute you enable.
To add a CI attribute to the query layout:
- Log in to UCMDB as an administrator.
- Navigate to Modeling > Modeling Studio.
- For Resource Type, select Queries.
- From the Queries navigation tree, click Integration > SM Sync > 9.xx.
- Select the query that manages the CI type whose attributes you want to add to the integration. For example, SM Computer Push. UCMDB displays the TQL graph for the integration query.
- Select the node from the query layout that contains the CI attribute you want to add to the integration. For example, Root.
- Right-click the node and select Query Node Properties. The Query Node Properties window opens.
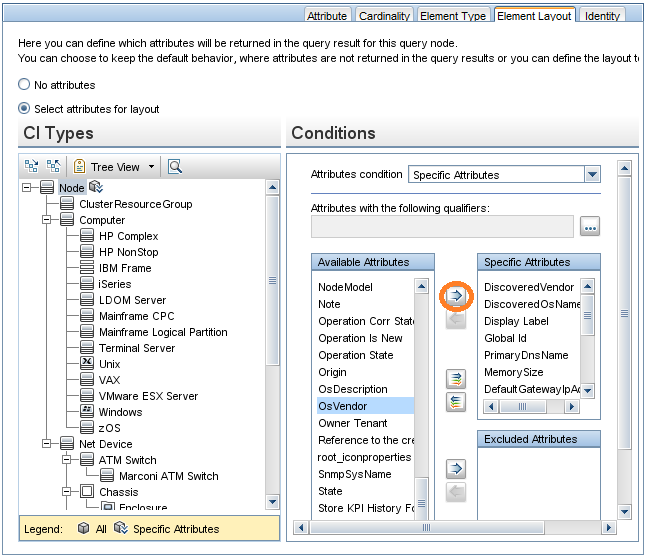
- Click Element layout tab. The Layout Settings tab opens.
- Select the CI attribute you want to include in the integration from the Available Attributes list, and click the Add button to add it to Specific Attributes list. For example, OsVendor.

- Click OK to save the node properties.
- Click the Save button
 to save the query.


