How to Create a Web Service Field to Support the CI Attribute
UCMDB uses the Service Manager ucmdbIntegration web service to send CI data. This web service publishes the objects that match the out-of-the-box CI types and CI attributes provided by the UCMDB-SM integration. For a list of the out-of-the-box web service fields and their mappings to Service Manager tables, see Managed Fields.
If you add a CI attribute to the integration on your UCMDB system, you must create a corresponding web service field on your Service Manager system to receive the incoming CI data from UCMDB. Each web service field must map to a valid Service Manager table and column.
To create a web service field for the OSVendor attribute described in previous sections:
- Log in to Service Manager with an administrator account.
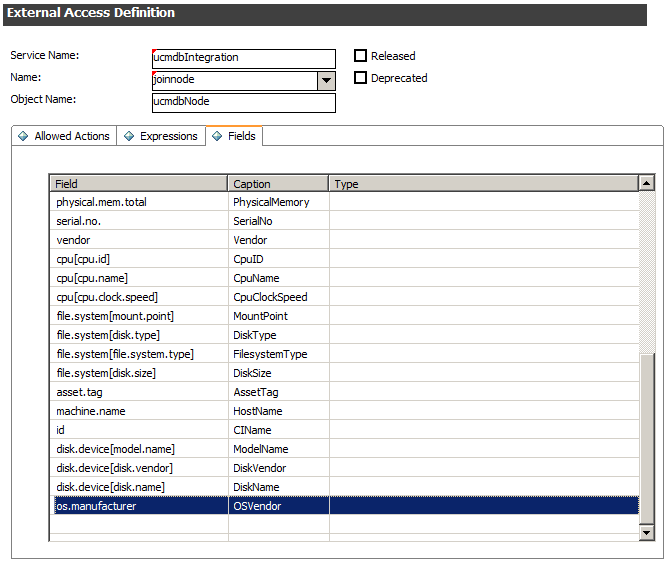
- Navigate to Tailoring > Web Services > WSDL Configuration. The External Access Definition form opens.
- For Service Name, type ucmdbIntegration.
- Click Search. Service Manager displays a record list of the objects that make up the ucmdbIntegration web service.
- Select an existing web service object to which you want to add the CI attribute. For example, select ucmdbNode.
- Click the Fields tab. Service Manager displays the fields published as web service fields.
- Select an empty row in the Fields list.
- For Field, select the Service Manager column name where you want to store the incoming CI attribute values. For example, os.manufacturer.
Note Service Manager displays the fields from all join tables associated with the table listed in the Name field. For example, for joinnode Service Manager displays the fields from the device and node tables.
- For Caption, type the name you want Service Manager to use when publishing the field as a web service field. For example, OSVendor.
Caution The Caption name must match the object name you listed in the XSL transformation file in Universal CMDB, or Service Manager will not receive any CI updates from your Universal CMDB system.
- Click Save.
The new web service field is available immediately; you do not need to restart the Service Manager system.