


Configure LDAP
Service Manager Service Portal has bundled Micro Focus Identity Manager (IdM) as an identity management tool, which must integrate with an Active Directory system for user authentication.
Important Service Manager Service Portal can use multiple LDAP directory services for user authentication, however, Service Manager supports only one LDAP directory service. Therefore, when using Service Manager Service Portal as a user portal, Service Manager and Service Manager Service Portal must share the same LDAP directory service.
Tip For more information on how to configure LDAP in Service Manager Service Portal, see the Service Manager Service Portal Admin Help.
Configure LDAP in Service Manager
For information on how to configure LDAP in Service Manager, see the Lightweight Directory Access Protocol (LDAP) section in the Service Manager Help Center and the Service Manager LDAP Best Practices Guide.
Configure LDAP in Service Manager Service Portal
To configure LDAP in Service Manager Service Portal, perform the following tasks.
Tip The following steps use an out-of-box organization named Consumer for example. You can create your own organization either by using the Add Organization button or updating an out-of-box one.
Task 1: Configure an LDAP server
To do this, follow these steps:
-
Log in to Service Manager Service Portal as the administrator, using the following URL and user account:
https://<SMSP host name>:9000/org/Provider (Use "admin" as the user and "propel" as the password.)
- Click Identity. The Organization List displays two out-of-box organizations: Consumer, and Provider.
-
Select Consumer.
- On the Authentication tab, click Add Configuration.
- Select the LDAP Configuration authentication type, and then click Create.
-
Configure the following settings.
LDAP Server Information
Item Description Example value Display Name The display name for the LDAP server. RC7 Hostname The fully-qualified LDAP server domain name (server.domain.com) or IP address.
10.255.255.255 Port The port used to connect to the LDAP server (by default, 389).
389 SSL Connection If the LDAP server is configured to require ldaps (LDAP over SSL), select the SSL Connection checkbox. Not selected Base DN Base distinguished name. The Base DN is the top level of the LDAP directory that is used as the basis of a search.
dc=maxcrc,dc=com User ID (Full DN) The fully distinguished name of any user with authentication rights to the LDAP server. If the LDAP server does not require a User ID or password for authentication, this value can be omitted.
cn=Manager,dc=maxcrc,dc=com Password Password of the User ID. If the LDAP server does not require a User ID or password for authentication, this value can be omitted.
Retype Password Retype the password of the User ID. LDAP Attributes
Item Description Example value Full Name The name of the LDAP attribute used to store the full name of the user. Often, this is cn or Display Name, but different LDAP directories may use different attributes. Contact your LDAP administrator to determine the proper Full Name.
Default: cn
cn User Email The name of the attribute of a user object that designates the email address of the user. The email address is used for notifications. If a value for this attribute does not exist for a user, the user does not receive email notifications.
Default: mail
mail Group Membership The name of the attribute(s) of a group object that identifies a user as belonging to the group. If multiple attributes convey group membership, the attribute names should be separated by a comma.
Default: member,uniqueMember
memberOf Manager Identifier The name of the attribute of a user object that identifies the manager of the user.
Default: manager
manager Manager Identifier Value The name of the attribute of a user object that describes the value of the Manager Identifier's attribute. For example, if the value of the Manager Identifier attribute is a distinguished name (such as cn=John Smith, ou=People, o=xyz.com) then the value of this field could be dn (distinguished name). Or, if the Manager Identifier is an email address (such as admin@xyz.com) then the value of this field could be email.
Default: dn
managedObjects User Avatar LDAP attribute whose value is the URL to a user avatar image that is displayed for the logged-in user. If no avatar is specified, a default avatar image is used.
Empty value User login Settings
Item Description Example value User Name Attributes The name of the attribute of a user object that contains the username that will be used to log in. The value for this field can be determined by looking at one or more user objects in the LDAP directory to determine which attribute consistently contains a unique user name. Often, you will want a User Name Attribute whose value in a user object is an email address.
Examples: userPrincipalName or sAMAccountName or uid
uid User Searchbase The location in the LDAP directory where users' records are located. This location should be specified relative to the Base DN. If users are not located in a common directory under the Base DN, leave this field blank.
Examples: cn=Users or ou=People
ou=Users User Search Filter Specifies the general form of the LDAP query used to identify users during login. It must include the pattern {0}, which represents the user name entered by the user when logging in. The filter is generally of the form {<attribute>= 0}, with<attribute> typically corresponding to the value entered for User Name Attribute.
Examples: userPrincipalName={0} or sAMAccountName={0} or uid={0}
uid={0} Search Option (Search Subtree) When a user logs in, the LDAP directory is queried to find the user's account. The Search Subtree setting controls the depth of the search under User Searchbase.
If you want to search for a matching user in the User Searchbase and all subtrees under the User Searchbase, make sure the Search Subtree checkbox is selected.
If you want to restrict the search for a matching user to only the User Searchbase, excluding any subtrees, unselect the Search Subtree checkbox.
Not selected - Save the configuration.
- Click Save.
Task 2: Create groups
There are three ways to create groups in Service Manager Service Portal: LDAP Representation, Database Representation, or Calculated Representation.
LDAP Representation
You are recommended to create groups in LDAP and then synchronize the groups to Service Manager Service Portal.
To synchronize a group from LDAP, follow these steps:
-
Log in to Service Manager Service Portal:
https://<SMSP host name>:9000/org/Provider (Use "admin" as the user and "propel" as the password.)
- Click Identity. The Organization List displays two out-of-box organizations: Consumer, and Provider.
- Select Consumer from the organization list.
- On the Groups tab, click Add Group.
-
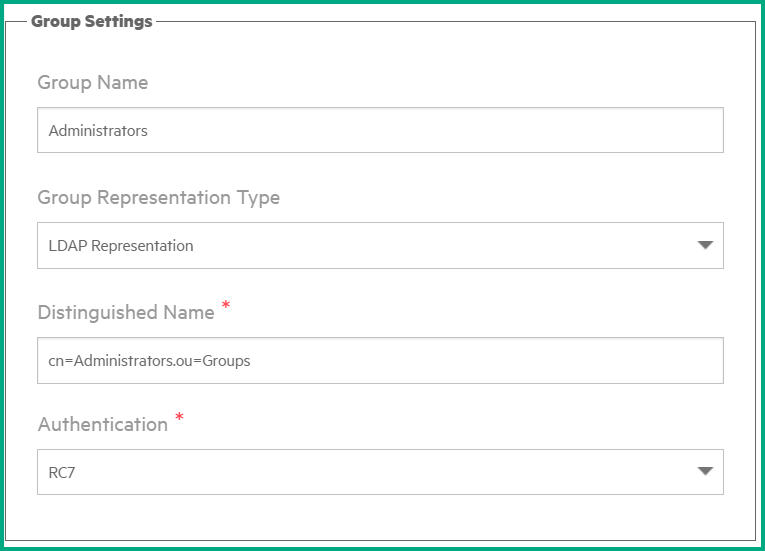
Enter the following information:
- Group Name: Enter a name for the LDAP group. It can be the same name as the group name in LDAP or a different one.
- Group Representation Type: Select LDAP Representation.
- Distinguished Name: Enter a value according to your LDAP data hierarchy. For example: cn=<Group Name in LDAP>.ou=Groups
- Authentication: Select the LDAP server you configured.
The following figure shows an example.
-
Click Save. The Group is added to the Groups tab.
- Repeat the steps for the rest of your LDAP groups.
Database Representation
If you have no groups created in LDAP and you want to manually create them in Service Manager Service Portal. follow these steps:
-
Log in to Service Manager Service Portal:
https://<SMSP host name>:9000/org/Provider (Use "admin" as the user and "propel" as the password.)
- Click Identity. The Organization List displays two out-of-box organizations: Consumer, and Provider.
- Select Consumer from the organization list.
- On the Groups tab, click Add Group.
-
Enter the following values:
- Group Name: enter a name. For example:
Administrators. - Group Representation Type: Select Database Representation.
- Associated Users: Leave this field empty, as there are no users available to add at this point.
- Group Name: enter a name. For example:
-
Click Save. The group is added to the Groups tab.
-
Repeat the steps to add more groups as needed.
Note Do not log out. Continue with associating the groups to user roles.
Calculated Representation
If you have no groups created in LDAP and you want to create groups in Service Manager Service Portal automatically based on specific criteria, follow these steps:
-
Log in to Service Manager Service Portal:
https://<SMSP host name>:9000/org/Provider (Use "admin" as the user and "propel" as the password.)
- Click Identity. The Organization List displays two out-of-box organizations: Consumer, and Provider.
- Select Consumer from the organization list.
- On the Groups tab, click Add Group.
-
Enter the following values:
- Group Name: enter a name. For example:
Administrators. - Group Representation Type: Select Calculated Representation
-
Reference User: Choose a user who logs into Service Portal previously or let it empty.
If a user is selected, User Profile Attributes will be displayed. Any of the attributes can be added to Calculation Criteria, and the Calculation Criteria can be edited.
-
Criteria: Specify one or multiple criteria to calculate the groups.
- Combining Criteria : "All Criteria Must Match" or " At least one criteria must match"
- Group Name: enter a name. For example:
-
Click Save. The group is added to the Groups tab.
-
Repeat the steps to add more groups as needed.
Note Do not log out. Continue with associating the groups to user roles.
Task 3: Associate groups to user roles
After the groups are created, associate the groups to user roles. To do this, follow these steps:
-
On the Consumer organization details page, click Permissions.
Note Service Manager Service Portal provides two out-of-box roles: Consumer, and Organization Administrator. You can create more roles if needed. For details, see the Service Manager Service Portal Admin Help.
- Determine the user role to which you want to associate the group. For example, you may want to associate the
Administratorsgroup you created to the Organization Administrator user role. - Click Add Group under the user role to which you want to associate the group.
-
Select the group and click Save. The group is associated to the user role.
Note Do not log out. Continue with adding the groups as impersonation groups.
Task 4: Add the groups as impersonation target groups
Members of a organization's group can request catalog items on behalf of members in a different group within the organization. This capability is called request on behalf (RoB). This task is needed to enable the RoB capability for the groups.
To do this, follow these steps:
- Click the Impersonation tab.
- Click Add Group.
- Select a group you created, and then click Save.
- Repeat the steps for the rest of the groups.
- Log out of Service Manager Service Portal.
Task 5 Create LDAP users in Service Manager Service Portal
Note An LDAP user is not created in Service Manager Service Portal until the user is logged in to Service Manager Service Portal. Once an LDAP user is created in Service Manager Service Portal, you are able to add the user to a group.
To do this, follow these steps:
-
Log in to Service Manager Service Portal with an LDAP user account:
https://<SMSP host name>:9000/org/Consumer
If you are successfully logged in, your LDAP configuration is working correctly.
- Log out of Service Manager Service Portal.
The user (falcon) is now created in Service Manager Service Portal. You can add it to a group now.
Task 6: Add LDAP users to each of the groups
Tip This task is not needed if you selected to synchronize groups from LDAP, because users are synchronized along with each group. If you selected "Database Representation" to create user groups, perform this step.
To do this, follow these steps:
-
Log in to Service Manager Service Portal:
https://<SMSP host name>:9000/org/Provider (Use "admin" as the user and "propel" as the password.)
-
Add LDAP users to each group.
To add LDAP user to a group, follow these steps:
- Click Identity. The Organization List displays two out-of-box organizations: Consumer, and Provider.
- Select Consumer from the organization list.
- On the Groups tab, select a group that you created, and then click the Edit icon.
- Click the Associated Users field, select a user (for example, falcon) from the list, and then click Add User. The LDAP user is added to the group.
- Repeat the steps to add more LDAP users to the group.
- Click Save.
Note Repeat the steps for the rest of the groups.
Tip Next, you need to add the RESTful API and SOAP API capabilities in Service Manager for users that need to connect to Service Manager from Service Manager Service Portal. For details, see Add the RESTful API and SOAP API capabilities for Service Manager users.


