


Enable Knowledge Management search
This section provides instructions for enabling Knowledge Management (KM) search in Service Manager Service Portal. Two different scenarios are covered based on which search engine is enabled in SM.
Scenario 1: Service Manager uses the SOLR search engine
This section provides instructions for setting up KM Solr Search Engine and installing the Solr plugin for IDOL search.
Task 1: Setting Up KM Solr Search Engine
Make sure that you complete the following tasks in SM to enable KM Solr search engine for KM:
-
Install KM Solr search engine. For detailed instructions, see Install and configure the Solr Search Engine.
-
Complete KM indexing.
The
KMUpdateprocess controls indexing. Use SM’s Update Indexes form to stop and restart indexing, and to view the status statistics related to indexing. To access this form, from the Service Manager navigator menu, select Knowledge Management > Configuration > Update Indexes.For help with indexing, see the topic "indexing the knowledgebases" in Service Manager Help Center.
Tip To quickly verify thatKMUpdateis running, typestatusin the Command window to display all processes currently running.
Task 2: Configuring Steps – After Service Manager Service Portal Installation
Perform the following steps to configure KM after the Service Manager Service Portal installation.
-
On the Service Manager Service Portal VM, stop the Micro Focus SX UI service:
# systemctl stop sx-client-ui -
Add the following lines to the SM's
sm.cfgfile. This configuration avoids using web services over the SM LoadBalancer port, which is often port 13080:# Propel: port used by Catalog Aggregation and Catalog microservices
sm -httpPort:21090 -httpsPort:21493 –debugnode
–log:../logs/sm-propel-2.20.log –sslConnector:1 ssl:0This configuration allows connecting either with SSL (port 21493) or without SSL (port 21090).
- Service Manager Service Portal integration with SM’s KM module will use both the KM Search Engine and an SM integration servlet to gather the documents and related attachments. Determine which port the master KM Search Engine uses as follows: from the SM navigator menu, select Knowledge Management > Configuration > Configure Search Servers, then click Search. By default, this will be port 8080.
-
On the Service Manager Service Portal VM, modify the
/opt/hp/propel/sxClientUI/app.jsonfile. The following partial example shows modifications to theknowledgesection:}, "knowledge": {
"mount": "/api/km",
"kmUrl": "http://SM_Solr_Server:8380",
"kmContextPath": "/KMCores",
"kmStrictSSL": true,
"kmSecureProtocol": "TLSv1_method",
"kmCa": "/opt/hp/propel/security/CA.crt",
"kmAttachUrl": "https://SM_SERVER:21493",
"kmAttachContextPath": "/SM/9/rest",
"kmAttachStrictSSL": false,
"kmAttachSecureProtocol": "TLSv1_method",
"kmAttachCa": "/opt/hp/propel/security/CA.crt",
"kmAttachUsername": "falcon",
"kmAttachPassword": "",
},Where
SM_SERVERis the fully qualified hostname of the SM server. Other considerations for configuring theknowledgesection are:- The
KMUrlproperty contains the host and port of the SM SOLR server. The default SM SOLR port is 8380, but the port number can vary. - The
kmAttachUrlproperty can also use port 21090, but thenhttpsshould be changed tohttp. - The default value for the
kmAttachStrictSSLproperty istrue, but this needs to be set tofalsein case self-signed SSL certificates are used. - The
kmAttachUsernameproperty contains the SM integration account. This can be a clone of thefalconSM user.
- The
- Load the Service Manager Service Portal VM's CA-signed certificate into the SM system’s keystore. The general steps to do this are:
- Copy the Service Manager Service Portal VM’s
/opt/hp/propel/security/CA.crtfile to the SM system’s/tmpdirectory. On the SM system, import the Service Manager Service Portal CA-signed certificate:
# keytool –import –file /tmp/CA.crt –alias Propel_CA –trustcacerts –keystore <SM-KEYSTORE-PATH>/cacertsWhere
SM-KEYSTORE-PATHis the location of thecacertsfile on the SM system.On the SM system, restart SM:
# service sm restart
- Copy the Service Manager Service Portal VM’s
- Load the SM system’s CA-signed certificate into the Service Manager Service Portal VM’s keystore. The general steps to do this are:
- Copy the SM system’s
CA.crtfile to the Service Manager Service Portal VM’s/tmpdirectory. On the Service Manager Service Portal VM, import the SM CA-signed certificate:
# keytool –import –file /tmp/CA.crt –alias SM_CA –trustcacerts –keystore /usr/lib/jvm/java-1.8.0/jre/lib/security/cacertsOn the Service Manager Service Portal VM, start the Micro Focus SX UI service:
# systemctl restart sx-client-ui
- Copy the SM system’s
Task 3: Solr Plugin Installation and Configuration
To configure SM and KM to work with Service Manager Service Portal Search, you must install the Solr plugin and configure it to send changes to Service Manager Service Portal Search.
SM indexes KM articles to Solr. Service Manager Service Portal has a plugin to Solr, so all articles written to Solr are sent to Service Manager Service Portal, which indexes it to IDOL.
Solr Plugin Installation Steps
- On the Service Manager Service Portal VM, copy the
/opt/hp/propel/search/propel-solr-plugin.zipfile to the SM/KM machine. - Unzip the
propel-solr-plugin.zipfile. The contents are:
jackson-mapper-asl-1.9.13.jar
jackson-core-asl-1.9.13.jar
jasypt-1.9.2.jar
KMExtAccess.unl
propel-solr-plugin-1.2.0.jar - Copy the
.jarfiles to your primary search server. That is, copypropel-solr-plugin-1.2.0.jar,jackson-mapper-asl-1.9.13.jar,jackson-core-asl-1.9.13.jar, andjasypt-1.9.2.jarto<Primary_Search_Server>\Search_Engine\tomcat\webapps\KMCores\WEB-INF\lib\. -
Edit the
<Primary_Search_Server_Home>\Service Manager9.xx\Search_Engine\kmsearchengine\KMCores\kmcore\conf\solrconfig.xmlfile to add anupdateRequestProcessorChain:Add
updateRequestProcessorChaintosolrconfig.xmlFile Example<updateRequestProcessorChain name="propelSearch" default="true">
<processor class="com.hp.propel.solr.plugin.PropelPushUpdateFactory">
<str name="baseUrl">https://{Hostname:Port}/api/search/v1/article</str>
<str name="username">searchTransportUser</str>
<str name="password">{Password}</str>
<str name="tenant">Provider</str>
</processor>
<processor class="solr.RunUpdateProcessorFactory"/>
</updateRequestProcessorChain>Where:
Hostnameis the hostname of the Service Manager Service Portal server.-
Portis the port defined for thesearch.endpointparameter in the/opt/hp/propel-install/setup.propertiesfile on the Service Manager Service Portal server. The port number is visible in the Service Manager Service Portal Search services/opt/hp/propel/search/search.ymlconfiguration file, and is 9040 by default.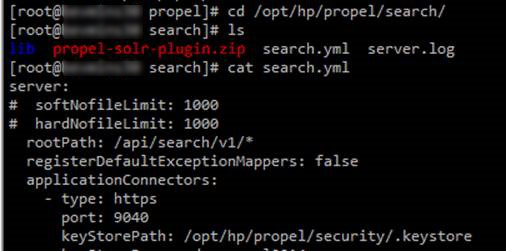
Passwordis the password forsearchTransportUser. (The default password issearchTransportUser.
-
Update the same
solrconfig.xmland modify therequestHandler.Modify
requestHandlerinsolrconfig.xmlFile Example<requestHandler name="/update" class="solr.XmlUpdateRequestHandler">
<lst name="defaults">
<str name="update.processor">propelSearch</str>
</lst>
</requestHandler>Example content for steps 4 and 5 (compared with an out-of-the-box
solrconfig.xmlfile):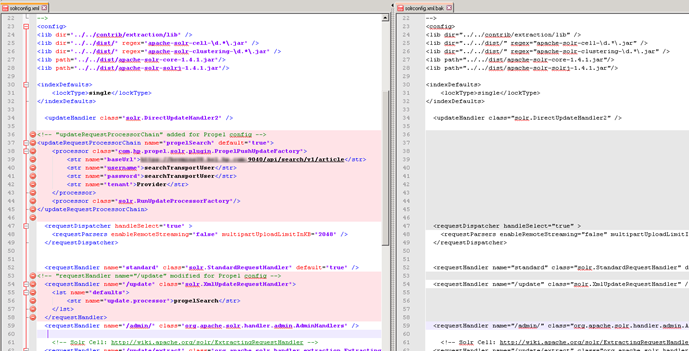
- Restart KM.
- Restart SM.
- In the SM client, reindex KM.
- Select Knowledge Management -> Administration -> Environment.
- Check SRC.
- Select the Search Server Name.
Click Full Reindex.
- In the SM client, reindex the KM Libraries:
- Select Knowledge Management -> Knowledgebases.
Click on each of the libraries, and then click Full Reindex.
Scenario 2: Service Manager uses Smart Analytics as the search engine
This section provides instructions for enabling KM search in Service Manager Service Portall when Smart Analytics is enabled in SM.
Task 1: Setting up Smart Analytics in SM
Make sure that you complete the following tasks in SM to enable Smart Search for KM:
- Install Smart Analytics for SMSP successfully. For instructions, see Set up Smart Analytics for Service Manager Service Portal.
- Enable Smart Analytics.
- Configure Smart Search and complete a full indexing.
Tip For more information, see Install and configure Smart Analytics.
Once you finish the full indexing in SM and SM can search from knowledge library by using Smart Search, go to the next task to set the “smaEnabled” flag in Service Manager Service Portal.
Task 2: Configuring Service Manager Service Portal
To configure Service Manager Service Portal to use Smart Analytics as the search engine, follow these steps:
- Go to the VM that installs the search and sxClientUI services.
- Stop the search and sxClientUI services.
-
Open and edit the /opt/hp/propel/search/search.yml file:
-
Set the "smaEnabled" parameter to "true" as shown in the following example:
idol:
...
smaEnabled: true
...
-
For each IDOL component, change the hostname value to the address of the single IDOL server (Smart Analytics) and update the port accordingly:
query:
    hostname: localhost
    port: 14000

index:
    hostname: localhost
    port: 14001
    queryPort: 14000

attach:
    hostname: localhost
    port: 7000

qms:
    hostname: localhost
    port: 16000

agentStore:
    hostname: localhost
    port: 14051
    queryPort: 14050
Refer to the following table to locate the port number for each component in Smart Analytics.
Component Where to locate the port number query Location: <Smart Analytics installation>/IDOL/IDOLServer.cfg
[Server]
//SecurityDebugLogging=true
Port=9000
IndexPort=9001
index Location: <Smart Analytics installation>/IDOL/IDOLServer.cfg
[Server]
//SecurityDebugLogging=true
Port=9000
IndexPort=9001
Note The
Serversection does not have aQueryPortvalue. When updating thequeryPortvalue for theindexsection in the search.yml file, use thePortvalue.attach Location: <Smart Analytics installation>/CFS/CFS.cfg
[Server]
Port=7000
QueryClients=*,,127.0.0.1,::1
AdminClients=*,,127.0.0.1,::1
qms Location: <Smart Analytics installation>/QMS/QMS.cfg
[Server]
Port=16000
AdminClients=*,127.0.0.1,::1
QueryClients=*,127.0.0.1,::1
agentStore
Location: <Smart Analytics installation>/IDOL/agentstore/portinfo.dat
[Ports]
ACIPort=9050
IndexPort=9051
QueryPort=9052
ServicePort=9053
Note When updating the
queryPortvalue for theagentStoresection in the search.yml file, use theACIPortvalue.
-
- Start the "search" service.
-
Edit the /opt/hp/propel/sxClientUI/app.json file.
-
Add the smaEnabled flag and configure kmAttachUrl as highlighted in the following example.
"knowledge": { "mount": "/api/km", "smaEnabled": true, "kmAttachUrl": "https://SM_SERVER: 13080", -
Set the SM user (user name and password) with the RESTful API capability in /opt/hp/propel/sxClientUI/app.json.
The user configured for kmAttachUsername (such as "falcon" in the following example) should have the RESTful API capability added in SM. By doing so, users can drill down to the km article detail page and to the km attachment.
In addition, if "kmUseIntegrationAccount" is set to "true," when the "Vote" or "Add comment" action is triggered in the KM module, a license of the user account specified by "kmAttachUsername" is consumed. If "kmUseIntegrationAccount" is set to "false," when the "Vote" or "Add comment" action is triggered in the KM module, a license of the currently logged-in user account is consumed. By default, "kmUseIntegrationAccount" is set to "False."
"knowledge": {
"mount": "/api/km",
"smaEnabled": true,
"kmUrl":"",
"kmContextPath": "/KMCores",
"kmStrictSSL": true,
"kmSecureProtocol": "TLSv1_method",
"kmCa": "/opt/hp/propel/security/CA.crt",
"kmAttachUrl": "https://SM_SERVER: 13080",
"kmAttachContextPath": "/SM/9/rest",
"kmAttachStrictSSL": true,
"kmAttachSecureProtocol": "TLSv1_method",
"kmAttachCa": "/opt/hp/propel/security/CA.crt",
"kmUseIntegrationAccount": true,
"kmAttachUsername": "falcon",
"kmAttachPassword": ""
},
-
- Start the “sx-client-ui" service.
Note In Service Manager Service Portal, users can only search for externally published KM documents. In addiction, as currently Service Manager Service Portal does not support permission control for document search, every user can search out all the externally published KM documents.


