


Configure HTTP Connector
To configure the HTTP Connector, follow these steps:
-
Make sure that the httpconnector component was included when Smart Analytics was installed.
Note You can install httpconnector either along with other components by using the All in One install template or install the connector separately by using the Customize install template through advanced installation. For more details, see section of Advanced Installation in Install Smart Analytics
-
Go to <Smart Analytics Installation>/HTTPConnector, locate the
httpconnector.cfgfile, and then configure the[FetchTasks]and[MYSITE]sections as needed.Sample code for one task:
[FetchTasks]
Number=1
0=MYSITE

[MYSITE]
URL=http://MYSITE.com
DIRECTORY=HTTPconnector
CantHaveCSVs=*.css,*.js
CantHaveCheck=1
//StayOnSite=True
//Depth=99
ProxyHost=<ProxyHost>
ProxyPort=8080
//FOLLOWROBOTPROTOCAL=FALSE
//----Login with form----
//LOGINMETHOD=FORMPOST
//LOGINURL=https://login.com/
//LOGINUSERFIELD=os_username
//LOGINUSERVALUE=USERNAME@EXAMPLE.COM
//LGOINPASSFIELD=os_password
//LOGINPASSVALUE=PASSWORD_ENCRYPTED
//LoginSubmitField=ButtonID
//----HTTP digest authentication----
//DigestUsername=USERNAME
//DigestPassword=PASSWORD_ENCRYPTED
//----NTLM authentication----
//NTLMUsername=USERNAME
//NTLMPassword=PASSWORD
Sample screenshot for one task:

To configure multiple tasks, for example, two tasks, configure the .cfg file as follows:
[FetchTasks]
Number=2
0=MYSITE1
1=MYSITE2
[MYSITE1]
...
[MYSITE2]
...
Sample screenshot for multiple tasks:

The following table describes the parameters of the
[MYSITE]section in the httpconnector.cfg file. If you want to configure multiple tasks for one connector, you just need to copy the content in the[MYSITE]section and rename the section.Parameter Description URL=http://MYSITE.COMUse this parameter to specify the root URL of the website for web crawling. DIRECTORY=MYSITESpecify the file location to save the crawling pages. CantHaveCSVs=*.css,*.jsSpecify the file types which are excluded from search resources. In this example, the .css and .js files are excluded. CantHaveCheck=1Specify that the value specified in the
CantHaveCSVsparameter must be excluded from the URL.//StayOnSite=FalseThe web crawling does not stay on the current site and will follow the links that leave the current page. //Depth=99Specify the maximum depth to which the connector can follow links during web crawling.
In this example, this parameter is commented, which means it uses the default value (3).
//ProxyHost=PROXY.COMSpecify the proxy URL. //ProxyPort=80Specify the proxy port. //FOLLOWROBOTPROTOCOL=FALSESpecify whether the HTTP connector follows the protocol of the website. Most websites have a robot protocol to claim which page can be fetched by the spider. If you enable this parameter, the HTTP connector will not follow the protocol. //----Login with form----Uncomment the content under this section if you use a login form to log in to your websites. //LOGINMETHOD=FORMPOSTSpecify that the website requires you to enter information such as the user name and password, and the form uses the POST method to send this information to the site's server. //LOGINURL=https://login.com/Specify the login URL. //LOGINUSERFIELD=os_usernameSpecify the ID of the field in which you enter your username. You can get the ID by viewing the source of the web page. //LOGINUSERVALUE=USERNAME@COMPANY.COMSpecify the user name. //LOGINPASSFIELD=os_passwordSpecify the ID of the field in which you enter your password. //LOGINPASSVALUE=PASSWORD_ENCRYPTEDSpecify your password. //LoginSubmitField=ButtonIDSpecify the ID of the button you click to log in to your website //----HTTP digest authentication----Uncomment the content under this section if you use an HTTP digest authentication to log in to your website. //DigestUsername=USERNAMESpecify the user name for HTTP digest authentication. //DigestPassword=PASSWORD_ENCRYPTEDSpecify the password for HTTP digest authentication. //----NTLM authentication----Uncomment the content under this section if you use NTLM authentication to log in to your web page. //NTLMUsername=USERNAMESpecify the user name for NTLM authentication. //NTLMPassword=PASSWORDSpecify the password for NTLM authentication. - Restart the Smart Analytics HTTP Connector service.
- Log on to Service Manager, and then click System Administration > Ongoing Maintenance > Smart Analytics > Smart Search. The Smart Search configuration page appears.
- Click the Connector Configuration link to open the connector configuration page.
-
From the HTTP Connector tab, a list of all connector URLs and their status is provided. You can perform the following actions:
-
Add an HTTP connector: Type a new HTTP connector URL here, for example, http://192.168.255.255:5678/. You can click Test connection to test the URL connection status, and click Add to add this URL to the current list.

Note
- The “/” at the end of the URL is mandatory.
- Make sure the status for SharePoint is online.
-
To get the URL information for the HTTP connector you have configured, check the following configuration file:
<Smart Analytics Installation>/HTTPConnector/httpconnector.cfg
- Delete: Select an HTTP connector URL, and then click this button to delete it from the list.
- Refresh Status: Click to refresh the status of the URL list.
-
-
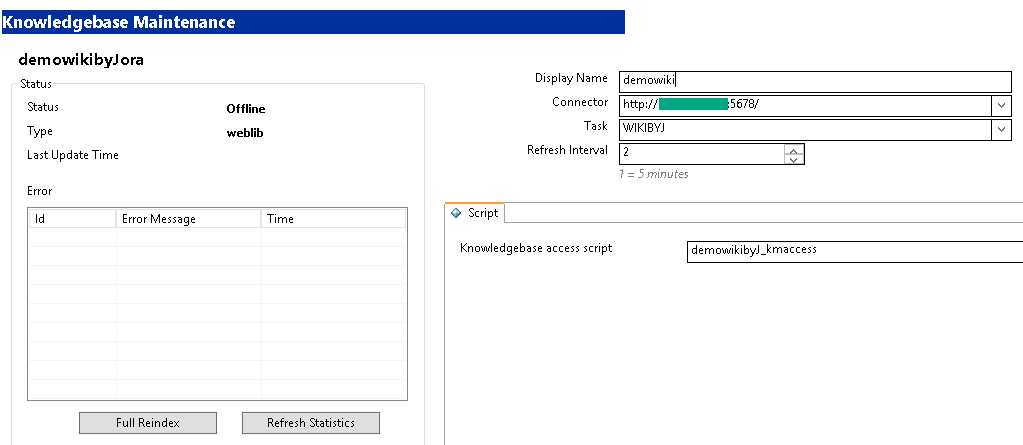
Do the following to add a weblib library for the http connector:
- Go to Smart Search Configuration page.
- Specify Knowledgebase Name
- Select weblib for Type,
-
Click Add. The Knowledgebase Maintenance page opens.

- Specify Connector and Task.
- Click Save.
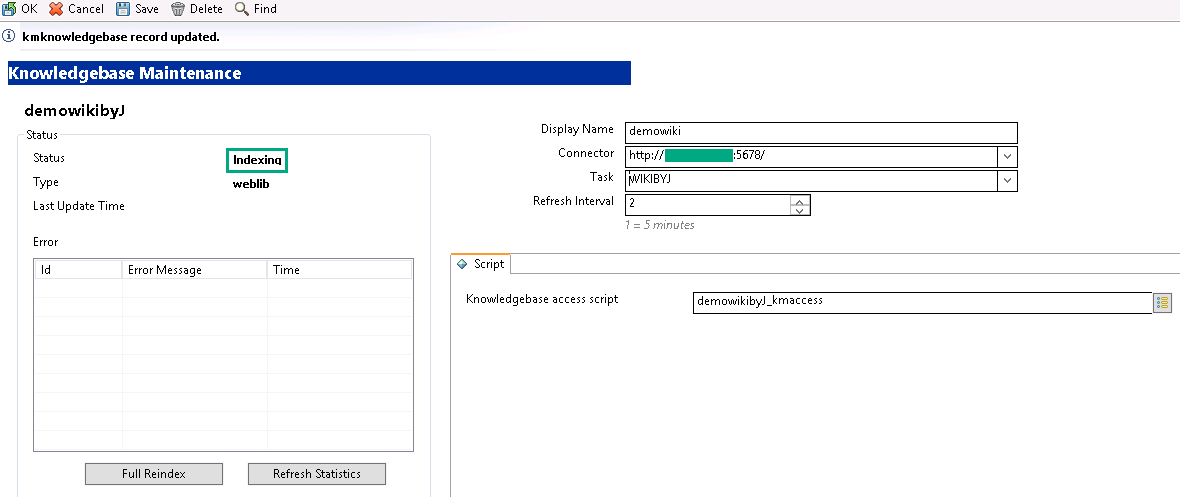
-
Click Full Reindex and Refresh Status.

-
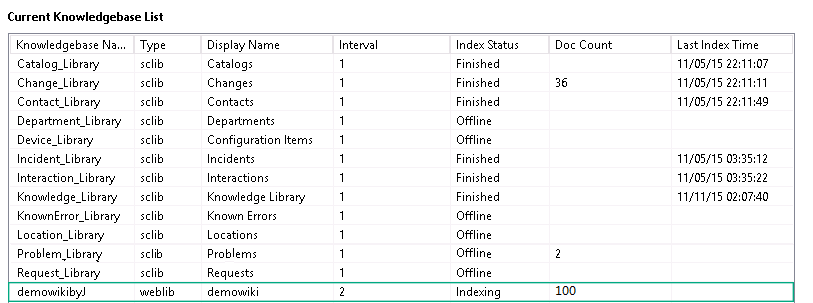
You can perform the search when the status changes to Indexing and Doc Count for this library is greater than 1.
Note Log off and then log back on to your Service Manager if you can not find weblib library in your Smart Search library list.


