


Configure Oracle Connector
To install and configure the Oracle Connector, follow these steps:
- Stop Service Manager and Smart Analytics.
-
Follow these steps to install the Oracle Client:
Note
- This step uses the Linux operating system as an example.
- To retrieve information from an Oracle database, you must install Oracle Client version 11 on the same computer where the IDOL Oracle connector is installed. The connector can use the Oracle Client version 11 libraries to retrieve information form Oracle Database version 9, 10, or 11.
-
Log on to the Linux server where Smart Analytics is installed.
-
Download the Oracle Client 11.1.0.7.0 (64-bit) zip file for Linux from the following Oracle website:
http://www.oracle.com/technetwork/topics/linuxsoft-082809.html
You can only use this Oracle Client version for the IDOL Oracle Connector.
-
Unzip instantclient-basic-linux-11.1.0.7.0.zip and instantclient-sqlplus-linux-11.1.0.7.0.zip into the same directory. For example,
../OracleClient/. -
Navigate to
../OracleClient/instantclient_11_1/, and then create thenetwork/admin directory. Copy the tnsnames.ora file from Oracle database to../OracleClient/instantclient_11_1/network/admin/. -
Configure the environment variables for the Oracle client.
For example, modify
/etc/profileas follows if you are using CentOS, and then run the source /etc/profile command.export ORACLE_HOME=/root/OracleClient/instantclient_11_1 export LD_LIBRARY_PATH=LD_LIBRARY_PATH:$ORACLE_HOME export PATH=$PATH:${K8S_HOME}/bin:$ORACLE_HOME -
Check LD_LIBRARY_PATH by running the echo $LD_LIBRARY_PATH command. The output is
/root /OracleClient/instantclient_11_1. -
Verify the Oracle Client installation.
For example, the following screenshot illustrates a successful Oracle Client installation:

-
Install the IDOL Oracle Connector.
Note This step uses the Linux operating system as an example.
- Log on to the Linux server where Smart Analytics is installed.
-
Refer to Install Smart Analytics on Linux to install the Oracle connector. Make sure that you select Advanced install as your installation type, and then select Oracle Connector in the Choose Distributed Components step.
-
Navigate to the
../OracleConnectordirectory, and then open the OracleConnector.cfg file. You can update theConnectionStringvalue as necessary. For more information, refer to the Documentation.zip file in the Oracle Connector installation directory. -
Update the SQL query according to your requirements.
-
You also can add a task for another query. Refer to the following sample codes:
Number=2
0=mytask
1=mytask1

[mytask1]
IngestActions=LUA:okmparse.lua
ConnectionString = username/passwords@net_service_name
#used your own Oracle username,passwords and net_service_name.
SQL=select field_names from table_name
PrimaryKeys=PK_field
Template=template.tmpl
SubTables= sub_table
[sub_table]
Template=sub.tmpl
SQL=sub_query
-
Start the IDOL Oracle Connector.
Note This step uses the Linux operating system as an example.
- Start Service Manager and Smart Analytics.
-
Navigate to the
../OracleConnectorCFSdirectory, and then run the StartOracleConnector.sh command. The OracleConnectorCFS is started.
- Configure the IDOL Oracle Connector.
Log on to Service Manager as a system administrator, and then click System Administration > Ongoing Maintenance > Smart Analytics > Smart Search. The Smart Search configuration page appears.
Click the Connector Configuration link to open the connector configuration page.
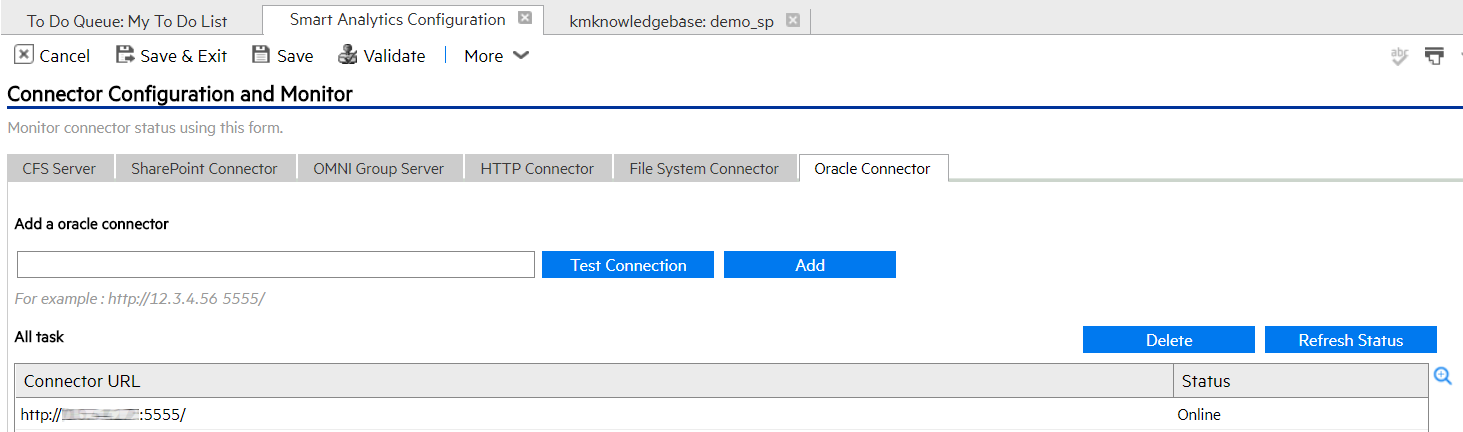
Go to the Oracle Connector tab, type a configured Oracle connector URL in the Add an Oracle connector field. For example, http://<hostname.domain>:5555/. You can click Test connection to test the URL connection status, and then click Add to add this URL to the current list. Note that the connector's status must be Online.
Sample screenshot:
-
Do the following to add an okmlib library for the Oracle connector:
-
Go to the Smart Search Configuration page.
-
Specify the Knowledgebase Name.
-
Select okmlib for Type.
-
Click Add. The Knowledgebase Maintenance page opens.
-
Specify Connector URL, Task, and Refresh Interval.

- Click Save.
-
-
(Optional) Modify the Knowledgebase access script if you want to further control access permissions to this Oracle knowledge base.
For example, you can add the following codes to prevent the ESS users from accessing the okm_test1 library:
if (system.functions.nullsub(vars.$G_ess,false)) return false; else return true; -
Modify the Knowledgebase feature script to further configure the current Oracle knowledge base.
-
The
Oracle KM view base urlis the base URL for the article page in the Oracle KM system. For example: https://<FQDN>/infocenter/index. You can configure the Oracle KM application base URL in thegetOKMViewUrlfunction. -
You can configure the Lua script in the
getOKMParseScriptNamefunction. For more information about how to apply the Lua script to manipulate documents, refer to the Documentation.zip file in the Oracle Connector installation directory.
-
-
Click Full Reindex and Refresh Status.


