


Edit Business Process
Concepts
Business processes tailor the approval policies to business needs. A business process along with its parameters make an approval policy. The system provides the following out-of-the-box business process definitions:
- Simple Manager Approval — A simple approval process that requires manager approval.
- Simple External Approval — An external approval process that is controlled in an Service Manager Service Portal supplier. This process requires a supplier with external approval support.
- Manager Approval with Reminder — An approval process that requires manager approval and has a reminder email sent periodically to the approver.
- Conditional Approval — A more complex approval process with the usage of a condition.
- Parametrized Conditional Approval — A complex approval process similar to conditional approval. The start activity has a price property in the form to avoid hard-coding a price in the process.
- Advanced Approval — A more complex approval process with the usage of a sub-process, timer, and conditions.
Note It is highly recommended that you immediately clone the Service Manager Service Portal out-of-the-box business process definitions to new names and only edit those copies.
The Organization Administrator can edit existing business process definitions or define new business processes.
Strategy
As a strategy, first see whether the Service Manager Service Portal provided business processes meet your needs; setting parameter values is a simple way to customize the business processes.
If the Service Manager Service Portal provided business process definitions do not meet your needs, it is recommended to make a copy of the business process definition that is closest to your use case and modify it.
As a last resort, create a new business process definition using the provided example business process logic to design your own business process definition.
Note It is recommended that you edit an existing business process definition rather than create a new business process definition.
Structure of a Process
A business process is defined as a sequence of activities that carry out work. A process is depicted as a graph of flow elements—activities, events, gateways, and sequence flows—that describe the execution.
A valid process begins with a start event and ends with an end event. It contains one or more activities (tasks)—Named approval, User context approval, Script task, and so on—that are connected by flow sequence arrows. Tasks are where the work gets done, either manually (such as calling a customer or filling in a form) or automatically (via script). Gateways also direct the flow within the process.
A results variable carries status information throughout the business process execution. Generally the results variable is named approved. Its value is set to true (approved) or false (denied). The business process execution varies depending on its value. For example, the approval tasks are not executed if the results variable is already set to false.
Processes become more complex with the following:
- Branching the flow based on specified conditions
- Using different combinations of approval tasks
- Adding automated JavaScript tasks
- Defining sub processes
- Adding timers to exit or repeat events
For a business process definition to be valid and supported by Service Manager Service Portal, its tasks and sequence flows must be connected at both ends—must have at least one input and one output—except for Start and End tasks that only have a single output or input.
Execution of Approval Tasks: During business process execution, Approval tasks—Named approval, User context approval, and Group approval—are skipped if the Approved result variable is already set to false by some preceding activity or script task. It is assumed the result is already decided, therefore the activity is skipped. This simplifies the approval processes by avoiding an exclusive gateway after each approval activity.
Once a business process is defined, multiple instances of the process can be run in Service Manager Service Portal.
Tasks
Edit a Business Process
To edit a business process definition:
- From the Launchpad, click the Business Processes application. The Business Processes view is displayed.
-
Click the vertical ellipses
 next to the business process that you want to edit and select Open in editor. The Process Editor opens.
Note You can also access the Process Editor from the Process Detail view. Click the business process that you want to edit to open the Process Detail view. Click the vertical ellipses
and then select Open in editor. - Make the desired changes to the business process definition (see Use the Service Manager Service Portal Process Editor for instructions).
-
Click
 to save your changes. Update the model Name and Description. Click the Save and close editor button to save the model and return to the Business Processes view.
Note Saving as a new name replaces the name of the original business process. To retain the original business process, first clone the original business process and then edit the copy. (See Clone Business Process for instructions.)
If you are customizing an Service Manager Service Portal provided business process, clone it as a unique name rather than overwriting the Service Manager Service Portal provided business process and then edit the copy.
Use the Service Manager Service Portal Process Editor
The Process Editor is a powerful tool used to define and edit business process definitions.
Note You open the Process Editor when editing an existing business process (here), cloning an existing business process (see Clone Business Process), or creating a new business process (see Create Business Process).
To use the Process Editor:
-
Understand the layout of the Process Editor.
Process Editor Layout Area Description Process design area
The main editing area that displays the current business process definition.
Process elements area
The area (on the left side) that contains design elements that can be added to the business process definition. Each category can be expanded to display all elements within the category. Elements can be dragged and dropped into the Process design area. Refer to Elements in the Process Elements Area for instructions to use the elements.
Process element options icons
The icons that pop up in the Process design area when an element is selected. The icon tools edit the element or add the next element to the business process definition. Refer to Process Element Options Icons for instructions to use the icons. Process toolbar area
The toolbar (at the top) with icons for the editing tools. Refer to Tools in the Process Toolbar Area for instructions to use the tools.
Process task parameter area
The area (at the bottom) that provides details, such as parameter values, for the overall business process or for the selected element. Refer to Parameters in the Process Task Parameter Area for instructions to set and use the parameters.
-
Walk through the steps to create a simple business process definition using the Process Editor.
These instructions walk you through the basic mechanics of using the Process Editor to create a simple business process definition. The steps are explained at a high level; detailed instructions and definitions follow.
- Follow the instructions in Create Business Process. The Process Editor opens with a blank Process design area.
- In the Process elements area, expand Start Events, and then drag and drop Start event to the Process design area.
- With the Start event selected in the Process design area, click the Exclusive gateway icon from the Process element options icons. You now see two elements connected by a Sequence flow arrow.
- With the Exclusive gateway selected in the Process design area, click the Named approval icon from the Process element options icons.
- With the Named approval task selected in the Process design area, click the Set approval result icon from the Process element options icons. Note that every business process definition must include the Set approval result task before it ends.
- With the Set approval result task selected in the Process design area, click the End event icon from the Process element options icons. You now see five elements connected by Sequence flow arrows.
-
You notice that the Exclusive gateway in the sequence should have another output. In the Process elements area, expand Activities, and then drag and drop User context approval to the Process design area below the existing sequence.
To connect the Exclusive gateway to the User context approval task, select the Exclusive gateway to open its Process element options icons. Drag and drop the Sequence flow icon on top of the User context approval task.
-
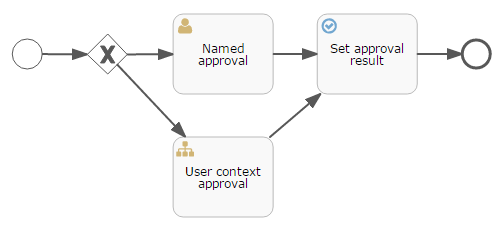
Since all paths from Start event to End event must include the Set approval result task, you need to merge the second path into the Set approval result task. To do so, select the User context approval task to open its Process element options icons. Drag and drop the Sequence flow icon on top of the Set approval result task.
You should now have a business process definition that looks similar to the following:
-
You still need to perform other steps to complete the business process definition:
- Provide parameter values for process elements. Some parameters are required in order for the process to be valid.
- Improve the appearance of the process.
- Save the process.
-
Drag and drop elements from the Process elements area (at the left side) to the Process design area (main working area).
Elements in the Process Elements Area Category Element Description Start Events Start event Add a start event without a specific trigger.
Required for every business process definition.
Refer to Start event for parameter instructions.
Activities Named approval Add a new task that initiates approval by specified users.
If the approval is already denied, the task is not executed.
Refer to Named approval task for parameter instructions.
User context approval Add a new task that initiates approval by the specified number of levels in manager hierarchy.
If the approval is already denied, the task is not executed.
Refer to User context approval task for parameter instructions.
Group approval Add a new task that initiates approval by specified group.
If the approval is already denied, the task is not executed.
Refer to Group approval task for parameter instructions.
External approval Add a new task that initiates approval by a supplier, which is external to Service Manager Service Portal. Final approval can be provided either through Service Manager Service Portal or the supplier.
If the approval is already denied, the task is not executed.
Refer to External approval task for parameter instructions.
Set approval result Add a new task that sets the result of the business approval (
true=approved,false=denied).This task is needed to synchronize with the Catalog application's Request Status for the requested item. The Set approval result task should always be the last task prior to End event in the business process definition. The results variable (
approved) is input to this task so it must always be set totrueorfalsebefore this task is executed. If this task is not included, the business process execution fails and gives the error message "Approval process {} completed without deciding approval state."Refer to Set approval result task for parameter instructions.
Script task Add a new automatic task with script logic—JavaScript or Java Unified Expression Language (JUEL).
When the process being executed arrives at the Script task, the corresponding script is executed.
Refer to Script task for parameter instructions and to Scripting for information about Scripting.
Mail task Add a mail task.
Refer to Mail task for parameter instructions.
Structural Sub process Add a sub process scope.
A sub process is like a process-inside-a-process. It can be used for standardization or easy reuse. It can be used in conjunction with a Boundary timer event (see Boundary Events) to specify when the process instance should stop, send an email, or such. For example, the Boundary timer event can stop the process instance after 14 days if approval or denial has not occurred, and then deny the request.
Gateways Exclusive gateway Add a choice gateway.
An exclusive gateway (XOR gateway) indicates a decision in the process. When a process being executed arrives at this gateway, all outgoing sequence flows are evaluated in the order in which they are defined. The first—and only the first—sequence flow that evaluates to TRUE is selected for continuing the process. If no sequence flow evaluates to TRUE, the default flow is taken (if a default flow is defined).
Refer to Exclusive gateway for parameter instructions.
Boundary Events Boundary timer event Add a boundary event with a timer trigger.
A timer boundary event acts like an alarm clock or stopwatch. When a boundary event is attached to an activity, a timer is started when that activity is executed. When the timer fires (the timer goes off after the specified period), the activity is interrupted and the new execution path is followed.
Refer to Boundary timer event for parameter instructions.
End event End event Add an end event without a specific trigger.
Required for every business process definition.
Refer to End event for parameter instructions.
Artifacts Text annotation Annotate elements with description text.
Refer to Text annotation for parameter instructions.
-
Use the Process element options icons (small icons that pop up next to an element in the Process design area) to delete or change the element, or to add the next element to the process.
Process Element Options Icons Icon Element Description 
Delete Delete the element from the process. 
Change
Change the element type to another element in the same category. 
Named approval
Add a new task that initiates approval by specified users.
If the approval is already denied, the task is not executed.
Refer to Named approval task for parameter instructions.

User context approval Add a new task that initiates approval by the specified number of levels in manager hierarchy.
If the approval is already denied, the task is not executed.
Refer to User context approval task for parameter instructions.

Group approval Add a new task that initiates approval by specified group.
If the approval is already denied, the task is not executed.
Refer to Group approval task for parameter instructions.

External approval Add a new task that initiates approval by a supplier, which is external to Service Manager Service Portal. Final approval can be provided either through Service Manager Service Portal or the supplier.
If the approval is already denied, the task is not executed.
Refer to External approval task for parameter instructions.

Set approval result Add a new task that sets the result of the business approval (
true=approved,false=denied).This task is needed to synchronize with the Catalog application's Request Status for the requested item. The Set approval result task should always be the last task prior to End event in the business process definition. The results variable (
approved) is input to this task so it must always be set totrueorfalsebefore this task is executed. If this task is not included, the business process execution fails and gives the error message "Approval process {} completed without deciding approval state."Refer to Set approval result task for parameter instructions.

Script task Add a new automatic task with script logic—JavaScript or Java Unified Expression Language (JUEL).
When the process being executed arrives at the Script task, the corresponding script is executed.
Refer to Script task for parameter instructions and to Scripting for information about Scripting.

Exclusive gateway Add a choice gateway.
An exclusive gateway (XOR gateway) indicates a decision in the process. When a process being executed arrives at this gateway, all outgoing sequence flows are evaluated in the order in which they are defined. The first—and only the first—sequence flow that evaluates to TRUE is selected for continuing the process. If no sequence flow evaluates to TRUE, the default flow is taken (if a default flow is defined).
Refer to Exclusive gateway for parameter instructions.

End event Add an end event without a specific trigger.
Required for every business process definition.
Refer to End event for parameter instructions.

Text annotation Annotate elements with description text.
Refer to Text annotation for parameter instructions.

Sequence flow Add sequence flow to define the execution order of activities. To add sequence flow:
- Create the next element by dropping and dragging the element from the Process elements area to the Process design area.
- Click the Sequence flow icon for the previous element and drag to the next element.
-
Use the editing tools in the Process toolbar area (at the top).
Note The tool icons change from gray to green when they are available for the specific edit that you are performing.
-
After selecting an element in the Process design area (main working area), set values for its parameters in the Process task parameter area (at the bottom). The available parameters depend on the selected element. The top-level parameters document the business process. The parameters for business process elements—approval tasks, script tasks, gateways, timer events, and so on—supply execution values.
Note The following keys indicate where you need to specify parameter values:
- If an element is outlined in red in the Process design area, you must specify one or more parameter values before the business process can be published.
- If a parameter is in red in the Process task parameter area, a value is required.
- If a parameter has a red asterisk (*) in the Process task parameter area, a value is required but a default is provided.
Parameters in the Process Task Parameter Area Selected Element Parameters Business Process -
Process author: Enter the name of the business process author.
Start event -
Name: Enter a name for the start event.
-
Form properties: Define a form with a list of form properties. See Instructions to Define a Form for details.
-
Documentation: Enter any additional documentation and click Save.
Named approval task -
Name: Enter a name for the task. The default is Named approval.
-
Minimum approvals (required): Select an integer value for the minimum number of approvals that are necessary to approve the order. If 0, all members in the group must approve the order.
-
Approval result variable: Enter the variable name in which to store the approval result. The default is
approved. The variable is set to eithertrue(approved) orfalse(denied) in the task. -
Approvers (required): Select one or more users that will be asked to approve the order. See Instructions to Select Users for details.
-
Minimum denials (required): Select an integer value for the minimum number of rejections that result in rejection of the order. If 0, this property is ignored.
-
Documentation: Enter any additional documentation and click Save.
User context approval task -
Name: Enter a name for the task. The default is User context approval.
-
Approval result variable: Enter the variable name in which to store the approval result. The default is
approved. The variable is set to eithertrue(approved) orfalse(denied) in the task. -
Number of levels (required): Select an integer value for the number of management levels above the requester that are involved in the approval process. Managers are asked for approval in successive steps. All required managers must approve an order. One denial results in rejection of the order and no further managers are contacted for approval.
-
Documentation: Enter any additional documentation and click Save.
Group approval task -
Name: Enter a name for the Group approval task. The default is Group approval.
-
Minimum approvals (required): Select an integer value for the minimum number of approvals that are necessary to approve the order. If 0, all members in the group must approve the order.
-
Approval result variable: Enter the variable name in which to store the approval result. The default is
approved. The variable is set to eithertrue(approved) orfalse(denied) in the task. -
Group (required): Enter the Identity Management (IdM) group that is responsible for approval. As you start typing, groups are displayed. Select the desired group.
-
Minimum denials (required): Select an integer value for the minimum number of rejections that result in rejection of the order. If 0, this property is ignored.
-
Documentation: Enter any additional documentation and click Save.
External approval task -
Name: Enter a name for the External approval task.
- Supplier ID: Either select the supplier or specify that the supplier's value will be provided dynamically on the form.
-
Documentation: Enter any additional documentation and click Save.
Set approval result task -
Name: Enter a name for the task. The default is Set approval result.
-
Documentation: Enter any additional documentation and click Save.
-
Approval result expression: Enter an expression that evaluates to true or false. Typically the expression is
${approved}whereapprovedis the variable that the various approval tasks set to true or false. The default is${approved}. For more information, see Scripting.
Script task -
Name: Enter a name for the Script task.
-
Script (required): Enter JavaScript code to execute or a JUEL expression to evaluate and click Save. Must be valid. For more information, see Scripting.
For example, set Result variable to
approvedand Script totrueorfalse(both are simple valid scripts). -
Documentation: Enter any additional documentation and click Save.
-
Script format: Enter the script format, either JavaScript or juel. The default is JavaScript.
-
Result variable: Enter the variable name in which to store the result. For example, if the
approvedvariable is used, the script can set theapprovedvariable to eithertrue(approved) orfalse(denied) in the task. If no result variable is specified, the task is executed but no result is saved.
Mail task -
Name: Enter a name for the Mail task.
-
To (required): Enter a comma-separated list of valid email addresses—literal or with script—to which the email will be sent and click Save.
Examples:
joe.user@mycompany.com${_request.approvers.pending.emails} -
Subject (required): Enter an email subject line.
Examples:
Order needs to be approvedOrder ${_request.name} for ${_request.recipient.fullName} needs to be approved -
Bcc: Enter a comma-separated list of valid email addresses—literal or with script—to which the email will be sent in the Bcc field and click Save.
-
Html: Enter HTML code for the email message content and click Save. See HTML Example.
-
Documentation: Enter any additional documentation and click Save.
-
From: Enter a valid email address—literal or with script—from which the email will be sent and click Save. The default is configured in
bpm.propertiesin/opt/hp/propel/bpm/WEB-INF/classes. -
Cc: Enter a comma-separated list of valid email addresses—literal or with script—to which the email will be sent in the Cc field and click Save.
-
Text: Enter Plain Text for the email message content and click Save. Email clients that do not support Rich Text format will fall back to this format. Can be used in combination with HTML.
-
Charset: Enter the character set to be used for the mail. Different character sets are necessary for many non-English languages. For example, UTF-8.
For more information, see Scripting.
Exclusive gateway -
Name: Enter the name of the Exclusive gateway.
-
Flow order: Define the order in which the gateway exit criteria are evaluated. See Instructions to Change the Flow Order for details.
-
Documentation: Enter any additional documentation and click Save.
Sequence flow -
Name: Enter the name of the Sequence flow.
-
Flow condition: Enter the flow condition expression in script and click Save. For more information, see Scripting.
Examples:
${_request.totalInitialPrice.amount>=100}${_request.totalInitialPrice.amount>=price}where price is a variable defined in the Start Event form properties and will be a parameter in Service Manager Service Portal Policies. -
Documentation: Enter any additional documentation and click Save.
-
Default flow: Check the box if the flow is the default flow from a gateway. In the diagram, a slash mark appears on the arrow for the default flow.
Text annotation -
Name: Enter the name of the Text annotation.
-
Text: Enter descriptive text.
-
Documentation: Enter any additional documentation and click Save.
End event -
Name: Enter the name of the End event.
-
Documentation: Enter any additional documentation and click Save.
Boundary timer event -
Name: Enter the name of the Boundary timer event.
-
Timer cycle: Enter the repeat period of the timer event in ISO-8601 format. For example: R3/PT10H (repeat 3 times over a period of 10 hours).
-
Timer duration: Enter the duration of the timer event in ISO-8601 format. For example: PT5M (a period of 5 minutes).
-
Cancel activity: Check the box if the Timer Event activity should be canceled and the process continue along the original path.
-
Documentation: Enter any additional documentation and click Save.
-
Timer date: Enter the date of the timer event in ISO-8601 format. For example: 2016-09-01 (September 1, 2016).
-
Timer End Date: Enter the end date of the timer event in ISO-8601 format. Only specify a value if Timer Cycle is also specified. For example: 2016-12-31 (December 31, 2016).
Note Only one of these timer parameters—Timer cycle, Timer duration, Timer date—must be specified.
For more information, see Instructions to Define Timer Events.
Instructions to Define a Form
Tip These instructions pertain to defining the Form properties parameter for a Start event. (See Start event).
A form provides a convenient, user-friendly method for the Organization Administrator to specify parameter values before executing a business process or sub process.
To define a form:
-
In the Change value for "Form properties" box, click
 to add a new property to the form. Define the property components.
Property Components Property component Description Name Name of the property to display when the business process is executed.
Type Type of property. Valid values are string, long, boolean, date, and enum. Variable A variable name that can be used to reference the value in conditions or script. For example, if you enter
price, you can use${_request.totalInitialPrice.amount>=price}as a sequence flow condition.Required Checkbox to indicate whether a value is required for the property in the Service Manager Service Portal Policy form. -
Optional: Select a property and click
 to delete the property from the form.
 -
Optional: Click
 or
or  to rearrange the order of the properties in the form.
 -
Click the Save button to save the form as part of the Start Event.
Instructions to Select Users
Tip These instructions pertain to defining the Approvers parameter for a Named approval task. (See Named approval task).
To select users:
- In the Select Users box, start typing the name of a user.
- From the choices offered, select the desired user.
- Click to add the user to the list.
-
Optional: Select a user and click
to delete the user. - Repeat if any other users are to be added.
- Click the Save button when the list of users is complete.
Scripting
Tip These instructions pertain to defining script based parameters for various elements: Set approval result task (see Set approval result task), Mail task (see Mail task), Script task (see Script task), and Sequence flow (see Sequence flow).
Several Service Manager Service Portal parameters can use scripting to refine and customize tasks and values. Two types of scripting can be used: Java Unified Expression Language (JUEL) and JavaScript.
Type of Scripting Task Element Parameter Type of Scripting Set approval result task
Approval result expression JUEL
Mail task
To
Subject
Bcc
From
Cc
JUEL Mail task
Html
Any HTML Script task
Script
By default uses JavaScript but can use JUEL as well Sequence flow
Flow condition
JUEL
Java Unified Expression Language (JUEL) Overview
JUEL allows designers to use simple expressions to dynamically access data.
JUEL evaluates expressions encased in the
${}syntax and returns the results immediately.JUEL evaluates literal expressions to the text of the expression (type String). Literal expressions do not use the
${}delimiters. When a literal expression is evaluated, it can be converted to another type. For example, the literal expression 19 (a string) can be converted to integer type with the result of 19.JUEL Operators Operator categories Operators Additional information Arithmetic +, - (binary)
*, /,
div%,
mod- (unary)
Logical and, &&or, ||not, !Relational ==,
eq!=,
ne<,
lt>,
gt<=,
le>=,
geComparisons can be made against other values, or against boolean, string, integer, or floating point literals.
Empty emptyThe empty operator is a prefix operation that can be used to determine whether a value is null or empty.
Conditional
A ? B : C
Evaluate B or C, depending on the result of the evaluation of A.
Tip For more information about Java Unified Expression Language, see The Java EE 6 Tutorial, Chapter 6 Unified Expression Language:
JavaScript
Tip This information pertains to defining the Script parameter in the Script task (see Script task).
The code for Script Tasks can be JavaScript ECMAScript 5.1 (as well as JUEL).
Tip For more information about the Service Manager Service Portal JavaScript, see ECMAScript® Language Specification:
Variables
Variables can be used in scripts. For example, you can use a variable in a condition on a sequence flow to determine the next task.
You can create your own unique variables in a Start Event (Form Properties parameter) or a Script Task. When a business process is executed, the form properties are passed to the process instance as variables and can be used in the business process tasks.
You can also use Service Manager Service Portal provided properties, such as a request's name, type, and price. An underscore (_) precedes all Service Manager Service Portal provided properties. For example, to reference "request price", use the JUEL expression
${_request.totalInitialPrice.amount}.Service Manager Service Portal Provided Properties Property group Property Description _request
name Name of the request. _request
type
Type of the request. Valid values:
- SERVICE: Service Manager Service Portal service requests
- SUPPORT: Service Manager Service Portal support tickets
- ACTION: Service Manager Service Portal service instance action
_request
state
State of the request. Valid value:
- PENDING_APPROVAL (always the case when the business process is executed)
_request
tenant
The organization. For example, CONSUMER.
_request
count
The count for the catalog item that is requested.
_request
created
Time when the request was created. Units are milliseconds since epoch.
_request
humanReadableId
The human-friendly ID shown in the UI. For example, PR00117.
_request
createdBy
- name
- fullName
User that generated the request.
_request
recipient
- name
- fullName
User that will receive the request.
_request
totalInitialPrice
- amount
- currency
Total initial price where the amount (a number) is in the specified currency type (for example, USD).
_request
totalRecurrentPrice
- amount
- currency
Total recurrent price where the amount (a number) is in the specified currency type (for example, USD).
_request
totalRecurrencePeriod
- timeUnit
- unitCount
Recurrence period where the price will reoccur after unitCount (a number) repetitions of the timeUnit.
Valid values for timeUnit: MS, S, MIN, HOUR, DAY, WEEK, MONTH, YEAR.
_request
approvers
-
pending
- emails
Comma-separated list of all pending approver emails.
_environment
propel
- host
Hostname of the Service Manager Service Portal installation.
HTML Example
Tip This information pertains to defining the Html parameter in the Mail task (see Mail task).
The following is an example of HTML for an email:
<!DOCTYPE html>
<html>
  <body style="margin: 0; padding: 0;">
    <p>
    Your approval is required for the ${_request.name}
    request created by ${_request.createdBy.fullName}
    for ${_request.totalInitialPrice.amount}.
    </p>
    <p>
    Please go to <a href="https://www.mycompany.com/">
    https://www.mycompany.com</a> to either
    approve or deny the request.
    </p>
  </body>
</html>
Tip For instructions to design HTML emails, see: http://webdesign.tutsplus.com/articles/build-an-html-email-template-from-scratch--webdesign-12770
Instructions to Change the Flow Order
Tip These instructions pertain to the Flow order parameter in the Exclusive gateway (see Exclusive gateway).
The Flow Order defines the order in which the gateway exit criteria are evaluated. The order is important for Exclusive gateways where the flow only continues to the first criteria that evaluates to TRUE.
To change the Flow Order:
-
In the Change value for "Flow order" box, view the flow order that is in effect.
-
Click
or to change the order. -
Click the Save button when the flow is in the desired order.
Instructions to Define Timer Events
Tip These instructions pertain to the time-based parameters in the Boundary timer event (see Boundary timer event).
The Service Manager Service Portal Boundary timer events use the internationally accepted date and time representations defined by ISO 8601.
General principles:
- Date and time values are ordered from largest to smallest unit of time—year down to fraction of a second.
- Values can be dropped from least significant to most significant—fraction of a second, seconds, minutes, and so on.
- Each date and time value has a fixed number of digits that may be padded with leading zeros.
- Standardized separators can be included to improve readability.
The following Boundary Timer Event parameters are based on ISO 8601 definitions:
- Time cycle
- Timer duration
- Timer date
- Timer end date
ISO 8601 Definitions Element Format Example Comments
Year YYYY
2016 Calendar date YYYY-MM-DD or YYYYMMDD
2016-03-18 or 20160318 Calendar month YYYY-MM (but not YYYYMM) 2016-03 Week YYYY-Www or YYYYWww 2016-W26 or 2016W26 Start a week designation with W. Replace ww with 01 to 53.
Week 01 is defined as the week with the year's first Thursday.
The ISO week-numbering year starts at the first day (Monday) of week 01 and ends at Sunday before the new ISO year so that there will be no overlap or gap. It consists of 52 or 53 full weeks.
Week and day of week YYYY-Www-D or YYYYWwwD 2009-W01-1 is Monday, 29 December 2008
2009-W53-7 is Sunday, 3 January 2010
Replace D with weekday number, 1 to 7, beginning with Monday and ending with Sunday.
Ordinal date YYYY-DDD or YYYYDDD 2016-040 is February 9, 2016 Replace DDD with day number of the year, 001 to 365 (or 366 for leap years). Time hh:mm:ss.sss or hhmmss.sss
hh:mm:ss or hhmmss
hh:mm or hhmm
hh
13:47:30 or 134730 Replace hh with hour, 00 to 24.
Replace mm with minute, 00 to 59.
Replace ss with second, 00 to 59 (or 60 for leap second).
Midnight may be either 00:00 or 24:00. Thus, 2007-04-05T24:00 is the same as 2007-04-06T00:00.
Time zone designators
<time>Z
<time>±hh
<time>±hh:mm
<time>±hhmm
09:30Z is 9:30 a.m. UTC
144515Z is 2:45:15 p.m. UTC
If the location is unspecified, the time zone is assumed to be local time. This may be ambiguous when communicating across time zones.
To designate UTC, append a Z after the time .
To designate an offset from UTC, append + or - followed by hour and minute specification. Replace hh with hour, 00 to 24. Replace mm with minute, 00 to 59.
Date and time <date>T<time> 2007-04-05T14:30 To specify a specific time on a specific date, append T and a valid time to a date. Duration PnYnMnDTnHnMnS
PnW
P<Date>T<Time>
P3Y6M4DT12H30M5S represents 3 years, 6 months, 4 days, 12 hours, 30 minutes, and 5 seconds
P1M is 1 month duration
PT1M is 1 minute duration
Durations define the amount of intervening time.
Replace n by the appropriate value for each of the date or time elements.
Start a duration representation with P.
Y indicates years.
M indicates months.
W indicates weeks.
D indicates days.
T precedes the time component.
H indicates hours.
M indicates minutes.
S indicates seconds.
Time interval <start>/<end>
<start>/<duration>
<duration>/<end>
<duration>
2007-03-01/2008-05-11
2007-03-01/P1Y
P1Y/2017-12-31
P1Y2M with additional context information
A time interval is the amount of time between two time points or a duration.
When two values are required, separate with a forward slash (/).
Replace <start> and <end> with valid date-time designations.
Replace <duration> with a valid duration designation.
Repeating intervals Rnn/<interval>
R/<interval>
R52016-05-01/P1W is repeat 5 times, starting May 1, 2016, once per week Repeating intervals define the repetitions.
Start the repeating interval with R.
Replace nn with the number of repetitions. If nn is not defined there are an unbounded number of repetitions.
Replace <interval> with a valid time interval designation.
Tip For more information about ISO 8601 format, see:
-
Add descriptive text to an element.
To add descriptive text to an element such as an Activity or a Gateway, double-click the element and enter the desired text.
Related Topics


