


Task 7: Update the Configurations for Custom CI Types in UCMDB
The configurations for all out-of-the-box CI types in UCMDB 10.20 are already based on the Service Manager Enhanced Generic Adapter. However, you still need to perform the following steps to manually update the configurations for your custom CI types in UCMDB.
Step 1. Convert the mapping scripts from XSLT to XML and Groovy.
The old Service Manager adapters use XSLT scripts for field mapping between UCMDB and SM. Most of the mapping scripts were developed for the four typical mapping scenarios described in the following table.
| Scenario | Notes |
|---|---|
| One to One field mapping |
|
| One to Many field mapping |
|
| Many to Many field mapping |
|
| Value Conversion |
|
The Service Manager Enhanced Generic Adapter uses XML and Groovy mapping scripts. Old mapping scripts for the out-of-the-box CI types have been converted to XML and Groovy by default. However, you still need to convert your existing custom scripts to XML and Groovy.
To convert a custom mapping script, you need to identify its mapping scenario (One to One, One to Many, Many to Many, or Value Conversion) first; then you can convert the script by referring to the following sample scripts for your specific scenario.
Tip In all mapping scenarios, you can use the Visual Mapping tool to generate an XML script skeleton. Compared with the use of an old XSLT adapter, this is much easier as you can drag and drop the mapped fields to generate the script instead of writing every code line from scratch. For details about how to use XML and Groovy scripts in the UCMDB integration framework, see the Micro Focus Universal CMDB 10.20 Developer Reference Guide.
Tip The Service Manager Enhanced Generic Adapter has four out-of-the-box Groovy scripts, which you can use as a reference:
- SMUtils.groovy: defines common methods used for push, population, and federation.
- SMPushFunctions.groovy: defines the methods used in the out-of-the-box push mapping scripts.
- SMPopulateFunctions.groovy: defines the methods used in the out-of-the-box population mapping scripts.
- SMFederationFunctions.groovy: defines the methods used in the out-of-the-box federation mapping scripts.
Additionally, the SMFederationConverter.groovy script defines value conversions for federation.
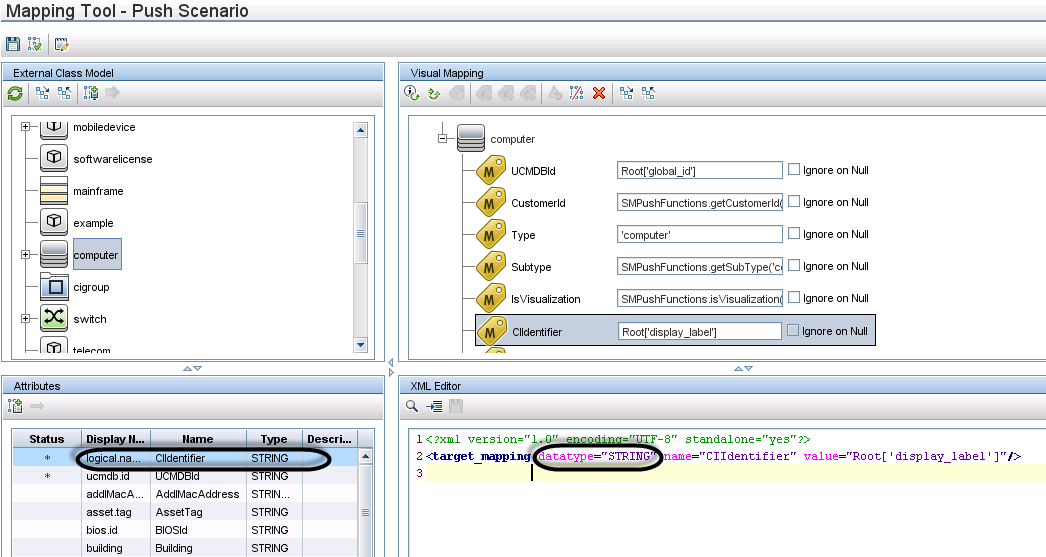
Field mapping must use the correct data type for each attribute. It is convenient to determine the data type for an attribute by using the Visual Mapping tool. The following figure illustrates the data type for the CIIdentifier attribute. You can either find the data type from the External Class Model Attributes pane or simply drag and drop the attribute from that pane to the Visual Mapping area to automatically get the correct data type.
One to One Field Mapping
Sample Script in XSLT:
<Type>computer</Type>
Or
<UCMDBId><xsl:value-of select="@id"/></UCMDBId>
Or
<xsl:for-each select="@display_label">
 <DisplayName><xsl:value-of select="."/></DisplayName>
</xsl:for-each>
Sample Script in XML (Groovy is not required in this scenario):
<target_mapping datatype="STRING" name="DisplayName" value="Root['display_label']"/>
Where: The datatype must be the correct data type defined in Service Manager for the attribute. You can find the data type from the Visual Mapping tool interface.
One to Many Field Mapping
Sample Script in XSLT:
<xsl:variable name="prefix" select="'Value>'"/>
<xsl:variable name="suffix" select="'</Value'"/>
<Subtype>
<xsl:choose>
<xsl:when test="contains(@node_role,concat($prefix,'desktop',$suffix))">Desktop</xsl:when>
<xsl:when test="@os_family">
<xsl:value-of select="@os_family"/>
</xsl:when>
<xsl:otherwise>Server</xsl:otherwise>
</xsl:choose>
</Subtype>
Sample Script in XML:
<target_mapping datatype="STRING" name="Subtype" value="SMPushFunctions.getSubType('computer',Root['node_role'],Root['os_family'])"/>
Sample Script in Groovy:
You must develop a groovy function to implement the mapping logic. Usually the relevant fields in the counterpart system will be used as the parameters of the Groovy function.
Many to Many Field Mapping
Sample Script in XSLT:
<xsl:for-each select="cpus">
    <cpu>
        <xsl:for-each select="cpu">
            <cpu>
                <CpuID><xsl:value-of select="@cpu_id"/></CpuID>
                <CpuName><xsl:value-of select="@name"/></CpuName>
                <CpuClockSpeed>
                      <xsl:value-of select="@cpu_clock_speed"/>
                </CpuClockSpeed>
            </cpu>
        </xsl:for-each>
    </cpu>
</xsl:for-each>
Sample Script in XML:
<for-each-source-entity count-index="i" source-entities="Root.Cpu">
    <target_entity name="cpu">
          <target_mapping datatype="STRING" name="CpuID" value="Root.Cpu[i]['cpu_id']"/>
          <target_mapping datatype="STRING" name="CpuName" value="Root.Cpu[i]['name']"/>
          <target_mapping datatype="STRING" name="CpuClockSpeed" value="Root.Cpu[i]['cpu_clock_speed']"/>
    </target_entity>
 </for-each-source-entity>
Where: <source-entities> (Root Cpu) comes from the local TQL query structure, while <target_entity name> (cpu) comes from the <cpu> tag in the XSLT file.
Note Groovy scripts are not required for this scenario.
Value Conversion
Sample Script in XSLT:
<xsl:if test="@customer_id">
    <xsl:variable name="ucmdbCustomerId" select="@customer_id"/>
    <xsl:variable name="tenantMappingEntry" select="document('SM_MT_mapping.xml')/list['TenantMapping']/entry[@ucmdb=$ucmdbCustomerId]"/>
    <xsl:choose>
        <xsl:when test="$tenantMappingEntry">
            <CustomerId><xsl:value-of select="$tenantMappingEntry/@sm"/></CustomerId>
        </xsl:when>
        <xsl:otherwise>
            <CustomerId><xsl:value-of select="@customer_id"/></CustomerId>
        </xsl:otherwise>
    </xsl:choose>
</xsl:if>
Or
<xsl:if test="contains(@node_role,concat($prefix,'virtualized_system',$suffix))">
         <IsVisualization>true</IsVisualization>
 </xsl:if>
Sample Script in XML:
<target_mapping datatype="STRING" name="CustomerId" value="SMPushFunctions.getCustomerId(CustomerInformation)"/>
Or
<target_mapping datatype="BOOLEAN" name="IsVisualization" value="SMPushFunctions.isVisualization(Root['node_role'])"/>
Note Usually the relevant field in the counterpart system will be used as one of the parameters of the Groovy function.
Sample Scripts in Groovy:
/**
     * Priority Mapping
     * [uCMDB value : SM value ]
     */
    private static final def PriorityMapping = [
        "1_critical":"1",
        "2_high":"2",
        "3_average":"3",
        "4_low":"4"];
/**
     * Convert the Priority value from uCMDB to SM
     *
     * @param priority uCMDB Priority value
     * @return SM Priority value
     */
    public static String convertPriority(String priority, DataAdapterLogger log) {
        return convertEnumValue(priority,"Priority");
    }
Step 2. Update the configuration files.
Update the files as described in the following table.
| File | Description |
|---|---|
| icon.properties |
This configuration file defines the UCMDB icons that will be displayed in the mapping tool for Service Manager CI Types. If you have defined any custom CI types in SM, you can update this configuration file to assign them appropriate icons. For more information, see the Universal CMDB Data Flow Management Guide. |
| sm.properties |
This is the integration adapter configuration file. If you have modified the out-of-the-box settings in your old sm.properties file (for example, the number of concurrent threads), you need to update this configuration file accordingly for those options that are still valid in the Service Manager Enhanced Generic Adapter. For more information, see How to Update the Integration Adapter Configuration File (sm.properties). |
| smFedConf.xml |
This configuration file is used for federation and is introduced by the Service Manager Enhanced Generic Adapter. If you have any custom logic for the federation feature, such as custom fields for federation CIs, you need to update this configuration file. For more information, see Troubleshooting Federation Issues. |
| smPopConf.xml |
This configuration file is used for population and replaces the old smPopConfFile.xml configuration file. If you have any custom logic for the population feature, such as custom query conditions, you need to update this configuration file. For more information, see the following topics: What Is the Purpose of the <container> Element in the Population Configuration File (smPopConf.xml)? |
| smPushConf.xml |
This configuration file is used for relationship data push and replaces the old smSyncConfFile.xml configuration file. For more information about this file, see the following topics: How to Map a Relationship Type Query to the Service Manager Web Service Object |
Step 3. Enable Push, Population and Federation for CI types.
Once you have completed the tasks described above, you must edit your integration point to add Push and Population jobs for the CI types, as well as enable Federation for supported CI types. For details, see the following topics:
How to Create an Integration Point in UCMDB
How to Define Data Push Jobs in UCMDB
How to Define Population Jobs in UCMDB
How to Add an Attribute of a Supported CI Type for Federation


