


Task 6: Deploy the chat service
In this task, you will install the chat service for End User Chat.
Note To enable Collaboration with LDAP, comment the follow line in sm.ini and then restart the Service Manager server:
ldapauthenticateonly:1
Follow these steps:
- Save the chat service installer sm9.60.xxxx_ChatMSVC.zip from Service Manager installation package to the same computer on which the chat server was deployed.
-
Log on to your Openfire Administration Console.
-
Click the User/Groups tab and create an Openfire user. For example:
User name: publishadmin
Password: admin123
-
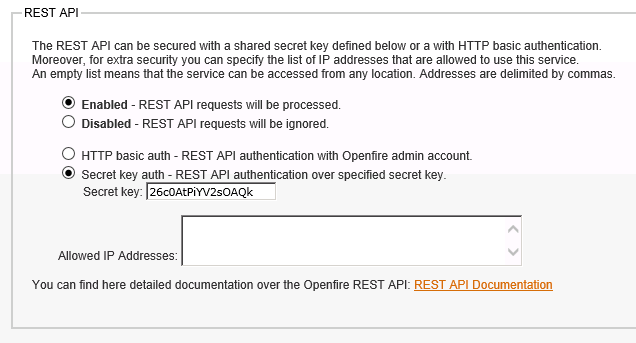
To enable the virtual agent, click Server > Server Settings > REST API. Enable REST API and record the secret key auth.
- Save your changes, and then restart the Openfire chat server.
-
Run tso_srv_slvt.bat to create the following certificate files:
Directory Files Certs\ Cacerts
clientpubkey.cert
mycacert.pem
mycacert.srl
scclientcert.pem
smservercert.pem
trustedclients.keystoreKey\ cakey.pem
server.keystore
<FQDN of the Chat Service host>.keystoreNote
-
When running tso_cln_svlt.bat, you need to append the FQDN of the Chat Service host as the bat parameter. For example,
tso_cln_svlt.bat training.sm-demo.com. Make sure that you type the same FQDN of the Chat Service host when you are asked to enter your first and last name. -
After the client keystore is created, update the new trustedclients.keystore file in C:\Program Files (x86)\Micro Focus\Service Manager 9.60\ChatServer\resources\security folder and rename the file to client.truststore.
-
-
Copy the CA certificates file (Cacerts) and the chat service client keystore (<FQDN of the Chat Service host>.keystore) to the C:\Program Files (x86)\Micro Focus\Service Manager 9.60\ChatService\conf folder.
- Run tso_2nd_srvs_svlt.bat to generate a second server.keystore by following the instructions as described in Task 5: Deploy the chat server > Replace the server certificate and OpenSSL connection > step 3 in this document.
-
-
Extract sm9.60.xxxx_ChatMSVC.zip to C:\Program Files (x86)\Micro Focus\Service Manager 9.60\ChatService.
-
Copy app.properties and config.yml from C:\Program Files (x86)\Micro Focus\Service Manager 9.60\ChatService\conf\samples\https to C:\Program Files (x86)\Micro Focus\Service Manager 9.60\ChatService\conf, and replace the original files. Open the chat service configuration file app.properties with a text editor.
-
Update the related parameters:
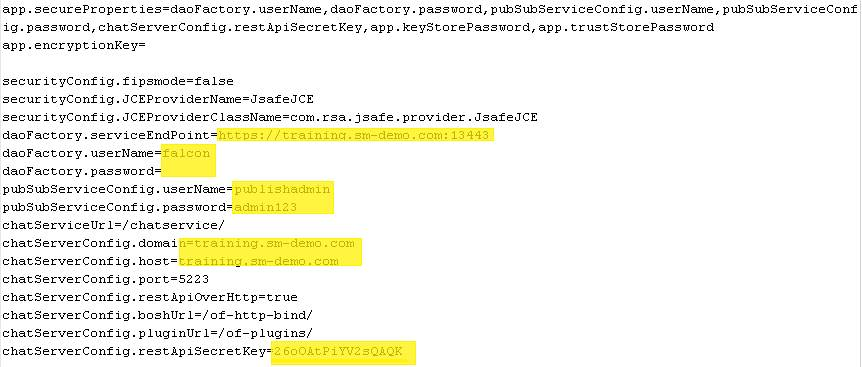
Parameter Description daoFactory.serviceEndPoint The Service Manager server’s URL. daoFactory.username The Backend user name for chat service to access Service Manager.
Important The backend user must be an SM user with the "system administrator" privilege and the “RESTful API” capability.
daoFactory.password The daoFactory user password. pubSubServiceConfig.userName The user name created in step 3. pubSubServiceConfig.password The user password created in step 3. chatServerConfig.domain The domain user filled during install chat server. chatServerConfig.host The chat server computer name or IP. chatServerConfig.restApiSecretKey The secret key you recorded in step 4. - Save your changes and close this file.
- To install the chat service as a Windows service, open a DOS command prompt and change the directory to C:\Program Files (x86)\Micro Focus\Service Manager 9.60\ChatService\bin.
-
Run the install-service.bat command to install the Service Manager chat service as a Windows service.
Note We recommend using 64-bit Java because 32-bit Java may have potential performance limitations. However, if you are working with 32-bit Java, follow these steps so that the Service Manager chat service Windows service can start successfully:
-
Open C:\Program Files (x86)\Micro Focus\Service Manager 9.60\ChatService\bin\startup.bat with a text editor.
-
Update the memory setting as follows:
SET CHAT_SVC_JVM_OPTIONS=-XX:ThreadStackSize=256 -Xms512m -Xmx1024m - Save your changes and close this file.
-
Open C:\Program Files (x86)\Micro Focus\Service Manager 9.60\ChatService\bin\ install-service.bat with a text editor.
-
Update the
ThreadStackSizememory setting toThreadStackSize=256 -Xms512m -Xmx1024m. - Save your changes and close this file.
You can run nssm edit HpeSmChatService to edit the corresponding configurations after the Windows service is installed.
Tip To remove this Windows service, run the nssm remove HpeSmChatService command.
-


