


Add a weblib Knowledgebase
User role: System Administrator
Web crawling enables administrators to make outside knowledge sources accessible to users and reduce administration costs. With this feature, you can:
- Index and search external Web content, such as RightAnswers and Microsoft's TechNet.
- Index and search Intranet content, such as internal corporate web content.
If you have large number of documents that you do not want to import into Service Manager but still wish to index and search, you can publish these documents to a web server for crawling with the web crawler. You can also crawl these documents with the file system crawler.
Indexing requirements for web crawling
The indexing requirements for a weblib-type knowledgbase are different than those of an sclib type. For weblib types, Service Manager stores only information used to create the knowledgebase (collection) format and the information used by the search engine to index the pages being crawled.
Log files for web crawling
Log files are generated during indexing for the web pages being crawled. These log files are located in the following directory:
C:\Program Files (x86)\Micro Focus\Service Manager x.xx\Search_Engine\kmcrawler\logs
The log files end in .log.
The two most important log files in this folder are skipkeys.log and joberror.log. The skipkeys.log provides detailed information as to why a particular page was skipped during indexing. For example, if a page is an excluded mime type or if the path depth has been exceeded, it is logged in this file. The joberror.log contains the errors encountered by the indexer. For example, if you provided a start URL that could not be reached, it is logged here.
To add a new weblib knowledgebase, you need to complete the following tasks.
Task 1: Add a weblib type knowledgebase record.
To add a weblib type knowledgebase record:
- Click Knowledge Management > Configuration > Knowledgebases.
- Type a unique name for the new knowledgebase in the Knowledgebase name field (required). For example, My_Web.
- Type a display name for the knowledgebase (required). For example, My Web.
- Select weblib in the Type field list.
-
Click Add.
The knowledgebase record is added. Continue to configure the tabs of the record and test the knowledgebase, as described in the following tasks.
Task 2: Configure the Type information tab.
The Type Information tab maintains information about the knowledgebase's source and security. Configure the following Type information settings.
| Field | Description |
|---|---|
| URLs |
URL: Type the URLs in the space provided. You can enter more than one URL, but use only one URL per line. |
| URL path depth |
Limits indexing to the specified number of path segments in the URL or file system path. The default is 100 path segments. The path length is determined as follows:
|
| Max links to follow |
Specifies the maximum number of levels from the starting URL that an indexing includes. If you see extremely large numbers of documents in a knowledgebase where you do not expect them, consider experimenting with this option, in conjunction with the Content options, to reduce the reach of the index. Specify a number between 0 and 255. The default is 255, which is equivalent to there are no limits on the number of jumps. |
| Constrain indexing to host domains | By default, links are not followed outside the hosts provided in the URLs. Un-checking this box lets the indexer index outside the hosts specified. |
| Mime Types |
|
| Proxy Configuration |
|
| Security Scripts |
|
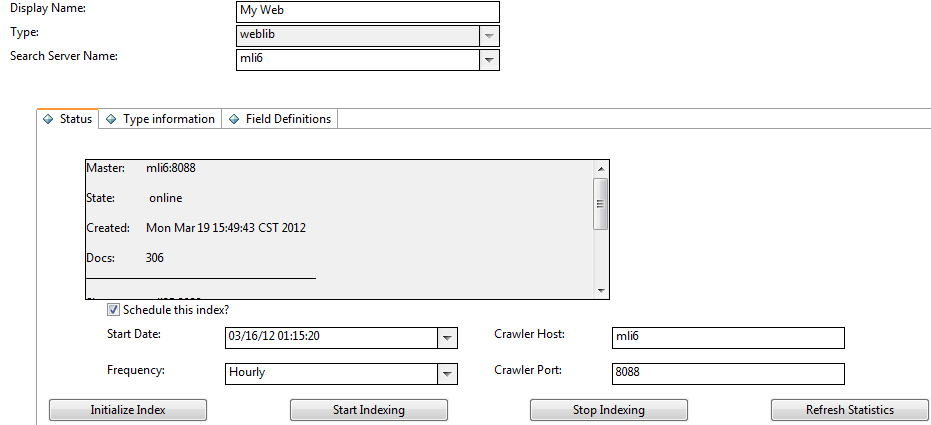
Task 2: Configure the Status tab.
The Status tab for a weblib knowledgebase displays information about the selected knowledgebase's index. This information includes the following:
| Field | Description |
|---|---|
| Master, Slave, or Load Balancer |
This field provides information about the search servers that are connected to the selected knowledgebase. Details on each server connection include type of server (Master, Slave, or Load Balancer), state of the server, date the server was created, and the number of documents that were indexed in the knowledgebase. For more information, see the State, Created, and Docs settings. To make changes to a search server, go to Knowledge Management > Manage Search Servers and select the search server. |
| State | Indicates whether the knowledgebase is on-line, off-line, or replicating (if it is a slave server). If State is blank, the knowledgebase is either off-line or the search engine is not connected. If the knowledgebase has not been created, this field is blank. |
| Created | Displays the knowledgebase creation date and time. If the knowledgebase has not been created, this field is blank. |
| Docs | Displays the number of documents contained in the index. If the knowledgebase has not been created, this field is blank. If the knowledgebase has been created but not indexed, this field will show 0 documents. |
| Status | Since the index is created separately from the knowledgebase creation, the Status field displays the current status of the index. Values can be "Not Created," "Created," "Running," and "Finished." |
| Schedule this index? | You can choose to schedule the index to start on a particular day and time. Select the Schedule this index? check box to enable scheduling. |
| Start Date | Select the first day you wish this index to run. Adjust the time values to the time of day the index should run. |
| Frequency |
You can schedule the index to run once, hourly, daily, weekly, or monthly. Note: When indexing, the search engine only indexes documents that have changed since the last run. |
| Crawler Host |
Specify the host name of a search server for web crawling. It can be a master or slave search server; however for optimized performance you can use a dedicated server for crawling only. |
| Crawler Port | Specify the Tomcat port of the crawler host. |
The tab also includes buttons for indexing.
| Button | Description |
|---|---|
| Initialize Index | Once you have all your settings specified for a new knowledgebase, click this button. The system sends the settings to the search engine. The search engine creates the empty knowledgebase for index. After a knowledgebase and index have been created, click this button to erase the index and create an empty knowledgebase. You should create a new knowledgebase if you change the parameters on either the Type information tab or Field Definitions tab. |
| Start Indexing | Click this button to start an index manually. Instead of scheduling index updates, you can use this button if the file system you are crawling does not change or if you want to test index settings once. |
| Stop Indexing | Click this button to stop an indexing process that is running. Click the Start Indexing button to resume indexing from the point where the index was stopped. To start indexing from the beginning, click Initialize Index. |
| Refresh Statistics | When selected, the search engine refreshes the statistics of the indexing process to show how many documents are indexed and searchable at that time in the process. |
Task 3: Index the weblib knowledgebase.
- On the Status tab, click Initialize Index.
- Click Start Indexing.
-
Click Refresh Statistics to monitor the indexing status. Once the documents have been indexed on the crawler and replicated to the searcher, you can continue to perform a test search on the weblib knowledgebase.
The following figure shows an example.
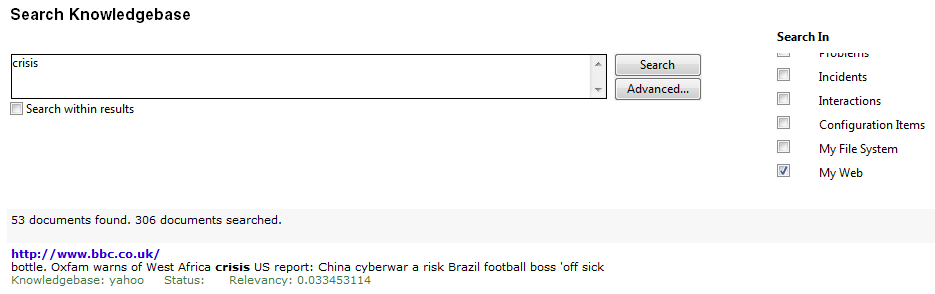
Task 4: Search in the weblib knowledgebase.
Perform a search in the new weblib knowledgebase to verify that it is set up properly.
- Click Knowledge Management > Search Knowledgebase.
- In the Search In section, select only the new weblib knowledgebase.
-
Enter a search word in the search box, and click Search.
The following figure illustrates a list of search results of an example weblib knowledgebase.
Related topics


