


Add an sclib Knowledgebase
User role: System Administrator, KMAdmin
The sclib type is used to index data contained in Service Manager tables, such as knowledge articles or other records. Out-of-the-box, there are five sclib knowledgebases:
- Incident_Library: used to index data of all Incident records.
- Interaction_Library: used to index data of all Interaction records.
- Knowledge_Library: used to index data of all knowledge articles.
- KnownError_Library: used to index data of all Known Error records.
- Problem_Library: used to index data of all Problem records.
You may need to add more sclib knowledgebases in your production environment. To do so, you need to perform the following tasks.
Task 1: Add an sclib knowledgebase record.
To add a sclib knowledgebase record:
- Click Knowledge Management > Configuration > Knowledgebases.
- Type a name for the new knowledgebase.
- Type a display name for the new knowledgebase.
- Select sclib in the Type list.
- Click Add.
- Type the Refresh Interval rate on the Status tab so that the selected knowledgebase index is updated at the specified interval. Each interval unit is five minutes (default). You may increase the interval to slow down the time between updates, or you may set the number at zero (0) to disable updates to the index.
-
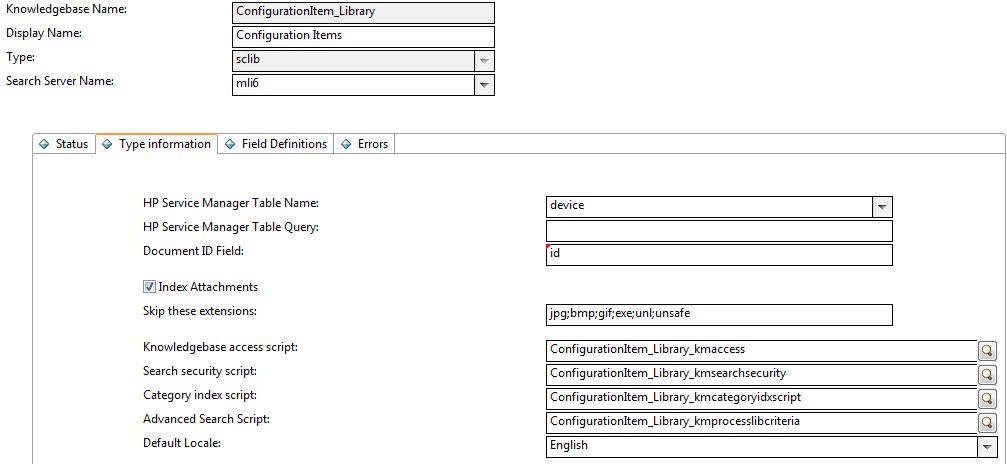
On the Type information tab, provide the necessary information. The system creates a default Knowledgebase access script, a Search security script, and Category index scripts.
Field Description Micro Focus Service Manager Table Name: This is the Service Manager table that will be indexed. A valid Service Manager table is required. For example: kmdocument. Micro Focus Service Manager Table Query: Used to enter a Service Manager style query to limit what records in the table are indexed. For example, a query to return only documents that are neither draft nor retired in the kmdocument table:
status ~= "draft" and status ~="retired".A blank query indicates that all records will be indexed.
Document ID Field: Every table in Service Manager has a unique ID field and this field identifies the field name of the ID field. The indexer uses this field to uniquely identify each document in the index. This is a required field for indexing a knowledgebase. Index Attachments If the table being indexed has attachments, select this check box to have the attachments indexed.
Caution: The search engine can index a wide variety of data types. However, indexing attachments is processor intensive. Each attachment must be extracted from the attachment table, written out to the local file system, and then streamed to the search engine server.Skip These Extensions: A semicolon-separated list of file extensions that should not be indexed nor extracted. Certain file types either cannot be indexed, or provide no relevance. By providing these extensions, you can increase index performance.
Note: Samplegif;jpgwithout any spaces.Knowledgebase access script: This script specifies the script the system uses to determine if a particular user has rights to access the knowledgebase. See the default script for detailed information. Search security script: This script further limits what users have access to, when they have access to the knowledgebase. This script returns a query string that is added to the user's normal query to limit the scope of the particular user's access to documents in the knowledgebase. See the default script for detailed information. Category index script: This script processes the document category so that the indexer can translate the document’s category into a string that the search engine can use later to find the document based on the user’s category access. Advanced Search Script: This script is used to build and return a string of library-specific query values that were entered by the user under the tabs in the Advanced Search screen. Tailor this script when a knowledgebase has a tab in the Advanced Search screen and you wish to modify the fields available for Advanced Search. Default Locale: Specifies the default language used by the search engine when searching and indexing. By default, the language code is English. The following figure shows the Type information tab of an example sclib knowledgebase named ConfigurationItem_Library.
-
Provide the necessary field definition data for the new knowledgebase.
Field Description Field Name Specifies the field name in the Service Manager table included in the index. Alias Specifies the name that the field is to be indexed as. You can make use of the Alias field to have a single common field name for searching and for the hitlist. For example, you may wish to alias different fields from different tables as "Title" so they can be searched using Advanced Search. Fields can have more than one alias. Separate these fields with a semicolon. An alias can be the same name as the field name. If the alias name includes ".", the system converts the period to an underscore when indexed. Type Indicates whether the field is a plain text string, a rich text string or a date type. The indexer ignores HTML markup in rich text strings and indexes plain text strings completely. Hitlist Defines what fields are available on the search hitlist. Fields marked as "true" in the hitlist column are available to be included on a search results hitlist display. Doc Body This column is a Boolean (True/False) field. By setting the field in this column to "true," the system indexes the field's content as part of the document body and also as an individual field. The search engine searches only the document body in the simple search. Fields with the Doc Body marked as "false" can only be searched by doing a field search with the Advanced Search. Delete Field Used to delete a field from the table.
- Select the field you want to delete.
- In the Windows client, click a field to select it.
- In the web client, hold down the Shift key as you click a field to select it.
- Click the Delete Field button to delete the field.
The following figure shows the Field Definitions tab of the ConfigurationItem_Library knowledgebase. These fields are defined in the device table, and you need to specify an Alias for each of them.

- Select the field you want to delete.
-
Configure the Status tab.
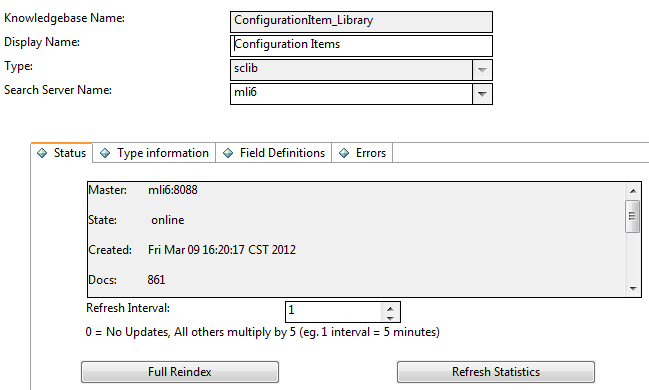
The Status tab for an sclib knowledgebase provides information about the selected knowledgebase's index and details about the search servers to which the knowledgebase is connected. This information includes:
Field Description Master, Slave, or Load Balancer This field provides information about the search servers that are connected to the selected knowledgebase. Details on each server connection include type of server (Master, Slave, or Load Balancer), state of the server, date the server was created, and the number of documents that were indexed in the knowledgebase. For more information, see State, Created, and Docs.
To make changes to a search server, go to Knowledge Management > Configuration > Configure Search Servers and select the search server.
State Indicates whether the knowledgebase is on-line, off-line, or replicating (if it is a slave server). If State is blank, the knowledgebase is either off-line or the search engine is not connected. Created Displays the date and time the knowledgebase was created. This value will change when the Full Reindex button is pressed. Docs Displays the number of documents currently indexed in the knowledgebase . This number may or may not exactly match the number of records in the table being indexed. Factors that can contribute to this include: Using a selection query other than "true" on the Type Information tab or when a document is indexed into multiple document categories. It is indexed once for each document category to which it is assigned. Refresh Interval Displays the current interval used to update the selected knowledgebase index. Each interval unit is 5 minutes (default). You may increase the interval, which slows down time between updates, by increasing this number. Setting this number to 0 (zero) disables updates to the index. To re-start indexing, reset the interval to a value greater than zero.
Note: Changes made to the table being indexed will be cached even if the update interval is set to 0. These changes will be processed once the interval is set higher than 0. A full re-index removes all changes for this knowledgebase from the change cache.The tab also includes buttons for indexing.
Button Description Full Reindex: When selected, the search engine performs a full re-index of a knowledgebase. If the index does not exist, it will be created. If it does exist, it will be deleted and re-created. A full re-index will remove all changes for this knowledgebase from the change cache since they will no longer be relevant.
When you click the Full Reindex button, the KMUpdate process begins initialization processing to start indexing a knowledgebase, but because indexing runs as a background process, the search engine does not begin indexing until the specified refresh interval is reached. Doing a full re-index on a large knowledgebase may have a significant impact on system resources.Certain actions require a full re-index. These actions are:
- Initial setup (no indexes exist).
- Changing any value on the Type Information tab or the Field Definitions tab.
- When a large number of changes or new documents have been added. For example, when you import new documents.
- When search engine performance becomes sluggish.
As updates are applied to the index, they are added as incremental index files. If you have a knowledgebase that has had many changes applied, these incremental index files can slow the search engine down, since it must perform your query on each one. A full re-index builds a new clean index that performs better. This is similar to defragmenting a hard drive.
Note: If you have a single master server defined, users will not be able to search the knowledgebase being re-indexed until the process completes successfully. If you have one or more slave servers, users will continue to search the old knowledgebase while the index is being re-created on the master server. Once indexing is complete, the old knowledgebase will be replaced by the new knowledgebase on the slave servers automatically and seamlessly, without disrupting user searchers.Refresh Statistics When selected, the search engine refreshes the statistics of the indexing process to show how many documents are indexed and searchable at that time in the process. - Click Save.
- Click Full Reindex on the Status tab to re-index the documents in the knowledgebase.
-
Click Refresh Statistics on the Status tab to refresh statistics tracking knowledge documents at various stages.
The following figure shows that a Full Re-indexing has been completed for the example ConfigurationItem_Library knowledgebase.
Now, you can perform simple searches in the new knowledgebase. However, if you want to enable the Advanced Search functionality for the knowledgebase, you need to complete the following additional tasks.
Task 2: Add new fields in the kmquery table.
You must add new fields to the kmquery dbdict record, which specifies the fields available for searching during an advanced search of the new knowledgebase.
When you add a field, use the naming convention <element_name>lib.<field_name> to make it available for advanced searching. Taking the ConfigurationItem_Library knowledgebase for example, you can use ci or configurationitem for <element_name>, followed by the field's Alias name defined on the Field Definitions tab. For example,for the logical.name field, you can add an entry of cilib.ciidentifier.
When you add a new sclib type library, the system adds a new Boolean field. For example, if you named your new knowledgebase ConfigurationItem_Library, the system adds a Boolean field named ConfigurationItemLibrary.

As an example, the following steps illustrate how to add new fields in the kmquery dbdict record for the ConfigurationItem_Library knowledgebase.
- Log in to the Service Manager Windows client as a system administrator.
- Type dbdict in the command line, and press Enter.
- In the File Name field, type kmquery, and click Search. The kmquery dbdict record opens.
- On the Fields tab, place the cursor on the descriptor row, and click New Field/Key to add the following example fields to the kmquery dbdict record.

- Click OK.
- Select SM Alters. A message displays: Record updated in the dbdict file.
Task 3: Add the new fields to the Advanced Search Script of the knowledgebase.
Once you have added the Advanced Search fields in the kmquery dbdict, add the fields in the advanced search script that was created when the knowledgebase record was added. You can find this script on the Type information tab of the sclib knowledgebase record. For example, for the ConfigurationItem_Library knowledgebase, the Advanced Search Script is named ConfigurationItem_Library_kmprocesslibcriteria.
As an example, the following steps illustrate how to add the new fields in task 2 to the ConfigurationItem_Library_kmprocesslibcriteria script.
- Log in to Service Manager as a system administrator.
- Type sl in the command line, and press Enter.
- In the Name field, type ConfigurationItem_Library_kmprocesslibcriteria, and then click Search.
-
Add the following lines to the script.
function ProcessLibCriteria(KMQuery)
{var getenginename = system.library.KMSearchInterface.getEngineName();
var strQuery = "";
if (getenginename == "K2")
{if(KMQuery.cilib_ciidentifier != null)
strQuery += " <AND> (ciidentifier <CONTAINS> " + KMQuery.cilib_ciidentifier + " <AND> _style <CONTAINS> ConfigurationItem_Library)";
if(KMQuery.cilib_type != null)
strQuery += " <AND> (type <CONTAINS> " + KMQuery.cilib_type + " <AND> _style <CONTAINS> ConfigurationItem_Library)";
y)";
if(KMQuery.cilib_status != null)
strQuery += " <AND> (status <CONTAINS> " + KMQuery.cilib_status + " <AND> _style <CONTAINS> ConfigurationItem_Library)";
if(KMQuery.cilib_partnumber != null)
strQuery += " <AND> (partnumber <CONTAINS> " + KMQuery.cilib_partnumber + " <AND> _style <CONTAINS> ConfigurationItem_Library)";
if(KMQuery.cilib_id != null)
strQuery += " <AND> (id <CONTAINS> " + KMQuery.cilib_id + " <AND> _style <CONTAINS> ConfigurationItem_Library)";
}
else
{if(KMQuery.cilib_ciidentifier != null)
strQuery += " (ciidentifier : " + KMQuery.cilib_ciidentifier + " AND knowledgebase_name: ConfigurationItem_Library)";
if(KMQuery.cilib_type != null)
strQuery += " (type: \"" + KMQuery.cilib_type + "\" AND knowledgebase_name: ConfigurationItem_Library)";
if(KMQuery.cilib_status != null)
strQuery += " (status: " + KMQuery.cilib_status + " AND knowledgebase_name: ConfigurationItem_Library)";
if(KMQuery.cilib_partnumber != null)
strQuery += " (partnumber: " + KMQuery.cilib_partnumber + " AND knowledgebase_name: ConfigurationItem_Library)";
if(KMQuery.cilib_id != null)
strQuery += " (id: " + KMQuery.cilib_id + " AND knowledgebase_name: ConfigurationItem_Library)";
}
return strQuery;
}
- Save and compile the script. A message should display: Successful compilation of JavaScript function or expression.
Task 4: Create a viewing format for the knowledge candidates for the knowledgebase.
Use Forms Designer to create a viewing form for the knowledge candidates for the new knowledgebase. When users click a search result (knowledge candidate) of the new knowledgebase, it opens in this form.
Task 5: Add a tab to the Knowledgebase Advanced Search form.
Use the Forms Designer to add a new widget to include the fields that have been added in the kmquery dbdict. Set the visible condition for the widget to use the same Boolean field name the system added when you added the new knowledgebase.
As an example, the following steps illustrate how to add a widget for the ConfigurationItem_Library knowledgebase.
- Log in to Service Manager as a system administrator.
- Type fd in the command line, and press ENTER.
- Create a subform for the ConfigurationItem_Library knowledgebase.
- In the Form field, type kmknowledgebase.cilib.sub, and then click New.
- Click No to create the subform without using the form wizard.
Create the subform with all fields you have added to the kmquery dbdict record.

- Add a widget for the ConfigurationItem_Library knowledgebase.
- In Forms Designer, open the kmknowledgebase.advsearch.g form in Design mode. Out-of-the-box, this form contains the following Group controls: Knowledge Library, Known Errors, Problems, Incidents, and Interactions.
- Create a new Group widget by copying an existing Group control, for example, the Interactions group.
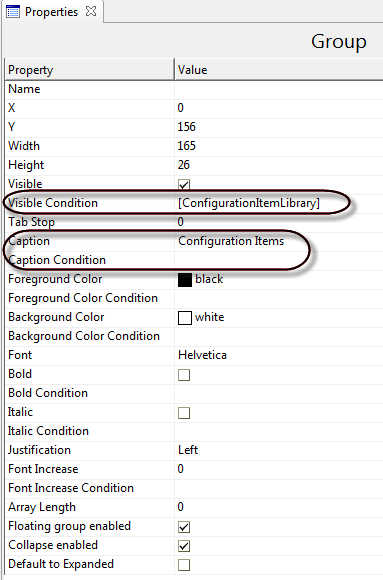
- Change the following properties of the new group:
- Visible Condition: [ConfigurationItemLibrary] (This is the Boolean field name the system added to the kmquery dbdict record when you added the new knowledgebase)
- Caption: Configuration Items
Caption Condition: Leave this setting empty.
Select the subform enclosed in the group, and change the Format property to kmknowledgebase.cilib.sub.
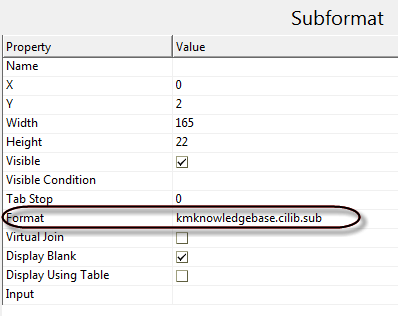
- ClickOK.
- Verify that KM Advanced Search is enabled for the new knowledgebase.
- Navigate to Knowledge Management > Search Knowledgebase.
In the Search In section, select and then deselect the Configuration Items library, to verify that the Configuration Items widget displays and disappears accordingly.
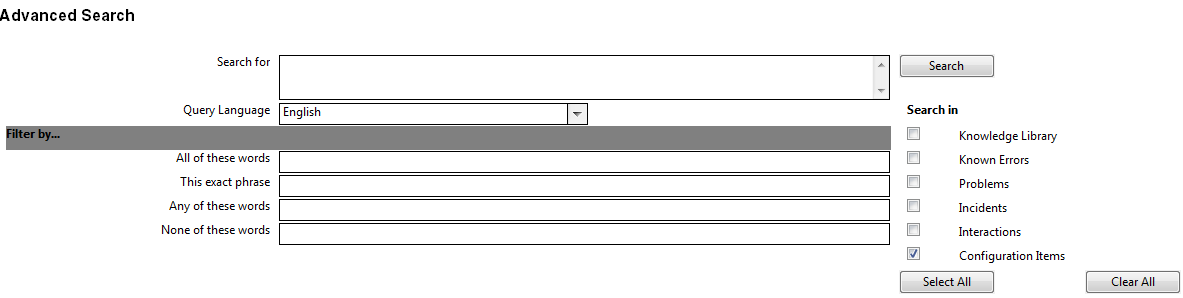

- Enter values in certain Configuration Item fields, and then click Search, to verify that Advanced Search works correctly for configuration item records.
Related topics


