


Enable Classic Request Management and Process Designer-based Request Fulfillment to run in parallel
Migration from Classic Request Management to Process Designer-based Request Fullfillment is a manual process that can be time-consuming if you have heavily tailored the Request Management module. In order to ease this transition Service Manager Hybrid enables you to run the Classic Request Management and the Process Designer-based Request Fulfillment modules in parallel. To do this, follow these steps.
Step 1: Set the value of the global flag to "true"
In the ProcessDesignerEnablement Script Library, locate the isNonPDRequestInParallel function, un-comment the line $G.nonpd.request.in.parallel variable, and then set its value to "True."
Step 2: Restore the non-Process Designer Request menu items
Request module menu items
To restore these menu items, search for menu records that have the parameter value "RM PD." In out-of-box systems, there are three such records. Add the Classic "Request Management" menu item back to the menu.
Request environment menu items
These menu items are located at System Administration > Ongoing Maintenance > Environment Records. To restore these menu items, search for the "ENV RECORDS" menu, and then add the Classic request menu items.
Request profile menu items
These menu items are located at System Administration > Ongoing Maintenance > Profiles. To restore these menu items, search for the "MODULE PROFILES" menu, and then add the Classic request menu items.
Models menu item
This menu item is located at System Administration > Base System Configuration. To restore this menu item, search for the "SYSTEM ADMINISTRATION" menu, and then add the Classic Request menu items.
Step 3: Update the queries in Inbox views
-
Search all Approval inboxes andcheck the query condition in each record to determine whether it uses only Classic global variables (
$G.ocmq.environment,$G.ocmo.environment, and$G.ocml.environment) or Process Designer-based global variables ($G.request.environmentand$G.requestTask.environment). If so, modify the queries to use both sets of global variables.For example, this query in the "All my Approvals" inbox contains a condition that resembles the following:
(file.name="request" and (current.pending.groups isin approval.groups in $G.request.environment or current.pending.groups isin {$lo.user.name})In this situation, you need to change the query to the following:
(file.name="request" and (current.pending.groups isin approval.groups in $G.request.environment or current.pending.groups isin {$lo.user.name}) or (file.name="ocmq" and (current.pending.groups isin approval.groups in $G.ocmq.environment or current.pending.groups isin {$lo.user.name}) - In the "My Group's To Do List" Inbox view, restore
itemType="ocmq" or itemType="ocml"to the query, and make sure that the "request" and "requestTask" item types are included in the query. -
In the "My Pending Delegated Approvals" Inbox view, append the following string to the query:
or (file.name="ocmq" and current.pending.groups isin $G.delegated.ocmq.groupsIn the "My Pending Approvals" Inbox view, append the following string to the query:
or (file.name="ocmq" and (current.pending.groups isin approval.groups in $G.ocmq.environment or current.pending.groups isin {$lo.user.name})
Step 4: Restore the "OCM Create Order" schedule record
To restore the "OCM Create Order" schedule record, you must unload the record from your system before you upgrade to Service Manager Hybrid, and then load it to your system after the upgrade process is complete.
You also can unload this record from a previous version of Service Manager.
Step 5: Configure search
Search for SearchConfig records that have a table name that begins with "ocm," and then remove the "false" condition in the Allow Advanced Find query.
Step 6: Add display options
These display options are located at More > Scheduled Maintenance > Generate Recurring > Request in CI record display forms.
The sub-menu in the following illustration refers to Request table records.
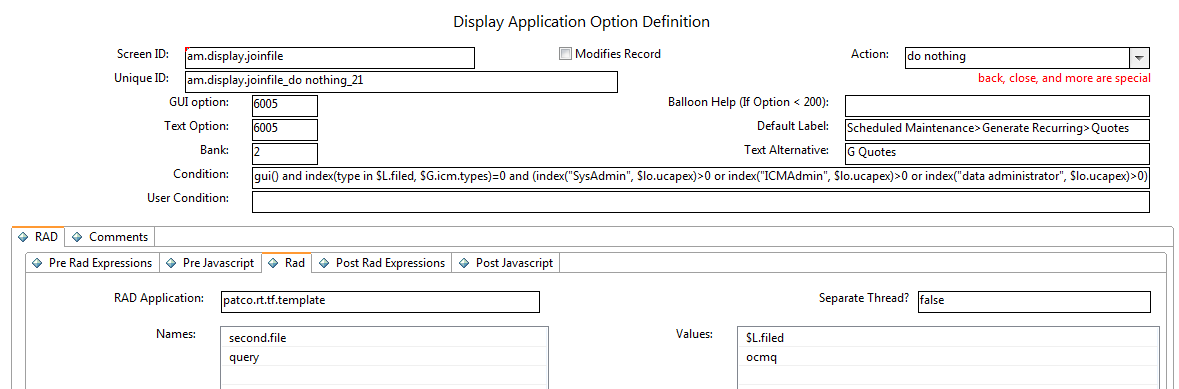
Create a copy of the display option for this sub-menu, and then modify it to refer to the OCMQ table records, as demonstrated in the following image.
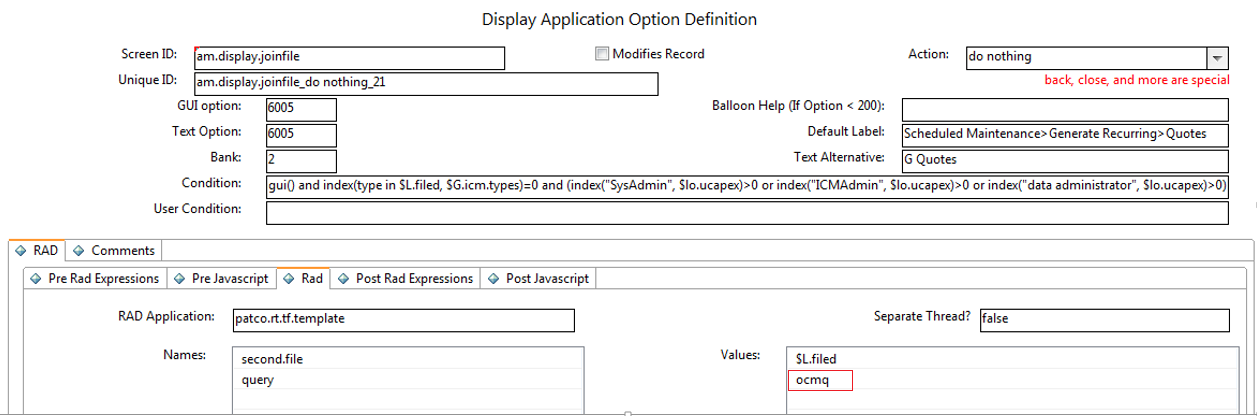
When you have done this, two sub-menus are displayed in the CI form. One sub-menu refers to the Request table records, and the other sub-form refers to the OCMQ table records.
Step 7: Rename the connector
Rename the Process Designer catalog connector. For example, name the connector "Open New PD Request."
If you customized the "Open New Request" catalog connector, the out-of-box Process Designer catalog connector is named "NEW941Open New PD Request" after the migration process.
If you did not customize the "Open New Request" catalog connector, the out-of-box Process Designer catalog connector is named "Open New Request" after the migration process. In this case, you need to rename the catalog connector to "NEW941Open New PD Request," and then restore the non-Process Designer catalog connector.
Step 8: Modify the connector wizard
- In the "svcCat Select Connector" wizard, click File Selection > JavaScript, and then change the connector name for the bundle catalog in the connector list from "Open New Request" to "Open New PD Request" (or to the name that you used in step 6).
- Click the Next Wizard tab, and then change the connector name for Process Designer Request from "Open New Request" to "Open New PD Request" (or to the name that you used in step 6).
- Restore the Next wizard for Request Management.
Step 9: Restore the Classic Request profile setting to the Operator form
Update the JavaScript of the "operator.view" and "operator.search" display screens as follows.
Before update
if(lib.ProcessDesignerEnablement.isRequestEnabled())
{
vars['$L.showRMProfile']=false;
}
After update
if(lib.ProcessDesignerEnablement.isRequestEnabled() && vars['$G.nonpd.request.in.parallel']!==true)
{
vars['$L.showRMProfile']=false;
}
Step 10: Assignment delegation
In order for Classic Request Management to work in parallel with Process Designer-based Request Fulfilment, you must enable approval delegation to differentiate between these two modules.
To do this, you must modify the ApprovalDelegationGroups and ApprovalUtil script libraries to support both Classic and Process Designer-based Request delegation.
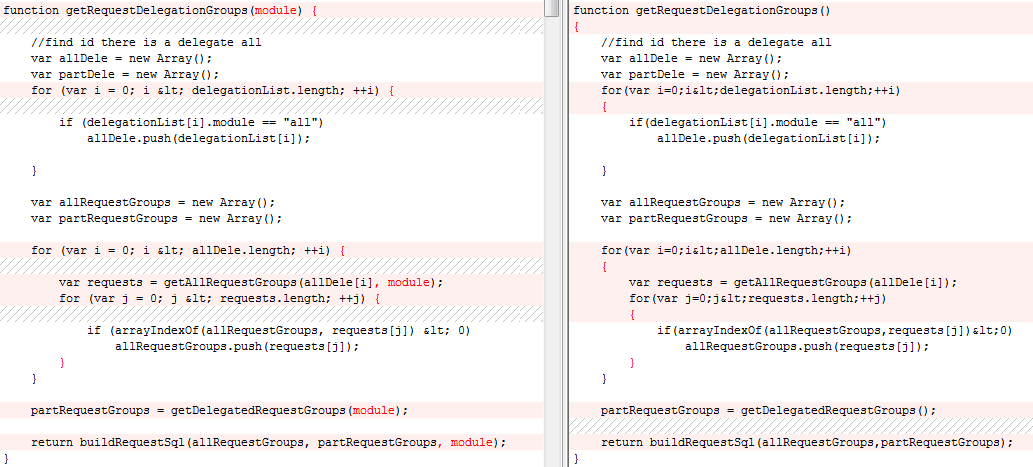
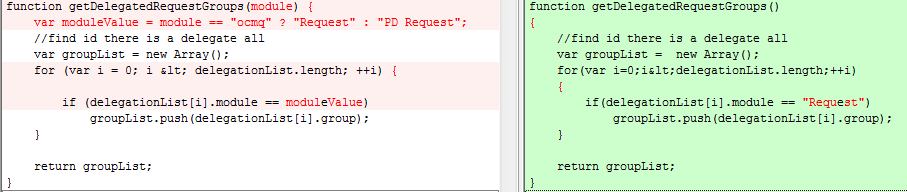
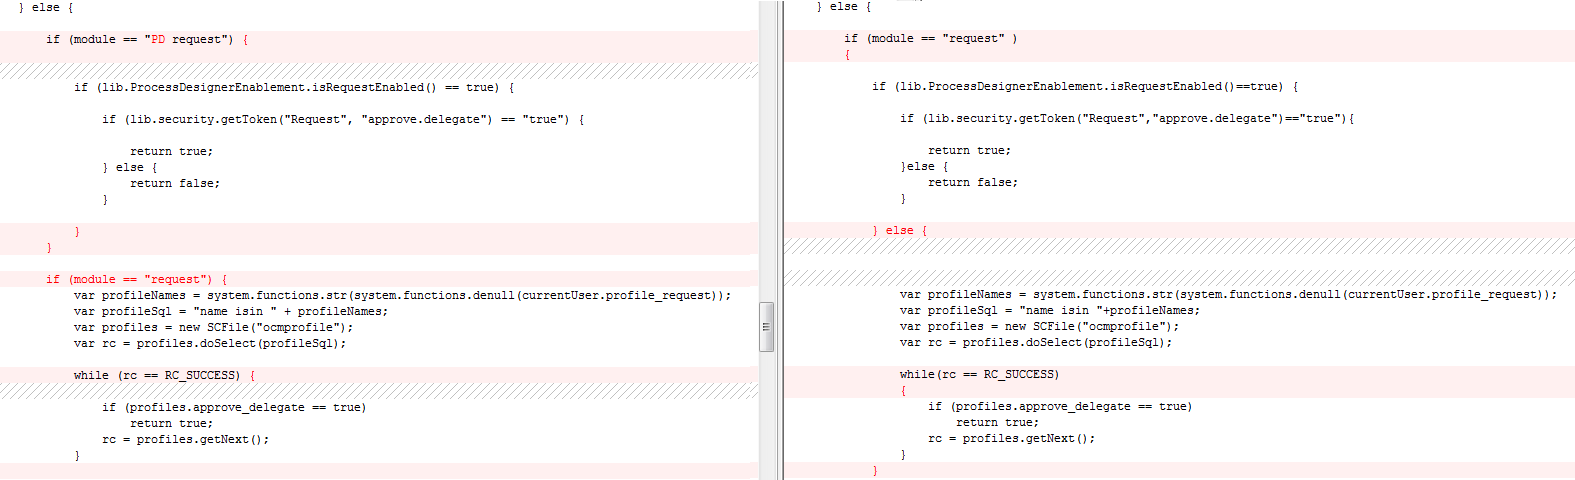
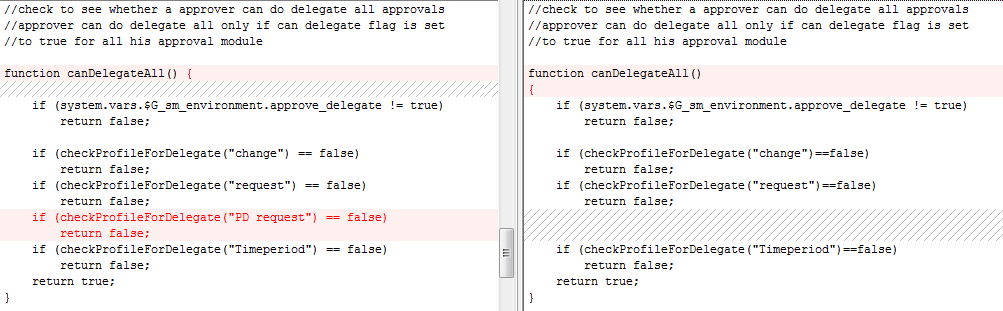
Note In the following illustrations, the updated code is displayed on the left-hand side, and the original code is displayed on the right-hand side.
ApprovalDelegationGroups
For the Classic Codeless request modules to work in parallel, you must add the module (file name) information to the following functions, which are related to request delegation:
-
addDelegateGroups

-
buildRequestSql

-
getAllRequestGroups

-
getRequestDelegationGroups
The value of the delegation module field in approvals delegation is "Request" for Classic request and "PD Request" for Process Designer-based request. You must configure the related JavaScript function accordingly.
-
getDelegatedRequestGroups
This function retrieves the "Request" delegation group for "ocmq" and the "PD Request" delegation group "request."
-
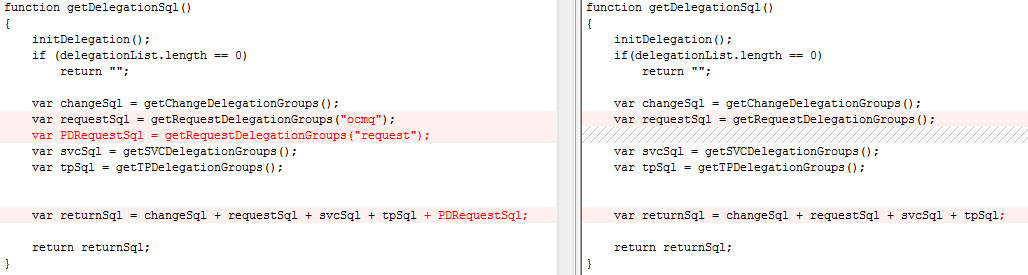
getDelegationSql
This function retrieves the delegation SQL for all modules. Therefore, you must configure it to retrieve the delegation SQL for both the ocmq and request tables, and to combine the results.
ApprovalUtil
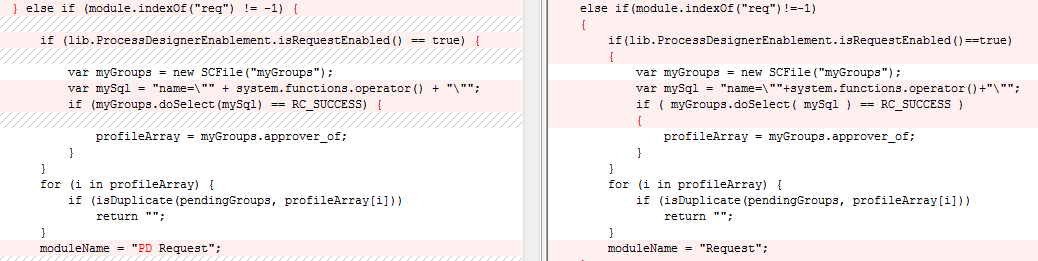
Functions in this library use "Request" as the delegation module name for the Classic request module (when Process Designer-based request is not enabled), and "PD Request" as the delegation module name for Process Designer-based request (when Process Designer-based request is enabled).
For the Classic and Process Designer-based request modules to work in parallel, you must configure the following functions to use "Request" as the delegation module name for the Classic request module and "PD Request" as the delegation module name for Process Designer-based request.
-
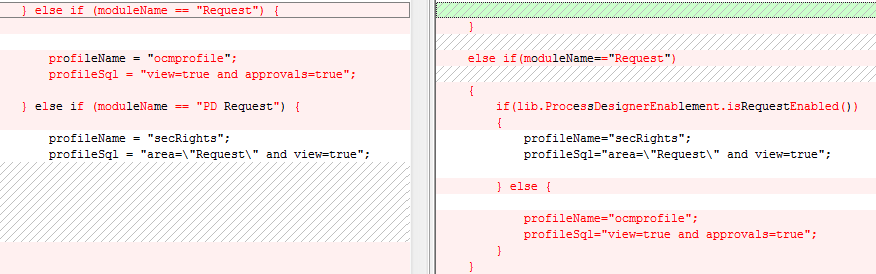
checkDelegates
The function uses the profile ("ocmprofile") to check user rights in Classic systems, and uses the role-based access model ("secRole" and "secRights") in Process Designer-based systems.
-
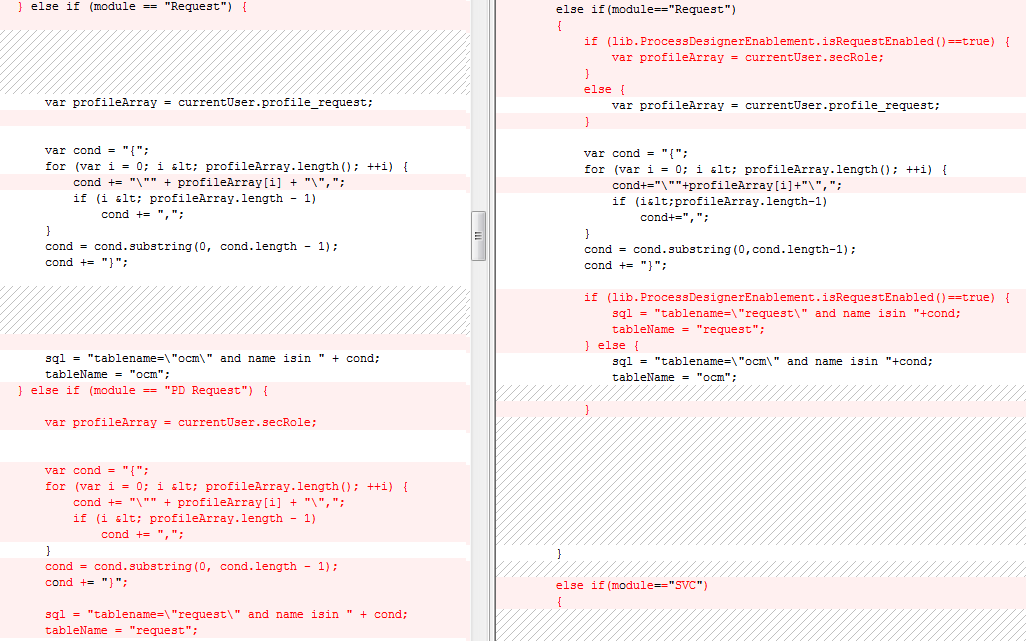
getQuery

-
addFolderQuery
-
checkProfileForDelegate
-
canDelegateAll
-
getCanDelegateModulesValue

-
getCanDelegateModules

Step 11: Use the model table for Classic Request Management
After you run the Applications Upgrade Utility, Process Designer-based Request Fulfilment uses the new productCatalog table instead of the model table. Additionally, the tool updates all references to the model table to refer to the productCatalog table.
In order for the Classic Request Management to work in parallel with Process Designer-based Request Fulfilment, the two modules must use the two tables separately.
To achieve this, first restore the links that reference the model table.
Links that must be updated
| Link name | Field |
|---|---|
|
"ocmlrec" |
part.no |
|
"ocml.view.summary" |
part.no |
|
"ocml.view.space" |
model |
|
"ocml.view.space" |
part.no |
|
"ocml.view.sap" |
part.no |
|
"ocml.view.detail" |
parts.part.no |
|
"ocml.view.detail" |
part.no |
|
"ocml.view.default.workorder" |
parts.part.no |
|
"ocml.view.default.workorder" |
model |
|
"ocml.view.default.workorder" |
part.no |
|
"ocml.view.default.telecom" |
parts.part.no |
|
"ocml.view.default.telecom" |
part.no |
|
"ocml.view.default.office.move" |
parts.part.no |
|
"ocml.view.default.office.move" |
part.no |
|
"ocml.view.default.internal" |
parts.part.no |
|
"ocml.view.default.internal" |
part.no |
|
"ocml.view.default" |
parts.part.no |
|
"ocml.view.default" |
model |
|
"ocml.view.default" |
part.no |
|
"ocml.search" |
part.no |
|
"ocml.copy.model" |
number |
|
"ocml" |
part.no |
|
"ocmco" |
part.no |
|
"ocmco" |
parent.parts |
|
"model" |
component.part.no |
|
"model" |
parent.parts |
|
"model" |
model |
|
"advFind.search.line.item" |
part.no |
Links to update (optional)
| Link name | Field |
|---|---|
|
"Survey.CFG.addFilter" |
part.no |
|
"stock" |
part.no |
|
"software.counter" |
installation.models |
|
"software.counter" |
license.models |
|
"problem" |
failing.component |
|
"problem" |
model |
|
"pc.software.files" |
part.no |
|
"modelvendor.lkup" |
part.no |
|
"modelvendor" |
part.no |
|
"model.icm" |
model |
|
"IM.summary" |
model |
|
"IM.master.update" |
model |
|
"IM.master.open" |
model |
|
"IM.master.link" |
model |
|
"IM.master.close" |
model |
|
"furnishings" |
model |
|
"device2" |
model |
|
"device.template" |
bios.model |
|
"device.template" |
part.no |
|
"device.telecom" |
part.no |
|
"device.storage" |
part.no |
|
"device.softwarelicense" |
part.no |
|
"device.officeelectronics" |
print.model |
|
"device.officeelectronics" |
part.no |
|
"device.networkcomponents" |
part.no |
|
"device.mainframe" |
part.no |
|
"device.handhelds" |
part.no |
|
"device.furnishings" |
part.no |
|
"device.example" |
bios.model |
|
"device.example" |
part.no |
|
"device.displaydevice" |
part.no |
|
"device.display" |
part.no |
|
"device.computer" |
bios.model |
|
"device.computer" |
part.no |
|
"device" |
part.no |
|
"DEFAULT ICM" |
model |
|
"dec.device.pc" |
part.no |
|
"contract.template" |
part.no |
|
"contract.template" |
model |
|
"contract" |
part.no |
|
"contract" |
model |
|
"configurationItemNode" |
bios.model |
|
"configurationItemNode" |
part.no |
|
"configurationItem" |
bios.model |
|
"configurationItem" |
part.no |
|
"cm3t" |
part.no |
|
"cm3t" |
product.no. |
|
"cm3r" |
part.no |
|
"cm3r" |
product.no. |
|
"advFind.search.contract" |
part.no |
|
"advFind.search.contract" |
model |
|
"advFind.search.ci" |
part.no |
Next, configure synchronization between the "model" and "productCatalog" tables. Classic Request Management and Process Designer-based Request Fullfillment use the two tables separately, but you must ensure that the data in the two tables is consistent.
Step 12: Modify the KM knowledge base
After you run the Applications Upgrade Utility, the "Request_Library" KM knowledge base is updated to use the request table. You must add another library that uses the OCMQ table, so that the KM knowledge base can support both Classic and Process Designer-based request.
For example, you might create the following knowledgebase:
-
Knowledgebase Name: Quote_Library
-
Display Name: Quote
-
Type: sclib
-
Search Server Name: <your search server name>
Then, in the Field Definitions tab, configure the following field definitions.
|
Field name |
Alias |
Type |
Hitlist |
Index weight |
Match |
Sort |
|---|---|---|---|---|---|---|
|
number |
id |
String |
true |
Level 4 |
false |
|
|
status |
problemstatus;kmstatus |
String |
true |
No Index |
true |
|
|
current.phase |
phase |
String |
true |
No Index |
true |
|
|
brief.description |
title |
String |
true |
Level 4 |
false |
|
|
description |
description |
String |
false |
Level 3 |
false |
|
|
requested.for |
requestedfor |
String |
true |
Default |
false |
|
|
requestor.name |
requestorname |
String |
true |
Default |
false |
|
|
requested.date |
requesteddate |
Date |
true |
No Index |
false |
|
|
company |
company |
String |
true |
No Index |
false |
|
|
assigned.dept |
assignment |
String |
true |
Default |
true |
|
|
assigned.to |
assignee |
String |
true |
Default |
false |
|
|
priority |
priority |
String |
true |
No Index |
true |
|
|
justification |
justification |
String |
false |
Default |
false |
|
|
sysmodtime |
sysmodtime |
Date |
true |
No Index |
false |
|
Step 13: Ensure the related record functionality works correctly
For more information about how to update your forms to use the new related record functionality, refer to Upgrade to the Process Designer related record subform.
If you want your system to allow the creation of related records between the Classic Request Management and Process Designer-based Request Fullfillment modules, you must configure the screlationtype table appropriately. For example, if you want to allow the creation of related quotes from Incident records, you must add a new record in the screlationtype table.
For more information about how to perform data migration for screlation records, refer to Related Records data migration.
After you have done this, you can create related quotes from incident records.
Step 14: Restart the server
After you have configured Request Management and Request Fulfillment to run in paralel, you must restart the Service Managerserver.


