


Integrate NNMi with a Directory Service through LDAP
This chapter contains information about integrating NNMi with a directory service for consolidating the storage of user names, passwords, and, optionally, NNMi user group assignments. This topic includes the following sections:
- NNMi User Access Information and Configuration Options
- Configure NNMi to Access a Directory Service
- Directory Service Queries
- Directory Service Configuration for Storing NNMi User Groups
- Verify the Directory Service Configuration
- LDAP Configuration File Reference
- Switch to the nms-auth-config.xml File
NNMi User Access Information and Configuration Options
Together, the following items define an NNMi user:
- The user name uniquely identifies the NNMi user. The user name provides access to NNMi and receives incident assignments.
- The password is associated with the user name to control access to the NNMi console or NNMi command line.
- NNMi user group membership controls the information available and the type of actions that a user can take in the NNMi console. User group membership also controls the availability of NNMi commands to the user.
NNMi provides several options for where the NNMi user access information is stored, as described in the following topics. The following table indicates the databases that store the NNMi user access information for each configuration option.
If a user is not specified using External (Option 3), NNMi does not have a mechanism for enforcing password policies, such as password strength checks and other account protection mechanisms. It is recommended that you implement best practices for password policy management, including requiring that users change passwords at regular intervals.
|
Mode |
User Accounts |
User Group |
User Group Membership |
|---|---|---|---|
|
Internal (Option 1) |
NNMi |
NNMi |
NNMi |
|
Mixed (Option 2) |
Mixed (account name in NNMi, account passwords in LDAP) |
NNMi |
NNMi |
|
External (Option 3) |
Directory Service |
Both |
Directory Service |
NNMi communicates with the directory service using Lightweight Directory Access Protocol (LDAP). If you want to use LDAP with NNMi, use one of the following modes shown in previous table:
-
Mixed Mode (Originally Referred to as Option 2): Some NNMi User Information in the NNMi Database and Some NNMi User Information in the Directory Service
Using mixed mode involves configuring NNMi to store user names, user groups and user group mappings in the NNMi database, and relying on the directory service for user names and passwords (User Accounts). That means that account name information must be stored in both NNMi and LDAP, however account passwords should only be stored in LDAP.
-
External Mode (Originally Referred to as Option 3): All NNMi User Information in the Directory Service
When using external mode, there is no need to add user account information to NNMi, as all user account information is stored using LDAP.
NNMi's LDAP configuration file: In both the modes, NNMi retrieves the LDAP server information from a configuration file. You can use the ldap.properties or nms-auth-config.xml file to specify the details of the LDAP server information.
When adding new user accounts, or modifying existing accounts using mixed mode, you must select the Directory Service Account check box. When configuring User Accounts do not select the Directory Service Account check box for some users and not select it for others as a method of combining internal, mixed, and external modes. Doing so is an unsupported configuration.
When NNMi is integrated with a directory service for some or all of the user access information, the user account and user group definition statement on the Server tab of the System Information window indicates the type of information that was obtained through LDAP queries.
Single sign-on (SSO) between NNMi and other applications is not dependent on how the NNMi user access information is configured or where this information is stored.
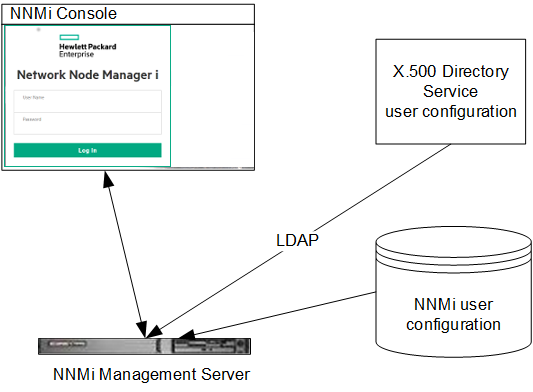
Internal Mode (Originally Referred to as Option 1): All NNMi User Information in the NNMi Database
With configuration using the internal mode, NNMi accesses the NNMi database for all user access information, which the NNMi administrator defines and maintains in the NNMi console. The user access information is local to NNMi. NNMi does not access a directory service, and NNMi is not configured to retrieve information from the LDAP configuration file.
The following diagram shows the information flow for this option, which is appropriate in the following situations:
- The number of NNMi users is small.
- No directory service is available.
For information about setting up all user information in the NNMi database, see Control Access with NNMi Accounts in the NNMi help. You do not need to read this chapter.
NNMi User Sign-in Information Flow for the Internal Mode
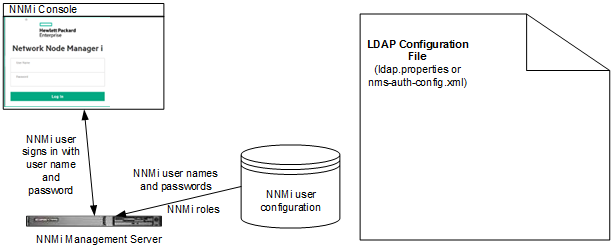
Mixed Mode (Originally Referred to as Option 2): Some NNMi User Information in the NNMi Database and Some NNMi User Information in the Directory Service
With configuration using the mixed mode, NNMi accesses a directory service for the user name and password, which are defined externally to NNMi and are also available to other applications. The mapping of users to NNMi user groups is maintained in the NNMi console. The configuration and maintenance of NNMi user access information is a joint effort as described here:
- The directory service administrator maintains the user names and password in the directory service.
- TheNNMi administrator enters the user names (as defined in the directory service), user group definitions, and the user group mappings in the NNMi console.
- The NNMi administrator configures NNMi's LDAP configuration file to describe the directory service structure for user names to NNMi.
Because user names must be entered in two places, user name maintenance must be performed in both places.
The following diagram shows the information flow for this option, which is appropriate in the following situations:
- The number of NNMi users is small, and a directory service is available.
- The NNMi administrator wants to control the user groups instead of requiring a directory service change for each user group change.
- The directory service group definitions are available.
NNMi User Sign-in Information Flow for Using Mixed Mode
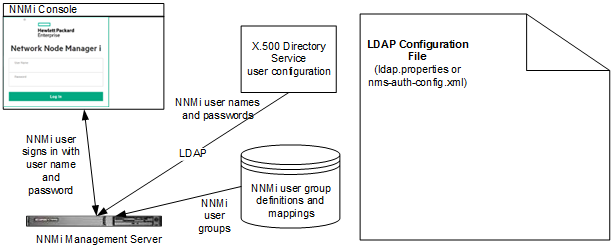
External Mode (Originally Referred to as Option 3): All NNMi User Information in the Directory Service
With configuration using the external mode, NNMi accesses a directory service for all user access information, which is defined externally to NNMi and is available to other applications. Membership in one or more directory service groups determines the NNMi user groups for the user.
The configuration and maintenance of NNMi user access information is a joint effort as described here:
- The directory service administrator maintains the user names, passwords, and group membership in the directory service.
- The NNMi administrator maps the directory service groups to NNMi user groups in the NNMi console.
- The NNMi administrator configures NNMi's LDAP configuration file to describe the directory service database schema for user names and groups to NNMi.
The following diagram shows the information flow for this option, which is appropriate for environments where the directory service can be modified to include user groups that align with the people who need access to NNMi.
Because this option is an expansion of the mixed mode scenario, recommends the following configuration process:
- Configure and verify NNMi user name and password retrieval from the directory service.
- Configure NNMi user group retrieval from the directory service.
For information about integrating with a directory service for all user information, see the rest of this chapter and Control Access with a Directory Service in the NNMi help.
NNMi User Sign-in Information Flow for Using External Mode
Configure NNMi to Access a Directory Service
You can configure directory service access in one of the following files:
-
nms-auth-config.xml
recommends that the
nms-auth-config.xmlfile be used for new configurations.The file is located at:
- Windows:
%nnmdatadir%\nmsas\NNM\conf - Linux:
$NnmDataDir/nmsas/NNM/conf
By default, the
nms-auth-config.xmlfile available in this location does not contain the XML elements required for LDAP configuration.You can manually add all the necessary XML elements to this file by following the instructions in this section.
NNMi places a sample
nms-auth-config.xmlfile in a different location, which can be used for reference.The sample
nms-auth-config.xmlfile is available in the following location:- Windows:
%nnminstalldir%\newconfig\HPOvNnmAS\nmsas\conf - Linux:
$NnmInstallDir/newconfig/HPOvNnmAS/nmsas/conf
You can also copy the entire
<ldapLogin>element from the samplenms-auth-config.xmlfile, and then make necessary modifications. - Windows:
-
ldap.properties
The
ldap.propertiesfile is now deprecated. recommends that thenms-auth-config.xmlfile be used for new configurations. You cannot configure NNMi to work with multiple LDAP servers in different domains if you use theldap.propertiesfile.The file is located at:
- Windows:
%NNM_SHARED_CONF%\ldap.properties - Linux:
$NNM_SHARED_CONF/ldap.properties
- Windows:
You cannot use both the nms-auth-config.xml and ldap.properties files at the same time.
For information about this file, see LDAP Configuration File Reference. Also see Examples.
For information about the general structure of a directory service, see Directory Service Queries.
For configuration with mixed mode, complete the following tasks:
- Task 1 Back up the Current NNMi User Information
- Task 2 Optional. Configure Secure Communications to the Directory Service
- Task 3 Configure User Access from the Directory Service
- Task 4: Test the User Name and Password Configuration
- Task 9: Clean up to Prevent Unexpected Access to NNMi
- Task 10: Optional. Map the User Groups to Security Groups
For configuration with external mode, complete the following tasks:
- Task 1 Back up the Current NNMi User Information
- Task 2 Optional. Configure Secure Communications to the Directory Service
- Task 3 Configure User Access from the Directory Service
- Task 4: Test the User Name and Password Configuration
- Task 5: (External Mode only) Configure Group Retrieval from the Directory Service
-
If you plan to store NNMi user groups in the directory service, the directory service must be configured with the NNMi user groups. For more information, see Directory Service Configuration for Storing NNMi User Groups.
- Task 6: (External Mode only) Map the Directory Service Groups to NNMi User Groups (Configuration Option 3 only
- Task 7: (External Mode only) Test the NNMi User Group ConfigurationConfiguration Option 3 only)
- Task 8: (External Mode only) Verify NNMi User Groups for Incident Assignment(Configuration Option 3 only)
- Task 9: Clean up to Prevent Unexpected Access to NNMi
- Task 10: Optional. Map the User Groups to Security Groups
Task 1 Back up the Current NNMi User Information
Back up the user information in the NNMi database:
nnmconfigexport.ovpl -c account -u <user>
-p <password> -f NNMi_database_accounts.xml
Task 2 Optional. Configure Secure Communications to the Directory Service
If the directory service requires the use of secure sockets layer (SSL), import your company’s certificate into the NNMi truststore as described in "Configure an SSL Connection to the Directory Service" .
Task 3 Configure User Access from the Directory Service
Complete this task for mixed mode and external mode only. Follow the appropriate procedure for your directory service. This task includes the following sections:
Do one of the following depending on your environment or configuration choice.
- Use nms-auth-config.xml
- Use ldap.properties
(For detailed configuration instructions, see User Identification.)
Use the nms-auth-config.xml file when you want to configure multiple LDAP servers (in a federated LDAP environment or when the LDAP servers are in an HA cluster).
-
Go to the following directory:
- Windows:
%nnmdatadir%\nmsas\NNM\conf - Linux:
$NnmDataDir/nmsas/NNM/conf
- Windows:
- Back up the
nms-auth-config.xmlfile that was shipped with NNMi, and then open the file in any text editor. -
Specify values for the following elements:
NNMi places a sample
nms-auth-config.xmlfile in a different location, which can be used for reference.The sample
nms-auth-config.xmlfile is available in the following location:- Windows:
%nnminstalldir%\newconfig\HPOvNnmAS\nmsas\conf - Linux:
$NnmInstallDir/newconfig/HPOvNnmAS/nmsas/conf
You can also copy the entire
<ldapLogin>element from the samplenms-auth-config.xmlfile, and then make necessary modifications.Elements of the ldapLogin Section of nms-auth-config.xml <enabled>
</enabled>
Specify
trueto use thenms-auth-config.xmlfile. By default, this element is set tofalse.<userRoleFilterList>
</userRoleFilterList>
Specify the NNMi roles to which NNMi users can assign incidents.
To assign incidents to all operators, administrators, and guests, add this:
<userRoleFilterList>
admin guest level2 level1
</userRoleFilterList>
<connectTimeLimit>
</connectTimeLimit>
Specify the connection timeout value in milliseconds. The default value is 10000 (10 seconds). If you are encountering timeouts during NNMi user sign in, increase this value. For example:
<connectTimeLimit>10000</connectTimeLimit><searchTimeLimit>
</searchTimeLimit>
Specify the search timeout value in milliseconds. The default value is 10000 (10 seconds). If you are encountering timeouts during NNMi user sign in, increase this value. For example:
<searchTimeLimit>10000</searchTimeLimit><server>Container element to contain all LDAP configuration information.
<host>
</host>
URL of the LDAP server with port. For example: ldap://hostname.domain.com
<secure>
</secure>
Specify
trueif you want to use HTTPS. Otherwise, specifyfalse.</server>Repeat the
serverelement when you want to use multiple LDAP servers. Use oneserverelement for each LDAP server.<bindCredential>
Container element to include bind credentials (mandatory for directory services that do not support anonymous logon).
<bindDN>
</bindDN>
Specify the bind DN.
<bindCredential>
</bindCredential>
Specify the bind DN password in the encrypted format.
Run the "nnmldap.ovpl -encrypt<mypassword>" command to encrypt the password.
<users>Container element to include all user configuration details.
<userSearch>
Container element to include the configuration information for searching users.
<base>
</base>
For example:
<base> SAMAccountName={0} </base>.<base> uid={0} </base><baseContextDN></baseContextDN>For Active Directory, specify the portion of the directory service domain that stores user records.
For example:
For Active Directory
CN=user,OU=Users,OU=Accounts,DC=mycompany,DC=comFor other LDAP technologies
ou=People,o=example.com</userSearch>
</users>
You can repeat the
configurationelement when you want to use multiple LDAP servers with different LDAP configurations.For example, if one unit in your organization uses Windows and Active Directory, and another unit uses Linux with OpenLDAP, you could specify two different <configuration> elements, one for Active Diectory and the other for OpenLDAP.
. Use one set of
base-baseContextDNelements for each LDAP server.In an HA cluster of LDAP servers, the identity information is identical across servers and you should use multiple
serverelements in a singleconfigurationelement, instead of using multipleconfigurationelements.However, in other environments, it is possible to specify different base formats for different LDAP servers (for example,
SAMAccountNamefor one anduidfor the other). - Windows:
-
After editing the
nms-auth-config.xmlfile (in the <NnmInstallDir>/nmsas/NNM/confdirectory), run the following command:- Windows:%nnminstalldir%\bin\nnmldap.ovpl -reload
- Linux:$NnmInstallDir/bin/nnmldap.ovpl -reload
- Back up the
ldap.propertiesfile that was shipped with NNMi, and then open the file in any text editor. -
Specify the URL for accessing the directory service.
-
Uncomment the following line:
java.naming.provider.url
-
Set the property to
ldap://<myldapserver>:<port>/.In this instance,
<myldapserver>is the fully-qualified hostname of the directory server and <port > is the communication port of the directory server.
Example:
java.naming.provider.url=ldap://testsystem.example.com:636
-
-
Specify the security mode.
-
Uncomment the following line:
java.naming.security.provider
-
Set the property to
SSLif you want NNMi to communicate with the directory server securely.
Example:
java.naming.security.provider=SSL
-
-
If you directory service installation does not support anonymous access, specify credentials for a valid directory service user.
-
Uncomment the following lines:
bindDN
bindCredential -
Set these properties to the following values:
bindDN=<mydomain>\\<myusername>
bindCredential=<mypassword>
In this instance, <
mydomain> with the name of the directory server domain;<myusername>and<mypassword>are the user name and password for accessing the directory server.If you plan to add the password in plain text, specify a user name with read-only access to the directory service. If you plan to specify an encrypted password, use the following command to encrypt the plain text password before adding it to the
ldap.propertiesfile:nnmldap.ovpl -encrypt <mypassword>
This encrypted password only works for the NNMi instance you create it for. Do not attempt to use it for a different NNMi instance.
For more information see the nnmldap.ovpl reference page, or the Linux manpage.
-
-
Specify the portion of the directory service domain that stores user records.
-
Uncomment the following line:
baseCtxDN -
Set this properties to the portion of the directory service domain that stores user records.
Examples:
-
Microsoft Active Directory
baseCtxDN=CN=Users,DC=hostname,DC=example,DC=com -
Other LDAP
baseCtxDN=ou=People,o=example.com
-
-
- Modify the
userRoleFilterListparameter value to specify the NNMi roles to which NNMi operators can assign incidents.
Task 4: Test the User Name and Password Configuration
-
In the LDAP configuration file, set
defaultRoletoguestfor testing purposes. (You can change this value at any time.)-
In
nms-auth-config.xml, add the following content before theusersearchelement:<defaultRoles>
<role>guest</role>
</defaultRoles>
- In
ldap.properties, adddefaultRole=guest.
-
- Save the LDAP configuration file.
-
Force NNMi to re-read the file by running the following command:
nnmldap.ovpl -reload -
Log on to the NNMi console with a user name and password that are defined in the directory service.
Run this test with a user name that is not already defined in the NNMi database.
-
Verify the user name and NNMi role (Guest) in the title bar of the NNMi console.
-
Test the configuration for one user by running the following command:
nnmldap.ovpl -diagnose <NNMi_user>
Replace
<NNMi_user>with the sign-in name of an NNMi user as defined in the directory service.Examine the command output and respond appropriately. Suggestions include:
- Verify that you completed Task 3 correctly.
- Follow the detailed configuration process in User Identification.
- Repeat step 1 through step 5 until you see the expected result when signing in to the NNMi console.
Task 5: (External Mode only) Configure Group Retrieval from the Directory Service
Complete this task for configuration option 3. Follow the appropriate procedure for your directory service. This task includes the following sections:
-
Use the nms-auth-config.xml File
- Use ldap.properties
Do one of the following depending on your environment or configuration choice.
(For detailed configuration instructions, see User Identification.)
Use the nms-auth-config.xml File
-
Go to the following directory:
- Windows:
%nnmdatadir%\nmsas\NNM\conf - Linux:
$NnmDataDir/nmsas/NNM/conf
- Windows:
- Take a backup of the
nms-auth-config.xmlfile, and then open the file with a text editor. -
Modify the following elements:
NNMi places a sample
nms-auth-config.xmlfile in a different location, which can be used for reference.The sample
nms-auth-config.xmlfile is available in the following location:- Windows:
%nnminstalldir%\newconfig\HPOvNnmAS\nmsas\conf - Linux:
$NnmInstallDir/newconfig/HPOvNnmAS/nmsas/conf
You can also copy the entire
<ldapLogin>element from the samplenms-auth-config.xmlfile, and then make necessary modifications.Elements of the ldapLogin Section of nms-auth-config.xml <roleSearch>Placeholder element to include the user role information.
<roleBase>member={1}</roleBase>Replace member with the name of the group attribute that stores the directory service user ID in the directory service domain..
<roleContextDN>
</roleContextDN>
Specify the portion of the directory service domain that stores group records.
The format is a comma-separated list of directory service attribute names and values. For example:
- For Microsoft Active Directory
CN=Users,DC=ldapserver,DC=mycompany,DC=com -
For other LDAP technologies
ou=Groups,o=example.com
</roleSearch> - Windows:
- Save the file.
-
Run the following command:
nnmldap.ovpl -reload
- Back up the
ldap.propertiesfile, and then open the file in any text editor. - Uncomment the
rolesCtxDNproperty. -
Set the property to the portion of the directory service domain that stores group records.
Examples:
-
Microsoft Active Directory
rolesCtxDN=CN=Users,DC=hostname,DC=example,DC=com -
Other LDAP
rolesCtxDN=ou=Groups,o=example.com
-
- Save the file.
-
Run the following command:
nnmldap.ovpl -reload
Task 6: (External Mode only) Map the Directory Service Groups to NNMi User Groups
-
In the NNMi console, map the predefined NNMi user groups to their counterparts in the directory service:
-
Open the User Groups view.
In the Configuration workspace, expand Security, and then click User Groups.
- Double-click the admin row.
- In the Directory Service Name field, enter the full distinguished name of the directory service group for NNMi administrators.
- Click the
 Save and Close icon.
 -
Repeat step b through step d for each of the guest, level1, and level2 rows.
These mappings provide NNMi console access. Every user who will access the NNMi console must be in a directory service group that is mapped to one of the predefined NNMi user groups named in this step.
-
-
For other groups containing one or more NNMi users in the directory service, create a new user group in the NNMi console:
-
Open the User Groups view.
In the Configuration workspace, expand Security, and then click User Groups.
-
Click the
 New icon, and then enter the information for the group:
- Set Unique Name to any unique value. Short names are recommended.
- Set Display Name to the value users should see.
- Set Directory Service Name to the full distinguished name of the directory service group.
- Set Description to text that describes the purpose of this NNMi user group.
- Click Save and Close.
- Repeat step b and step c for each additional directory service group of NNMi users.
These mappings provide topology object access in the NNMi console. Each directory service group can be mapped to multiple NNMi user groups.
-
Task 7: (External Mode only) Test the NNMi User Group Configuration
- Save NNMi's LDAP configuration file (
ldap.propertiesornms-auth-config.xml). -
Force NNMi to re-read the LDAP configuration file by running the following command:
nnmldap.ovpl -reload -
Log on to the NNMi console with a user name and password that are defined in the directory service.
Run this test with a user name that is not already defined in the NNMi database and is a member of a directory service group that is mapped to the admin, level1, or level2 NNMi user group.
-
Verify the user name and NNMi role (as configured in the Display Name field in the User Group view) in the title bar of the NNMi console.
- If user signin works correctly, continue with Task 8.
- If user signin does not work correctly, continue with step 5, next.
After each test, sign out of the NNMi console to clear the session credentials.
-
Test the configuration for one user by running the following command:
nnmldap.ovpl -diagnose<NNMi_user>Replace
<NNMi_user>with the sign-in name of an NNMi user as defined in the directory service.Examine the command output and respond appropriately. Suggestions include:
- Verify that you completed Task 5 correctly.
- Verify that you completed Task 6 correctly for each of the predefined NNMi user groups.
- Follow the detailed configuration process in User Group Identification.
- Repeat step 1 through step 4 until you see the expected result when signing in to the NNMi console.
Task 8: (External Mode only) Verify NNMi User Groups for Incident Assignment
- Log on to the NNMi console with a user name and password that are defined in the directory service.
- In any incident view, select an incident, and then click Actions > Assign > Assign Incident. Verify that you can assign the incident to a user in each of the NNMi roles specified by the
userRoleFilterListparameter.
Task 9: Clean up to Prevent Unexpected Access to NNMi
- Optional. Change the value of, or comment out, the
defaultRoleelement or parameter in the LDAP configuration file. -
(Mixed Mode only) To store user group membership in the NNMidatabase, reset the user access information in the NNMidatabase as follows:
-
Remove any pre-existing user access information. (Delete all rows in the User Accounts view.)
For instructions, see Delete a User Account in the NNMi help.
-
For each NNMi user, create a new object in the User Accounts view for the user name.
- For the Name field, enter the user name as defined in the directory service.
- Select the Directory Service Account check box.
- Do not specify a password.
For more information, see User Account Tasks in the NNMi help.
-
For each NNMi user, map the user account to one or more NNMi user groups.
For instructions, see User Account Mapping Tasks in the NNMi help.
-
Update incident ownership so that each assigned incident is associated with a valid user name.
For instructions, see Manage Incident Assignments in the NNMi help.
-
-
(External Mode only) To rely on the user group membership in the directory service, reset the user access information in the NNMi database as follows:
-
Remove any pre-existing user access information. (Delete all rows in the User Accounts view.)
For instructions, see Delete a User Account in the NNMi help.
-
Update incident ownership so that each assigned incident is associated with a valid user name.
For instructions, see Manage Incident Assignments in the NNMi help.
-
Task 10: Optional. Map the User Groups to Security Groups
For instructions, see Security Group Mapping Tasks in the NNMi help.
Directory Service Queries
NNMi uses LDAP to communicate with a directory service. NNMi sends a request, and the directory service returns stored information. NNMi cannot alter the information that is stored in the directory service.
This section contains the following topics:
- Directory Service Access
- Directory Service Content
- Information Owned by the Directory Service Administrator
- User Identification
- User Group Identification
LDAP queries to a directory service use the following format:
ldap://<directory_service_host>:<port>/<search_string>
ldapis the protocol indicator. Use this indicator for both standard connections and SSL connections to the directory service.<directory_service_host>is the fully-qualified name of the computer that hosts the directory service.<port>is the port that the directory service uses for LDAP communication. The default port for non-SSL connections is 389. The default port for SSL connections is 636.<search_string>contains the information request. For more information, see "Directory Service Content" and RFC 1959, An LDAP URL Format, which is available at:
labs.apache.org/webarch/uri/rfc/rfc1959.txt
You can enter an LDAP query as a URL in a web browser to verify that you have the correct access information and the correct structure for the search string.
If the directory service (for example, Active Directory) does not permit anonymous access, the directory service denies LDAP queries from a web browser. In this case, you can use a third-party LDAP browser (for example, the LDAP browser included in Apache Directory Studio) to validate your configuration parameters.
A directory service stores information such as user names, passwords, and group membership. To access the information in a directory service, you must know the distinguished name that references the storage location of the information. For sign-in applications, the distinguished name is a combination of variable information (such as a user name) and fixed information (such as the storage location of user names). The elements that make up a distinguished name depend on the structure and content of the directory service.
The following examples show possible definitions for a group of users called USERS-NNMi-Admin. This group lists the directory service user IDs that have administrative access to NNMi. The following information pertains to these examples:
- The Active Directory example is for the Windows operating system.
- The other directory services example is for Linux operating systems.
- The file shown in each example is a portion of a lightweight directory interchange format (LDIF) file. LDIF files provide for sharing directory service information.
- The figure shown in each example is a graphical representation of the directory service domain that provides an expanded view of the information in the LDIF file excerpt.
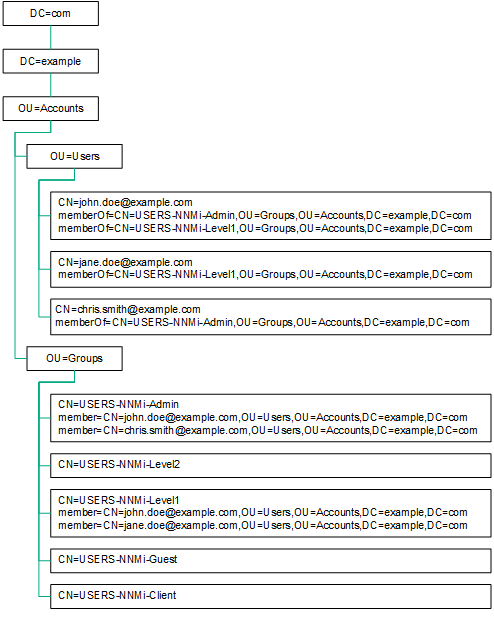
Example content structure for Active Directory
In this example, the following items are of interest:
- The distinguished name of the user John Doe is:
CN=john.doe@example.com,OU=Users,OU=Accounts,DC=example,DC=com - The distinguished name of the group USERS-NNMi-Admin is:
CN=USERS-NNMi-Admin,OU=Groups,OU=Accounts,DC=example,DC=com - The group attribute that stores the directory service user ID is:
member
Example LDIF file excerpt:
groups |USERS-NNMi-Admin
dn: CN=USERS-NNMi-Admin,OU=Groups,OU=Accounts,DC=example,DC=com
cn: USERS-NNMi-Admin
description: Group of users for NNMi administration.
member: CN=john.doe@example.com,OU=Users,OU=Accounts,
 DC=example,DC=com
member: CN=chris.smith@example.com,OU=Users,OU=Accounts,
  DC=example,DC=com
The following diagram illustrates this directory service domain.
Example Domain for Active Directory
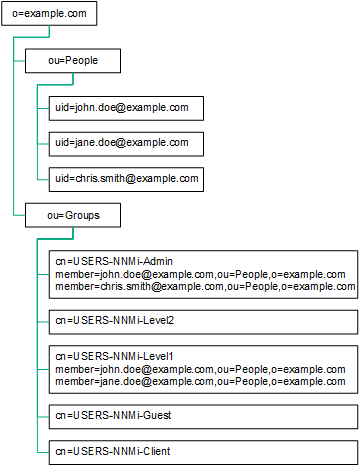
Example content structure for other directory services
In this example, the following items are of interest:
- The distinguished name of the user John Doe is:
uid=john.doe@example.com,ou=People,o=example.com - The distinguished name of the group USERS-NNMi-Admin is:
cn=USERS-NNMi-Admin,ou=Groups,o=example.com - The group attribute that stores the directory service user ID is:
member
Example LDIF file excerpt:
groups |USERS-NNMi-Admin
dn: cn=USERS-NNMi-Admin,ou=Groups,o=example.com
cn: USERS-NNMi-Admin
description: Group of users for NNMi administration.
member: uid=john.doe@example.com,ou=People,o=example.com
member: uid=chris.smith@example.com,ou=People,o=example.com
Example Domain for Other Directory Services
Information Owned by the Directory Service Administrator
The following tables list the information to obtain from the directory service administrator before configuring NNMi for LDAP access to a directory service.
- If you plan to use the directory service for user names and passwords only (mixed mode only), gather the information for "Retrieve User Names and Passwords from a Directory Service".
- If you plan to use the directory service for all NNMi access information (external mode only), gather the information for each of the following tables.
User identification applies to mixed mode and external mode.
The distinguished name for user identification is the fully-qualified method of locating one user in the directory service. NNMi passes the user distinguished name in an LDAP request to the directory service.
In the LDAP configuration file, the user distinguished name is the concatenation of the <base> and <baseContextDN> elements in the nms-auth-config.xml file (the baseFilter value and the baseCtxDN value in the ldap.properties file). If the password returned by the directory service matches the sign-in password the user entered into the NNMi console, user sign in continues.
For mixed mode, the following information applies:
-
For NNMi console access, NNMi examines the following information and grants the user the highest possible privileges:
- The value of the
defaultRoleparameter in the LDAP configuration file - This user’s membership in the predefined NNMi user groups in the NNMi console
- The value of the
- For NNMi topology object access, NNMi grants access according to the security group mappings for the NNMi user groups to which this user belongs in the NNMi console.
For external mode, the following information applies:
-
For NNMi console access, NNMi examines the following information and grants the user the highest possible privileges:
- The value of the
defaultRoleparameter in the LDAP configuration file - This user’s membership in the directory service groups that are mapped (with the Directory Service Name field) to the predefined NNMi user groups in the NNMi console
- The value of the
- For NNMi topology object access, NNMi grants access according to the security group mappings for the groups to which this user belongs in the directory service (as mapped to NNMi user groups in the NNMi console).
Active Directory user identification example
In the nms-auth-config.xml file
If the nms-auth-config.xml file contains <base>CN={0}</base><baseContextDN>OU=Users,OU=Accounts,DC=example,DC=com</baseContextDN>, and a user signs in to NNMi as john.doe, the string passed to the directory service is:
CN=john.doe,OU=Users,OU=Accounts,DC=example,DC=com
In the ldap.properties file
If baseFilter is set to CN={0}, baseCtxDN is set to OU=Users,OU=Accounts,DC=example,DC=com, and a user signs in to NNMi as john.doe, the string passed to the directory service is:
CN=john.doe,OU=Users,OU=Accounts,DC=example,DC=com
Other directory services user identification example
In the nms-auth-config.xml file
If the nms-auth-config.xml file contains <base>uid={0}@example.com</base><baseContextDN>ou=People,o=example.com</baseContextDN>, and a user signs in to NNMi as john.doe, the string passed to the directory service is:
uid=john.doe@example.com,ou=People,o=example.com
In the ldap.properties file
If baseFilter is set to uid={0}@example.com, baseCtxDN is set to ou=People,o=example.com, and a user signs in to NNMi as john.doe, the string passed to the directory service is:
uid=john.doe@example.com,ou=People,o=example.com
Configure NNMi User Access from the Directory Service (Detailed Approach)
If the simple approach described in Task 3 did not work correctly, follow these steps:
- Obtain the required user information from the directory service administrator.
-
Verify the format of user names in the directory service by completing the appropriate procedure:
- LDAP browser approach for Active Directory and other directory services: See Determine How the Directory Service Identifies a User (LDAP Browser Approach)
- Web browser approach for other directory services: See Determine How the Directory Service Identifies a User (Web Browser Approach).
-
Open the
ldap.propertiesfile in any text editor.For information about the
ldap.propertiesfile, see LDAP Configuration File Reference. -
Set the
java.naming.provider.urlparameter to the URL for accessing the directory service through LDAP.- LDAP browser approach: Obtain this information from the LDAP browser configuration.
- Web browser approach: Include the values of <directory_service_host> and <port> from Determine How the Directory Service Identifies a User (Web Browser Approach).
To specify multiple directory service URLs, separate each URL with a single space character.
-
If you configured secure communications to the directory service, uncomment (or add) the following line:
java.naming.security.protocol=ssl -
(Active Directory only) Set the
bindDNandbindCredentialparameters as follows:- Replace
<mydomain>with the name of Active Directory domain. -
Replace
<myusername>and<mypassword>with a user name and password for accessing the Active Directory server.If you plan to add the password in plain text, specify a user name with read-only access to the directory service.
If you plan to specify an encrypted password, use the following command to encrypt the plain text password before adding it to theldap.propertiesfile:nnmldap.ovpl -encrypt <mypassword>
This encrypted password only works for the NNMi instance you create it for. Do not attempt to use it for a different NNMi instance.
For more information see the nnmldap.ovpl reference page, or the Linux manpage.
- Replace
- Set the
baseCtxDNparameter to the elements of the distinguished user name that are the same for multiple users. -
Set the
baseFilterparameter to correlate user names as they are entered for NNMi signin to the way user names are stored in the directory service.This value is the element of the distinguished user name that changes for each user. Replace the actual user name with the expression
{0}. - Test the configuration as described in Task 4.
Determine How the Directory Service Identifies a User (LDAP Browser Approach)
In a third-party LDAP browser, do the following:
- Navigate to the portion of the directory service domain that stores group information.
- Identify a group of users, and then examine the format of the distinguished names for the users associated with that group.
Determine How the Directory Service Identifies a User (Web Browser Approach)
-
In a supported web browser, enter the following URL:
ldap://<directory_service_host>:<port>/<user_search_string>
- <directory_service_host> is the fully-qualified name of the computer that hosts the directory service.
- <port> is the port that the directory service uses for LDAP communication.
- <user_search_string> is the distinguished name for one user name that is stored in the directory service.
-
Evaluate the results of the directory service access test.
- If the request times out or you see a message that the directory service could not be reached, verify the values of <directory_service_host> and <port>, and then repeat step 1.
- If you see a message that the directory service does not contain the requested entry, verify the value of <user_search_string>, and then repeat step 1.
- If you see the appropriate user record, the access information is correct. The value of <user_search_string> is the distinguished user name.
User group identification applies to external mode.
NNMi determines the user groups for an NNMi user as follows:
- NNMi compares the values of the external names of all user groups configured in the NNMi console with the names of the directory service groups.
- For any user group match, NNMi then determines whether the NNMi user is a member of that group in the directory service.
In the NNMi console, short text strings identify the unique names of the predefined NNMi user groups that grant NNMi console access. These text strings are also required by the defaultRole and userRoleFilterList parameters in the LDAP configuration file. The following table maps the unique names of these groups to their display names.
|
NNMi Role Name in the |
User Group Unique Name and Text String in NNMi Configuration Files |
|---|---|
|
Administrator |
admin |
|
Global Operators |
globalops |
|
Operator Level 2 |
level2 |
|
Operator Level 1 |
level1 |
|
Guest |
guest |
|
Web Service Client |
client |
The NNMi Global Operators User Group (globalops) grants access to all topology objects only. A user must be assigned to one of the other User Groups (admin, level2, level1, or guest) to access the NNMi console.
The administrator should not map the globalops User Group to any security group because this User Group is, by default, mapped to all security groups.
Configure User Group Retrieval from the Directory Service (Detailed Approach)
If the simple approach described in Task 5 did not work correctly, follow these steps:
- Obtain the required user information from the directory service administrator.
-
Verify the format of group names and group members in the directory service by completing the appropriate procedure:
- LDAP browser approach for Active Directory: See Determine How the Directory Service Identifies a Group and Group Membership (LDAP Browser Approach for Active Directory).
- LDAP browser approach for other directory services: See Determine How the Directory Service Identifies a Group and Group Membership (LDAP Browser Approach for Other Directory Services).
- Web browser approach for other directory services: See Determine How the Directory Service Identifies a Group (Web Browser Approach).
-
Configure the LDAP configuration file.
-
Use the nms-auth-config.xml file:
- Open the
nms-auth-config.xmlfile in any text editor. -
Set the
roleelement to correlate user names to the way user names are stored for groups in the directory service. Replace the actual user name with one of the following expressions:- Use
{0}to denote the user name entered for signin (for example,john.doe). - Use
{1}to denote the distinguished name of the authenticated user as returned by the directory service (for example,uid=john.doe@example.com,ou=People,o=example.com).
- Use
-
Set the
roleContextDNelement to the portion of the directory service domain that stores group records.The format is a comma-separated list of directory service attribute names and values. For example:
- For Microsoft Active Directory
CN=Users,DC=ldapserver,DC=mycompany,DC=com -
For other LDAP technologies
ou=Groups,o=example.coms
- For Microsoft Active Directory
- Open the
-
Use the
ldap.propertiesfile:- Open the
ldap.propertiesfile in any text editor. - Set the
rolesCtxDNparameter to the elements of the distinguished group name that are the same for multiple groups. -
Set the
roleFilterparameter to correlate user names to the way user names are stored for groups in the directory service. Replace the actual user name with one of the following expressions:- Use
{0}to denote the user name entered for signin (for example,john.doe). - Use
{1}to denote the distinguished name of the authenticated user as returned by the directory service (for example,uid=john.doe@example.com,ou=People,o=example.com).
- Use
- Set the uidAttributeID parameter to the name of the group attribute that stores the user ID.
- Open the
-
- Test the configuration as described in Configure NNMi to Access a Directory Service.
Determine How the Directory Service Identifies a Group and Group Membership (LDAP Browser Approach for Active Directory)
In a third-party LDAP browser, do the following:
- Navigate to the portion of the directory service domain that stores user information.
- Identify a user who requires access to NNMi, and then examine the format of the distinguished names for the groups associated with that user.
- Navigate to the portion of the directory service domain that stores group information.
- Identify the groups that correspond to NNMi user groups, and then examine the format of the names for the users associated with a group.
Determine How the Directory Service Identifies a Group and Group Membership (LDAP Browser Approach for Other Directory Services)
In a third-party LDAP browser, do the following:
- Navigate to the portion of the directory service domain that stores group information.
- Identify the groups that correspond to NNMi user groups, and then examine the format of the distinguished names for those groups.
- Also examine the format of the names for the users associated with a group.
Determine How the Directory Service Identifies a Group (Web Browser Approach)
-
In a supported web browser, enter the following URL:
ldap://<directory_service_host>:<port>/<group_search_string>
- <directory_service_host> is the fully-qualified name of the computer that hosts the directory service.
- <port> is the port that the directory service uses for LDAP communication.
- <group_search_string> is the distinguished name for a group name that is stored in the directory service, for example:
cn=USERS-NNMi-Admin,ou=Groups,o=example.com
-
Evaluate the results of the directory service access test.
- If you see a message that the directory service does not contain the requested entry, verify the value of <group_search_string>, and then repeat step 1.
- If you see the appropriate list of groups, the access information is correct.
- Examine the group properties to determine the format of the names for the users associated with that group.
Directory Service Configuration for Storing NNMi User Groups
If you plan to store NNMi user groups in the directory service (external mode), the directory service must be configured with NNMi user group information. Ideally, the directory service already contains appropriate user groups. If this is not the case, the directory service administrator can create new user groups specifically for NNMi user group assignment.
Because directory service configuration and maintenance procedures depend on the specific directory service software and your company’s policies, those procedures are not documented here.
Verify the Directory Service Configuration
-
Verify the NNMi LDAP configuration by running the following command:
nnmldap.ovpl -info
If the reported configuration is not as expected, verify the settings in the
ldap.propertiesfile. -
Force NNMi to re-read the LDAP configuration file by running the following command:
nnmldap.ovpl -reload
-
Test the configuration for one user by running the following command:
nnmldap.ovpl -diagnose <NNMi_user>
Replace
<NNMi_user>with the sign-in name of an NNMi user as defined in the directory service.Examine the command output and respond appropriately.
-
Verify that the directory service contains the expected records. Use a web browser or a third-party LDAP browser (for example, the LDAP browser included in Apache Directory Studio) to examine the directory service information.
Information about the format of a query to a directory service can be found in RFC 1959, An LDAP URL Format, which is available at:
-
View the log file to verify that the sign-in request is correct, and to determine if any errors occurred:
Windows:
%NnmDataDir%\log\nnm\nnm.logLinux:
$NnmDataDir/log/nnm/nnm.log-
A message similar to the following line indicates that the directory service requires HTTPS communication. In this case, enable SSL as described in "Configure an SSL Connection to the Directory Service" .
javax.naming.AuthenticationNotSupportedException: [LDAP: error code 13 - confidentiality required]
-
A message similar to the following line indicates that a timeout occurred while communicating with the directory service. In this case, increase the value of
searchTimeLimitin theldap.propertiesfile.javax.naming.TimeLimitExceededException: [LDAP: error code 3 - Timelimit Exceeded]
-
LDAP Configuration File Reference
nms-auth-config.xml
The nms-auth-config.xml file contains the settings for communicating with and building LDAP queries to the directory service in the XML format. This section prov ides a reference of only the elements that are relevant for LDAP configuration.
This file is located as follows:
- Windows:
%nnmdatadir%\nmsas\NNM\conf - Linux:
$NnmDataDir/nmsas/NNM/conf
By default, the nms-auth-config.xml file available in this location does not contain the XML elements required for LDAP configuration.
You can manually add all the necessary XML elements to this file by following the instructions in this section.
NNMi places a sample nms-auth-config.xml file in a different location, which can be used for reference.
The sample nms-auth-config.xml file is available in the following location:
- Windows:
%nnminstalldir%\newconfig\HPOvNnmAS\nmsas\conf - Linux:
$NnmInstallDir/newconfig/HPOvNnmAS/nmsas/conf
You can also copy the entire <ldapLogin> element from the sample nms-auth-config.xml file, and then make necessary modifications.
After editing the nms-auth-config.xml file (in the <NnmInstallDir>/nmsas/NNM/conf directory) , force NNMi to read the LDAP configuration again by running the following command:
- Windows:%nnminstalldir%\bin\nnmldap.ovpl -reload
- Linux:$NnmInstallDir/bin/nnmldap.ovpl -reload
<ldapLogin> |
|
<!-- This is the on/off switch for LDAP authentication. Set to true to use LDAP-based authentication--> <enabled>true</enabled> |
|
<!-- This element enables you to specify which users can assign incidents.--> <userRoleFilterList>admin guest level2 level1</userRoleFilterList> |
|
<!-- If <enabled> is set to true, define one or more <configuration> elements to specify LDAP parameters --> <configuration> |
|
<!-- The filter (optional) is matched against the user, that tries to log on, to determine if this is the right configuration to use. This is useful when multiple configurations are specified, to skip non-applicable LDAP servers to reduce log-on time. --> <filter> <usernamePattern>.*@hpe\.com</usernamePattern> </filter> |
|
<!-- Time limit for performing searches against the LDAP server --> <searchTimeLimit>10000</searchTimeLimit> <connectTimeLimit>10000</connectTimeLimit> |
|
<!-- Define at least one server URL; multiple servers can be specified for High-Availability clusters.--> <server> <hostname>ldaps://ldap.domain1.com</hostname> <secure>true</secure> </server> <server> <hostname>ldaps://ldap.domain2.com</hostname> <secure>true</secure> </server> |
|
<!---Optional. Bind credential and encrypted password for connecting to LDAP servers that do not support anonymous access. Use "nnmldap.ovpl -encrypt" to create the encrypted password.---> <bindCredential>
<bindDN>someUser@some.com</bindDN>
<bindCredential>someEncryptedPassword</bindCredential>
</bindCredential> |
|
<!-- This element defines the rules to search for users in this LDAP configuration --> <users> <!-- Optional. Filter that is matched against the user that attempts to log on. The intention is to skip non-applicable LDAP configurations to reduce the log-on time. Note that this is a Java regular expression.--> <filter> <usernamePattern>.*some\.com</usernamePattern> </filter> |
|
<!-- Optional. The display name expression to show in the NNMi console.--> <displayName>${sn},${givenName} (HPE)</displayName>
|
|
<!-- Optional. Default roles that are given to all users that are authenticated against this configuration --> <defaultRoles>
<role>guest</role></defaultRoles> |
|
<!-- One or more search configuration for locating user accounts. The pattern "{0}" in the string will be replaced with the log-on name entered by the user in the log-on screen. --> <userSearch> <base>uid={0}</base><baseContextDN>ou=People,o=domain.com</baseContextDN> </userSearch> </users> |
|
<!-- Defines the rules to search for user roles or groups in this LDAP configuration --> <roles>
|
|
<!-- Optional. Filter that defines which users should be attempted for role lookup against this configuration. Note that this is a Java regular expression. --> <filter><usernamePattern>x</usernamePattern></filter>
|
|
<!-- One or more search configuration for locating LDAP groups that contain the authenticated user DN. Use the string "{1}" where the user's DN would appear. --> <roleSearch> <roleBase>member={1}</roleBase><roleContextDN>ou=Groups,o=some.com</roleContextDN> </roleSearch>
<roleSearch> <roleBase>GroupMember={1}</roleBase> <roleContextDN>CN=Groups,DC=mycompany,DC=com</roleContextDN>
</roleSearch>
|
</roles> |
</configuration> |
</ldapLogin> |
ldap.properties
The ldap.properties file is now deprecated.
The ldap.properties file contains the settings for communicating with and building LDAP queries to the directory service. This file is located as follows:
- Windows:
%NNM_SHARED_CONF%\ldap.properties - Linux:
$NNM_SHARED_CONF/ldap.properties
You cannot configure NNMi to work with multiple LDAP servers in different domains if you use the ldap.properties file.
In the ldap.properties file, the following conventions apply:
- To comment out a line, begin that line with a number sign character (
#). -
The following rules apply to special characters:
- To specify a backslash character (\), comma (,), semicolon (;), plus sign (+), less than sign (<), or greater than sign (>), escape the character with a backslash character. For example: \\ or \+
- To include a space character ( ) as the first or last character in a string, escape the space character with a backslash character (\).
- To include a number sign character (#) as the first character in a string, escape the number sign character with a backslash character (\).
Characters not mentioned here do not need to be escaped or quoted.
After editing the ldap.properties file, force NNMi to re-read the LDAP configuration by running the following command:
nnmldap.ovpl -reload
The following table describes the parameters in the ldap.properties file.
The initial ldap.properties file might not include all parameters that are listed in the following table. Add the parameters you need.
|
Parameter |
Description |
|---|---|
|
java.naming.provider.url |
Specifies the URL for accessing the directory service. The format is the protocol (ldap), followed by the fully-qualified host name of the directory server, optionally followed by the port number. For example: java.naming.provider.url=ldap://ldap.example.com:389/ If the port number is omitted the following defaults apply:
If you specify multiple directory service URLs, NNMi uses the first directory service when possible. If that directory service is not accessible,NNMi queries the next directory service in the list, and so forth. Separate each URL with a single space character. For example: java.naming.provider.url=ldap://ldap1.example.com/ ldap:// ldap2.example.com/ Configuring this parameter enables LDAP communication between NNMi and the directory service. To disable LDAP communication, comment out this parameter, and then save the file. NNMi ignores the configuration in the |
|
java.naming.security.protocol |
Specifies the connection protocol specification.
|
|
bindDN |
For a directory service (such as Active Directory) that does not permit anonymous access, specify the user name for accessing the directory service. For example: bindDN=region1\\john.doe@example.com
|
|
bindCredential |
When bindCredential=PasswordForJohnDoe |
|
baseCtxDN |
Specifies the portion of the directory service domain that stores user records. The format is a comma-separated list of directory service attribute names and values. For example:
For more information, see User Identification. |
|
baseFilter |
Specifies the format of user names for signing in to NNMi. The format is the name of the directory service user name attribute and a string that relates the entered user sign-in name to the format of names in the directory service. The user name string contains the expression
For more information, see User Identification. |
|
defaultRole |
Optional. Specifies a default role that applies to any directory service user who signs in to NNMi through LDAP. The value of this parameter applies regardless of where user group mappings are stored (in the NNMi database or in the directory service). If a user is directly configured for a predefined NNMi user group, NNMi grants the user the superset of privileges for the default role and the assigned user group. Valid values are as follows: Note that although These names are the unique names of the predefined NNMi user group names. For example: defaultRole=guest If commented out or omitted, NNMi does not use a default role. |
|
rolesCtxDN |
Specifies the portion of the directory service domain that stores group records. The format is a comma-separated list of directory service attribute names and values. For example:
In other directory services (not Active Directory), for a faster search, you can identify one or more directory service groups that contain NNMi user groups. If the group names form a pattern, you can specify a wildcard. For example, if the directory service includes groups named rolesCtxDN=cn=USERS-NNMi-*,ou=Groups,o=example.com Configuring this parameter enables directory service queries for NNMi user group assignments through LDAP. To disable directory service queries for NNMi user group assignments through LDAP, comment out this parameter, and then save the file. NNMi ignores the remaining user group-related values in the For more information, see User Group Identification. |
|
roleFilter |
Specifies the format of group member names in the directory service group definitions. The format is the name of the directory service group attribute for user ID and a string that relates the entered user sign-in name to the format of user IDs in the directory service. The user name string contains one of the following expressions and any other characters that are needed to match the directory service formatting of group member names.
For more information, see User Group Identification. |
|
uidAttributeID |
Specifies the group attribute that stores the directory service user ID. For example: uidAttributeID=member For more information, see User Group Identification. |
|
userRoleFilterList |
Optional. Limits the NNMi user groups whose associated users can be assigned incidents in the NNMi console. The user groups in this list apply only to directory service user names authenticated through LDAP. This parameter provides functionality that is not available when NNMi user groups are assigned in the NNMi console and stored in the NNMi database. The format is a semicolon-separated list of the unique names for one or more predefined NNMi user group names. userRoleFilterList=admin;globalops;level2;level1 |
|
searchTimeLimit |
Optional. Specifies the timeout value in milliseconds. The default value is 10000 (10 seconds). If you are encountering timeouts during NNMi user sign in, increase this value. For example: searchTimeLimit=10000 |
Example ldap.properties file for Active Directory
An example ldap.properties file follows for Active Directory:
java.naming.provider.url=ldap://MYldapserver.example.com:389/
bindDN=MYdomain\\MYusername
bindCredential=MYpassword
baseCtxDN=CN=Users,DC=MYldapserver,DC=EXAMPLE,DC=com
baseFilter=CN={0}
defaultRole=guest
rolesCtxDN=CN=Users,DC=MYldapserver,DC=EXAMPLE,DC=com
rolesCtxDN=CN=Users,DC=MYldapserver,DC=EXAMPLE,DC=com
roleFilter=member={1}
uidAttributeID=member
userRoleFilterList=admin;level2;level1
Example ldap.properties file for other directory services
An example ldap.properties file follows for other directory services:
java.naming.provider.url=ldap://MYldapserver.example.com:389/
baseCtxDN=ou=People,o=EXAMPLE.com
baseFilter=uid={0}
defaultRole=guest
rolesCtxDN=ou=Groups,o=EXAMPLE.com
roleFilter=member={1}
uidAttributeID=member
userRoleFilterList=admin;level2;level1
Switch to the nms-auth-config.xml File
If you want to move NNMi's LDAP configuration to the nms-auth-config.xmlfile from the ldap.properties file, follow these steps:
The nms-auth-config.xml file enables you to configure multiple LDAP servers with NNMi. With the ldap.properties file, you cannot configure more than one LDAP server with NNMi.
The ldap.properties file is now deprecated.
- Take a backup of the existing
ldap.propertiesfile. You can use this copy of the file as a reference while completing the following tasks. -
Complete the tasks listed in Configure NNMi to Access a Directory Service
Follow the steps highlighted for the
nms-auth-config.xmlfile in this section. -
Run the following command:
- Windows:%nnminstalldir%\bin\nnmldap.ovpl -reload
- Linux:$NnmInstallDir/bin/nnmldap.ovpl -reload