


Set Up NNMi in a High Availability Cluster
This topic includes the following sections:
- Verify the Prerequisites to Configuring NNMi for High Availability
- Configure High Availability
- Shared NNMi Data in High Availability Environments
- Maintain the High Availability Configuration
- Unconfigure NNMi from an HA Cluster
- Patch NNMi under HA
- Troubleshoot the HA Configuration
- High Availability Configuration Reference
High availability (HA) refers to a hardware and software configuration that provides for uninterrupted service should some aspect of the running configuration fail. An HA cluster defines a grouping of hardware and software that works together to ensure continuity in functionality and data when failover occurs.
NNMi provides support for configuring NNMi to run in an HA cluster under one of several separately purchased HA products. Most of the NNM Smart Plug-ins (iSPIs), but not the NNM iSPI NET Diagnostics Server, can also run under HA.
The NNM iSPI NET Diagnostics Server can be installed with NNM iSPI NET and NNMi Ultimate.
When configuring NNMi in a high availability cluster, it is important to follow the standard configuration procedures included in this chapter. Nonstandard configurations are not supported.
This topic provides a template for configuring NNMi to run in an HA environment. This chapter does not provide end-to-end instructions for configuring your HA product. The HA configuration commands that NNMi provides are wrappers around the commands for the supported HA products.
This topic contains the following sections:
Verify the Prerequisites to Configuring NNMi for High Availability
Successful configuration of NNMi for High Availability (HA) depends on a number of factors:
- Appropriate hardware
- Understanding of the HA product
- A methodical approach to configuration
Before you begin to configure NNMi for HA, complete the following preparation:
- Verify that NNMi supports your HA product by checking the information in the NNMi Support Matrix.
-
Read the documentation for your HA product to familiarize yourself with the capabilities of that product and to make design decisions.
HA product documentation changes frequently. Be sure you have the most recent versions available.
-
Verify that each system to be included as a node in an NNMi HA cluster meets the following requirements:
- Meets all requirements described in the documentation for the HA product.
-
Includes at least two network interface cards (NIC cards).
Review the HA product, operating system, and NIC card documentation to verify that these products can all work together.
-
Supports the use of a virtual IP address for the HA resource group. This IP address is the IP address used for the NNMi license.
WSFC requires multiple virtual IP addresses, one for the HA cluster and one for each HA resource group. In this case, the virtual IP address of the NNMi HA resource group is the IP address used for the NNMi license.
-
Supports the use of a shared disk or disk array
Review the HA product, operating system, and disk manufacturer documentation to verify that these products, including the related SCSI cards, can all work together.
- Meets all requirements for NNMi as described in the NNMi Support Matrix.
- If you plan to run any NNM iSPIs in the NNMi HA cluster, read the appropriate NNM iSPI documentation for additional HA configuration prerequisites.
-
Allocate the following virtual IP addresses and host names:
- One virtual IP address for the HA cluster (WSFC only)
- One virtual IP address for each HA resource group to be configured
- From any system, use the
nslookupcommand to validate correct DNS response for all of the IP addresses and hostnames you allocated in step 5. - Verify that operating system of each system is at the correct version and patch level for the HA product and NNMi.
-
If necessary, install the HA product.
- Prepare the shared disk as described in Prepare the Shared Disk Manually in High Availability Environments.
-
Use the commands for your HA product to configure (if necessary) and test an HA cluster.
The HA cluster provides such functionality as checking the application heartbeat and initiating failover. The HA cluster configuration must, at a minimum, include the following items:
- (Linux only) ssh, remsh, or both
- (Windows only) Virtual IP address for the HA cluster that is DNS-resolvable
- Virtual hostname for the HA cluster that is DNS-resolvable
-
A resource group that is unique and specific to NNMi.
NNMi expects that the NNMi HA resource group includes all required resources. If this is not the case, use the HA product functionality to manage dependencies between the NNMi HA resource group and the other HA resource groups. For example, if Oracle is running in a separate HA resource group, configure the HA product to ensure that the Oracle HA resource group is fully started before the HA product starts the NNMi HA resource group.
- WSFC: Use the create cluster wizard of Failover Cluster Management for Windows Server.
- VCS: Not necessary. Product installation created an HA cluster.
- RHCS: Add services (cman, rgmanager) as described in the RHCS documentation.
For information about testing the resources that you will place into the NNMi HA resource group, see HA Resource Testing
This text is used in the following locations:
IPv6 chapter in the Deployment Reference
UCMDB integration chapter in the Integration Reference
Configure High Availability
This section describes the procedures for configuring a new High Availability (HA) configuration for NNMi. It contains the following topics:
- Configure NNMi Certificates for High Availability
- Configure NNMi for High Availability
- Configure NNM iSPIs for High Availability
- Configure NNMi for High Availability in an Oracle Environment
When configuring HA, note the following general guidelines:
- RHCS configuration requires a complete restart of the HA cluster daemons, including all applications, on each node in the HA cluster. Plan your configuration effort accordingly.
-
Do not use the RHCS luci Web interface to change the NNMi resource group. The luci Web interface removes the NNMi resource group global variables from /etc/cluster/cluster.conf if changes are made to the NNMi resource group. The NNMi resource group global variables are required for proper NNMi HA functionality.
- By default, in an HA environment, the SNMP source address is set to a physical cluster node address. To set the SNMP source address to the NNM_INTERFACE (which is set to the virtual IP address), you must edit the ov.conf file and set the value for IGNORE_NNM_IF_FOR_SNMP to OFF. (By default, this setting is set to ON.)
-
When making file changes under High Availability (HA), you must make the changes on both nodes in the cluster. If the change requires you to stop and restart the NNMi management server, you must put the nodes in maintenance mode before running the
ovstopandovstartcommands. See Maintenance Mode for more information.
Configure NNMi Certificates for High Availability
The NNMi installation process configures a self-signed certificate for secure communications between the NNMi console and the NNMi database. The process for configuring NNMi for High Availability (HA) correctly shares the self-signed certificate among the primary and secondary cluster nodes. You do not need to take any extra steps to use the default certificate with NNMi running under HA.
If you want to use a different self-signed certificate or a Certificate Authority (CA)-signed certificate for NNMi communications, you must do some additional work. After obtaining the new certificate, complete the steps shown in "Working with Certificates in High-Availability Setups" . You can complete this procedure before or after configuring NNMi for HA.
Configure NNMi for High Availability
The two distinct phases of configuring NNMi for High Availability (HA) are as follows:
-
Copy the NNMi data files to the shared disk.
- Do this task on the primary node, as described in step 1 through step 9 of Configure NNMi on the Primary Cluster Node
-
Configure NNMi to run under HA.
- Do this task on the primary node, as described in step 10 through step 15 of Configure NNMi on the Primary Cluster Node
- Also do this task on the secondary node, as described in Configure NNMi on the Secondary Cluster Nodes
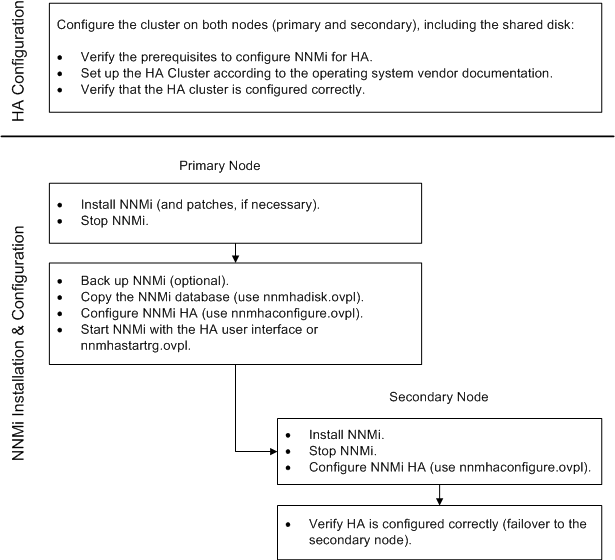
Designate one HA cluster node as the primary NNMi management server. This is the node you expect to be active most of the time. Configure the primary node, and then configure all other nodes in the HA cluster as secondary nodes.
You cannot configure NNMi for HA simultaneously on multiple cluster nodes. After the HA configuration process is completed on one cluster node, proceed with the HA configuration on the next node, and so forth until NNMi is configured for HA on all nodes in the cluster environment.
During failover, the NNMi console is unresponsive. After failover completes, NNMi users must log on to continue their NNMi console sessions.
The following diagram provides an illustration of the NNMi HA configuration process.
NNMi HA Configuration Workflow
If you encounter errors during HA configuration, do the following:
- Unconfigure NNMi from the HA environment by running the
nnmhaunconfigure.ovplcommand. - Correct the condition indicated by the error message(s).
-
Reconfigure NNMi into the HA environment by running the
nnmhaconfigure.ovplcommand.(RHCS only) For the
nnmhaconfigure.ovplandnnmhaunconfigure.ovplcommands to work properly, the<failoverdomains/>tag must exist in the/etc/cluster/cluster.conffile.The
<failoverdomains/>tag is embedded within the resource manager section, for example:...
...
<rm>
<failoverdomains/>
</rm>
The
nnmhaconfigure.ovplcommand requires the<failoverdomains/>tag to create the NNMi resource group, using the following example structure:...
<rm>
<failoverdomains>
<failoverdomain name="<rg-name>-dom" nofailback="0"
ordered="0" restricted="1">
<failoverdomainnode name="<node1>" priority="1"/>
<failoverdomainnode name="<node2>" priority="1"/> </failoverdomain>
</failoverdomains>
<service autostart="1" domain="<rg-name>-dom"
exclusive="0" name="nnmha" recovery="relocate">
<ip address="<addr>" monitor_link="1">
<fs device="<nnmhalvol>" force_fsck="1"
force_unmount="1" fsid="" fstype="ext3"
mountpoint="<nnm-hamount>" name="nnmha-mount"
options="" self_fence="0">
<NNMscript GLOBAL_VARIABLES="NNM_INTERFACE=
<virtual hostname>;HA_LOCALE=en_US.UTF-8;
HA_MOUNT_POINT=/<nnm-hamount>"
file="/var/opt/OV/hacluster/<rg-name>/nnmharhcs"
name="nnmha-APP"/>
</fs>
</ip>
</service>
</rm>
The
nnmhaunconfigure.ovplcommand also requires the above structure to remove the node's failoverdomain entry.For more information, see the nnmhaunconfigure.ovpl and nnmhaconfigure.ovpl reference pages, or the Linux manpages.
NNMi High Availability Configuration Information
The High Availability (HA) configuration script collects information about the NNMi HA resource group. Please prepare the information listed in the following table before you configure NNMi HA. This information is needed to execute the HA script (nnmhaconfigure.ovpl) interactively, depending on your operating system or HA software.
|
HA Configuration Item |
Description |
|---|---|
|
HA resource group |
The name of the resource group for the HA cluster that contains NNMi. This name must be unique, specific to NNMi, and not currently in use. See your HA system provider’s reference material for information on valid names. Upon input of an HA resource group name, NNMi generates the following resources for Linux and Windows systems: <resource group name>-IP <resource group name>-Mount <resource group name>-App In addition, for Windows systems, the following resource is generated upon input of a vitual hostname: <virtual hostname> |
|
Virtual host short name |
The short name for the virtual host. This hostname must map to the virtual IP address for the HA resource group. The If NNMi is unable to resolve the virtual host short name or the virtual host IP address, the HA configuration script could leave the system in an unstable state. Therefore, recommends that you implement a secondary naming strategy (such as entering the information in the |
|
Virtual host netmask |
The subnet mask that is used with the virtual host IP address, which must be an IPv4 address. |
|
Virtual host network interface |
The network interface on which the virtual host IP address is running. For example:
|
|
The type of shared disk configuration being used for the HA resource group. Possible values are:
|
|
|
(Linux only) The file system type of the shared disk (if the shared file system type is has tested the following shared disk formats:
HA products support other file system types. If you use a shared disk format that has not tested, prepare the disk before configuring NNMi to run under HA, and then specify |
|
|
Disk information (disk group, volume group, and/or logical volume name, depending on the operating system used) |
The name associated with the disk information for the NNMi shared file system. When you create/attach a disk on UNIX platforms, for example, with vxfs or lvm, you create different items, such as: disk group, volume group, logical volume. The names for these items are assigned by the system administrator at the time of creation. NNMi does not enforce any naming conventions. Contact your system administrator for your company’s naming information. |
|
Mount point |
The directory location for mounting the NNMi shared disk. This mount point must be consistent between systems. (That is, each node must use the same name for the mount point.) For example:
|
Configure NNMi on the Primary Cluster Node
Complete the following procedure on the primary cluster node.
If you are using Oracle for the main NNMi database, see Configure NNMi for High Availability in an Oracle Environment first.
- If you have not already done so, complete the procedure for Verify the Prerequisites to Configuring NNMi for High Availability
- If you have not already done so, install NNMi (including the latest consolidated patch, if any), and then verify that NNMi is working correctly.
- If you expect to run any NNM iSPIs on this NNMi management server, see Configure NNM iSPIs for High Availability before continuing with this procedure.
-
Use the
nnmbackup.ovplcommand, or another database command, to back up all NNMi data. For example:nnmbackup.ovpl -type offline -scope all -target nnmi_backups
-
Define the disk device group (and logical volume), consisting of at least one shared disk for the NNMi HA resource group. For example:
- WSFC: Use Disk Management to configure the disk mount point and format the disk.
-
VCS:
Use VSF commands such as
vxdiskadm,vxassist, andmkfsto add and initialize the disk, allocate disks by space, and create the logical volume.
-
RHCS:
Use LVM commands such as
pvcreate,vgcreate, andlvcreateto initialize the disk, create the volume group, and create the logical volume.
NNMi requires RHCS clusters be configured such that the cluster node names specified in the
/etc/cluster/cluster.conffile must be fully qualified for NNMi to correctly start and stop.For Linux operating systems, a reference web site is:
http://www.unixguide.net -
Create the directory mount point (for example,
S:\or/nnmmount), and then mount the shared disk:-
Windows: Use the Windows Explorer and Disk Management tool to assign a drive letter.
Use the Disk Management tool make sure that the shared disk displays online. If it displays reserved, this indicates WSFC has control of the shared disk. Use the Delete action from the WSFC user interface to remove the shared disk from WSFC control. Also use the Disk Management tool to confirm that the reserve flag is changed to online.
-
Linux:
- Use the
mkdirandmountcommands. -
Verify that the shared disk directory mount point has been created with
rootas the user,sysas the group, and the permissions set to755. For example:ls -l /nnmmount
After configuration, the HA product manages disk mounting. Do not update the files system table with this mount point.
- Use the
-
-
Stop NNMi:
ovstop -cIf NNMi is already installed on a node that you will include in this HA resource group, also run
ovstop -con that node at this time. -
Copy the NNMi database to the shared disk:
-
Windows:
%NnmInstallDir%\misc\nnm\ha\nnmhadisk.ovpl NNM -to <HA_mount_point>
-
Linux:
$NnmInstallDir/misc/nnm/ha/nnmhadisk.ovpl NNM -to <HA_mount_point>
To prevent database corruption, run this command (with the
-tooption) only one time. For information about alternatives, see Re-Enable NNMi for High Availability after All Cluster Nodes are Unconfigured.
-
-
(Linux only) Unmount the shared disk and deactivate the disk group:
umount <HA_mount_point>
vgchange -a n <disk_group>
-
Verify that NNMi is not running:
ovstop -c -
(RHCS only) Perform the following to add the necessary NNMscript resource to the
/usr/share/cluster/cluster.rngfile:- Save a copy of the
cluster.rngfile. - Edit the
/usr/share/cluster/cluster.rngfile as follows:- Find
<define name=”CHILDREN”>. Embed the contents of the file
/opt/OV/misc/nnm/ha/NNMscript.rngahead of the statement found in the previous step.For example go one line above
<define name=”CHILDREN”>, and type::r /opt/OV/misc/nnm/ha/NNMscript.rng
In the CHILDREN XML block, add the text that is bold in the following:
<define name=”CHILDREN”>
<zeroOrMore>
<choice>
…
<ref name=”SCRIPT”/>
<ref name=”NNMSCRIPT”/>
<ref name=”NETFS”/>
- Save the
cluster.rngfile.
- Find
- Copy the
/opt/OV/misc/nnm/ha/NNMscript.shfile to/usr/share/clusterand ensure that it has 755 permissions with root:root ownership. - Restart the ccsd service or reboot.
-
If you rebooted the system in the previous step, before continuing with the cluster configuration, stopNNMi:
ovstop -c
-
Verify that NNMi is not running:
ovstatus -c
- Save a copy of the
-
Configure the NNMi HA resource group:
-
Windows:
%NnmInstallDir%\misc\nnm\ha\nnmhaconfigure.ovpl NNM -
Linux:
$NnmInstallDir/misc/nnm/ha/nnmhaconfigure.ovpl NNM
-
-
(Linux only) By default, NNMi starts in the locale of the user who ran the
nnmhaconfigure.ovplcommand. To change the NNMi locale, run the following command:$NnmInstallDir/misc/nnm/ha/nnmhaclusterinfo.ovpl –config NNM –set HA_LOCALE <locale>
-
In step 12, determine the value you specified for the shared file system type:
- For type
disk, thennmhaconfigure.ovplcommand configured the shared disk. Continue with step 15. - For type
none, prepare the shared disk as described in Prepare the Shared Disk Manually in High Availability Environments, and then continue with step 15.
- For type
-
Start the NNMi HA resource group:
-
Windows:
%NnmInstallDir%\misc\nnm\ha\nnmhastartrg.ovpl NNM <resource_group>
-
Linux:
$NnmInstallDir/misc/nnm/ha/nnmhastartrg.ovpl NNM <resource_group>
If NNMi does not start correctly, see Troubleshoot the HA Configuration.
-
Now that NNMi is running under HA, do not use the ovstart and ovstop commands for normal operation. Use these commands only when instructed to do so for HA maintenance purposes.
Configure NNMi on the Secondary Cluster Nodes
Complete the following procedure on one secondary cluster node at a time.
- If you have not already done so, complete the procedure for Configure NNMi on the Primary Cluster Node.
- If you have not already done so, complete the procedure for Verify the Prerequisites to Configuring NNMi for High Availability.
- If you have not already done so, install NNMi (including the latest consolidated patch, if any), and then verify that NNMi is working correctly.
- Install the NNM iSPIs that you installed in step 3 of Configure NNMi on the Primary Cluster Node.
-
Stop NNMi:
ovstop -c -
Create a mount point for the shared disk (for example,
S:\or/nnmmount).This mount point must use the same name as the mount point you created in step 6 of the procedure Configure NNMi on the Primary Cluster Node.
-
(RHCS only) Perform the following to add the necessary NNMscript resource to the
/usr/share/cluster/cluster.rngfile:- Save a copy of the
cluster.rngfile. -
Edit the
/usr/share/cluster/cluster.rngfile as follows:- Find
<define name=”CHILDREN”> -
Embed the contents of the file
/opt/OV/misc/nnm/ha/NNMscript.rngahead of the statement found in the previous step.For example go one line above
<define name=”CHILDREN”>, and type::r /opt/OV/misc/nnm/ha/NNMscript.rng
-
In the CHILDREN XML block, add the text that is bold in the following:
<define name=”CHILDREN”>
<zeroOrMore>
<choice>
…
<ref name=”SCRIPT”/>
<ref name=”NNMSCRIPT”/>
<ref name=”NETFS”/>
- Save the
cluster.rngfile.
- Find
- Save a copy of the
-
(RHCS only) Copy the NNMi custom script into place, and then restart the HA cluster daemons.
-
Copy the
/opt/OV/misc/nnm/ha/NNMscript.shfile to the following location:/usr/share/cluster/NNMscript.sh
- Stop and then restart the
/sbin/ccsdprocess.
-
-
Configure the NNMi HA resource group:
- Windows:
%NnmInstallDir%\misc\nnm\ha\nnmhaconfigure.ovpl NNM - Linux:
$NnmInstallDir/misc/nnm/ha/nnmhaconfigure.ovpl NNM
Supply the HA resource group name when the command requests this information.
- Windows:
-
Verify that the configuration was successful:
-
Windows:
%NnmInstallDir%\misc\nnm\ha\nnmhaclusterinfo.ovpl
-group <resource_group> -nodes -
Linux:
$NnmInstallDir/misc/nnm/ha/nnmhaclusterinfo.ovpl
-group <resource_group> -nodes
The command output lists all configured nodes for the specified HA resource group.
-
- Optionally, test the configuration by taking the NNMi HA resource group on the primary node offline and then bringing the NNMi HA resource group on the secondary node online.
Configure NNM iSPIs for High Availability
If you expect to run any NNM iSPIs on the NNMi management server, read this section before configuring NNMi to run under HA.
NNM iSPI Performance for Metrics, NNM iSPI Performance for QA, and NNM iSPI Performance for Traffic
The NNM iSPI Performance for Metrics can be installed on the NNMi management server or on a standalone server.
The NNM iSPI Performance for Traffic) has two different components (Traffic Master and Traffic Leaf), which can be installed on the NNMi management server or standalone servers, or a combination of both (one component on the NNMi management server and the other on a remote server).
- If the NNM iSPI (or component) will be located on the NNMi management server, install the product before configuring NNMi to run under HA.
- If the NNM iSPI (or component) will be located on a standalone server, configure NNMi to run under HA before installing the product. During the NNM iSPI installation process, supply the NNMi HA resource group virtual hostname as the NNMi management server name.
For more information on installing an NNM iSPI, see the appropriate NNM iSPI installation guide.
NNM iSPI Performance for QA, NNM iSPI for MPLS, NNM iSPI for IP Multicast, and NNM iSPI for IP Telephony
The NNM iSPI Performance for QA, NNM iSPI for MPLS, NNM iSPI for IP Multicast, and NNM iSPI for IP Telephony can be installed on the NNMi management server only.
For information about configuring the NNM iSPIs to run under HA, see the documentation for the appropriate NNM iSPI.
NNM iSPI Network Engineering Toolset Software and NNMi Running under HA
The NNM iSPI Network Engineering Toolset Software SNMP trap analytics and Microsoft Visio export functionality are automatically installed with the NNMi Premium or NNMi Ultimate products. No extra work is needed to run these tools under HA.
The NNM iSPI NET Diagnostics Server cannot be included in the NNMi HA resource group. Do not install this component on the NNMi management server. To run the NNM iSPI NET Diagnostics Server on a system that is outside the NNMi HA resource group, follow these steps:
The NNM iSPI NET Diagnostics Server requires an NNM iSPI NET or NNMi Ultimate license. See the NNM iSPI Network Engineering Toolset Software Interactive Installation and Upgrade Guide for information about how to install and configure this server.
- Completely configure the NNMi HA resource group.
-
Install the NNM iSPI NET Diagnostics Server on a system that is outside the NNMi HA resource group. During the NNM iSPI NET Diagnostics Server installation process, supply the NNMi HA resource group virtual hostname as the NNM Server Hostname.
For more information, see the NNM iSPI Network Engineering Toolset Software Planning and Installation Guide.
If the NNM iSPI NET Diagnostics Server is already installed on an NNMi management server that will run under HA, uninstall the NNM iSPI NET Diagnostics Server before configuring NNMi to run under HA.
Uninstalling the NNM iSPI NET Diagnostics Server removes all existing reports.
It might be possible to save existing reports, as described here, but the following procedure is untested:
-
Use MySQL Workbench to perform a backup of the existing
nnminetdatabase.MySQL Workbench is available in the downloads area at dev.mysql.com.
- Uninstall the NNM iSPI NET Diagnostics Server.
- Configure NNMi to run under HA.
- Install the NNM iSPI NET Diagnostics Server on a separate system.
- Before running any flows, use MySQL Workbench to recover the
nnminetdatabase onto the new installation.
Configure NNMi for High Availability in an Oracle Environment
This sections presents a high-level overview of the process for configuring NNMi with an Oracle database to run under High Availability (HA).
The number of possible Oracle configurations is large, and the configuration process can vary according to the Oracle release. For the most accurate information about configuring Oracle to run under HA and creating an NNMi dependency on the Oracle HA resource group, see the HA product documentation. You can also go to the Oracle web site (www.oracle.com) for information about the appropriate Oracle configuration for your HA product.
NNMi Dependency on Oracle in High Availability Environments
When Oracle and NNMi both run under High Availability (HA), the NNMi HA resource group must include a shared disk for the NNMi data that is not stored in the Oracle database.
Additionally, consider the following information:
- If the HA product supports dependencies, the recommended approach is to configure each product to run in a separate HA resource group. The Oracle HA resource group must be fully started before the NNMi HA resource group starts. If both HA resource groups are in the same HA cluster, you can modify the cluster configuration to set resource group ordering. If the HA resource groups are in different HA clusters, make sure that the NNMi HA resource group dependency on the Oracle HA resource group is met.
- If the HA product does not support dependencies, include the Oracle systems and the NNMi systems in the NNMi HA resource group.
Configure NNMi for High Availability in an Oracle Environment
- If you plan to run Oracle under High Availability (HA), complete that configuration first.
- Create an empty Oracle database instance for NNMi.
-
On the primary NNMi node, install NNMi (including the latest consolidated patch, if any). During installation, do the following:
- Select the Oracle database type, and then select Primary Server Installation.
- Specify the virtual IP address or hostname for the Oracle HA resource group (if applicable).
- On the primary NNMi node, configure NNMi to run under HA as described in Configure NNMi on the Primary Cluster Node.
-
Set up the NNMi dependency on the Oracle HA resource group.
For specific instructions, see the HA product documentation.
-
On the secondary NNMi node, install NNMi (including the latest consolidated patch, if any). During installation, do the following:
- Select the Oracle database type, and then select Secondary Server Installation.
- Specify the virtual IP address or hostname for the Oracle HA resource group (if applicable).
- On the secondary NNMi node, configure NNMi to run under HA described in Configure NNMi on the Secondary Cluster Nodes.
- For each additional secondary NNMi node, repeat step 6 and step 7.
Shared NNMi Data in High Availability Environments
This implementation of NNMi running under High Availability (HA) requires the use of a separate disk for sharing files between all NNMi nodes in the HA cluster. This topic includes:
- Data on the NNMi Shared Disk in High Availability Environments
- Replication of Configuration Files in High Availability Environments
- Prepare the Shared Disk Manually in High Availability Environments
- A Note about Shared Disk Configuration on Windows Server
NNMi implementations that use Oracle as the primary database also require the use of a separate disk for shared data.
Data on the NNMi Shared Disk in High Availability Environments
This section lists the NNMi data files that are maintained on the shared disk when NNMi is running under High Availability (HA).
The locations are mapped to the shared disk location as follows:
-
Windows:
%NnmInstallDir%maps to%HA_MOUNT_POINT%\NNM\installDir%NnmDataDir%maps to%HA_MOUNT_POINT%\NNM\dataDir
-
Linux:
$NnmInstallDirmaps to$HA_MOUNT_POINT/NNM/installDir$NnmDataDirmaps to$HA_MOUNT_POINT/NNM/dataDir
The directories that are moved to the shared disk are as follows:
-
Windows:
%NnmDataDir%\shared\nnm\databases\Postgres
The embedded database; not present when using an Oracle database.%NnmDataDir%\log\nnm
The NNMi log directory.%NnmDataDir%\nmsas\NNM\log
The NNMi audit log directory.-
%NnmDataDir%\nmsas\NNM\confThe NNMi directory for configuring the audit log file.
%NnmDataDir%\nmsas\NNM\data
The transactional store used by ovjboss.
-
Linux:
$NnmDataDir/shared/nnm/databases/Postgres
The embedded database; not present when using an Oracle database.$NnmDataDir/log/nnm
The NNMi log directory.-
%NnmDataDir/nmsas/NNM/log
The NNMi audit log directory. -
%NnmDataDir/nmsas/NNM/confThe NNMi directory for configuring the audit log file.
$NnmDataDir/nmsas/NNM/data
The transactional store used by ovjboss.
The nnmhadisk.ovpl command copies these files to and from the shared disk. Run this command as the instructions in this chapter indicate. For a summary of the command syntax, see the nnm-ha manpage.
Replication of Configuration Files in High Availability Environments
The NNMi High Availability (HA) implementation uses file replication to maintain copies of the NNMi configuration files on all NNMi nodes in the HA cluster.
By default, NNMi manages file replication, copying NNMi configuration files from the active node to a passive node during the failover process. The nnmdatareplicator.conf file specifies the NNMi folders and files included in data replication.
Disable Data Replication
You can disable data replication as follows:
-
Edit the following file:
- Windows:
%NnmDataDir%\shared\nnm\conf\ov.conf - Linux:
$NnmDataDir/shared/nnm/conf/ov.conf
- Windows:
-
Include the following line:
DISABLE_REPLICATION=DoNotReplicate
-
Save your changes.
When you change files (for example, configuration files) on the Active node, these files are automatically replicated to the Standby node on failover.
-
Restart the NNMi management server:
When making file changes under High Availability (HA), you must make the changes on both nodes in the cluster. If the change requires you to stop and restart the NNMi management server, you must put the nodes in maintenance mode before running the
ovstopandovstartcommands. See Maintenance Mode for more information.- Run the
ovstopcommand on the NNMi management server. - Run the
ovstartcommand on the NNMi management server.
- Run the
Prepare the Shared Disk Manually in High Availability Environments
If the shared disk is of a format that is supported by , the High Availability (HA) configuration script prepares the shared disk, and you can ignore this section. See NNMi High Availability Configuration Information for more information about supported disk formats.
If the shared disk uses a non-tested configuration, such as disk formats supported by the HA product, you must prepare the disk manually. Enter the value none for the file system type during HA configuration, and then configure the shared disk and the NNMi HA resource group’s use of the shared disk.
You can configure the disk before or after configuring the NNMi HA resource group.
To prepare the shared disk manually:
- Configure the shared disk as described in Configuring a SAN or a Physically Connected Disk.
-
Configure the NNMi HA resource group to recognize the disk by completing both of the following procedures:
- Setting the HA Variables in the ov.conf File
- Moving the Shared Disk into the HA Resource Group
Configure a SAN or a Physically Connected Disk
Connecting and formatting a disk that disk into a vxfs or ext3 file system. To configure a SAN or a physically-connected disk:
-
Verify that the shared disk is not configured to be mounted at system boot time.
The resource group is responsible for mounting the shared disk.
-
Connect the device:
-
For a SAN disk, add the SAN device to the network.
The logical volume on the SAN disk should be in exclusive mode, if that mode is available.
- For a physically-connected disk, attach the disk using a Y cable.
-
-
Add operating system entries to all cluster nodes (disk group, logical volume, volume group, and disk):
- For a SAN disk, the entries reference the SAN.
- For a physically-connected disk, the entries reference the disk hardware.
- Format the disk using a supported disk format. See NNMi High Availability Configuration Information for more information.
-
Ensure that the SAN mounts.
For Linux systems, a reference web site is: http://www.unixguide.net
- Unmount and deport the disk.
- To test the configuration, add the disk to a resource group and initiate failover.
Set the High Availability Variables in the ov.conf File
The NNMi High Availability (HA) resource group uses the following variables to access the shared disk:
HA_POSTGRES_DIR=<HA_mount_point>/NNM/dataDir/shared/nnm/databases/PostgresHA_EVENTDB_DIR=<HA_mount_point>/NNM/dataDir/shared/nnm/eventdbHA_NNM_LOG_DIR=<HA_mount_point>/NNM/dataDir/logHA_JBOSS_DATA_DIR=<HA_mount_point>/NNM/dataDir/nmsas/NNM/dataHA_MOUNT_POINT=<HA_mount_point>HA_CUSTOMPOLLER_DIR=<HA_mount_point>/NNM/dataDir/shared/nnm/databases/custompoller
If you plan to run any NNM iSPIs in the NNMi HA resource group, also set the ov.conf variables for each of those NNM iSPIs. For more information, see the documentation for the appropriate NNM iSPI.
To set the product variables for accessing the shared disk in the ov.conf file, run the following command for each of the preceding variables:
-
Windows:
%NnmInstallDir%\misc\nnm\ha\nnmhaclusterinfo.ovpl –config NNM –set <variable> <value>
-
Linux:
$NnmInstallDir/misc/nnm/ha/nnmhaclusterinfo.ovpl –config NNM –set <variable> <value>
When making file changes under High Availability (HA), you must make the changes on both nodes in the cluster. If the change requires you to stop and restart the NNMi management server, you must put the nodes in maintenance mode before running the ovstop and ovstart commands. See Maintenance Mode for more information.
Move the Shared Disk into the NNMiHA Resource Group
Modify the disk configuration file according to the product documentation to move the shared disk into the NNMi HA resource group. For example:
You can also use this process to add other resources, such as a NIC card or a backup disk to the NNMi HA resource group.
- WSFC: Use Failover Management to add resources to the resource group.
- VCS: Add disk entries and links to the HA configuration file by using the
/opt/VRTSvcs/bin/harescommand. For example: -
RHCS:
/etc/cluster/cluster.conf
A Note about Shared Disk Configuration on Windows Server
According to Microsoft Knowledge Base article 237853, dynamic disks are not supported for clustering with Windows Server.
To ensure the correct disk configuration, review the information located on the following web sites:
Maintain the High Availability Configuration
This section describes how to perform the following High Availability configuration maintenance tasks:
When you need to apply NNMi patches or update to a newer version of NNMi, put the NNMi HA resource group into maintenance mode to prevent failover during the process. When the NNMi HA resource group is in maintenance mode, you (or an installation script) can run the ovstop and ovstart commands as needed on the primary (active) cluster node.
Never run the ovstart or ovstop commands on a secondary (backup) cluster node.
Put an HA Resource Group into Maintenance Mode
Putting an HA resource group into maintenance mode disables HA resource group monitoring. When an HA resource group is in maintenance mode, stopping and starting the products in that HA resource group do not cause failover.
To put an HA resource group into maintenance mode, on the active cluster node, create the following file:
- Windows:
%NnmDataDir%\hacluster\<resource_group>\maintenance - Linux:
$NnmDataDir/hacluster/<resource_group>/maintenance
The maintenance file contents are as follows:
- To disable monitoring of the HA resource group, create the
maintenancefile. The file can be empty or can contain the keywordNORESTART. - To prevent NNMi from starting during a configuration procedure, the first line of the
maintenancefile must contain only the single word:NORESTART
Remove an HA Resource Group from Maintenance Mode
Taking an HA resource group out of maintenance mode re-enables HA resource group monitoring. Stopping the products in that HA resource group causes the HA resource group to fail over to a passive cluster node.
To remove an HA resource group from maintenance mode:
-
Verify that NNMi is running correctly:
ovstatus -cAll NNMi services should show the state RUNNING.
- Delete the
maintenancefile from the node that was the active cluster node before maintenance was initiated. This file is described in Put an HA Resource Group into Maintenance Mode.
Maintain NNMi in an HA Cluster
This section describes how to perform the following tasks that might be required to maintain NNMi in a High Availability (HA) Cluster.
Start and Stop NNMi
While NNMi is running under High Availability (HA), do not use the ovstart and ovstop commands unless instructed to do so for HA maintenance purposes.
For normal operation, use the NNMi-provided HA commands or the appropriate HA product commands for starting and stopping HA resource groups.
Change NNMi Hostnames and IP Addresses in a Cluster Environment
A node in a cluster environment can have more than one IP address and hostname. If a node becomes a member of another subnet, you might need to change its IP addresses. As a result, the IP address or fully-qualified domain name might change.
For example, on Linux systems, the IP address and the related hostname are generally configured in one of the following:
- /etc/hosts
- Domain Name Service (DNS)
- Network Information Service (NIS)
NNMi also configures the hostname and IP address of the management server for the managed node in the NNMi database.
If you are moving from a non-name-server environment to a name-server environment (that is, DNS or BIND), make sure that the name server can resolve the new IP address.
Hostnames work within IP networks to identify a managed node. While a node might have many IP addresses, the hostname is used to pinpoint a specific node. The system hostname is the string returned when you use the hostname command.
When changing the virtual hostname or IP address of the NNMi HA resource group, you must update the licenses.txt file on the shared disk with the new information from the license file on the active node. Complete the following procedure to correctly update the HA configuration.
To change the virtual hostname or IP address of the NNMi HA resource group, perform these steps on the active NNMi cluster node:
If you have purchased NNMi Premium or NNMi Ultimate, you need to use the license keys you requested from the Password Delivery Center for use with application failover or high availability. Be sure to request the following:
- High Availability: Obtain a license key for the virtual IP address of the NNMi HA resource group. This license key is initially used on the primary server and then used on the secondary server when needed.
- Application Failover: Obtain two license keys; one for the physical IP address of the primary server and one for the physical IP address of the standby server.
-
Convert the license keys for the prior virtual IP address of the NNMi HA resource group to the new virtual IP address of the NNMi HA resource group.
Do not install the new license keys at this time.
- Put the NNMi HA resource group into maintenance mode as described in Put an HA Resource Group into Maintenance Mode.
-
Stop the NNMi HA resource group:
-
Windows:
%NnmInstallDir%\misc\nnm\ha\nnmhastoprg.ovpl NNM <resource_group>
-
Linux:
$NnmInstallDir/misc/nnm/ha/nnmhastoprg.ovpl NNM <resource_group>
-
-
Change the IP address or node name of the NNMi HA resource group:
- In the
ov.conffile, edit theNNM_INTERFACEentry to be the new hostname or IP address. - In the
ovspmd.authfile, edit any lines containing the old hostname to contain the new hostname.
The
ov.confandovspmd.authfiles are available in the following location:- Windows:
%NnmDataDir%\shared\nnm\conf - Linux:
$NnmDataDir/shared/nnm/conf
- In the
-
If you changed the node name of the NNMi HA resource group, set NNMi to use the new fully-qualified domain name of the NNMi HA resource group with the
nnmsetofficialfqdn.ovplcommand. For example:nnmsetofficialfqdn.ovpl newnnmi.servers.example.com
For more information, see the nnmsetofficialfqdn.ovpl reference page, or the Linux manpage.
-
Change the cluster configuration to use the new IP address:
-
WSFC:
In Failover Cluster Management, open
<resource_group>.Double-click
<resource_group>-ip, select Parameters, and the enter the new IP address. -
VCS:
$NnmInstallDir/misc/nnm/ha/nnmhargconfigure.ovpl NNM <resource_group> -set_value <resource_group>-ip
Address <new_IP_address> -
RHCS:
On the active HA cluster node, edit the
/etc/cluster/cluster.conffile to replaceip address="<old_IP_address>"withip address="<new_IP_address>". Then runccs_tool update /etc/cluster/cluster.confto update all other systems.
-
- Install the license keys for the new virtual IP address of the NNMi HA resource group as described in "Licensing " .
-
Update the
licenses.txtfile on the shared disk with the new information from theLicFile.txtfile on the active node. Do one of the following:- If the
licenses.txtfile exists in theNNMdirectory on the shared disk, append the new license keys inLicFile.txton the active node tolicenses.txton the shared disk. - If the
licenses.txtfile does not exist on the shared disk, copyLicFile.txtfrom the active node tolicenses.txtin theNNMdirectory on the shared disk.
On the active node, the
LicFile.txtfile is in the following location:- Windows:
%NnmDataDir%\shared\nnm\conf\licensing\LicFile.txt - Linux:
$NnmDataDir/shared/nnm/conf/licensing/LicFile.txt
On the shared disk, example locations of the
licenses.txtfile are as follows:- Windows:
S:\NNM\licenses.txt - Linux:
/nnmount/NNM/licenses.txt
- If the
-
Start the NNMi HA resource group:
-
Windows:
%NnmInstallDir%\misc\nnm\ha\nnmhastartrg.ovpl NNM <resource_group>
-
Linux:
$NnmInstallDir/misc/nnm/ha/nnmhastartrg.ovpl NNM <resource_group>
-
-
Verify that NNMi started correctly:
ovstatus -cAll NNMi services should show the state RUNNING.
- Take the NNMi HA resource group out of maintenance mode as described in Remove an HA Resource Group from Maintenance Mode.
Stop NNMi Without Causing Failover
When you need to perform NNMi maintenance, you can stop NNMi on the active cluster node without causing failover to a currently passive node.
Follow these steps on the active cluster node:
- Put the NNMi HA resource group into maintenance mode as described in Put an HA Resource Group into Maintenance Mode.
-
Stop NNMi:
ovstop -c
Restart NNMi after Maintenance
If you have stopped NNMi in the manner that prevents failover, follow these steps to restart NNMi and HA monitoring:
-
Start NNMi:
ovstart -c -
Verify that NNMi started correctly:
ovstatus -cAll NNMi services should show the state RUNNING.
- Take the NNMi HA resource group out of maintenance mode as described in Remove an HA Resource Group from Maintenance Mode.
Maintain Add-on NNM iSPIs in an NNMi HA Cluster
The NNM iSPIs are closely linked to NNMi. When add-on NNM iSPIs are installed on the nodes in the NNMi HA cluster, use the NNMi HA cluster maintenance procedures as written.
Unconfigure NNMi from an HA Cluster
The process of removing an NNMi node from an High Availability (HA) cluster involves undoing the HA configuration for that instance of NNMi. You can then run that instance of NNMi as a standalone management server, or you can uninstall NNMi from that node.
Before uninstalling NNMi, remove any NNMi patches in reverse order, beginning with the most recent patch. The patch removal process varies according to the operating system running on the NNMi management server. See the patch documentation for installation and removal instructions.
If you want to keep NNMi configured for high availability, the HA cluster must contain one node that is actively running NNMi and at least one passive NNMi node. If you want to completely remove NNMi from the HA cluster, unconfigure the HA functionality on all nodes in the cluster.
To completely unconfigure NNMi from an HA cluster:
-
Determine which node in the HA cluster is active. On any node, run the following command:
-
Windows:
%NnmInstallDir%\misc\nnm\ha\nnmhaclusterinfo.ovpl -group <resource_group> -activeNode
-
Linux:
$NnmInstallDir/misc/nnm/ha/nnmhaclusterinfo.ovpl -group <resource_group> -activeNode
-
-
On each passive node, unconfigure any add-on NNM iSPIs from the HA cluster.
For information, see the documentation for each NNM iSPI.
-
On any node in the HA cluster, verify that the add-on NNM iSPIs on all passive nodes have been unconfigured from the HA cluster:
-
Windows:
%NnmInstallDir%\misc\nnm\ha\nnmhaclusterinfo.ovpl -config NNM -get NNM_ADD_ON_PRODUCTS
-
Linux:
$NnmInstallDir/misc/nnm/ha/nnmhaclusterinfo.ovpl -config NNM -get NNM_ADD_ON_PRODUCTS
The command output lists the add-on iSPI configurations in the format
<iSPI_PM_Name>[hostname_list]. For example:PerfSPIHA[hostname1, hostname2]
At this time, only the active node hostname should appear in the output. If a passive node hostname appears in the output, repeat step 2 until this command output includes only the active node hostname.
-
-
On the active node, unconfigure any add-on NNM iSPIs from the HA cluster.
For information, see the documentation for each NNM iSPI.On any node in the HA cluster, verify that the add-on NNM iSPIs on all nodes have been unconfigured from the HA cluster:
-
Windows:
%NnmInstallDir%\misc\nnm\ha\nnmhaclusterinfo.ovpl -config NNM -get NNM_ADD_ON_PRODUCTS
-
Linux:
$NnmInstallDir/misc/nnm/ha/nnmhaclusterinfo.ovpl -config NNM -get NNM_ADD_ON_PRODUCTS
If any hostname appears in the output, repeat this step until this command output indicates that no iSPIs are configured.
-
-
On each passive node, unconfigure NNMi from the HA cluster:
-
Windows:
%NnmInstallDir%\misc\nnm\ha\nnmhaunconfigure.ovpl NNM <resource_group>
-
Linux:
$NnmInstallDir/misc/nnm/ha/nnmhaunconfigure.ovpl NNM <resource_group>
This command removes access to the shared disk but does not unconfigure the disk group or the volume group.
-
-
On each passive node, move the NNMi HA resource group-specific files to a separate location for safe-keeping:
%NnmDataDir%\hacluster\<resource_group>\folder.If you do not plan to reconfigure the NNMi HA resource group, you do not need to save a copy of these files.
-
On the active node, stop the NNMi HA resource group:
-
Windows:
%NnmInstallDir%\misc\nnm\ha\nnmhastoprg.ovpl NNM <resource_group>
-
Linux:
$NnmInstallDir/misc/nnm/ha/nnmhastoprg.ovpl NNM <resource_group>
This command does not remove access to the shared disk. Nor does it unconfigure the disk group or the volume group.
-
-
On the active node, unconfigure NNMi from the HA cluster:
-
Windows:
%NnmInstallDir%\misc\nnm\ha\nnmhaunconfigure.ovpl NNM <resource_group>
-
Linux:
$NnmInstallDir/misc/nnm/ha/nnmhaunconfigure.ovpl NNM <resource_group>
This command removes access to the shared disk but does not unconfigure the disk group or the volume group.
-
-
On the active node, move the NNMi HA resource group-specific files to a separate location for safe-keeping:
%NnmDataDir%\hacluster\<resource_group>\ folderIf you do not plan to reconfigure the NNMi HA resource group, you do not need to save a copy of these files.
-
Unmount the shared disk.
- If you want to reconfigure the NNMi HA cluster at some point, you can keep the disk in its current state.
- If you want to use the shared disk for another purpose, copy all data that you want to keep (as described in Running Outside HA with the Existing Database), and then use the HA product commands to unconfigure the disk group and volume group.
Run NNMi Outside HA with the Existing Database
If you want to run NNMi outside HA on any node with the existing database:
-
On the active node (if one still exists), ensure that NNMi is not running:
ovstop
Alternatively, check the status of the
ovspmdprocess by using Task Manager (Windows) or thepscommand (Linux). -
On the current node (where you want to run NNMi outside HA), verify that NNMi is not running:
ovstop
To prevent data corruption, make sure that no instance of NNMi is running and accessing the shared disk.
-
(Linux only) Activate the disk group, for example:
vgchange -a e <disk_group>
-
Use the appropriate operating system commands to mount the shared disk. For example:
- Windows: Use Server Manager—>Disk Management.
- Linux:
mount /dev/vgnnm/lvnnm /nnmmount
-
Copy the NNMi files from the shared disk to the local disk:
-
Windows:
%NnmInstallDir%\misc\nnm\ha\nnmhadisk.ovpl NNM -from <HA_mount_point>
-
Linux:
$NnmInstallDir/misc/nnm/ha/nnmhadisk.ovpl NNM -from <HA_mount_point>
-
-
Use the appropriate operating system commands to unmount the shared disk. For example:
- Windows: Use Windows Explorer.
- Linux:
umount /nnmmount
-
(Linux only) Deactivate the disk group, for example:
vgchange -a n <disk_group>
- Obtain and install the permanent production license keys for the physical IP address of this NNMi management server as described in "Licensing "
-
Start NNMi:
ovstart -c
NNMi is now running with a copy of the database that was formerly used by the NNMi HA resource group. Manually remove from the NNMi configuration any nodes that you do not want to manage from this NNMi management server.
Patch NNMi under HA
To apply a patch for NNMi, work in High Availability (HA) maintenance mode:
-
Determine which node in the HA cluster is active:
-
Windows:
%NnmInstallDir%\misc\nnm\ha\nnmhaclusterinfo.ovpl -group <resource_group> -activeNode
-
Linux:
$NnmInstallDir/misc/nnm/ha/nnmhaclusterinfo.ovpl -group <resource_group> -activeNode
-
-
On each passive node, put the NNMi HA resource group into maintenance mode as described in Put an HA Resource Group into Maintenance Mode.
Include the
NORESTARTkeyword. -
On each passive node, apply the appropriate patches.
Never run the
ovstartorovstopcommands on a secondary (backup) cluster node. -
On all passive nodes, take the NNMi HA resource group out of maintenance mode as described in Remove an HA Resource Group from Maintenance Mode.
-
Fail over to a passive node.
-
Go to the node that was previously active (in step 1), and then perform these:
-
Put the NNMi HA resource group of the node into maintenance mode as described in Put an HA Resource Group into Maintenance Mode.
Include the
NORESTARTkeyword. -
On the node, apply the appropriate patches.
Never run the
ovstartorovstopcommands on a secondary (backup) cluster node. - On the node, take the NNMi HA resource group out of maintenance mode as described in Remove an HA Resource Group from Maintenance Mode.
-
Troubleshoot the HA Configuration
This section includes the following topics:
Verifying the Prerequisites to Configuring NNMi for High Availability
Configure NNMi Certificates for High Availability
Configure NNMi for High Availability
Configure NNM iSPIs for High Availability
Configure NNMi for High Availability in an Oracle Environment
Shared NNMi Data in High Availability Environments
Replication of Configuration Files
Prepare the Shared Disk Manually in High Availability Environments
A Note about Shared Disk Configuration on Windows Server
Licensing NNMi in an High Availability Cluster
Maintaining the High Availability Configuration
Maintaining NNMi in an High Availability Cluster
Maintaining Add-on NNM iSPIs in an NNMi HA Cluster
Unconfiguring NNMi from an HA Cluster
Running NNMi Outside HA with the Existing Database
Troubleshooting the HA Configuration
Common High Availability Configuration Mistakes
Configuration Issues with RHCS 6
Re-Enable NNMi for High Availability after All Cluster Nodes are Unconfigured
NNMi Does Not Start Correctly Under High Availability
Changes to NNMi Data are Not Seen after Failover
nmsdbmgr Does Not Start after High Availability Configuration
NNMi Runs Correctly on Only One High Availability Cluster Node (Windows)
Shared Disk is Not Accessible (Windows)
Shared Disk Does Not Contain Current Data
Shared Disk Files Are Not Found by the Secondary Node after Failover
Error: Wrong Number of Arguments
Resource Hosting Subsystem Process Stops Unexpectedly (Windows Server 2008 R2)
Product Startup Times Out (Windows MSCS 2008)
Log Files on the Active Cluster Node Are Not Updating
Cannot Start the NNMi HA Resource Group on a Particular Cluster Node
Common High Availability Configuration Mistakes
Some common High Availability (HA) configuration mistakes are listed here:
-
Incorrect disk configuration
- VCS: If a resource cannot be probed, the configuration is somehow wrong. If a disk cannot be probed, the disk might no longer be accessible by the operating system.
- Test the disk configuration manually and confirm against HA documentation that the configuration is appropriate.
-
The disk is in use and cannot be started for the HA resource group.
Always check that the disk is not activated before starting the HA resource group.
-
WSFC: Bad network configuration
If network traffic is flowing across multiple NIC cards, RDP sessions fail when activating programs that consume a large amount of network bandwidth, such as the NNMi ovjboss process.
-
Some HA products do not automatically restart at boot time.
Review the HA product documentation for information about how to configure automatic restart on boot up.
- Adding NFS or other access to the OS directly (resource group configuration should be managing this).
-
Being in the shared disk mount point during a failover or offlining of the HA resource group.
HA kills any processes that prevent the shared disk from being unmounted.
- Reusing the HA cluster virtual IP address as the HA resource virtual IP address (works on one system and not the other)
-
Timeouts are too short. If the products are misbehaving, HA product might time out the HA resource and cause a failover.
WSFC: In Failover Cluster Management, check the value of the Time to wait for resource to start setting. NNMi sets this value to 15 minutes. You can increase the value.
-
Not using maintenance mode
Maintenance mode was created for debugging HA failures. If you attempt to bring a resource group online on a system, and it fails over shortly afterwards, use the maintenance mode to keep the resource group online to see what is failing.
- Not reviewing cluster logs (cluster logs can show many common mistakes).
Configuration Issues with RHCS 6
It is possible for the /etc/cluster/cluster.conf file versions to differ between the two systems in an HA environment if the ricci service is down or has been intentionally disabled. Therefore, monitor the cluster.conf file regularly to ensure that the file versions are synchronized.
If the cluster.conf file versions are not sychronized, you may experience problems when you attempt to do any of the following:
- apply changes to
cluster.conf - unconfigure a resource group
- start the cluster
- use the
clustatcommand
This section describes the general approach for testing the resources that you will place into the NNMi HA resource group. This testing identifies hardware configuration problems. It is recommended to perform this testing before configuring NNMi to run under High Availability (HA). Note the configuration values that generate positive results, and use these value when performing the complete configuration of the NNMi HA resource group.
For specific details regarding any of the commands listed here, see the most recent documentation for your HA product.
To test HA resources:
- If necessary, start the HA cluster.
-
(Windows only) Verify that the following virtual IP addresses have been defined for the HA cluster:
- A virtual IP address for the HA cluster
- A virtual IP address for each HA resource group
Each of these IP addresses should not be used elsewhere.
-
Add an HA resource group to the HA cluster.
Use a non-production name, such as
test, for this HA resource group. -
Test the connection to the HA resource group:
-
Add the virtual IP address and corresponding virtual hostname for the resource group as a resource to the HA resource group.
Use the values that you will later associate with the NNMi HA resource group.
- Fail over from the active cluster node to the passive cluster node to verify that the HA cluster correctly fails over.
- Fail over from the new active cluster node to the new passive cluster node to verify failback.
- If the resource group does not fail over correctly, log on to the active node, and then verify that the IP address is properly configured and accessible. Also verify that no firewall blocks the IP address.v
-
- Configure the shared disk as described in Configure a SAN or a Physically Connected Disk.
-
Test the connection to the shared disk:
- Add the shared disk as a resource to the HA resource group as described in Move the Shared Disk into the NNMiHA Resource Group.
- Fail over from the active cluster node to the passive cluster node to verify that the HA cluster correctly fails over.
- Fail over from the new active cluster node to the new passive cluster node to verify failback.
- If the resource group does not fail over correctly, log on to the active node, and then verify that the disk is mounted and available.
- Keep a record of the commands and inputs that you used to configure the shared disk. You might need this information when configuring the NNMi HA resource group.
-
Remove the resource group from each node:
- Remove the IP address entry.
- Offline the resource group, and then remove resource group from the node.
At this point, you can use the NNMi-provided tools to configure NNMi to run under HA.
Re-Enable NNMi for High Availability after All Cluster Nodes are Unconfigured
When all NNMi High Availability (HA) cluster nodes have been unconfigured, the ov.conf file no longer contains any mount point references to the NNMi shared disk.
To re-create the mount point reference without overwriting the data on the shared disk, follow these steps on the primary node:
-
If NNMi is running, stop it:
ovstop -c -
Reset the reference to the shared disk:
-
Windows:
%NnmInstallDir%\misc\nnm\ha\nnmhadisk.ovpl NNM -setmount <HA_mount_point>
-
Linux:
$NnmInstallDir/misc/nnm/ha/nnmhadisk.ovpl NNM -setmount <HA_mount_point>
-
-
In the
ov.conffile, verify the entries related to HA mount points.For the location of the
ov.conffile, see NNMi High Availability Configuration Files.
NNMi Does Not Start Correctly Under High Availability
When NNMi does not start correctly, it is necessary to debug whether the issue is a hardware issue with the virtual IP address or the disk, or whether the issue is some form of application failure. During this debug process, put the system in maintenance mode without the NORESTART keyword.
-
On the active node in the HA cluster, disable HA resource group monitoring by creating the following maintenance file:
- Windows:
%NnmDataDir%\hacluster\<resource_group>\maintenance - Linux:
$NnmDataDir/hacluster/<resource_group>/maintenance
- Windows:
-
Start NNMi:
ovstart -
Verify that NNMi started correctly:
ovstatus -cAll NNMi services should show the state RUNNING. If this is not the case, troubleshoot the process that does not start correctly.
-
After completing your troubleshooting, delete the maintenance file:
- Windows:
%NnmDataDir%\hacluster\<resource_group>\maintenance - Linux:
$NnmDataDir/hacluster/<resource_group>/maintenance
- Windows:
Changes to NNMi Data are Not Seen after Failover
The NNMi configuration points to a different system than where NNMi is running. To fix the problem, verify that the ov.conf file has appropriate entries for the following items:
NNM_INTERFACE=<virtual_hostname>HA_RESOURCE_GROUP=<resource_group>HA_MOUNT_POINT=<HA_mount_point>NNM_HA_CONFIGURED=YESHA_POSTGRES_DIR=<HA_mount_point>/NNM/dataDir/shared/nnm/databases/PostgresHA_EVENTDB_DIR=<HA_mount_point>/NNM/dataDir/shared/nnm/eventdbHA_CUSTOMPOLLER_DIR=<HA_mount_point>/NNM/dataDir/shared/nnm/databases/custompollerHA_NNM_LOG_DIR=<HA_mount_point>/NNM/dataDir/logHA_JBOSS_DATA_DIR=<HA_mount_point>/NNM/dataDir/nmsas/NNM/dataHA_LOCALE=C
For the location of the ov.conf file, see NNMi High Availability Configuration Files.
nmsdbmgr Does Not Start after High Availability Configuration
This situation usually occurs as a result of starting NNMi after running the nnmhaconfigure.ovpl command but without the nnmhadisk.ovpl command with the -to option having been run. In this case, the HA_POSTGRES_DIR entry in the ov.conf file specifies the location of the embedded database on the shared disk, but this location is not available to NNMi.
To fix this problem:
-
On the active node in the High Availability (HA) cluster, disable HA resource group monitoring by creating the following maintenance file:
- Windows:
%NnmDataDir%\hacluster\<resource_group>\maintenance - Linux:
$NnmDataDir/hacluster/<resource_group>/maintenance
- Windows:
-
Copy the NNMi database to the shared disk:
-
Windows:
%NnmInstallDir%\misc\nnm\ha\nnmhadisk.ovpl NNM
-to <HA_mount_point> -
Linux:
$NnmInstallDir/misc/nnm/ha/nnmhadisk.ovpl NNM
-to <HA_mount_point>
To prevent database corruption, run this command (with the
-tooption) only one time. For information about alternatives, see Re-Enable NNMi for High Availability after All Cluster Nodes are Unconfigured.-
Windows:
%NnmInstallDir%\misc\nnm\ha\nnmhastartrg.ovpl NNM <resource_group>
-
Linux:
$NnmInstallDir/misc/nnm/ha/nnmhastartrg.ovpl NNM <resource_group>
-
-
Start NNMi:
ovstart -
Verify that NNMi started correctly:
ovstatus -cAll NNMi services should show the state RUNNING.
-
After completing your troubleshooting, delete the maintenance file:
- Windows:
%NnmDataDir%\hacluster\<resource_group>\maintenance - Linux:
$NnmDataDir/hacluster/<resource_group>/maintenance
- Windows:
NNMi Runs Correctly on Only One High Availability Cluster Node (Windows)
The Windows operating system requires two different virtual IP addresses, one for the High Availability (HA) cluster and one for the HA resource group.
If the virtual IP address of the HA cluster is the same as that of the NNMi HA resource group, NNMi only runs correctly on the node associated with the HA cluster IP address.
To correct this problem, change the virtual IP address of the HA cluster to a unique value for the network.
Disk Failover Does Not Occur
This situation can happen when the operating system does not support the shared disk. Review the HA product, operating system, and disk manufacturer documentation to determine whether these products can all work together.
If disk failure occurs, NNMi does not start on failover. Most likely, nmsdbmgr fails because the HA_POSTGRES_DIR directory does not exist. Verify that the shared disk is mounted and that the appropriate files are accessible.
Shared Disk is Not Accessible (Windows)
The command nnmhaclusterinfo.ovpl -config NNM -get HA_MOUNT_POINT returns nothing.
The drive of the shared disk mount point must be fully specified (for example, S:\) during HA configuration.
To correct this problem, run the nnmhaconfigure.ovpl command an each node in the HA cluster. Fully specify the drive of the shared disk mount point.
Shared Disk Does Not Contain Current Data
Responding to the nnmhaconfigure.ovpl command question about disk type with the text none bypasses the code for setting the disk-related variables in the ov.conf file. To fix this situation, follow the procedure in Prepare the Shared Disk Manually in High Availability Environments.
Shared Disk Files Are Not Found by the Secondary Node after Failover
The most common cause of this situation is that the nnmhadisk.ovpl command was run with the -to option when the shared disk was not mounted. In this case, the data files are copied to the local disk, so the files are not available on the shared disk.
To fix this problem:
-
On the active node in the High Availability (HA) cluster, disable HA resource group monitoring by creating the following maintenance file:
- Windows:
%NnmDataDir%\hacluster\<resource_group>\maintenance - Linux:
$NnmDataDir/hacluster/<resource_group>/maintenance
- Windows:
- Log on to the active node, and then verify that the disk is mounted and available.
-
Stop NNMi:
ovstop -
Copy the NNMi database to the shared disk:
-
Windows:
%NnmInstallDir%\misc\nnm\ha\nnmhadisk.ovpl NNM -to <HA_mount_point>
-
Linux:
$NnmInstallDir/misc/nnm/ha/nnmhadisk.ovpl NNM -to <HA_mount_point>
To prevent database corruption, run this command (with the
-tooption) only one time. For information about alternatives, see Re-Enable NNMi for High Availability after All Cluster Nodes are Unconfigured. -
-
Start the NNMi HA resource group:
-
Windows:
%NnmInstallDir%\misc\nnm\ha\nnmhastartrg.ovpl NNM <resource_group>
-
Linux:
$NnmInstallDir/misc/nnm/ha/nnmhastartrg.ovpl NNM <resource_group>
-
-
Start NNMi:
ovstart -
Verify that NNMi started correctly:
ovstatus -cAll NNMi services should show the state RUNNING.
-
After completing your troubleshooting, delete the maintenance file:
- Windows:
%NnmDataDir%\hacluster\<resource_group>\maintenance - Linux:
$NnmDataDir/hacluster/<resource_group>/maintenance
- Windows:
Error: Wrong Number of Arguments
The name of the product Perl module is a required parameter to most of the NNMi High Availability (HA) configuration commands.
- For NNMi, use the value
NNM. - To determine what value to use for an NNM iSPI, see the documentation for that NNM iSPI.
Resource Hosting Subsystem Process Stops Unexpectedly (Windows Server)
Starting an High Availability (HA) cluster resource on a computer running the Windows Server operating system stops the Resource Hosting Subsystem (Rhs.exe) process unexpectedly.
For information about this known problem, see the Microsoft Support web site article The Resource Hosting Subsystem (Rhs.exe) process stops unexpectedly when you start a cluster resource in Windows Server , which is available from http://support.microsoft.com.
Always run the NNMi resource in a separate resource monitor (rhs.exe) specific to the resource group.
Product Startup Times Out (Windows WSCS 2008)
After upgrading to NNMi 10.30, if the app resource (<resource>-app) in the Failover Cluster Manager changes from "Pending" to "Failed", there might be a timeout issue. If this situation occurs, do the following:
- Use the
cluster log /gencommand to generate thecluster.logfile. -
Open the log located in the following directory:
C:\Windows\cluster\reports\cluster.log
-
If you see an error in the cluster.log file similar to the following, you have a
DeadlockTimeoutissue:ERR [RHS] Resource <resource-name>-APP handling deadlock. Cleaning current operation.The
DeadlockTimeoutis the total time for failover when the agent might be blocked. ThePendingTimeoutrepresents either the online or offline operation. TheDeadlockTimeoutdefault value is 45 minutes (2,700,000 milliseconds), and thePendingTimeoutdefault value is 30 minutes (1,800,000 milliseconds).You can change the
DeadlockTimeoutand thePendingTimeoutvalues. For example, to set aDeadlockTimeoutof 75 minutes and aPendingTimeoutof 60 minutes, you can run the following commands:cluster res "<resource group>-APP" /prop DeadlockTimeout=4500000
cluster res "<resource group>-APP" /prop PendingTimeout=3600000
See your High Availability vendor documentation for more information
Log Files on the Active Cluster Node Are Not Updating
This situation is normal. It occurs because the log files have been redirected to the shared disk.
For NNMi, review the log files in the location specified by HA_NNM_LOG_DIR in the ov.conf file.
Cannot Start the NNMi HA Resource Group on a Particular Cluster Node
If the nnmhastartrg.ovpl or nnmhastartrg.ovpl command does not correctly start, stop, or switch the NNMi HA resource group, review the following information:
-
MSFC:
- In Failover Cluster Management, review the state of the NNMi HA resource group and underlying resources.
- Review the Event Viewer log for any errors.
-
VCS:
- Run
/opt/VRTSvcs/bin/hares -stateto review the resource state. - For failed resources, review the
/var/VRTSvcs/log/<resource>.logfile for the resource that is failing. Resources are referenced by the agent type, for example:IP*.log,Mount*.log, andVolume*.log.
- Run
If you cannot locate the source of the problem, you can manually start the NNMi HA resource group by using the HA product commands:
- Mount the shared disk.
-
Assign the virtual host to the network interface:
-
MSF:
- Start Failover Cluster Management.
- Expand the resource group.
- Right-click
<resource_group>-ip, and then click Bring Online.
- VCS:
/opt/VRTSvcs/bin/hares -online <resource_group>-ip-sys <local_hostname> - RHCS: Run
/usr/sbin/cmmodnetto add the IP address.
-
-
Start the NNMi HA resource group. For example:
-
Windows:
%NnmInstallDir%\misc\nnm\ha\nnmhastartrg.ovpl NNM
-start <resource_group> -
Linux:
$NnmInstallDir/misc/nnm/ha/nnmhastartrg.ovpl NNM
-start <resource_group>
-
The return code 0 indicates that NNMi started successfully.
The return code 1 indicates that NNMi did not start correctly.
High Availability Configuration Reference
This section contains reference information for the following High Availability configuration items:
- NNMi High Availability Configuration Files
- NNMi-Provided HA Configuration Scripts
- NNMi High Availability Configuration Log Files
NNMi High Availability Configuration Files
The following table lists the NNMi High Availability (HA) configuration files. These files apply to NNMi and add-on NNM iSPIs on the NNMi management server. These files are installed to the following location:
- Windows:
%NnmDataDir%\shared\nnm\conf - Linux:
$NnmDataDir/shared/nnm/conf
|
File Name |
Description |
|---|---|
|
ov.conf |
Updated by the |
|
nnmdatareplicator.conf |
Used by the For more information, see the comments in the file. |
NNMi-Provided HA Configuration Scripts
The following tables list the HA configuration scripts that are included with NNMi. The NNMi-provided scripts listed in NNMi HA Configuration Scripts are convenience scripts that can be used to configure HA for any product that has a customer Perl module. If you prefer, you can use the HA product-provided commands to configure HA for NNMi.
On the NNMi management server, the NNMi-provided HA configuration scripts are installed to the following location:
- Windows:
%NnmInstallDir%\misc\nnm\ha - Linux:
$NnmInstallDir/misc/nnm/ha
|
Script Name |
Description |
|---|---|
|
nnmhaconfigure.ovpl |
Configures NNMi or an NNM iSPI for an HA cluster. Run this script on all nodes in the HA cluster. |
|
nnmhaunconfigure.ovpl |
Unconfigures NNMi or an NNM iSPI from an HA cluster. Optionally, run this script on one or more nodes in the HA cluster. |
|
nnmhaclusterinfo.ovpl |
Retrieves cluster information regarding NNMi. Run this script as needed on any node in the HA cluster. |
|
nnmhadisk.ovpl |
Copies NNMi and NNM iSPI data files to and from the shared disk. During HA configuration, run this script on the primary node. At other times, run this script per the instructions in this chapter. |
|
nnmhastartrg.ovpl |
Starts the NNMi HA resource group in an HA cluster. During HA configuration, run this script on the primary node. |
|
nnmhastoprg.ovpl |
Stops the NNMi HA resource group in an HA cluster. During HA unconfiguration, run this script on the primary node. |
The NNMi-provided scripts listed in the following table are used by the scripts listed in NNMi HA Configuration Scripts. Do not run the scripts listed in the following table directly.
|
Script Name |
Description |
|---|---|
|
nnmdatareplicator.ovpl |
Checks the |
|
nnmharg.ovpl |
Starts, stops, and monitors NNMi in an HA cluster. For VCS configurations, used by the VCS start, stop, and monitor scripts. ( Also used by |
|
nnmhargconfigure.ovpl |
Configures HA resources and resource groups. Used by |
|
nnmhastart.ovpl |
Starts NNMi in an HA cluster. Used by |
|
nnmhastop.ovpl |
Stops NNMi in an HA cluster. Used by |
|
nnmhamonitor.ovpl |
Monitors NNMi processes in an HA cluster. Used by |
|
nnmhamscs.vbs |
Is a template for creating a script to start, stop, and monitor NNMi processes in a MSFC HA cluster. The generated script is used by MSFC and is stored in the following location: |
NNMi High Availability Configuration Log Files
The following log files apply to the HA configuration for NNMi and add-on NNM iSPIs on the NNMi management server:
-
Windows configuration:
%NnmDataDir%\tmp\HA_nnmhaserver.log%NnmDataDir%\log\haconfigure.log
-
Linux configuration:
$NnmDataDir/tmp/HA_nnmhaserver.log$NnmDataDir/log/haconfigure.log
-
Windows runtime:
Event Viewer log%HA_MOUNT_POINT%\NNM\dataDir\log\nnm\ovspmd.log%HA_MOUNT_POINT%\NNM\dataDir\log\nnm\public\postgres.log%HA_MOUNT_POINT%\NNM\dataDir\log\nnm\public\nmsdbmgr.log%HA_MOUNT_POINT%\NNM\dataDir\log\nnm\nnm.log-
%SystemRoot%\Cluster\cluster.logThis is the log file for cluster runtime issues including: adding and removing resources and resource groups; other configuration issues; starting and stopping issues.
-
Linux:
/var/adm/syslog/syslog.log$HA_MOUNT_POINT/NNM/dataDir/log/nnm/ovspmd.log$HA_MOUNT_POINT/NNM/dataDir/log/nnm/public/postgres.log$HA_MOUNT_POINT/NNM/dataDir/log/nnm/public/nmsdbmgr.log$HA_MOUNT_POINT/NNM/dataDir/log/nnm/nnm.log
You might also need to consult your HA vendor logs. For example, Veritas stores log files in the /var/VRTSvcs/log folder. RHCS records log messages to syslog.