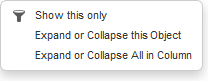
Use Hypervisor Diagrams and Dialogs
This topic includes the following sections:
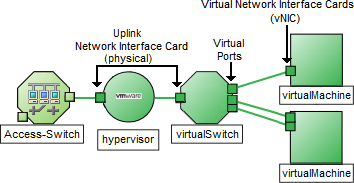
(NNMi Advanced) NNMi provides two types of interactive diagrams that show detailed information about virtual objects offered by a particular hypervisorThe virtual machine manager in charge of delegating various aspects from a pool of resources to become virtual devices. The delegations might be static or dynamic, depending on the manufacture's implementation. The type of virtual machines being generated depends on the manufacturer's implementation.. These diagrams are available on tabs in the Analysis Pane and available within interactive popup dialogs when the hypervisor or one of its virtual devices is selected:
|
Wheel Dialog (displaying the wheel diagram)
|
Loom Dialog (displaying the loom diagram) See Using Loom Dialog.
|


Access Hypervisor Dialogs
The dialogs can be accessed in a variety of ways.
| Access Point | Procedure | ||
|---|---|---|---|
|
Map Views Table Views |
For any object representing a hypervisor, virtual machine, or other component of a hypervisor (such as Node, Interface, or related Incident), do one of the following to launch the dialog: Right-click the object:
Select the object and then use the Actions menu:
|
||
|
Analysis pane and Dashboard view for: Node Interface Incident |
Select a hypervisor, virtual machine (VM), Virtual Switch (vSwitch), or other component being provided by a hypervisor, and then navigate to the Analysis pane or Dashboard view. Select one of the following Analysis Pane tab or Dashboard panel:
Only a limited number of Wheel Dialog and Loom Dialog features are available within the Analysis pane and Dashboard panel. For access to all available features: |
||
| Docked dialog: |
When you click the
|
||
|
Your NNMi administrator can display the Wheel and Loom outside of NNMi using |
|||
 Show Diagram in New Window in the Analysis pane.
 Use the Wheel Dialog
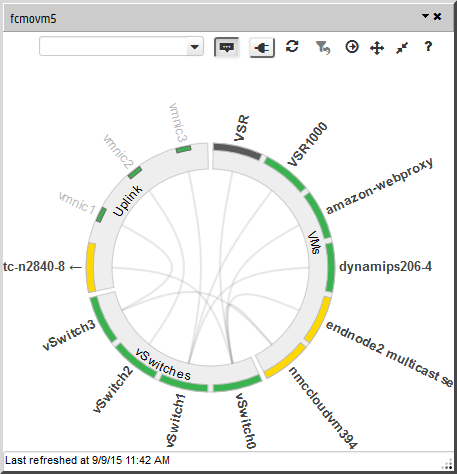
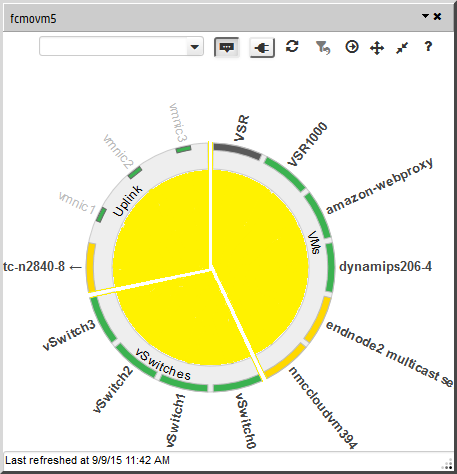
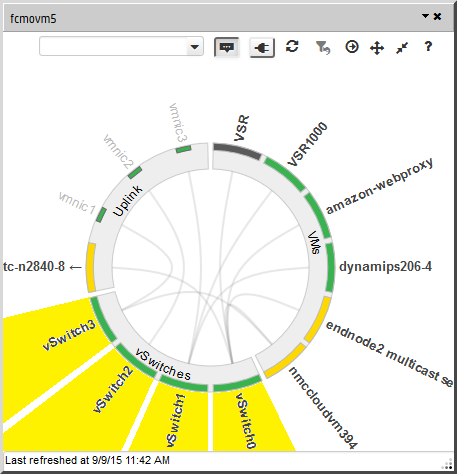
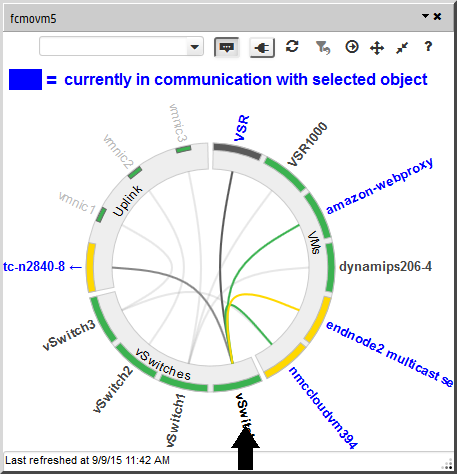
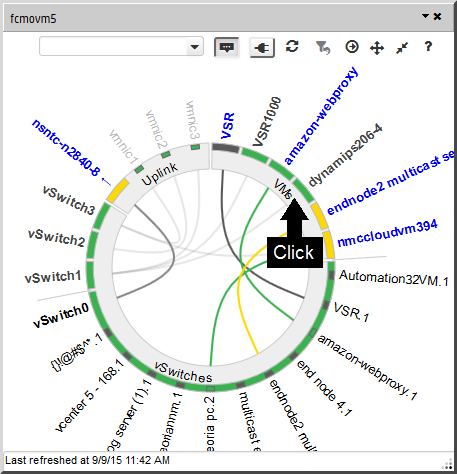
(NNMi Advanced) The Wheel Dialog shows the current deployment of virtual resources:
Slide 1: The initial display shows the entire set of virtual nodes currently being deployed by the hypervisorThe virtual machine manager in charge of delegating various aspects from a pool of resources to become virtual devices. The delegations might be static or dynamic, depending on the manufacture's implementation. The type of virtual machines being generated depends on the manufacturer's implementation. (any resources that are currently Powered Off are not displayed)
Slide 2: Inner ring segments represent categories of device types being provided by the hypervisor
Slide 3: Outer ring segments represent virtual devices being deployed by the hypervisor
Slide 4: Hover a name to display that object's current communication channels
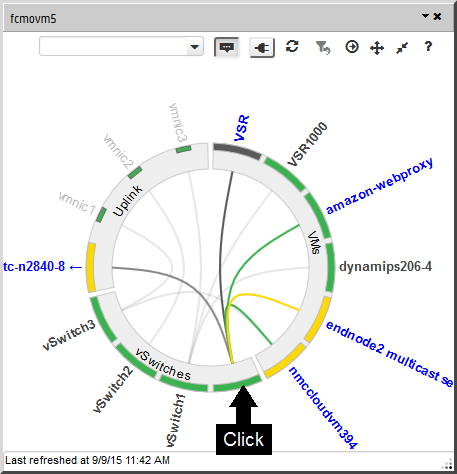
Slide 5-6: Click an outer arc to hide/show one device's interfaces or ports
Slide 7: Highlight the device name to display connection details
Slide 8: Click an inner arc to hide or show all device interfaces or ports within a category of devices
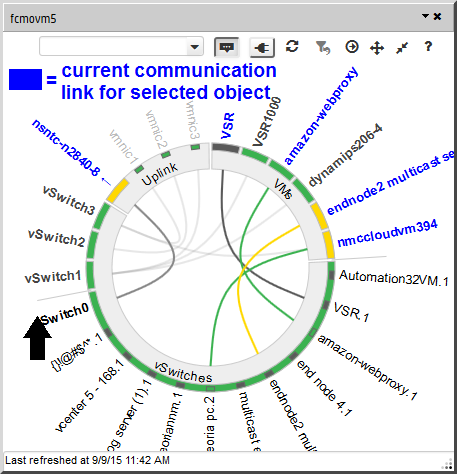
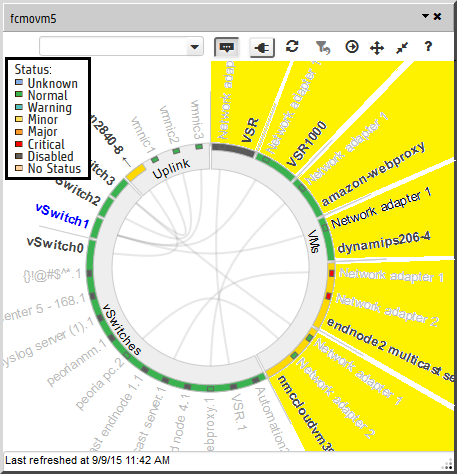
Slide 9: Color represents current status for each node, interface, or port
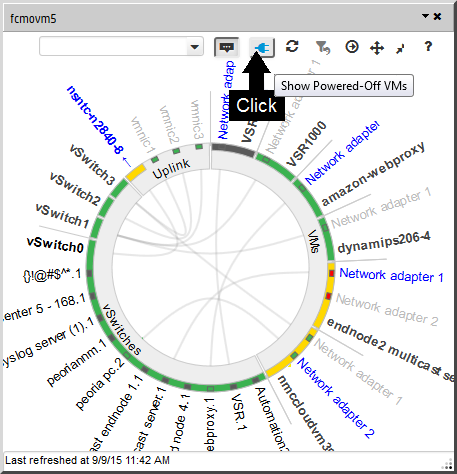
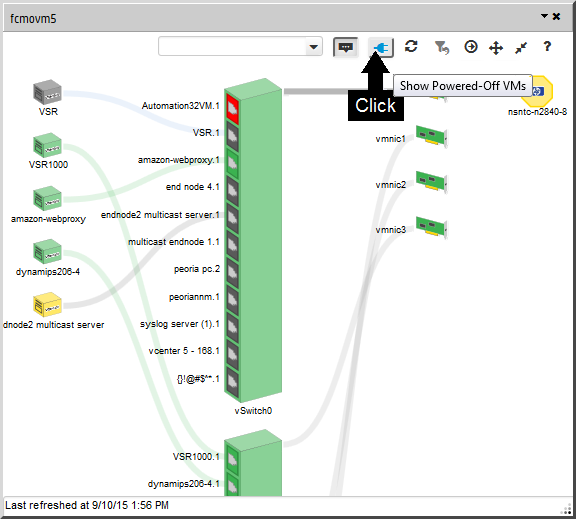
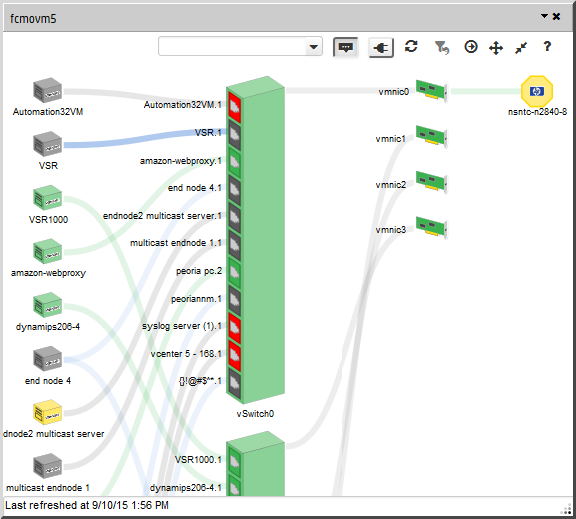
Slide 10-11:  Powered Off resources can be shown or hidden
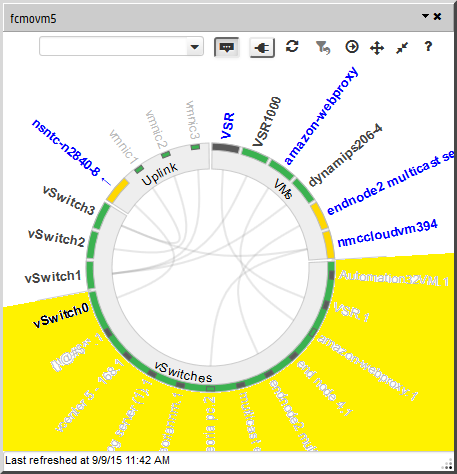
Slide 12-13: Search for and find any node, interface, or port
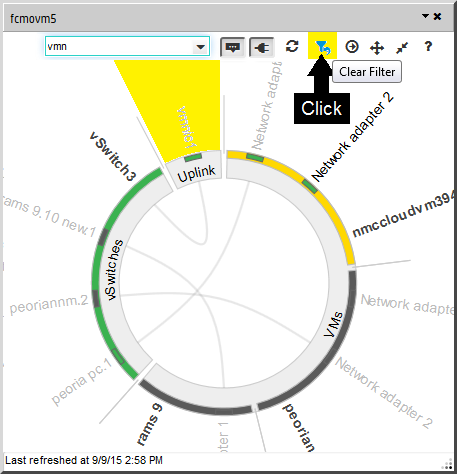
Slide 14-15:  Filter the Wheel to one device's environment
Slide 1:
Open the Wheel Dialog to see the hypervisor's currently deployed resources:
Slide 2:
Inner ring segments = categories of devices:
Slide 3:
Outer ring segments = specific virtual devices:
Slide 4:
Hover a name to display that object's current communication channels:
Slide 5:
Click an outer arc to hide/show one device's resources:
Slide 6:
Interfaces or ports are represented by rectangles within the arc:
Slide 7:
Hover the device name to see all interface or port connections:
Slide 8:
Click inner arcs to hide/show details of all devices in the category:
Slide 9:
Color = current status of the device, interface, or port:
Slide 10:
Display currently Powered Off resources (not deployed):
Slide 11:
Powered Off devices' status color is gray:
Slide 12:
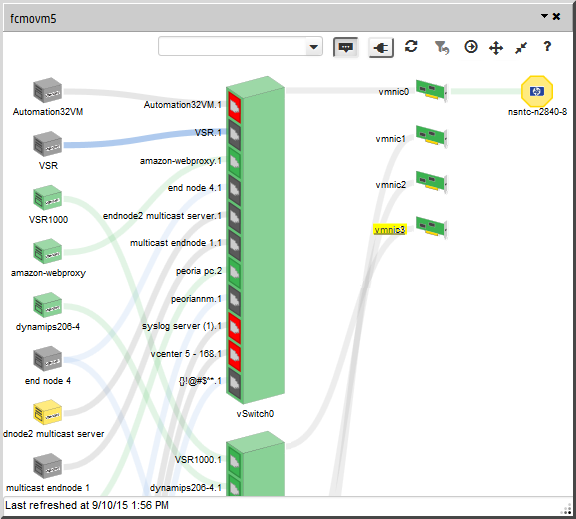
Search for any node, interface, or port:
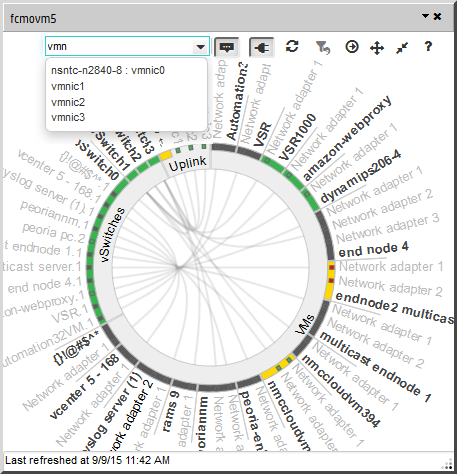
Slide 13:
The found node, interface, or port is highlighted:
Slide 14:
Filter the Wheel for one device's environment:
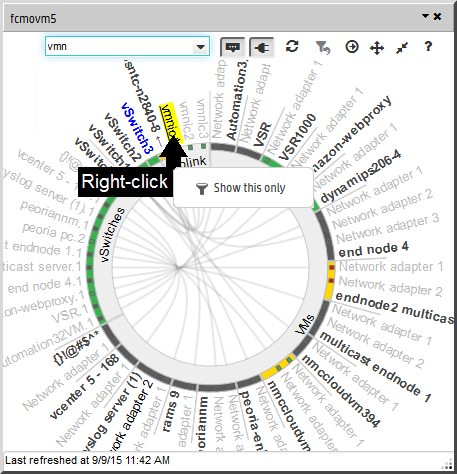
Slide 15:
Remove the filter and return to the previous display:
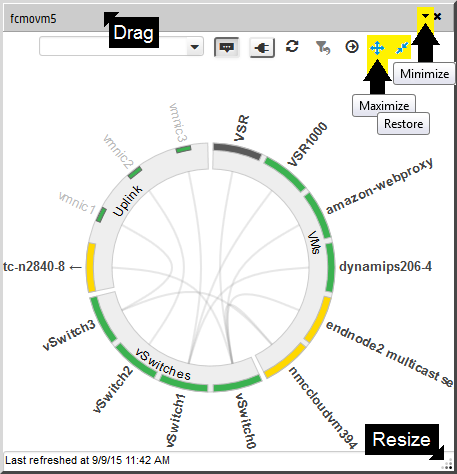
Change Size and Location of the Wheel
Left-click the background to establish which point should be considered the new center, and use the mouse to:
- Rotate the mouse wheel to zoom in or zoom out.
- Drag to pan to a new location a short distance within the diagram.
-
Pan while maintaining the current highlighted selection (for example follow a highlighted connection line across the diagram):
- Ctrl + rotate the mouse wheel
- Ctrl-drag
You can also change the size and location of the popup. NNMi remembers your preferences from session to session (per browser):
When minimized the Wheel appears at the bottom of the console window with the hypervisor's name: ![]()
|
|
Display Additional Information
- Click any text around the outside perimeter of the Wheel to populate the Analysis Pane in the main console.
- Double-click any text around the outside perimeter of the Wheel to display the node or interface form in the main console.
When the Wheel Dialog is launched from a map view, clicking an object on the wheel automatically highlights that object on the map. See also Use Hypervisor Diagrams and Dialogs.
|
|
Display devices connected beyond the Wheel
- In the Wheel Dialog toolbar, click
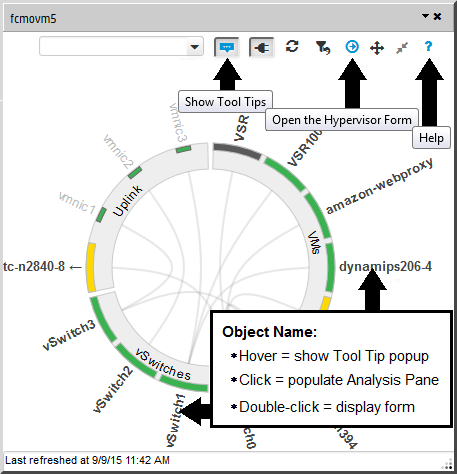
 Open the Hypervisor Form to display the Node form in the main console.
 -
Use Actions → Maps → Layer 2 Neighbor View.
 See Also
In addition to the following, you will see everything else connected to the access Switch.
- In the map toolbar, increase the Number of Hops setting to see a wider range of connections.
Toolbar Actions
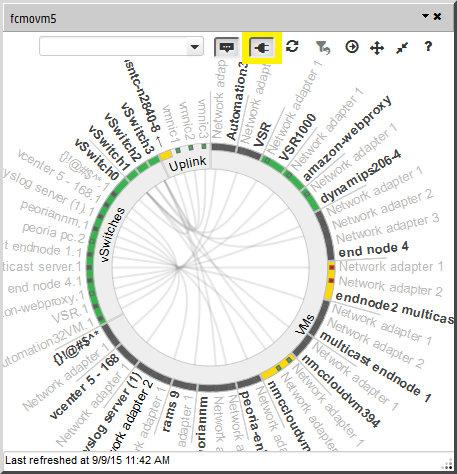
Toolbar icons are at the top of the Wheel Dialog:

| Icon | Description | ||
|---|---|---|---|

|
Dock. Minimizes the Wheel Dialog into a small rectangular link at the bottom right side of the console's workspace:
|
||
|
|
Close. Close the Wheel Dialog. | ||
| Find |
Auto complete pull-down that allows you to pick an item by VM name, VSwitch name, interface name, management address, or IP address: To highlight the selected object in the diagram, do one of the following:
If the selected item is not currently visible, NNMi automatically takes the appropriate action:
|
||
 or or  |
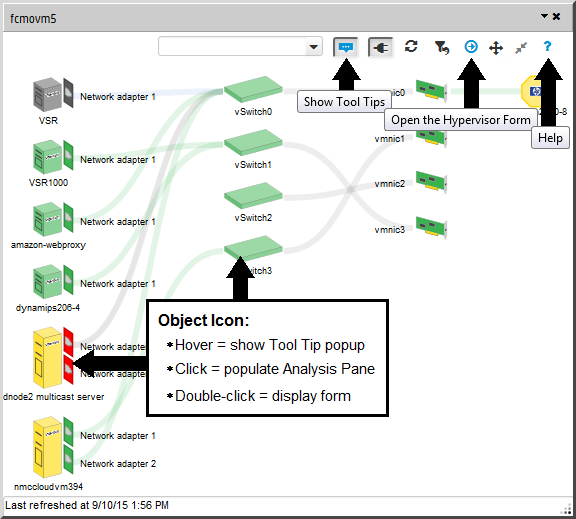
Show Tool Tips. Toggle button to
|
||
 or or |
Powered-Off VMs. Toggle button to |
||

|
Refresh. Refreshes the current diagram, showing the most recent virtual configuration and status of each object. | ||
 or or |
|
||
|
|
Open the Hypervisor Form. Displays the hypervisor's form no matter which subset of the hypervisor's resources are currently displayed in the Wheel. Double-click any node or interface label to display that object's form. |
||
 or or  |
Maximize.
|
||

|
Restore. Reverts the dialog to the size and settings prior to clicking |
||

|
Help. Click the icon for access to the Wheel Dialog Help. | ||

|
Resize:
|

Use the Loom Dialog
Change What Is Displayed within the Loom
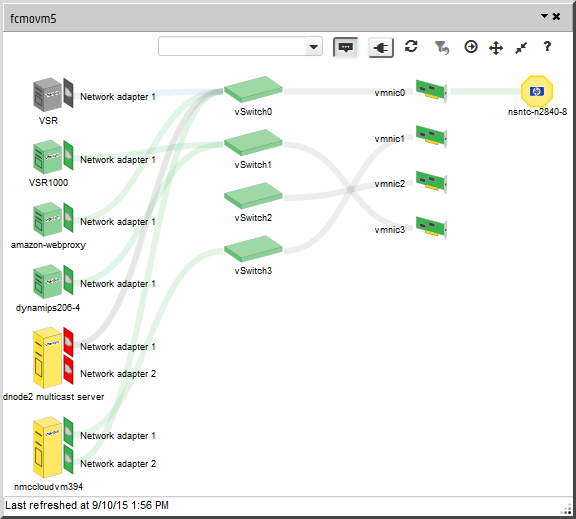
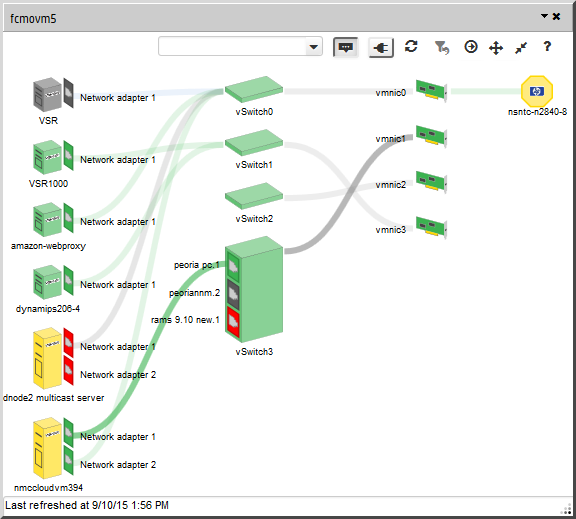
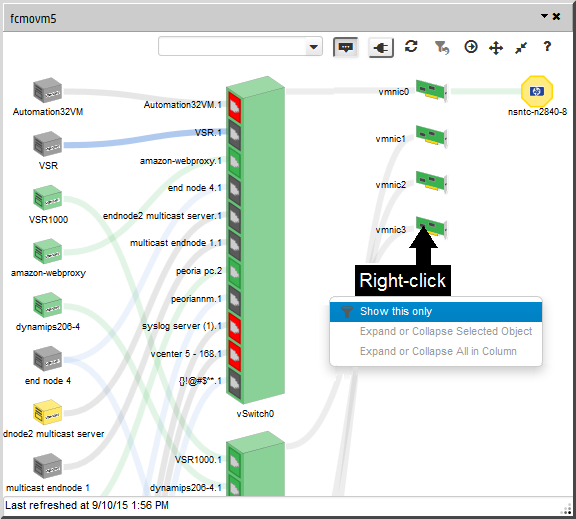
(NNMi Advanced) The Loom Dialog shows the current deployment of virtual resources:
Slide 1: The initial display shows the entire set of virtual nodes currently being deployed by the hypervisorThe virtual machine manager in charge of delegating various aspects from a pool of resources to become virtual devices. The delegations might be static or dynamic, depending on the manufacture's implementation. The type of virtual machines being generated depends on the manufacturer's implementation. (any resources that are currently Powered Off are not displayed)
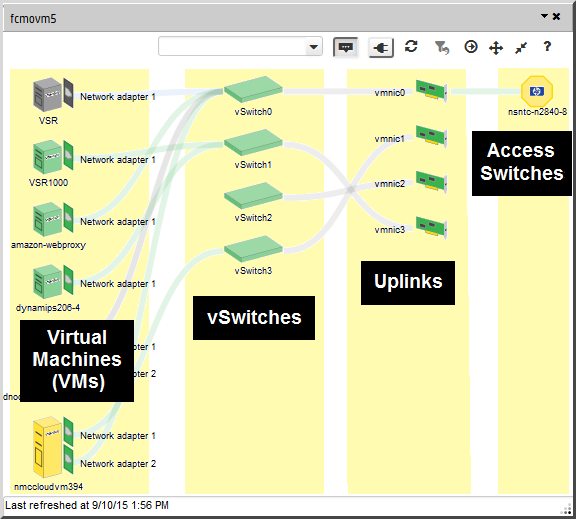
Slide 2: Columns represent categories of device types being provided by the hypervisor
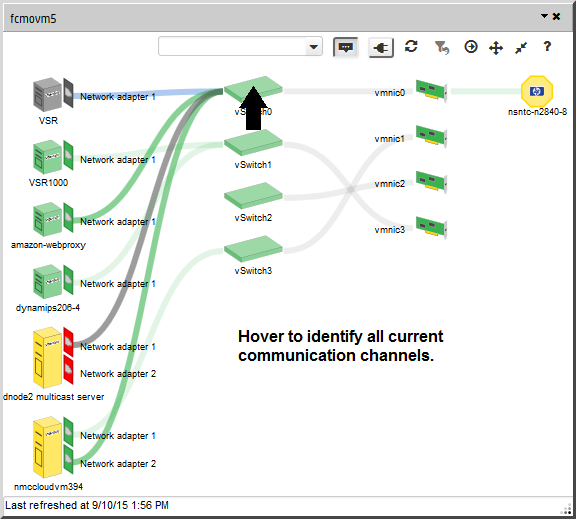
Slide 3: Hover a name to display the connections assigned to that object
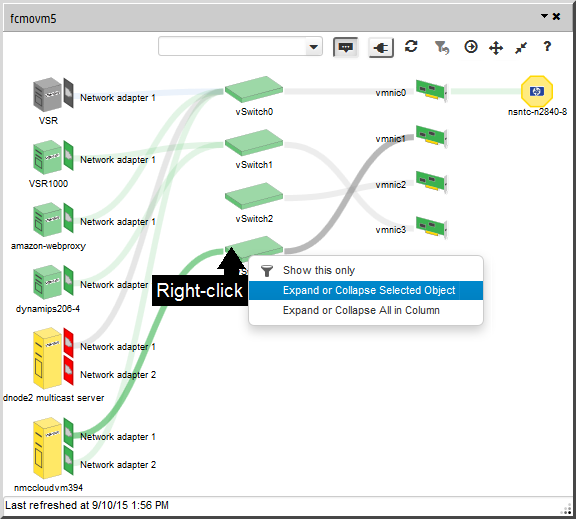
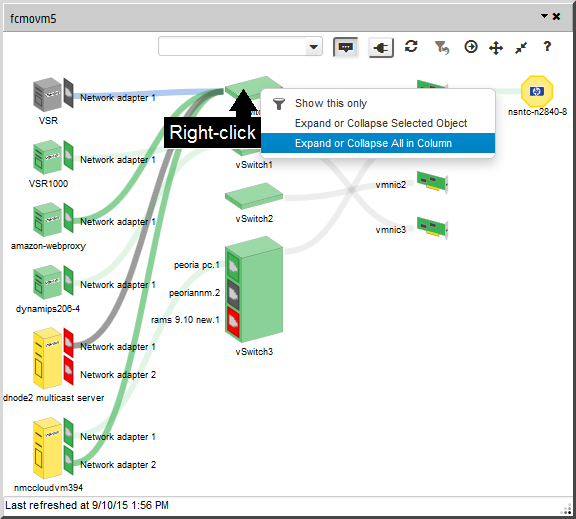
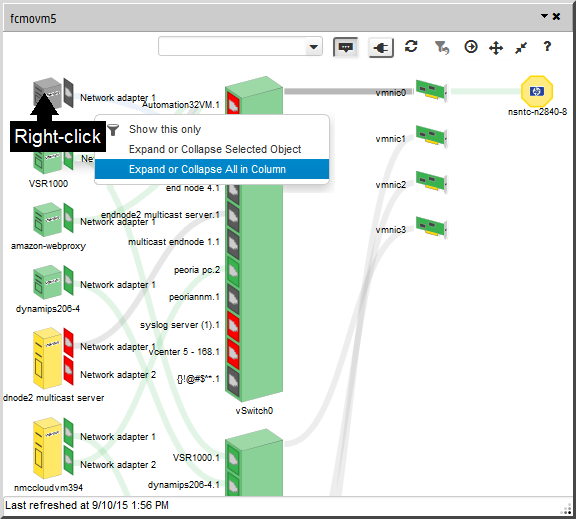
Slide 4-5: Right-click to show or hide one device's interfaces or ports
Slide 6: Right-click to show all device interfaces or ports within a category of devices
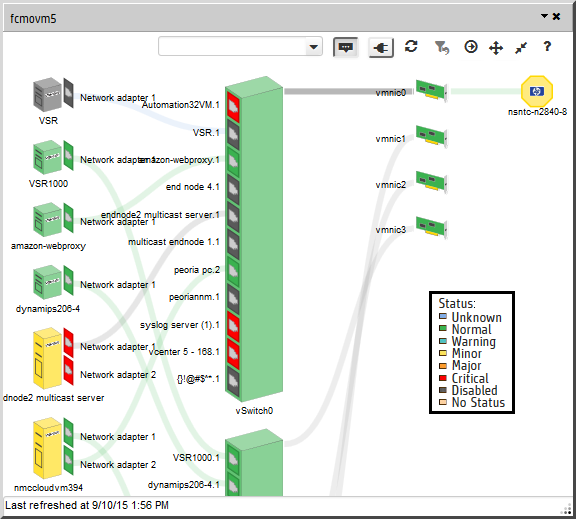
Slide 7: Color represents current status for each node, interface, or port
Slide 8: Right-click to hide all device interfaces or ports within a category of devices
Slide 9-10: Powered Off resources can be shown or hidden
Slide 11-12: Search for and find any node, interface, or port
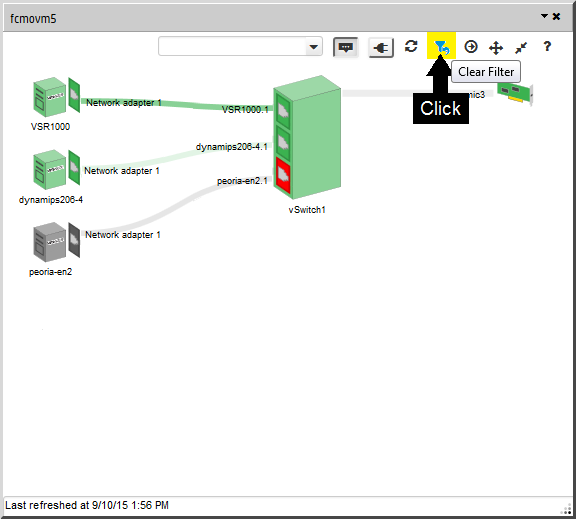
Slide 13-14: Filter the Loom to one device's environment
Slide 1:
Open the Loom Dialog to see the hypervisor's currently deployed resources:
Slide 2:
Columns = categories of devices:
Slide 3:
Hover an icon to display the connections assigned to that object:
Slide 4:
Right-click to hide/show one device's resources:
Slide 5:
Interfaces or ports are displayed within the object:
Slide 6:
Right-click to show details of all devices in the category:
Slide 7:
Color = current status of the device, interface, or port:
Slide 8:
Right-click to hide details of all devices in the category:
Slide 9:
Display currently Powered Off resources (not deployed):
Slide 10:
Powered Off devices' status color is gray:
Slide 11:
Search for any node, interface, or port:
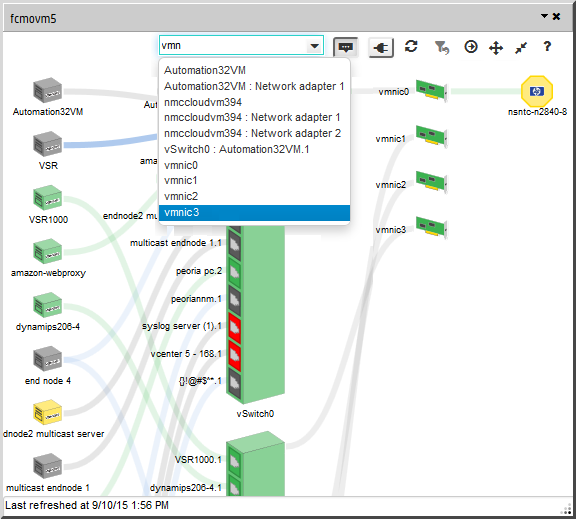
Slide 12:
The found node, interface, or port is highlighted:
Slide 13:
Filter the Loom for one device's environment:
Slide 14:
Remove the filter and return to the previous display:
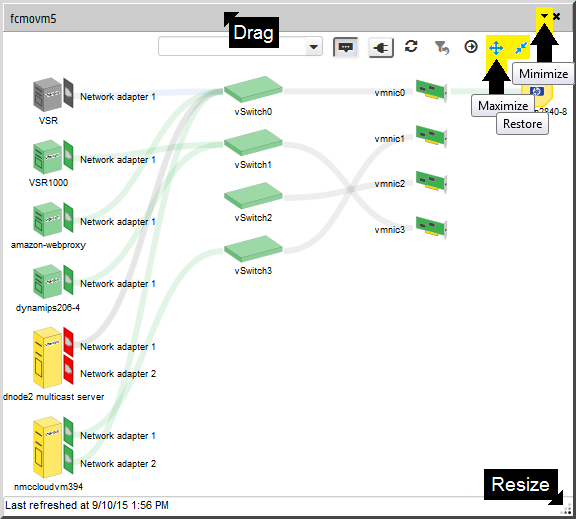
Change Size and Location of the Loom
Left-click the background to establish which point should be considered the new center, and use the mouse to:
- Rotate the mouse wheel to zoom in or zoom out.
- Drag to pan to a new location a short distance within the diagram.
-
Pan while maintaining the current highlighted selection (for example follow a highlighted connection line across the diagram):
- Ctrl + rotate the mouse wheel
- Ctrl-drag
You can also change the size and location of the popup. NNMi remembers your preferences from session to session (per browser):
When minimized the Loom appears at the bottom of the console window with the hypervisor's name: ![]()
|
|
Display Additional Information
- Click any text in the Loom to populate the Analysis Pane in the main console.
- Double-click any text in the Loom to display the node or interface's form in the main console.
When the Loom Dialog is launched from a map view, clicking an object automatically highlights that object on the map. See also Use Hypervisor Diagrams and Dialogs.
|
|
Display devices connected beyond the Loom
- In the Loom Dialog toolbar, click Open the Hypervisor Form to display the Node form in the main console.
-
Use Actions → Maps → Layer 2 Neighbor View.
See AlsoIn addition to the following, you will see everything else connected to the access Switch.
- In the map toolbar, increase the Number of Hops setting to see a wider range of connections.
Toolbar Actions
Toolbar icons are at the top of the Loom Dialog:
| Icon | Description | ||||||
|---|---|---|---|---|---|---|---|
|
|
Dock. Minimizes the Loom Dialog into a small rectangular link at the bottom right side of the console's workspace:
|
||||||
|
|
Close. Close the Loom Dialog. | ||||||
| Find |
Auto complete pull-down that allows you to pick an item by VM name, VSwitch name, interface name, management address, or IP address: To highlight the selected object in the diagram, do one of the following:
If the selected item is not currently visible, NNMi automatically takes the appropriate action:
|
||||||
|
or |
Show Tool Tips. Toggle button to
|
||||||
|
or |
Powered-Off VMs. Toggle button to |
||||||
|
|
Refresh. Refreshes the current diagram, showing the most recent virtual configuration and status of each object. | ||||||
|
or |
|
||||||
|
|
Open the Hypervisor Form. Displays the hypervisor's form no matter which subset of the hypervisor's resources are currently displayed in the Loom. Double-click any node or interface label to display that object's form. |
||||||
|
or |
Maximize.
|
||||||
|
|
Restore. Reverts the dialog to the size and settings prior to clicking Maximize. |
||||||
|
|
Help. Click the icon for access to the Loom Dialog Help. | ||||||
|
|
Resize:
NNMi remembers your preference for size and location (stored in your browser settings). |