


Navigate the Console
The main window of the console is your starting point for navigation.
A view is a collection of related objects that are depicted as a table or map. A form provides all known details about a selected object.
From the main window, you can perform the following tasks:
- Browse Through NNMi Views
- Access Object Information (Forms and Analysis Pane)
- Invoke Actions
- Use the Tools Menu
- Access Help
- Search the Help Topics
- Mark Your Favorite Help Topics
- About Workspaces
Browse Through NNMi Views
NNMi views contain information about the objects on your network. A view can contain a table (a list of objects) or a map with icons. For example, to assist you in managing incidents, NNMi provides the Open Key Incidents and My Open Incidents table views.
To navigate to a view:
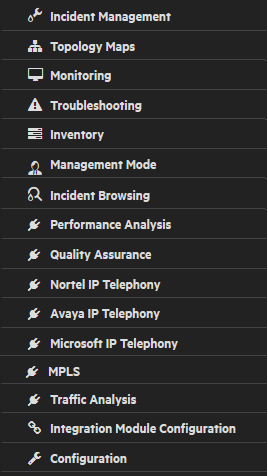
- Click a workspace name in the workspaces navigation panel to display a group of views. The workspaces provided by NNMi are shown below:
-
Select the view you want.
 See Also
In the view toolbar, you can click the  Show View in New Window icon to open the view in a new window. See Use the View Toolbars.
If the view has more than one page of information, use the scroll bar or the page controls to navigate through each page of the view. See Use the View Toolbars for more information about using page control.
See Use Actions to Perform Tasks for more information about views that are accessible from the console's Actions menu.
You can also right-click any object in a table or map view to access the items available within the Actions menu.
Access Object Information (Forms and Analysis Pane)
You can access detailed information about network objects from NNMi forms and the analysis pane. For example, in your current view, you can obtain more information about a node or interface that was reported as having problems. From within the node or interface form, you can access the associated incidents.
Access all object attributes and related objects by displaying the form:
A red asterisk (*) that precedes an attribute on a form indicates the attribute requires a value.
-
To open a form from a table view:
Double-click the row representing an object.
The form appears, containing the details about the object. For more information, see Work with Objects.
-
To open a form from a map view:
Do one of the following:
- Select the map object. Then, click the
 Open icon in the toolbar.
 -
Double-click the map object.
If the map object is a Child Node Group, double-clicking the Child Node Group object replaces the current map with a map containing each of the nodes in the Child Node Group. To access a Child Node Group form, use the
Open icon in the toolbar.
- Select the map object. Then, click the
Invoke Actions
The actions available to you depend on your NNMi user role and on the object selected. If no actions are available for a particular object, the Actions menu is empty.
To perform an action, select an object, and then select an action from the Actions menu. The Actions menu is accessible from the NNMi console main menu toolbar and from the menu toolbar in any view or form that is opened in a new window.
-
To invoke an action from a table or map view:
- If you do not have a view displayed, from the workspace navigation panel, select a view.
-
Do one of the following:
- In a table view, single-click a row.
- In a map view, single-click the object of interest.
For multiple selections, use Ctrl-click.
-
Select the Actions menu in the menu toolbar.
You can also right-click any object in a table or map view to access the items available within the Actions menu.
- Select the action you want to perform from the list of available actions.
-
To invoke an action from a form:
- If you do not have a form open, from the workspace navigation panel, select the table view you want to access.
- From the table view, double-click the row representing the object instance (for example, node) you want to update.
- From the menu toolbar, select Actions and then the action you want. For example, select Actions → Change Lifecycle → In Progress to change the Lifecycle State of the selected incident to In Progress.
When invoking actions, note the following:
- If you are running an action that modifies attributes on a form, the action takes effect immediately. You do not have to select
 Save.
Save. - An action might cause a new window to open.
- In the Actions menu, your administrator can add menu choices. Those action items are not described in NNMi Help.
Use the Tools Menu
Several tools are provided beneath the Tools menu. The list of tools changes depending on the role to which you are assigned. The tools listed in the following table are available to Operator Level 2.
| Tool | Description |
|---|---|
| Find a Node |
Searches the NNMi database for the case-sensitive string of characters you provide. NNMi finds the associated Node. If multiple Nodes match, NNMi displays the Node form of the first match. NNMi checks the following Node attributes for a match:
|
| Find Attached Switch Port | Identifies the switch port to which the selected node is attached. |
| MIB Browser | Displays the responses to NNMi's SNMP requests made to a particular node in your network environment, starting from a Management Information Base (MIB) object identifier (OID) within the Internet MIB structure. |
| NNMi Status | Displays a list showing the status of each process and service of NNMi. When NNMi is functioning properly, each process and service should be running. If one is not running, contact your NNMi administrator. |
| Status Distribution Graphs | Displays the overall health of your network by providing Stacked Area Graphs that display the distribution of Node, Interface, and IP Address Status information over time. |
| NNMi Self-Monitoring Graphs |
Displays information about NNMi components and their usage:
|
| Trap Analysis |
Requires Network Node Manager iSPI Network Engineering Toolset Software (NNM iSPI NET). NNMi measures the rate of incoming SNMP traps. The NNMi administrator configures thresholds for trap volume within your network. Use this menu item to access the Trap Analytics reports. |
| Visio Export |
Requires Network Node Manager iSPI Network Engineering Toolset Software (NNM iSPI NET). Exports topology maps displayed in NNMi to Visio documents for later use. |
| Signed In Users | View a list of the NNMi users who are currently signed in to NNMi. |
| Incident Actions Log | Displays a log of recent Incident Actions (configured by your NNMi administrator to happen when particular incidents are received/generated by NNMi). |
| Security Reports | (NNMi administrators only) Generate a report of possible NNMi Security configuration problems. |
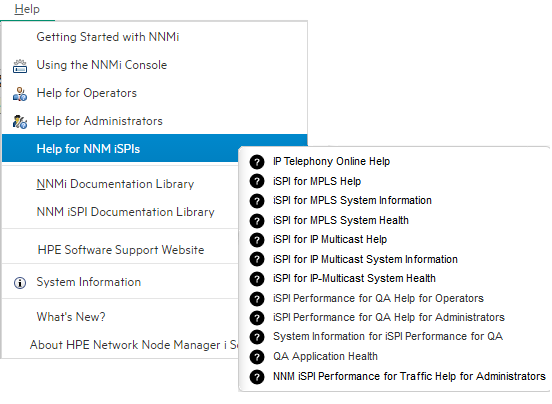
Access Help
[Context-sensitive help when user presses [F1].]
If you have a Guest user role, start with the topics in Help → Using the Console. More information about each view is in Help → Help for Operators. If you need more information about a form, use the Help → Using the <name> form within the form.
If you are an Operator, task information is provided in Help → Help for Operators. If you are an Administrator, all the resources described in the table below are valuable.
To expand NNMi menus, you can click with the mouse or use Ctrl-Shift and the underlined character (if any). NNMi uses Ctrl-Shift (instead of Alt) to avoid the browser's main menu behavior. For example, NNMi provides Ctrl-Shift+H, then n for Help → NNMi Documentation Library. If the NNMi menu does not expand as expected, your browser configuration already over-rides the NNMi configuration for that keyboard combination of Ctrl-Shift+<ASCII character>.
To access the help:
-
Select Help from the NNMi console main menu.
Within the NNMi user interface, pressing [F1] does not access context-sensitive help.
- From the help you can access all the information described in the table below.
| Help Link | Description |
|---|---|
| Using the <name> form | Context-sensitive help for the current form. |
| Getting Started with NNMi | Link to Best Practices Tours that explain some of NNMi’s capabilities. |
| Using the NNMi Console | Explains how to use the NNMi console, including how to navigate within the console, as well as how to access and use the forms and views NNMi provides. |
| Help for Operators | Describes how to use the views, forms, and additional NNMi features that are useful for monitoring and troubleshooting the network. |
| Help for Administrators | Explains how NNMi works and how you can configure NNMi to meet your needs. Describes how to use the Configuration workspace that lets you configure a variety of objects and settings for NNMi. |
| Help for NNM iSPIs |
Access more information about the NNM iSPI software currently installed on your NNMi server. Your NNMi administrator must install these programs before their Help entries appear.
|
| NNMi Documentation Library | Provides access to Reference Pages (command line tool information), Release Notes, and more. |
| Micro Focus Software Support Website | Accesses the Software support web site. |
| System Information | Health information about NNMi. See Display Information About NNMi. |
| What's New | Describes the NNMi features provided in the current release. |
| About Network Node Manager i Software | Current NNMi licensing information (total licensed capacity limit compared to the number of nodes currently managed). See Display NNMi Version and License Information. |
Search the Help Topics
To search for specific information across all help topics:
- In the top-right corner of the Help window, click the Search box.
- Type in a search string (see table).
- Click the
 button. The order of the resulting list of topics is based on a ranking order, with highest ranking topics at the top of the list.
 - Click the topic of interest. To return to the search results and make another choice, click the Backspace key on your keyboard.
Results returned are case insensitive. However, results ranking takes case into account and assigns higher scores to case matches. Therefore, a search for "templates" followed by a search for "Templates" would return the same number of help topics, but the order in which the topics are listed would be different.
Mark Your Favorite Help Topics
Use the Favorites tab in the Help system to set favorites for your commonly used help topics.
When using this feature, note the following:
- This feature is not related to the Favorites option in your Web browser.
- Any time you delete your Web browser cookies, your help topic favorites list is deleted.
About Workspaces
A workspace is a collection of views that represent a scope of interest and work. Workspaces group views with a related purpose or task flow.
When you click the name of a workspace, the views associated with that workspace display below the workspace in the workspace navigation panel. After you select a view, the view display panel shows the requested data. See About the NNMi Console for more information about the workspace navigation and view display panels.
The views within workspaces provide convenient access to information associated with each object type represented. A view displays all the objects of a given type that meet the filter criteria specified for that view.
You will see some or all of the workspaces and views described, depending on the following factors:
- Your assigned NNMi Security Group Mapping.
- The Network Node Manager i Smart Plug-in software currently installed.
NNMi includes the following workspaces:
| Workspace Name | Description |
|---|---|

|
Use the Dashboards require the NNM iSPI Performance for Metrics. |

|
Use the |

|
The The following changes are not automatically visible in the Topology Maps workspace folders:
To view any of these changes, click Refresh |

|
The |

|
Within the The Layer 2 Neighbor View map displays Layer 2 network connectivity. The Layer 3 Neighbor View map displays Layer 3 network connectivity. The Path View map displays the active IPv4 addresses in the path between a source and destination node. The Path View map is useful when troubleshooting data flow problems. The Node Group Map view displays all nodes within a specified group. |

|
Each view in the |

|
The |

|
The This workspace also includes views for incidents based on their Correlation Nature. Examples include Open Root Cause Incidents and Service Impact Incidents. You can also use this workspace to view all incidents. NNMi provides the Custom Incident and Custom Open Incident views that include all of the attributes available for an incident. These views are provided so that you can customize the incident views to include only the incident attributes of interest. This workspace also includes views of incidents generated from NNMi Syslog Messages and SNMP Traps. |

|
This view requires the NNM iSPI Performance for Metrics. To populate performance data in this view, install the Network Performance Server (NPS) -- click here for more information. |
|
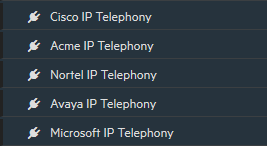
These views require the NNM iSPI for IP Telephony -- click here for more information. See also Views Available in NNMi. See also Views Available in NNMi. See also Views Available in NNMi. See also Views Available in NNMi. See also Views Available in NNMi. |

|
This view requires the NNM iSPI for MPLS -- click here for more information. See also Views Available in NNMi. |

|
This view requires the NNM iSPI for IP Multicast -- click here for more information. See also Views Available in NNMi. |

|
This view requires the NNM iSPI Performance for QA -- click here for more information. See also Views Available in NNMi. |

|
This view requires the NNM iSPI Performance for Traffic -- click here for more information. See also Views Available in NNMi. |

|
(NNMi Administrators only) Views for Integration Module Configuration are used to configure NNMi for communication with other software products. See Help → Help for Administrators for more information. |

|
(NNMi Administrators only) Views for Configuration are used to specify setting choices for NNMi and the iSPIs. See Help → Help for Administrators for more information. |
 Registered,
  In Progress, or
  Completed.
 in the upper right-hand corner of the workspace. Refresh
 Closed. The Closed Key Incidents view displays all incidents that have a Lifecycle State of Closed.