


When investigating and diagnosing network problems, it may be useful to query a node for SNMP MIB Variable values. This technique can provide real-time information about the node that is in addition to that information stored in the NNMi database. This topic includes the following sections:
- MIB Browser Prerequisites
- Run SNMP Walk Commands (MIB Browser)
- Run SNMP Set Commands (MIB Browser)
- Use Aliases in MIB Browser Commands
- View MIB Browser Results
- Save MIB Browser Results to a CSV File
- Print MIB Browser Results
If your NNMi Security Settings allow, you can use NNMi's MIB Browser to perform the following tasks:
SNMP Walk
This command gathers real-time responses to one or more questions (MIB Variables). The range and complexity of the queries is limited only by the target Node's associated SNMP Agent configuration for MIB fileManagement Information Base files are the basic building block of SNMP communication protocol. SNMP Agents are configured to respond to requests defined by a group of supported MIB files. support.In the MIB Browser, specify Node and the query starting point (OID of the MIB), then click the Walk button to generate responses from the SNMP Agent for MIB Variables from any designated starting point down though the MIB structure.
To display the responses obtained from another location in the Internet MIB structure, change the OID attribute value (MIB object identifier).
- SNMP Set
This command makes a real-time change on the target Node. For example, you could issue an SNMP Set for theSNMPv2-MIB's MIB Variable namedsysContactto let everyone on your team know that you are assigning someone new to that Node.
See the following topics for details:
Confirm the following items to ensure best results from your MIB Browser queries:
- Verify that the Node you want the MIB Browser to query responds to SNMP Get and Set commands. See SNMP Agent State settings on the Node Form.
- Verify that the MIB files defining the MIB Variables you want to use are supported by the target Node's SNMP Agent. See Determine which MIBs a Specific Node Supports.
Verify that the MIB files defining the MIB Variables you want to use are installed on the NNMi management server. See MIB Variables View.
- Contact your NNMi administrator with requests for loading additional MIB files on Nodes or the NNMi management server.
| Menu Item | ||
|---|---|---|
| Tools | → Diplay MIB File | Displays the MIB File (text source file) where the selected OID is defined. See Display a MIB File (source text file). |
| → List Supported MIBs | Determine which MIBs are installed on the selected Node. The resulting list determines which SNMP Walk and Set choices you have for this Node. Click the links on the displayed list to open a MIB Form. It is easier to review each available MIB Variable within this context than within the source text file. |
For additional MIB Browser information: ![]() See Also
See Also
Access to these commands depends on the NNMi RoleDetermined by your membership in one of four special NNMi User Groups (NNMi Administrators, NNMi Level 2 Operators, NNMi Level 1 Operators, or NNMi Guest Users). This membership determines what you can see and do within the NNMi console. and Object Access Privileges to which you are assigned. If you are unable to access an action, contact your NNMi administrator.You can use the NNMi MIB Browser to gather a wealth of real-time information from devices in your network environment. The list of available questions are defined in MIB files as MIB Variables, each with a unique OID. See Explore SNMP MIB Source Information.
To gather information from a particular Node in your network environment:
- Verify the MIB Browser Prerequisites.
 Access the MIB Browser.
Level-2 Operators and above, do one of the following:
- Select Tools → MIB Browser.
In any map or Node table view, do one of the following:
- Click a Node and select Actions → MIB Information → MIB Browser.
- Right-click a Node and select MIB Information → MIB Browser
In any Incident view, double-click an Incident to open the Incident form:
- In the Source Node attribute, click the
 drop-down, and select
  Open.
Open. - In the Node form, select Actions → MIB Information → MIB Browser.
- In the Source Node attribute, click the
Within the MIB Form or MIB Variable Form:
Select Actions → MIB Information → MIB Browser.
- Node: The Node Name or IP address of the Node whose MIB Variable values you want to collect.
Read Community String: (Optional) Do one of the following:
- Leave this attribute value blank. NNMi uses the read community string currently configured for the target Node in NNMi's Communication Configuration settings (without your needing to provide any in the MIB Browser).
- Enter a valid read community string for the Node.
Version (optional): Do one of the following:
- Leave this attribute value blank. NNMi uses the SNMP version currently configured for the target Node in NNMi's Communication Configuration settings (without your needing to provide any in the MIB Browser).
- Select an SNMP version from the drop-down list.
For a discovered Node: NNMi uses the read community string, SNMP version, timeout, maximum retries, and management address port currently configured for the target Node in NNMi's Communication Configuration settings for that Node (without your needing to provide any of those values in the MIB Browser).
For an undiscovered Node: NNMi uses default timeout, maximum retries, and management address port parameters provided by the NNMi administrator within the
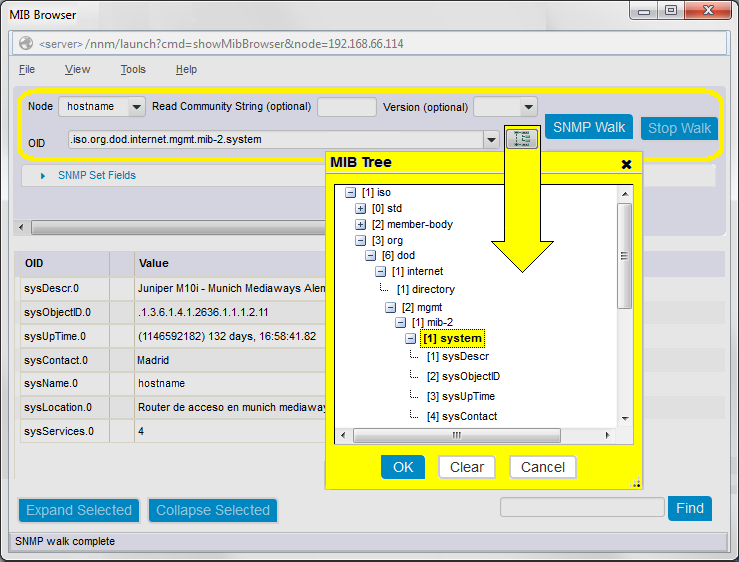
nms-ui.propertiesfile. And you must type a value in the MIB Browser's Read Community String field.OID: The MIB's object identifier (number or mnemonic keywords) you want to use for gathering one value or multiple values with the SNMP
Walk:If you access MIB Browser using Tools → MIB Browser = the default value is
.iso.org.dod.internet.mgmt.mib-2.systemIf you access MIB Browser using MIB Information → MIB Browser = NNMi populates this attribute with the currently selected view's row or form's MIB Variable value.
- Numbers must begin with a dot (.)
- As you type, a list appears assisting with auto-complete possibilities (OID text, numeric, or alias).
Click the
 MIB Tree icon to select the OID of interest. Click one of the following:
OK = Populates the OID field with the selected value.
Clear = Deletes any text from the OID field.
Cancel = Closes the MIB Tree popup.
The items in the MIB Tree represent all MIB files currently placed in the required location on the NNMi management server's hard drive and Loaded for use. Each MIB Variable may or may not be available on the Node you querie.
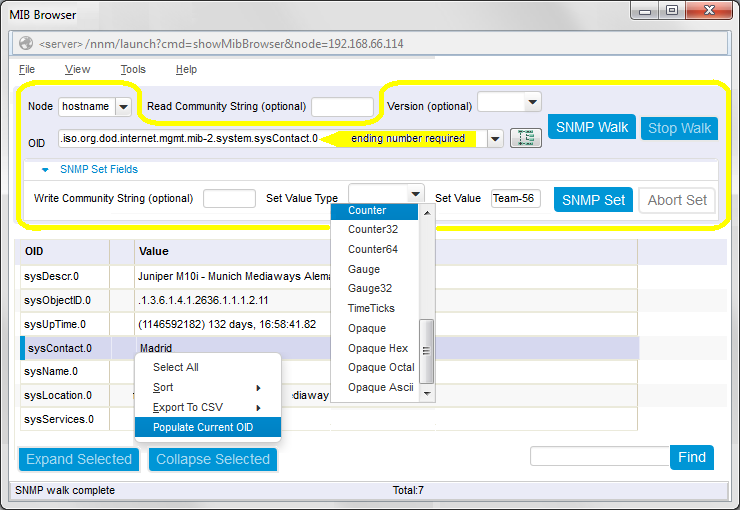
- In the results pane, select a row, then Right-Click → Populate Current OID.
- Click Tools → OID Aliases to use a shortcut defined by an installed MIB fileManagement Information Base files are the basic building block of SNMP communication protocol. SNMP Agents are configured to respond to requests defined by a group of supported MIB files. (source text files). See also Use Aliases in MIB Browser Commands.
The Node's SNMP Agent .responds to
.1.3with a list of real-time values for all currently supported MIB variables. See also MIB Variables View for more ideas.To see the Node's response to the MIB Browser's request:
- Press Enter or click the SNMP Walk button to get SNMP Walk results from your starting point down though the MIB Variables tree.
- Click the Stop Walk button to suspend the operation. (If the text on this button is gray, all data has been collected.)
If you are gathering SNMP data from a Node that is not currently in the NNMi database, notify your NNMi administrator that SNMP communications with this Node is possible, but not currently configured in NNMi. Request that your NNMi administrator establish Communication Configuration settings for automatic SNMP communication with this Node.
- Explore the results list. See View MIB Browser Results.
For additional MIB Browser information: ![]() See Also
See Also
Access to these commands depends on the NNMi RoleDetermined by your membership in one of four special NNMi User Groups (NNMi Administrators, NNMi Level 2 Operators, NNMi Level 1 Operators, or NNMi Guest Users). This membership determines what you can see and do within the NNMi console. and Object Access Privileges to which you are assigned. If you are unable to access an action, contact your NNMi administrator.You can use the NNMi MIB Browser to change settings on devices in your network environment. The list of available settings are defined in MIB files as MIB Variables, each with a unique OID. See Explore SNMP MIB Source Information.
To change information on Nodes in your network environment:
- Verify the MIB Browser Prerequisites.
- Access the MIB Browser.
Level-2 Operators and above, do one of the following:
- Select Tools → MIB Browser.
In any map or Node table view, do one of the following:
- Click a Node and select Actions → MIB Information → MIB Browser.
- Right-click a Node and select MIB Information → MIB Browser
In any Incident view, double-click an Incident to open the Incident form:
- In the Source Node attribute, click the drop-down, and select Open.
- In the Node form, select Actions → MIB Information → MIB Browser.
- In the Source Node attribute, click the
Within the MIB Form or MIB Variable Form:
Select Actions → MIB Information → MIB Browser.
- Node: The Node Name or IP address of the Node whose MIB Variable values you want to modify.
OID: The MIB's object identifier (number or mnemonic keywords) you want to use for the SNMP
Set. Do one of the following:- Type the OID you want to use into the OID field.
In any displayed previous SNMP Walk results:
- Right-click any previous SNMP Walk result's end-point (text in the OID column with a number appended to the end), and select Populate Current OID.
Click the
MIB Tree icon to select the OID of interest. Click one of the following:OK = Populates the OID field with the selected value.
Clear = Deletes any text from the OID field.
Cancel = Closes the MIB Tree popup.
Version (optional): Do one of the following:
- Leave this attribute value blank. NNMi uses the SNMP version currently configured for the target Node in NNMi's Communication Configuration settings (without your needing to provide any in the MIB Browser).
- Select an SNMP version from the drop-down list.
For a discovered Node: NNMi uses the read community string, SNMP version, timeout, maximum retries, and management address port currently configured for the target Node in NNMi's Communication Configuration settings for that Node (without your needing to provide any of those values in the MIB Browser).
For an undiscovered Node: NNMi uses default timeout, maximum retries, and management address port parameters provided by the NNMi administrator within the
nms-ui.propertiesfile. And you must type a value in the MIB Browser's Read Community String field.Write Community String: (Optional) Do one of the following:
- Leave this attribute value blank. NNMi uses the write community string currently configured for the target Node in NNMi's Communication Configuration settings (without your needing to provide any in the MIB Browser).
- Enter a valid write community string for the Node.
- Set Value Type: Click the drop-down list and make your selection.
- Set Value: Provide a numeric or text string appropriate for the value you are changing on the target Node.
Click the SNMP Set button. NNMi updates the results pane of the MIB Browser to show the Node's response to the SNMP Set request.
If the MIB Browser hangs due to the Node's SNMP Agent not responding, click the Abort Set button to bring NNMi back online.
If the text on the Abort Set button is gray, the target Node's SNMP Agent successfully completed the requested change.
- Explore the results list. See View MIB Browser Results.
For additional MIB Browser information: ![]() See Also
See Also
The MIB Browser uses the MIB Variable you enter into the OID attribute to determine which information is gathered or changed on the target Node. Type that OID value in one of the three formats specified in the MIB File's definition of that MIB Variable:
- The numeric identifier
- The text string identifier
- The alias (short text string)
To understand which particular alias values could save you time, do the following:
- Navigate to the MIB Variables View.
- Right-click the Syntax column heading and select Filter → Create Filter.
- Configure the filter with Equals = Other. Click Apply. The rows now visible in your MIB Variables view are the alias values provided by the MIB Files that are currently loaded onto the NNMi management server.
- To reduce the list to only those aliases for a particular MIB or MIBs of interest, create a filter for the MIB column.
- Double-click each row to study the definition and understand what the alias can do for you.
Now you can access the MIB Browser and copy/paste or type those aliases into the OID attribute to configure your query when you do the following:
In the MIB Browser, the Tools → OID Aliases menu item displays a quick-reference list of all available MIB aliases currently loaded on the NNMi management server.
For additional MIB Browser information: ![]() See Also
See Also
Prerequisite: Do one of the following:
To explore the results list:
- Click the
 Expand icon preceding an entry to expand one level deeper.
 - Select a row and click Expand Selected to expand all levels deeper.
- Click the
 Collapse icon preceding an entry to collapse deeper levels.
 - Select a row and click Collapse Selected to collapse deeper levels.
- Click a
 button to display a table of possible choices associated with a multiple-choice OID value.
 - Select any row and click View → Quick View (or double-click) to popup the basic definition of the item.
Use Find at the bottom of the Results pane. Type the first few letters of an item in Column 1 and click Find. Then click the Find button again to move to the next instance of matching initial text in Column 1
- OID column only
- Initial text only
- Case-sensitive
| Menu Item | |
|---|---|
| View | → Quick View |
| → MIB Table (alternate access to button results) | |
| Right-click | → Select All |
| → Sort → Ascending | |
| → Sort → Descending |
The following table describes the keystrokes you can use to navigate the NNMi MIB Browser.
| Keyboard Key | Description |
|---|---|
| Up Arrow | Scroll up vertically by one table row. |
| Down Arrow | Scroll down vertically by one table row. |
| Home | Move to the first row of the table. |
| End | Move to the last row of the table. |
| Page Up | Move to the first visible table row. |
| Page Down | Move to the last visible table row. |
| Shift + Right Arrow | Open a closed Expand icon preceding an entry to expand one level deeper. |
| Shift + Left Arrow | Close an open Collapse icon preceding an entry to collapse deeper levels. |
| Spacebar | Toggle the table column sort order between ascending and descending order. |
For additional MIB Browser information: ![]() See Also
See Also
Prerequisite: Do one of the following:
You can save your MIB Browser results to a comma separated values (CSV) file, and use those results in other programs of your choice (for example, spreadsheet software programs such as Microsoft Excel).
To save the results to a CSV file, decide whether you want to save all the data within the MIB Browser's results pane, or save a subset of that data. The MIB Browser provides the menu choices in the following table.
When saving a subset of information, use mouse click and shift-clicks for highlighting the block of data to be saved.
| Menu Item | |
|---|---|
| File | → Export to CSV → All Rows → Export to CSV → Selected Rows |
| Right-click | → Export to CSV → All Rows → Export to CSV → Selected Rows |
| Right-click | → Select All |
For additional MIB Browser information: ![]() See Also
See Also
Prerequisite: Do one of the following:
You can print MIB Browser results using the MIB Browser's File → Print Visible menu.
To print MIB Browser output for a selected node:
Navigate through the information in the results pane, and display the information that you would like to print:
- Click the Expand icon preceding an entry to expand one level deeper.
- Select a row and click Expand Selected to expand all levels deeper.
- Click the Collapse icon preceding an entry to collapse deeper levels.
- Select a row and click Collapse Selected to collapse deeper levels.
- Click a button to display a table of possible choices associated with a multiple-choice OID value.
- Click the
- To print the visible content, select File → Print Visible.
NNMi sends the visible image to the printer that you specify.
Only the results area visible on your monitor is included. You must scroll down the results pane and print each visible block if you want all of the results. Consider saving large amounts of results data to a CSV file and using some other tool for the printing. See Save MIB Browser Results to a CSV File.
| Menu Item | |
|---|---|
| File | → Print Visible |
| View | → Quick View |
| → MIB Table (alternate access to button results) | |
| Right-click | → Select All |
| → Sort → Ascending | |
| → Sort → Descending |
For additional MIB Browser information: ![]() See Also
See Also