


Using Certificates with the JKS Repository
Prior to the version 10.20, NNMi used to provide a Java KeyStore (JKS) repository to store certificates. NNMi 10.20 introduces a Public Key Cryptography Standards (PKCS) #12 repository to store certificates. The new PKCS #12 file-based certificate management technique is available for use as soon as you install a new instance of NNMi 10.20 on a system.
However, when you upgrade an older version of NNMi (older than 10.20) to the version 10.30, the PKCS #12 file-based certificate management does not immediately come into effect and NNMi continues to use the JKS repository for certificate management.
If you like, you can continue with the older JKS repository of certificates. This section provides you with instructions to use certificates when you want to continue to use the JKS repository of certificates. Do not use the information in this section if your NNMi environment uses the PKCS#12 repository.
To check the type of certificate repository:
- Log on to the NNMi console.
- Click Help > System Information, and then go to the Server tab.
-
Check the value of the
javax.net.ssl.keyStoreproperty.If the property points to the
nnm-key.p12file, your environment has a PKCS#12 repository.If the property points to the
nnm.keystorefile, your environment has a JKS repository.
Alternatively, do the following:
-
On the NNMi management server, as root or administer, run the following command:
- On Windows: %nnminstalldir%\bin\nnmprops -l
- On Linux: /opt/OV/bin/nnmprops -l
-
From the command output, note the value of the
javax.net.ssl.trustStoreTypeproperty.The value of this property indicates the type of certificate repository.
Many tasks in this section require you to use the keytool utility. The location of the keytool utility on the NNMi management server depends on the type of JDK configured with NNMi. To find out the location of the keytool utility:
-
On the NNMi management server, as root or administer, run the following command:
- On Windows: %nnminstalldir%\bin\nnmprops -l
- On Linux: /opt/OV/bin/nnmprops -l
-
From the command output, note the value of the property
com.hp.ov.nms.jdk.dir. This value indicates the home directory of JDK.The
keytoolutility resides within thebindirectory under this JDK home directory.
Tip To be able to access the keytool utility easily, you can create an environment variable (for example, jdkdir) that points to this JDK home directory.
About NNMi JKS Certificates
|
Concept |
Description |
|---|---|
|
Keystore and Truststore |
Truststore:
NNMi truststore is the Keystore:
NNMi keystore is the The nnm.truststore and nnm.keystrore files are located at:
|
|
Default NNMi certificates |
NNMi is installed with a self-signed certificate generated using default properties. You can replace the default certificate with another self-signed or CA-signed certificate. |
|
Tools |
Certificates are generated and managed using Java's Keytool utility. Additionally, NNMi provides the |
|
Supported encryption algorithms |
NNMi accepts certificates generated using RSA algorithm. DSA algorithm is not supported. |
| Self-Signed Certificate |
A Self-Signed certificate is typically used for establishing secure communication between your server and a known group of clients. NNMi installs with a self-signed certificate generated using default properties. Note NNMi instances configured to use a self-signed certificate will display a warning message when users try to access NNMi web console in a web browser. |
| CA-Signed Certificate |
Signed server certificate that you receive in response to the Certificate Signing Request will contain the NNMi certificate that is CA signed and one or more CA certificates (if there is more than one CA certificate, this is also known as the certificate chain). Note These certificates might be in a single file or in a two separate files. |
| Root CA Certificate | Identifies the certificate authority that is trusted to sign certificates for servers and users. |
| Intermediate CA Certificate |
A certificate signed by either a root or intermediate CA that is itself an authority, rather than a server or user. Note The list of certificates from the NNMi server certificate to the root CA certificate, including any intermediate CA certificates, is known as the certificate chain. |
Replacing an Existing Certificate with a New Self-Signed or CA-Signed Certificate
A self-signed certificate is created and installed during NNMi installation. You would typically replace a certificate in any of the following scenarios:
- To use a new self-signed or CA-signed certificate instead of the default certificate.
- To renew an expired certificate.
To replace a certificate, do the following:
-
Generate a self-signed certificate. For details, see Generating a Self-Signed Certificate.
- If you organization requires the certificate to be signed by a CA, generate a CSR (Certificate Signing Request) file and obtain a CA signed certificate. For details, see Generating a CA-Signed CertificateGenerating a CA-Signed Certificate
-
Open the following file and update the
com.hp.ov.nms.ssl.KEY_ALIASvariable to the value you used for<alias>while generating a certificate.- Windows:
%NNM_CONF%\nnm\props\nms-local.properties - Linux:
$NNM_CONF/nnm/props/nms-local.properties
- Windows:
- Restart the NNMi Management Server.
Run the
ovstopcommand on the NNMi management server.Run the
ovstartcommand on the NNMi management server.When making file changes under High Availability (HA), you need to make the changes on both nodes in the cluster. For NNMi using HA configurations, if the change requires you to stop and restart the NNMi management server, you must put the nodes in maintenance mode before running the
ovstopandovstartcommands.
-
Test HTTPS access to the NNMi console using the following syntax:
https://<fully_qualified_domain_name>:<port_number>/nnm/.
If you have used CA-signed certificate and if the browser trusts the CA, it will trust the HTTPS connection to the NNMi console.
If you have used self-signed certificate, browser displays a warning message about the untrusted HTTPS connection to the NNMi Console.
Generating a Self-Signed Certificate
To generate a self-signed certificate, follow these steps:
-
Change to the directory on the NNMi management server that contains the
nnm.keystoreandnnm.truststorefiles:- Windows:
%NnmDataDir%\shared\nnm\certificates - Linux:
$NnmDataDir/shared/nnm/certificates
- Windows:
-
Save a backup copy of the
nnm.keystorefile.Note
- If you are replacing an existing NNMi certificate, do not remove the existing certificate until you complete these steps. NNMi must start up at least once with both the old and new certificate installed so that it can transfer encrypted information to the new certificate.
- Make sure the alias points to the new certificate as described in the next step to ensure NNMi presents the new certificate on the NNMi management server to the client servers.
- Generate a private key from your system. Use the keytool command to generate this private key:
Run the following command exactly as shown:
- Windows:
%jdkdir%\bin\keytool.exe -genkeypair -
validity 3650 -keyalg rsa -keystore nnm.keystore -storepass nnmkeypass -
alias <alias_name>
Linux:
$jdkdir/bin/keytool -genkeypair -validity 3650
-keyalg rsa -keystore nnm.keystore -storepass nnmkeypass -alias
<alias_name>
Note The alias, referred to as
<alias_name>in this example, identifies this newly-created key. Although the alias can be any string, recommends you use the fully-qualified domain name (FQDN) followed by a suffix to help you easily identify the right version. For example, you can use alias name asmyserver.mydomain-<number>ormyserver.mydomain-<date>.
- Windows:
Enter the requested information.
Caution When prompted for your first and last name, enter the FQDN of your system.
A self-signed certificate is generated.
For obtaining CA-signed certificates, you need to additionally generate and submit a CSR file to a CA. For more information, see Generating a CA-Signed Certificate.
recommends that you use CA-signed certificates.
Generating a CA-Signed Certificate
To obtain and install a CA-signed certificate, follow these steps:
- Generate a self-signed certificate. For details, see Generating a Self-Signed Certificate.
-
Run the following command to create a CSR (Certificate Signing Request) file:
- Windows:
%jdkdir%\bin\keytool.exe -keystore nnm.keystore -certreq -storepass nnmkeypass -alias <alias_name> -file CERTREQFILE - Linux:
$jdkdir/bin/keytool -keystore nnm.keystore -certreq -storepass nnmkeypass -alias <alias_name> -file CERTREQFILE
Note
- In the command above,
<alias_name>corresponds to the alias you had provided at the time of generating the certificate. - For more information about the
keytoolcommand, search for “Key and Certificate Management Tool” at http://www.oracle.com/technetwork/java/index.html.
- Windows:
- Send the CSR to your CA signing authority which signs and returns the certificate files. For information on different types of CA certificates, see Types of CA-Signed Certificates.
-
Copy the files containing these certificates to a location on the NNMi management server. For this example, copy the files to the following location:
- Windows:
%NnmDataDir%\shared\nnm\certificates - Linux:
$NnmDataDir/shared/nnm/certificates
- Windows:
-
Change to the directory on the NNMi management server that contains the
nnm.keystoreandnnm.truststorefiles:- Windows:
%NnmDataDir%\shared\nnm\certificates - Linux:
$NnmDataDir/shared/nnm/certificates
- Windows:
-
Run the following command to import the certificate into the
nnm.keystore file:Windows:
%jdkdir%\bin\keytool.exe -importcert -trustcacerts -keystore nnm.keystore -storepass nnmkeypass -alias <alias_name> -file<myserver.crt>
Linux:
-
$jdkdir/bin/keytool -importcert -trustcacerts -keystore nnm.keystore -storepass nnmkeypass -alias <alias_name> -file<myserver.crt>Note
- In the above command,
<myserver.crt>corresponds to the full path of the location where you have stored the signed server certificate.<alias_name>corresponds to the alias you had provided at the time of generating the certificate.
- If you use the
-storepassoption and provide the password, the keystore program does not prompt you for the keystore password. If you do not use the-storepassoption, enternnmkeypasswhen prompted for the keystore password.
- In the above command,
-
When prompted to trust the certificate, enter: y
Example output for importing a certificate into the keystore
The output from the command is of the form:
Owner: CN=NNMi_server.example.com
Issuer: CN=NNMi_server.example.com
Serial number: 494440748e5
Valid from: Tue Oct 28 10:16:21 MST 2008 until: Thu Oct 04 11:16:21 MDT 2108
Certificate fingerprints:
MD5: 29:02:D7:D7:D7:D7:29:02:29:02:29:02:29:02:29:02
SHA1: C4:03:7E:C4:03:7E:C4:03:7E:C4:03:7E:C4:03:7E:C4:03
Trust this certificate? [no]: y
Certificate was added to keystore
-
Run the following commands to import the certificate into the
nnm.truststore file:-
Windows:
%jdkdir%\bin\keytool.exe -import -alias
<alias_name>-keystore nnm.truststore -file<myca.crt>
-
Linux:
$jdkdir/bin/keytool -import -alias
<alias_name>-keystore nnm.truststore -file <myca.crt>
Note
- In the above command,
<myca.crt>corresponds to the full path of the location where you have stored the CA certificates.<alias_name>corresponds to the alias you had provided at the time of generating the certificate.
- If you use the
-storepassoption and provide the password, the keystore program does not prompt you for the keystore password. If you do not use the-storepassoption, enternnmkeypasswhen prompted for the keystore password.
- In the above command,
-
- When prompted for the truststore password, enter: ovpass.
- Examine the contents of the truststore:
Windows:
%jdkdir%\bin\keytool -list -keystore nnm.truststore
Linux:
$jdkdir/bin/keytool -list -keystore nnm.truststore
When prompted for the truststore password, enter: ovpass
Example truststore output
The truststore output is of the form:
Keystore type: jks
Keystore provider: SUN
Your keystore contains 1 entry
nnmi_ldap, Nov 14, 2008, trustedCertEntry,
Certificate fingerprint (MD5): 29:02:D7:D7:D7:D7:29:02:29:02:29:02:29:02:29:02
Tip The truststore can include multiple certificates.
Types of CA-Signed Certificates
Note If your CA returns the certificates in other forms, contact the CA provider for instructions about obtaining the certificate chain and the Root CA Certificate.
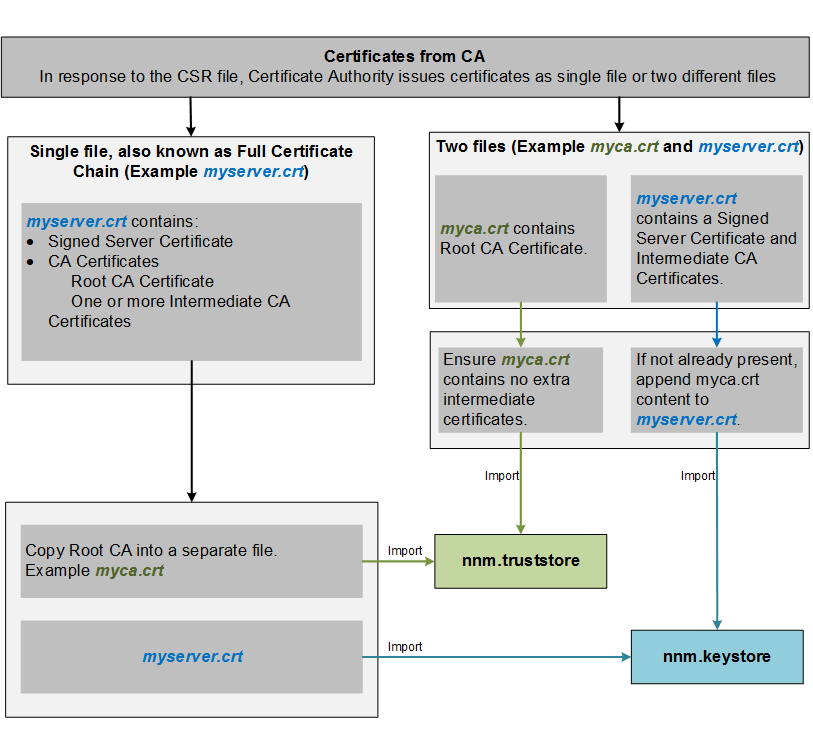
The Certificate Authority (CA) should provide you with one of the following:
-
A signed server certificate file containing the server certificate (the NNMi certificate that is CA signed) and one or more CA certificates. This section refers to the signed server certificate as
myserver.crt.A CA Certificate can be either of the following:
- Root CA Certificate - Identifies the authority that is trusted to sign certificates for servers and users.
-
Intermediate CA Certificate - A certificate signed by either a root or intermediate CA that is itself an authority, rather than a server or user.
Note The list of certificates from the NNMi server certificate to the root CA certificate, including any intermediate CA certificates, is known as the certificate chain.
-
A signed server certificate and a separate file containing one or more CA certificates. This section refers to the signed server certificate as
myserver.crtand the CA certificates asmyca.crt. Themyserver.crtfile should contain either a single server certificate or a certificate chain, but NOT the root CA certificate, which would be in themyca.crtfile.
To configure NNMi with the new certificate, you must import the certificate chain into the nnm.keystore and the root CA Certificate into the nnm.truststore. Use the myserver.crt file when importing the server certificate into the nnm.keystore file and the myca.crt file when importing the CA certificate into the nnm.truststore file.
Note If your CA returns the certificates in other forms, contact the CA provider for instructions about obtaining the separate certificate chain and root CA Certificate.
When provided with one file that contains a full certificate chain, copy the root CA certificate from that file into the myca.crt file. Use the myca.crt file to import into the nnm.truststore so that NNMi trusts the CA that issued the certificate.
When provided two files, add the myca.crt file content to the end of the myserver.crt, if the file does not include it, and also remove any extra intermediate certificates from the myca.crt, if it has any. This should result in one file, myserver.crt, containing the full certificate chain and one file, myca.crt, containing the root CA Certificate.
Note When using a CA, only the root CA certificate is generally added to the nnm.truststore. Adding intermediate CA or server certificates to the nnm.truststore will cause those certificates to be explicitly trusted and not checked for additional information, such as revocation. Only add additional certificates to the nnm.truststore if your CA requires it.
The following examples show what the files received from a CA signing authority might look like:
Separate server and CA certificate files:
-----BEGIN CERTIFICATE-----
Sample/AVQQKExNQU0EgQ29ycG9yYXRpb24gTHRkMRAwDgYDVQQLEwdOZXR3b3Js
eGVSZXZvY2F0aW9uTGlzdD9iYXNlP29iamVjdENsYXNzPWNSTERpc3RyaWJ1dGlw
................................................................
................................................................
TZImiZPyLGQBGRYDaW50MRIwEAYKCZImiZPyLGQBGRYCc2cxEzARBgNVBAMTCmNb
pSo6o/76yShtT7Vrlfz+mXjWyEHaIy/QLCpPebYhejHEg4dZgzWWT/lQt==
-----END CERTIFICATE-----
Combined server and CA certificates in one file:
-----BEGIN CERTIFICATE-----
Sample1/VQQKExNQU0EgQ29ycG9yYXRpb24gTHRkMRAwDgYDVQQLEwdOZXR3b3Js
eGVSZXZvY2F0aW9uTGlzdD9iYXNlP29iamVjdENsYXNzPWNSTERpc3RyaWJ1dGlw
................................................................
................................................................
TZImiZPyLGQBGRYDaW50MRIwEAYKCZImiZPyLGQBGRYCc2cxEzARBgNVBAMTCmNb
pSo6o/76yShtT7Vrlfz+mXjWyEHaIy/QLCpPebYhejHEg4dZgzWWT/lQt==
-----END CERTIFICATE-----
-----BEGIN CERTIFICATE-----
Sample2/Gh0dHA6Ly9jb3JwMWRjc2cyLnNnLmludC5wc2FnbG9iYWwuY29tL0Nlc
RaOCApwwggKYMB0GA1UdDgQWBBSqaWZzCRcpvJWOFPZ/Be9b+QSPyDAfBgNVHSMC
................................................................
................................................................
Wp5Lz1ZJAOu1VHbPVdQnXnlBkx7V65niLoaT90Eqd6laliVlJHj7GBriJ90uvVGu
BQagggEChoG9bGRhcDovLy9DTj1jb3JwMWRjc2cyL==
-----END CERTIFICATE-----
Working with Certificates in Application Failover Environments
Using Certificates with Application Failover
When configuring the application failover feature, you must merge the content of the nnm.keystore and nnm.truststore files for both nodes into one nnm.keystore file and one nnm.truststore file.
Complete the following steps to configure the application failover feature to use self-signed or CA-signed certificates.
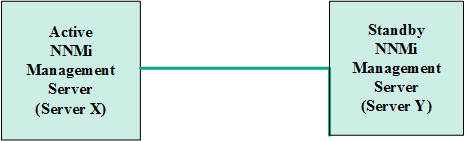
Caution If you are using self-signed certificates with NNMi along with the application failover feature, and do not complete the following steps, NNMi processes will not start correctly on the standby NNMi management server (Server Y in this example).
-
Change to the following directory on
Server Y:- Windows:
%NnmDataDir%\shared\nnm\certificates - Linux:
$NnmDataDir/shared/nnm/certificates
- Windows:
- Copy the
nnm.keystoreandnnm.truststorefiles fromServer Yto some temporary location onServer X. The remaining steps refer to these file locations as <keystore> and <truststore>. -
Run the following command on
Server Xto mergeServer Y’s certificates intoServer X’snnm.keystoreandnnm.truststorefiles.Windows:
nnmcertmerge.ovpl -keystore <keystore> -truststore <truststore>
Linux:
nnmcertmerge.ovpl -keystore <keystore> -truststore <truststore>
-
Copy the merged
nnm.keystoreandnnm.truststorefiles fromserver Xtoserver Y, so that both nodes have the merged files. The location of these files is as follows:- Windows:
%NnmDataDir%\shared\nnm\certificates - Linux:
$NnmDataDir/shared/nnm/certificates
- Windows:
-
Run the following command on both
Server XandServer Y. Verify that the displayed results from both servers, including the fully-qualified-domain names, match. If they do not match do not continue, rather redo 1 through 1.Windows:
%jdkdir%\bin\keytool.exe -list -keystore %NnmDataDir%\shared\nnm\certificates\nnm.keystore -storepass nnmkeypass
Linux:
$jdkdir/bin/keytool -list -keystore $NnmDataDir/shared/nnm/certificates/nnm.keystore -storepass nnmkeypass
-
Run the following command on both
Server XandServer Y. Verify that the displayed results from both servers, including the fully-qualified-domain names, match. If they do not match do not continue, rather redo 1 through 1.Windows:
%jdkdir%\bin\keytool.exe -list -keystore %NnmDataDir%\shared\nnm\certificates\nnm.truststore
-storepass ovpassLinux:
$jdkdir/bin/keytool -list -keystore $NnmDataDir/shared/nnm/certificates/nnm.truststore -storepass ovpass
-
Continue configuring the application failover feature at Application Failover.
Working with Certificates in High-Availability Environments
This section describes how to configure NNMi to use Self-Signed or Certificate Authority Certificates in an HA environment.
Using Certificates with HA
Configuring High-Availability Using Default Certificates
The process for configuring NNMi for HA correctly shares the default self-signed certificate among the primary and secondary cluster nodes. You do not need to take any extra steps to use the default certificate with NNMi running under HA.
Configuring High-Availability Using New Certificates
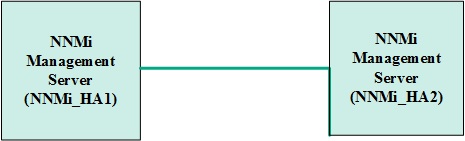
This section creates a new self-signed or CA certificate, referred to as newcert. Complete the following steps to configure HA with this new CA or self-signed certificate.
Note When making file changes under High Availability (HA), you must make the changes on both nodes in the cluster. If the change requires you to stop and restart the NNMi management server, you must put the nodes in maintenance mode before running the ovstop and ovstart commands. See Maintenance Mode for more information.
Tip You can complete this procedure before or after configuring NNMi for HA, as described in Shared NNMi Data in High Availability Environments.
-
Change to the following directory on
NNMi_HA1before completing step 2:- Windows:
%NnmDataDir%\shared\nnm\certificates - Linux:
$NnmDataDir/shared/nnm/certificates
- Windows:
-
On
NNMi_HA1, run the following commands to importnewcertinto thennm.keystorefile:- Windows:
%jdkdir%\bin\keytool -import -alias newcert_Alias -keystore nnm.keystore -file newcert - Linux:
$jdkdir/bin/keytool -import -alias newcert_Alias -keystore nnm.keystore -file newcert
- Windows:
-
Edit the following file on both the active (
NNMi_HA1)and the standby (NNMi_HA2) nodes:- Windows:
%NnmDataDir%\conf\nnm\props\nms-local.properties - Linux:
$NnmDataDir/conf/nnm/props/nms-local.properties
- Windows:
-
Change the following line in the
nms-local.propertiesfile on bothNNMi_HA1andNNMi_HA2.com.hp.ov.nms.ssl.KEY_ALIAS = newcert_Alias
- Save your changes.
Working with Certificates in Global Network Management Environments
Configuring Certificates in Global Network Management Environments
During NNMi installation, the installation script creates a self-signed certificate for the NNMi management server. This certificate contains an alias that includes the fully-qualified domain name of the node. The installation script adds this self-signed certificate to the NNMi management server’s nnm.keystore and nnm.truststore files.
Complete the following steps to configure the global network management feature to use self-signed/CA-signed certificates based on the following diagram.
Before you begin, make sure that the required certificates are created on the regional manager systems. For details, see Replacing an Existing Certificate with a New Self-Signed or CA-Signed Certificate.
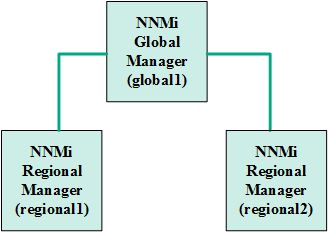
-
Change to the following directory on
regional1andregional2:- Windows:
%NnmDataDir%\shared\nnm\certificates - Linux:
$NnmDataDir/shared/nnm/certificates
- Windows:
- Copy the
nnm.truststorefiles from the above locations onregional1andregional2to some temporary location onglobal1. -
Run the following command on
global1to merge theregional1andregional2certificates intoglobal1’snnm.truststorefile.Windows:
nnmcertmerge.ovpl -truststore regional1_nnm.truststore_locationnnmcertmerge.ovpl -truststore regional2_nnm.truststore_location
Linux
nnmcertmerge.ovpl -truststore regional1_nnm.truststore_locationnnmcertmerge.ovpl -truststore regional2_nnm.truststore_location
-
Run the following command sequence on
global1:- Run
ovstopon theglobal1NNMi management server. - Run
ovstarton theglobal1NNMi management server.
When making file changes under High Availability (HA), you need to make the changes on both nodes in the cluster. For NNMi using HA configurations, if the change requires you to stop and restart the NNMi management server, you must put the nodes in maintenance mode before running the
ovstopandovstartcommands. - Run
Configuring Certificates in Global Network Management Environments with Failover
During NNMi installation the installation script creates a self-signed certificate for the NNMi management server. This certificate contains an alias that includes the fully-qualified domain name of the node. The installation script adds this self-signed certificate to the NNMi management server’s nnm.keystore and nnm.truststore files.
This example uses the global network management configuration with the application failover feature as shown in the following diagram:
Global Network Management with Application Failover
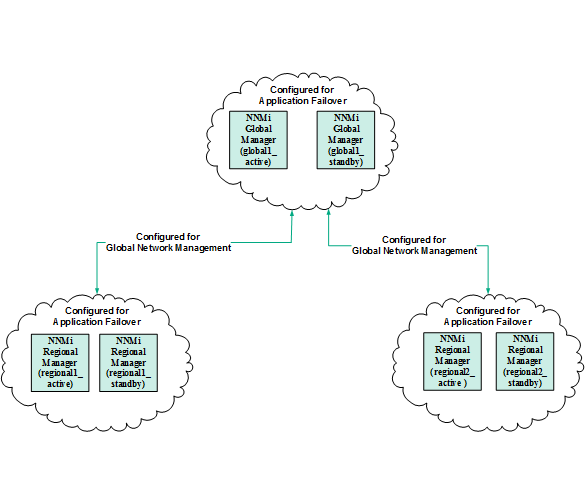
Complete the following steps to configure the global network management feature to work with application failover based on the above diagram.
- Follow the instructions shown in Working with Certificates in Application Failover Environments for each application failover cluster shown in the above diagram.
- Complete the configuration for application failover shown in Application Failover Requirements.
- Follow the instructions shown in Working with Certificates in Global Network Management Environments for
regional1_active and regional2_active.
Configuring an SSL Connection to the Directory Service
By default, when directory service communications are enabled, NNMi uses the LDAP protocol for retrieving data from a directory service. If your directory service requires an SSL connection, you must enable the SSL protocol to encrypt the data that flows between NNMi and the directory service.
SSL requires a trust relationship between the directory service host and the NNMi management server. To create this trust relationship, add a certificate to the NNMi truststore. The certificate confirms the identity of the directory service host to the NNMi management server.
To install a truststore certificate for SSL communications, follow these steps:
- Obtain your company’s truststore certificate from the directory server. The directory service administrator should be able to give you a copy of this text file.
-
Change to the directory that contains the NNMi truststore:
- Windows:
%NnmDataDir%\shared\nnm\certificates - Linux:
$NnmDataDir/shared/nnm/certificates
Run all commands in this procedure from the
certificatesdirectory. - Windows:
-
Import the root CA certificate of the LDAP directory server (without intermediate certificates) into the NNMi truststore:
-
Run the following command:
-
Windows:
%jdkdir%\bin\keytool.exe -import-alias nnmi_ldap -keystore nnm.truststore-file <Directory_Server_Certificate.txt> -
Linux:
$jdkdir/bin/keytool -import-alias nnmi_ldap -keystore nnm.truststore-file <Directory_Server_Certificate.txt>Where
<Directory_Server_Certificate.txt>is your company’s truststore certificate.
-
- When prompted for the keystore password, enter: ovpass
-
When prompted to trust the certificate, enter: y
Example output for importing a certificate into the truststore
The output from this command is of the form:
Owner: CN=NNMi_server.example.com
Issuer: CN=NNMi_server.example.com
Serial number: 494440748e5
Valid from: Tue Oct 28 10:16:21 MST 2008 until: Thu Oct 04 11:16:21 MDT 2108
Certificate fingerprints:
MD5: 29:02:D7:D7:D7:D7:29:02:29:02:29:02:29:02:29:02
SHA1: C4:03:7E:C4:03:7E:C4:03:7E:C4:03:7E:C4:03:7E:C4:03
Trust this certificate? [no]: y
Certificate was added to keystore
-
-
Examine the contents of the truststore:
-
Windows:
%jdkdir%\bin\keytool.exe -list
-keystore nnm.truststore -
Linux:
$jdkdir/bin/keytool -list
-keystore nnm.truststore
When prompted for the keystore password, enter: ovpass
Example truststore output
The truststore output is of the form:
Keystore type: jks
Keystore provider: SUN
Your keystore contains 1 entry
nnmi_ldap, Nov 14, 2008, trustedCertEntry,
Certificate fingerprint (MD5): 29:02:D7:D7:D7:D7:29:02:29:02:29:02:29:02:29:02
Tip The truststore can include multiple certificates.
-
-
Restart the NNMi management server.
-
Run the
ovstopcommand on the NNMi management server. -
Run the
ovstartcommand on the NNMi management server.Note When making file changes under High Availability (HA), you must make the changes on both nodes in the cluster. If the change requires you to stop and restart the NNMi management server, you must put the nodes in maintenance mode before running the
ovstopandovstartcommands. See Maintenance Mode for more information.
-
For more information about the keytool command, search for “Key and Certificate Management Tool” at http://www.oracle.com/technetwork/java/index.html.