Searching the Help
To search for information in the Help, type a word or phrase in the Search box. When you enter a group of words, OR is inferred. You can use Boolean operators to refine your search.
Results returned are case insensitive. However, results ranking takes case into account and assigns higher scores to case matches. Therefore, a search for "cats" followed by a search for "Cats" would return the same number of Help topics, but the order in which the topics are listed would be different.
| Search for | Example | Results |
|---|---|---|
| A single word | cat
|
Topics that contain the word "cat". You will also find its grammatical variations, such as "cats". |
|
A phrase. You can specify that the search results contain a specific phrase. |
"cat food" (quotation marks) |
Topics that contain the literal phrase "cat food" and all its grammatical variations. Without the quotation marks, the query is equivalent to specifying an OR operator, which finds topics with one of the individual words instead of the phrase. |
| Search for | Operator | Example |
|---|---|---|
|
Two or more words in the same topic |
|
|
| Either word in a topic |
|
|
| Topics that do not contain a specific word or phrase |
|
|
| Topics that contain one string and do not contain another | ^ (caret) |
cat ^ mouse
|
| A combination of search types | ( ) parentheses |
|
Configure Security Example (Allow a Subset of Users to Access a Subset of Nodes)
This example uses NNMi's security configuration to allow a subset of users to access only those nodes in Building 5. The remaining users can access all nodes discovered by NNMi.
This location includes an NNMi Level 1 Operator (with more limited access privileges than Level 2 Operators) and an NNMi Level 2 Operator. Jeff is an NNMi Level 2 Operator who can access only the nodes in Building 5.
Note Be sure to create a User Account that is mapped to the NNMi Administrator User Group so that one person has access to the Configuration workspace and all the nodes in the network.
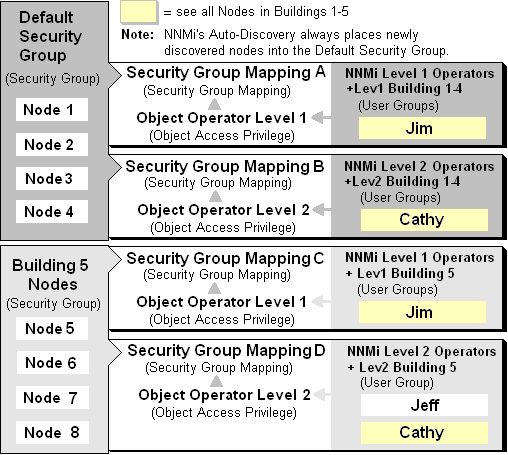
The following table lists the NNMi console access requirements (NNMi User GroupNNMi User Groups are those User Groups provided by NNMi. Users cannot access the NNMi console until their User Account is mapped to at least one of the following NNMi User Groups: NNMi Administrators, NNMi Level 2 Operators, NNMi Level 1 Operators (with more limited access privileges than Level 2 Operators), and NNMi Guest Users) and node access requirements (User Group, Object Access Privilege and Security Group) for each User Account.
Note You can place all operators into the NNMi Level 2 Operators if you want all operators to see all menu options, but only have the ability to run them based on their Object Access Privilege.
To set up security for this location follow these procedures:
-
Remove the Default Security Group Mapping to NNMi User Groups: NNMi Level 1 Operators, NNMi Level 2 Operators, and NNMi Guest
Note The NNMi User GroupNNMi User Groups are those User Groups provided by NNMi. Users cannot access the NNMi console until their User Account is mapped to at least one of the following NNMi User Groups: NNMi Administrators, NNMi Level 2 Operators, NNMi Level 1 Operators (with more limited access privileges than Level 2 Operators), and NNMi Guest Userss are provided for those NNMi administrators who are not concerned with Security configuration. After you remove these Security Group Mappings, the NNMi User Groups provide access to the NNMi console only rather than to the NNMi console and to all nodes.
- Create the User Accounts. (See the Example Security Configuration table.)
- Create Additional User Groups. (See the Example Security Configuration table.)
- Map User Accounts to NNMi User Groups. (See the Example Security Configuration table.)
- Create the Building 5 Security Group.
- Map each Security Group to the new User Groups. (See the Example Security Configuration table.)
- From the Security Wizard main page, select the Map User Groups and Security Groups option.
-
Navigate to the Security Group Mappings table.
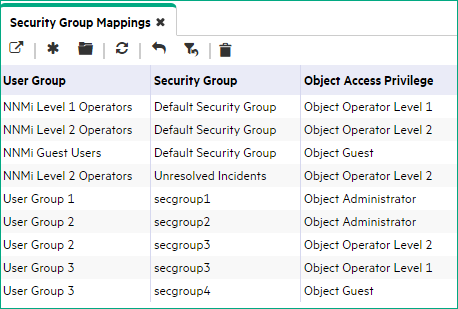
- Click the row representing the NNMi Level 1 Operators User Group.
- Click the
 Delete icon to remove the Default Security Group to NNMi Level 1 Operators User Group mapping.
 - Repeat steps 3 and 4 to remove the Default Security Group to NNMi Level 2 Operator and the NNMi Guest User Group mappings.
-
Continue or, click the Save and Close button to save your security configuration.
Note NNMi does not save any configuration changes until you click Save and Close to save your security configuration.
- From the Security Wizard main page, select the Map User Accounts and User Groups option.
- Navigate to the User Accounts table.
- Click
 New.
New. -
In the Create User Account dialog box, enter the following:
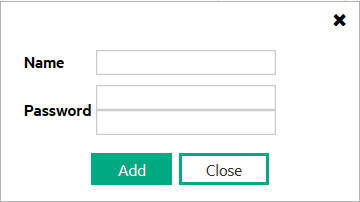
- Name: Enter the user name Jim.
-
Directory Service: Do not enable this option.
 = User name and password are stored in the NNMi database. See NNMi Configuration Settings to Control NNMi Access.
 -
Password: Enter the Password value Jim. The Password value can be any amount of alpha-numeric characters, punctuation, spaces, and underline characters.
- Click Add.
- Repeat to add each User Account. (See the Example Security Configuration table.)
- When you finish creating User Accounts, in the Create User Account dialog box, click Close.
-
Continue or, click the Save and Close button to save your security configuration.
Note NNMi does not save any configuration changes until you click Save and Close to save your security configuration.
- From the Security Wizard main page, select the Map User Accounts and User Groups option
- Navigate to the User Groups table.
- Click
 New.
New. -
In the Create User Group dialog box, enter the following:
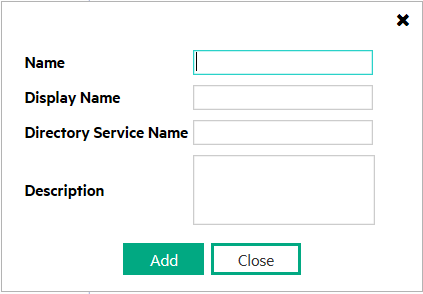
- Name: Enter Lev1Building1-4. The name can be a maximum of 40 alpha-numeric characters. Spaces are not permitted.
-
Display Name: Enter Lev1 Building 1-4. The Display Name is displayed in the NNMi console to identify this User Group. Enter a maximum of 50 characters. Alpha-numeric, spaces, and special characters (~ ! @ # $ % ^ & * ( ) _+ -) are permitted.
Tip
-
Directory Service Name: When a directory service defines this User Group, enter the group’s Distinguished Name. This example does not use this option. NNMi communicates with the directory service using Lightweight Directory Access Protocol (LDAP).
- Description: Type a maximum of 2048 characters to describe this User Group. Alpha-numeric, spaces, and special characters (~ ! @ # $ % ^ & * ( ) _+ -) are permitted.
- Click Add.
- Repeat to add the Lev1Building5, Lev2Building1-4, and Lev2Building5 User Groups. (See the Example Security Configuration table.)
-
When you finish creating User Groups, in the Create User Group dialog box, click Close.
-
Continue, or click the Save and Close button to save your security configuration:
Note NNMi does not save any configuration changes until you click Save and Close to save your security configuration
Note A User Account cannot access the NNMi console until after it is mapped to one of the NNMi User Groups.
- From the Security Wizard main page, select the Map User Accounts and User Groups option
- Select Jim in the User Accounts table.
-
In the User Groups table, select the left arrow that precedes the NNMi Level 1 Operators User Group.
The User Account and User Group names appear in the User Account Mapping table.
-
Repeat steps 2 and 3 to assign each User Account to the appropriate User Group. (See the Example Security Configuration table.):
Assign Jim to the Lev1Building1-4 and Lev1Building5 User Group
Assign Cathy to the NNMi Level 2 Operators, Lev2Building1-4, and Lev2Building5 User Groups
Assign Jeff to the NNMi Level 2 Operators and Lev2Building 5 User Groups.
-
Continue or, click the Save and Close button to save your security configuration.
Note NNMi does not save any configuration changes until you click Save and Close to save your security configuration.
Your User Account to User Group mappings should look similar to the following:

- From the Security Wizard main page, select the Map User Groups and Security Groups option
- Navigate to the Security Groups table.
- Click
 New.
New. -
In the Create Security Group dialog box, enter the following:
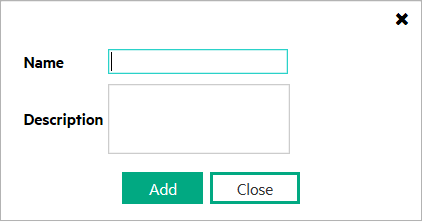
- Name: Enter Building 5 Nodes. The name must be a maximum of 255 characters. Alpha-numeric, spaces, and special characters (~ ! @ # $ % ^ & * ( ) _+ -) are permitted.
- Description: Type a maximum of 2048 characters. Alpha-numeric, spaces, and special characters (~ ! @ # $ % ^ & * ( ) _+ -) are permitted.
- Click Add.
- When you finish creating Security Groups, in the Create Security Group dialog box, click Close.
-
Continue, or click the Save and Close button to save your security configuration:
Note NNMi does not save any configuration changes until you click Save and Close to save your security configuration.
- From the Security Wizard main page, select the Map User Groups and Security Groups option.
- Select Default Security Group in the Security Groups table.
- In the Security Group Mappings drop-down selection box, select Object Operator Level 1.
-
In the User Groups table, click the
 right arrow in the Lev1Building1-4 row.
The Security Group and User Group names appear in the Security Group Mapping table.
-
Repeat steps 2 through 4 to assign the following Security Group Mappings:
Tip Be sure to select the appropriate Object Access Privilege in the drop-down selection box under Security Group Mappings.
Lev1Building5 User Group to the Building 5 Nodes.
Lev2Building1-4 User Group to the Default Security Group
Lev2Building5 User Group to the Building 5 Nodes.
-
Continue or, click the Save and Close button to save your security configuration.
Note NNMi does not save any configuration changes until you click Save and Close to save your security configuration.
Your User Group to Security Group mappings should look similar to the following:

- From the Security Wizard main page, select the Assign Nodes to Security Groups option.
- Select the Building 5 Nodes row in the Security Groups table.
-
In the Available Nodes table, do one of the following:
- Select a Node Group in the Node Group filter drop-down list to specify the nodes to be assigned to the Security Group.
- User Ctrl-Click to select each node you want to assign to the Building 5 Nodes.
-
Click
 to specify that you want to assign the selected nodes to the Security Group.
 The Nodes to be Assigned to Selected Group table displays the list of nodes to be assigned to the selected Security Group.
-
Repeat steps 2 through 4 to assign nodes to a selected Security Group.
-
Continue or, click Save and Close to save your security configuration.
Note NNMi does not save any configuration changes until you click Save and Close to save your security configuration.
From the Security Wizard main page, select the View Summary of Changes option.
NNMi displays a summary of the configuration changes made since you last saved your changes.
When you finish, click the Save and Close button to save your security configuration.
Note NNMi does not save any configuration changes until you click Save and Close to save your security configuration.
We welcome your comments!
To open the configured email client on this computer, open an email window.
Otherwise, copy the information below to a web mail client, and send this email to network-management-doc-feedback@hpe.com.
Help Topic ID:
Product:
Topic Title:
Feedback:


