


Use the View Toolbars
NNMi provides toolbars for the following types of views:
- Table views toolbar
- Node Group Map and Quick Access toolbar
- Neighbor views toolbar
- Path View toolbar
- Network Overview toolbar
This is the table view display panel toolbar:

Use the table view toolbar to perform the following tasks within the displayed view.
| Icon | Description |
|---|---|

|
Show View in New Window. Displays the current view in a new window. |

|
New. NNMi Administrators only. Opens the form to create a new object instance. |

|
Open. Displays the form for the selected object. |

|
Refresh. Refreshes the current view. See Refresh a View for more information. Restarts periodic refresh if it has been disabled. |

|
Stop Periodic Refresh. Temporarily disables the periodic refresh of a view. See Stop Periodic Refresh of a View for more information. |

|
Restore Default Settings. Resets default settings, including the resizing of table columns, sort selections, and filters. Any hidden columns are restored to the view. See Hide a Column. |

|
Restore Default Filters. Clears any currently applied filters. See Filter a Table View. |

|
Delete. If your role permits, deletes the selected object instance and any objects contained in that object. For example, deleting a node also deletes the interface and address instances associated with that node, and the history of those objects. |

|
Selects a time period filter. This filter only appears in incident views. |
 Selects an available node group or interface group filter. Selects an available node group or interface group filter. |
|
|
The page controls only appears when viewing tables. They let you page through table information by rows. Use Use Use Use Tip Use the keyboard's keys:
Note In the Table status bar: Total value displays the number of rows in the current table. If the table row count exceeds the maximum table size specified by NNMi, the Total value is followed by the limit set for the table. If the limit is exceeded:
|
|
 or or  |
Text Wrap:
|
 (view name tab) (view name tab) |
Close. Close the current view. |

 Previous or [Page Up] to move up one page.
  Next or [Page Down] to move down one page.
 First or [Home] to move to the top of the table.
  Last or [End] to move to the end of the table.
 Node Group Map and Quick Access Toolbar
This is the Node Group Map and Quick Access display panel toolbar:

The Node Group Map and Quick Access toolbar lets you perform the following tasks within the displayed map.
| Icon | Description | |
|---|---|---|
|
|
Show View in New Window. (Only available from the main console.) Displays the current view in a new window. | |
|
|
Open. Displays the form for the selected object. | |

|
Open Node Group Map. Opens the Node Group Map for the selected Child Node Group. The Child Node Group map replaces the current map and displays each node within the Child Node Group. Note You can also double-click the See About Node and Interface Groups for more information about Node Groups. |
|

|
Save Map. Saves the current position of each of the nodes on the current Node Group Map. Note Each time you use this option, any previous location information is deleted. |
|
|
|
Refresh. Refreshes the current view. See Refresh a View for more information. | |

|
Refresh Status. Refreshes only the status of each node in the map. See Refresh Node Status on a Map for more information. | |
 icon")
|
Fit Content. Adjusts the size of the node symbols so that all members of the Node Group fit within the current window. See Adjust the Zoom Factor for more information. | |
 icon")
|
Actual Size. Cancels any current zoom setting. See Adjust the Zoom Factor for more information. | |
 icon")
|
Zoom Out. Zooms out 25% of current size. See Adjust the Zoom Factor for more information. | |
 icon")
|
Zoom In. Zooms in 25% of current size. See Adjust the Zoom Factor for more information. | |
 |
Highlight VLAN Members. Select a VLAN from a list displaying VLANs with Layer 2 connections. For more information, see Find a VLAN for Highlighting VLAN Maps. | |
 |
VLAN Highlight Options. Pops up a dialog of multiple choices to highlight VLAN members in the map. For more information, see Select Highlight Options for VLAN Maps.
|
|
 or or  |
Find. Toggles on or off highlighting the identified Node in the current map and ensures that the node is in the map's display area. See Find a Node in a Map. |
|
 or or  |
Indicate Key Incidents. Toggles on or off NNMi's enlarging any map symbol that has an associated Key IncidentIncidents with both: (1) Severity = other than Normal. (2) Correlation Nature = equal to Root Cause, Service Impact, Stream Correlation, Rate Stream Correlation, Info, or None.. See Node Group Map Objects for more information. | |
 or or  |
Tool Tips. Toggles on or off Tool Tips information that pops up when the mouse cursor is placed over an object on a map. See Control Tool Tips Information on a Map for more information. | |
 or or  |
Overview Location. Pops up a dialog of choices for placement of the Overview Pane (used to pan around on the map). See Pan Around the Map:
|
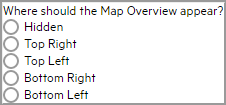
For more information, see Set the Location of the Overview Pane. |
|
(view name tab) |
Close. Close the current view. | |
 Node Group symbol to open the Child Node Group Map.
This is the neighbor view display panel toolbar:

The neighbor view toolbar lets you perform the following tasks within the displayed view.
| Icon | Description | ||
|---|---|---|---|
|
|
Show View in New Window. (Only available from the main console.) Displays the current view in a new window. | ||
|
|
Open. Displays the form for the selected object. | ||
|
|
Refresh. Refreshes the current view. See Refresh a View for more information. | ||
|
|
Refresh Status. Refreshes only the status of each node in the map. See Refresh Node Status on a Map for more information. | ||
|
|
Fit Content. Adjusts the size of the node symbols so that all members of the Node Group fit within the current window. See Adjust the Zoom Factor for more information. | ||
|
|
Actual Size. Cancels any current zoom setting. See Adjust the Zoom Factor for more information. | ||
|
|
Zoom Out. Zooms out 25% of current size. See Adjust the Zoom Factor for more information. | ||
|
|
Zoom In. Zooms in 25% of current size. See Adjust the Zoom Factor for more information. | ||

|
Specify the starting node for the neighbors you want to map. Populate this field with the current value of the node's Name attribute or one of the Node's IP addresses. Note As you type, NNMi provides a selection list of all current valid entries matching your criteria. You must use one of the suggested values. |
||

|
Select the number of hops to be displayed within the map view. A hop is a node representing any network device, such as a workstation, gateway, or switch, which is connected by a link with no intermediate nodes. | ||
|
|
Highlight VLAN Members. Select a VLAN from a list of VLANs discovered by NNMi for all the nodes. For more information, see Find a VLAN for Highlighting VLAN Maps. | ||
| |
VLAN Highlight Options. Pops up a dialog of multiple choices to highlight VLAN members in the map. For more information, see Select Highlight Options for VLAN Maps. | ||
|
or |
Find. Toggles on or off highlighting the identified Node in the current map and ensures that the node is in the map's display area. See Find a Node in a Map. | ||
|
or |
Tool Tips. Toggles on or off Tool Tips information that pops up when the mouse cursor is placed over an object on a map. See Control Tool Tips Information on a Map for more information. | ||
|
or |
|
||
|
(view name tab) |
Close. Close the current view. |
This is the Path View display panel toolbar:

The Path View toolbar lets you perform the following tasks within the displayed view.
| Icon | Description | |
|---|---|---|
|
|
Show View in New Window. (Only available from the main console.) Displays the current view in a new window. | |
|
|
Open. Displays the form for the selected object. | |
|
|
Refresh. Refreshes the current view. See Refresh a View for more information. | |
|
|
Refresh Status. Refreshes only the status of each node in the map. See Refresh Node Status on a Map for more information. |
|
|
|
Fit Content. Adjusts the size of the node symbols so that all members of the Node Group fit within the current window. See Adjust the Zoom Factor for more information. | |
|
|
Actual Size. Cancels any current zoom setting. See Adjust the Zoom Factor for more information. | |
|
|
Zoom Out. Zooms out 25% of current size. See Adjust the Zoom Factor for more information. | |
|
|
Zoom In. Zooms in 25% of current size. See Adjust the Zoom Factor for more information. | |
|
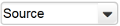
Specify the source node to be used in the Path View. Caution Do not specify a node that is a switch. Populate this field with the current value of the node's Hostname attribute (case-sensitive) or one of the node's IPv4 addresses. These are the values from the Node form. Note As you type, the auto-complete feature displays a list of possible matches. Select any item from the list. (NNMi Advanced) Path View works only with IPv4 addresses. The NNMi Advanced IPv6 address values are not valid choices for Path View. Any devices in your network that are configured with IPv6 addresses cannot be displayed on Path View maps. |
|

|
Swap Nodes. Swaps the source and destination nodes in the Path View. | |
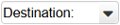
|
Specify the destination node in the Path View. Caution Do not specify a node that is a switch. Populate this field with the current value of the node's Hostname attribute (case-sensitive) or one of the node's IPv4 addresses. These are the values from the Node form. Note As you type, the auto-complete feature displays a list of possible matches. Select any item from the list. (NNMi Advanced) Path View works only with IPv4 addresses. The NNMi Advanced IPv6 address values are not valid choices for Path View. Any devices in your network that are configured with IPv6 addresses cannot be displayed on Path View maps. |
|

|
Compute Path. Computes the Path View. Note Also use this icon to re-compute the Path View. |
|
|
or |
Find. Toggles on or off highlighting the identified Node in the current map and ensures that node is in the map's display area. See Find a Node in a Map. | |
|
or |
Tool Tips. Toggles on or off Tool Tips information that pops up when the mouse cursor is placed over an object on a map. See Control Tool Tips Information on a Map for more information. | |
|
or |
Overview Location. Pops up a dialog of choices for placement of the Overview Pane (used to pan around on the map). See Pan Around the Map:
|
For more information, see Set the Location of the Overview Pane. |
|
(view name tab) |
Close. Close the current view. | |
This is the Network Overview display panel toolbar:

The Network Overview toolbar lets you perform the following tasks within the displayed view.
| Icon | Description |
|---|---|
|
|
Show View in New Window. (Only available from the main console.) Displays the current view in a new window. |
|
|
Open. Displays the form for the selected object. |
|
|
Refresh. Refreshes the current view. See Refresh a View for more information. |
|
|
Refresh Status. Refreshes only the status of each node in the map. See Refresh Node Status on a Map for more information. |
|
|
Fit Content. Adjusts the size of the node symbols so that all members of the Node Group fit within the current window. See Adjust the Zoom Factor for more information. |
|
|
Actual Size. Cancels any current zoom setting. See Adjust the Zoom Factor for more information. |
|
|
Zoom Out. Zooms out 25% of current size. See Adjust the Zoom Factor for more information. |
|
|
Zoom In. Zooms in 25% of current size. See Adjust the Zoom Factor for more information. |
|
|
Highlight VLAN Members. Select a VLAN from a list of VLANs discovered by NNMi for all the nodes. For more information, see Find a VLAN for Highlighting VLAN Maps. |
|
|
VLAN Highlight Options. Pops up a dialog of multiple choices to highlight VLAN members in the map. For more information, see Select Highlight Options for VLAN Maps. |
|
or |
Find. Toggles on or off highlighting the identified Node in the current map and ensures that the node is in the map's display area. See Find a Node in a Map. |
|
or |
Tool Tips. Toggles on or off Tool Tips information that pops up when the mouse cursor is placed over an object on a map. See Control Tool Tips Information on a Map for more information. |
|
or |
Overview Location. Pops up a dialog of choices for placement of the Overview Pane (used to pan around on the map). See Pan Around the Map:
|
|
(view name tab) |
Close. Close the current view. |