


SNMP Trap Management
This topic includes the following sections:
- Introduction
- About SNMP Traps and NNMi
- The Flow of SNMP Traps on the NNMi Management Server
- Troubleshoot Examples
Introduction
Managing SNMP trap configuration within NNMi is a key task that can be used to improve NNMi efficiency. This document gives an overview on the flow of SNMP traps within NNMi, and then steps through the following three tasks for configuring and managing traps with NNMi:
-
Determine why SNMP traps are not appearing in the NNMi Console
-
Manage the Number of incoming SNMP traps
-
Periodically trim the NNMi database to remove SNMP traps
When following the procedures in this document, note the following:
- The example procedures in this document use a Linux NNMi management server, and can be followed on a Windows NNMi management server.
-
The example commands assume the system user is assigned the following password: mypassword
-
Some screen captures might be slightly different from those that appear in the most recent NNMi graphical user interface.
About SNMP Traps and NNMi
NNMi works with SNMP traps at the following three levels:
-
The nnmtrapreceiver process (running as an operating system’s service)
-
The NNMi Trap Service (controlled by ovjboss)
-
The NNMi Event Pipeline (controlled by ovjboss)
The nnmtrapreceiver process runs as an operating system service and is comprised of the nnmtrapreceivermd and nnmtrapreceiver processes as shown in the following example output:

-
The nnmtrapreceivermd process integrates with ovspmd and responds to ovstart/ovstop messages
-
During ovstart, the nnmtrapreceivermd process starts the nnmtrapreceiver process
-
The ovstop command stops the nnmtrapreceivermd process, but leaves the nnmtrapreceiver process running
-
The nnmtrapreceiver process sends traps into the NNMi Trap Service or queues traps until the ovjboss process is started. In both cases, the Trap Service is started.
-
The nnmtrapreceiver process is especially useful in high availability (HA) and Application Failover clusters. It runs on BOTH the nodes (active and standby) in the cluster. This means that, during failover, no trap is lost.
The NNMi Trap Service maintains a separate data store of traps. This service is controlled by ovjboss and managed through the nnmtrapconfig.ovpl CLI.
The Event Pipeline is visible and controlled through the NNMi console.
As shown in the following diagram, incoming traps are received by the nnmtrapreceiver process. The process sends traps to a message queue, which is processed by the NNMi Trap Service. Each trap moves through various stages in NNMi Trap Service, and, if it passes various filters, eventually reaches the NNMi Event Pipeline.
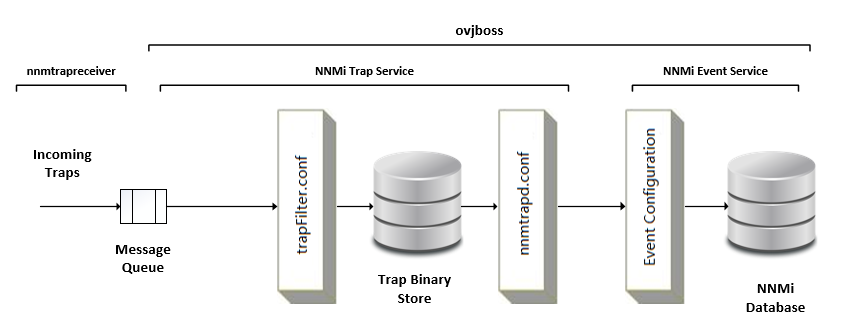
It is important to understand the flow of SNMP traps within NNMi Trap Service. The next section describes the details of how NNMi Trap Service and Event Service process SNMP traps at various stages.
The Flow of SNMP Traps on the NNMi Management Server
Figure 2 demonstrates the detailed flow of SNMP traps on the NNMi management server. It shows various checkpoints where a trap can potentially be dropped and where and how to configure filters.
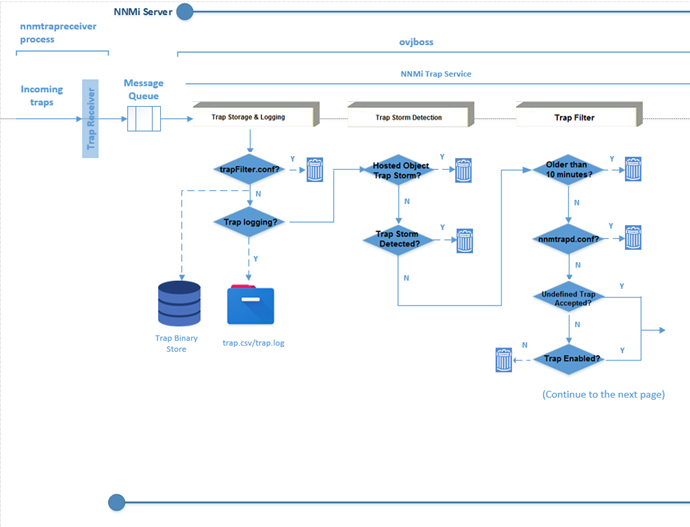
Trap Storage and Logging Stage
In the Trap Storage and Logging Stage, the following actions take place:
- The nnmtrapreceiver process receives incoming traps.
-
The nnmtrapreceiver process sends traps to the NNMi Trap Service, which is controlled by ovjboss. If the trap’s source IP address, OID, or both are listed in the trapFilter.conf file, the trap is dropped. Otherwise, the trap is stored in the Trap Binary Store and is used in trap analysis (for example, to calculate the trap rate).
- By adding device IP addresses or OIDs to the trapFilter.conf file, you can block these high-volume incidents and avoid incident volume problems.
-
The trapFilter.conf is located in <NnmDataDir>/shared/nnm/conf directory.
-
The trap binary store consists of up to five binary files: traplog0 through traplog4. They are located in the <NnmDataDir>/shared/nnm/databases/traps directory.
- If the trap log is enabled, traps are logged to the trap.csv, trap.log files, or both in the <NnmDataDir>/log/nnm directory.
You can enable/disable trap logging and change the trap logging format by using the nnmtrapconfig.ovpl command:
nnmtrapconfig.ovpl –setProp trapLoggingMode < TXT, CSV, BOTH, OFF>
Trap Storm Detection Stage
This stage is also known as NarrowTrapAnalysis and WideTrapAnalysis.
In the Trap Storm Detection Stage the following events occur:
-
In NarrowTrapAnalysis, the NNMi Trap Service evaluates traps against the trap storm filter specified in the hosted-on-trapstorm.conf file. If the filter detects a hosted-on-trap storm, the trap is dropped.
The hosted-on-trapstorm.conf file is located in the <NnmDataDir>/shared/nnm/conf directory.
-
In WideTrapAnalysis, if the NNMi Trap Service detects a trap storm based on the overall trap rate and threshold, the traps are dropped.
To configure the trap storm definition, use the nnmtrapconfig.ovpl command.
Trap Filter Stage
In the Trap Filter Stage, the following events occur:
-
If the timestamp of the trap is older than 10 minutes, the trap is dropped.
-
If the trap’s source IP address, OID, or both are listed in the nnmtrapd.conf, the trap is dropped.
-
The nnmtrapd.conf file is located in the <NnmDataDir>/shared/nnm/conf directory.
-
Traps that meet the following criteria are also evaluated against the nnmtrapd.conf filter:
– Pass the trapFilter.conf filter
– Stored in the Trap Binary Store
- If the trap’s source IP address, OID, or both are listed in the nnmtrapd.conf file, the trap is dropped here. These traps are blocked from entering the NNMi event subsystem.
-
NNMi still uses these traps to calculate the trap rate and to write to the trap binary store. By using the nnmtrapd.conf file approach, you can only stop incidents from being created or stored in the database.
-
-
If undefined traps are accepted, the trap is sent to the next stage—the Trap Forwarding Stage. If the trap is enabled, it also moves to the next stage.
-
NNMi drops undefined traps silently by default. You can change the property com.hp.nnm.events.allowUndefinedTraps in the $NNM_PROPS/nms-jboss.properties file.
-
You can use the combination of the nnmloadmib.ovpl and “nnmincidentcfg.ovpl –loadTraps” CLIs to create new trap configuration in NNMi.
The article “Step- by-Step Guide to Incident Management” provides some examples.
-
-
If the trap is not enabled, it is dropped.
You can enable and disable SNMP traps in the NNMi console.
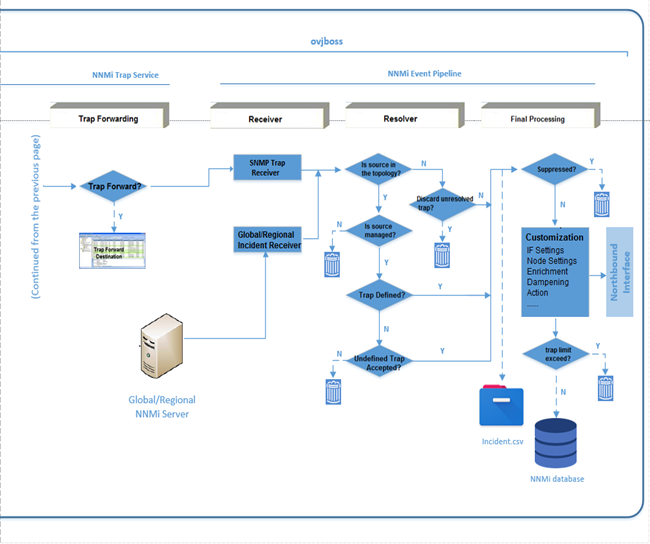
Trap Forwarding Stage
The Trap Forward Stage is responsible for the following:
-
Traps are forwarded to the NNMi Event Pipeline and to the specified trap forwarding destinations, if any.
You can configure trap forwarding destinations in the NNMi console.
Receiver Stage (Event Pipeline)
In the Receiver Stage, the following events occur:
-
This stage has two receivers. The SNMP Trap Receiver receives traps that are processed and forwarded by NNMi Trap Service. The Global or Regional Incident Receiver receives traps and incidents sent from a Global or a Regional Manager. Both the receivers send traps and incidents to the Resolver.
-
Certain conditions might prevent an incident from being forwarded from the Regional Manager. Examples include:
– If the number of messages in the JMS message queue between the Regional and Global Managers exceeds a configured threshold
– If the rate of forwarding incidents exceeds a configured threshold.
In both cases, the idea of dropping traps is to be able to continue processing management events that are more important.
-
If a trap from the Regional Manager is dropped, one of the following incidents is generated:
MessageQueueSizeExceeded incident with WARNING severity
MessageQueueSizeExceeded incident with CRITICAL severity
MessageQueueIncidentRateExceeded incident
-
Resolver Stage
In the Resolver Stage, the following events occur:
-
Various conditions are checked in this stage before traps are sent to the Event Pipeline’s final processing stage. The evaluation of these conditions and the consequential trap flow are shown in the detailed flow diagrams provided in this section. Note that traps can be dropped in this stage under different configurations.
-
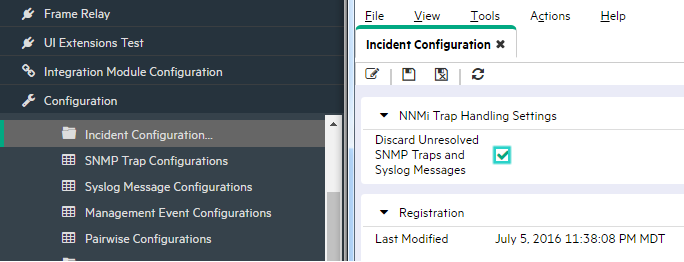
In the NNMi console, you can configure whether to discard Unresolved Traps.
-
You can configure whether to accept the Undefined Traps in the $NNM_PROPS/nms-jboss.properties file. See Step 8.
-
You can use the combination of the nnmincidentcfgdump.ovpl and nnmincidentcfgload.ovpl CLIs to export, modify, and import the trap and incident configurations.
-
Final Processing Stage
In the Final Processing Stage, the following events occur:
-
In this stage, first, traps are logged in the incident.csv file. Next, traps are evaluated, enriched, or dropped based on various configurations. These configurations include Interface Group Settings, Node Group Settings, action, enrichment, dampening, and suppression. For example, if the suppression configuration applies, the trap is dropped.
-
Finally, traps are persisted in the NNMi database and forwarded to the NNMi Northbound Interface.
-
The incident.csv file is located in the <NnmDataDir>/log/nnm directory.
-
NNMi allows 100,000 traps to be stored in the NNMi database. After this limit is reached, no additional traps are stored in the NNMi database.
-
You can use the auto-trim oldest SNMP trap incidents feature to control the number of SNMP traps (and syslog messages) stored in the NNMi database and to retain important incoming SNMP traps. For more information, see the "Configuring the Auto-Trim Oldest SNMP Trap Incidents Feature" section of the "Maintaining NNMi" chapter in the Network Node Manager i Software Deployment Reference.
-
NNMi Trap Service also performs a trap analysis task in the background, which is not shown in Figure 2. It uses data from the Tarp Binary Store and generates Trap Analytics Reports the can be viewed from the NNMi console.

The details of trap analytics are also logged in the trapanalytics.log file located in <NnmDataDir>/log/nnm directory.
Troubleshoot Examples
Step 1 - Determine why SNMP Traps are not appearing in the NNMi Console
SNMP traps are being sent to the NNMi management server, but are not displayed in the NNMi SNMP Trap views.
This example uses the following trap and node values:
-
SNMP Trap: ciscoSyslogMIBNotification trap (.1.3.6.1.4.1.9.9.41.2.0.1)
-
Node: 10.2.121.254
To determine why SNMP traps are not appearing in the NNMi console:
-
Check that the trap service is up and running by using the ovstatus command:
ovstatus –v ovjboss
The output should include the following line to indicate the SNMP Trap Service is running:
NnmTrapService Service is started
Check the SNMP Trap Service configuration using nnmtrapconfig.ovpl:
nnmtrapconfig.ovpl -showProp -u system -p mypassword
-
Compare your defaults with the default values in the following example nnmtrapconfig.ovpl output:
Many parameters can be tuned by using the nnmtrapconfig.ovpl tool. See the nnmtrapconfig.ovpl Reference Page (Help --> Documentation Library --> Reference Pages) for more information
trapInterface : All interfaces
trapPort : 162
recvSocketBufSize : 2048 KBytes
blockTraps : true
thresholdRate : 50 traps/sec
rearmRate : 50 traps/sec
overallThresholdRate : 150 traps/sec
overallRearmRate : 150 traps/sec
windowSize : 300 secs
updateSourcesPeriod : 30 secs
notifySourcesPeriod : 300 secs
minTrapCount : 25 traps
numSources : 10
databaseQSize : 300000 traps
pipelineQSize : 50000 traps
databaseFileSize : 100 MBytes
databaseFileCount : 5
loopbackAddrOverride : Empty
-
After you determine that the service is running and configured, check the NNMi Trap Service storage (Trap Store) files to determine whether they are growing in size.
-
Navigate to the following directory:
/var/opt/OV/shared/nnm/databases/traps
-
List the directory contents. For example, on Linux:
ls -l
You should see a maximum of five files: traplog0 through traplog4. You can view the datestamps to see how fast these log files are being updated.
-
-
Use the nnmtrapdump.ovpl command to verify that the traps you are expecting to view in NNMi appear in the contents of the NNMi Trap Service storage (Trap Store).
It is recommended that you redirect the output. Because the output can be quite large, you might want to limit the amount of traps in the output by using any of the following options: -source, -trapid, -from, and -to.
For our example, we use the -source option with a value of 10.2.121.254 to limit the amount of traps coming from the source device that has an IP address of 10.2.121.254.
nnmtrapdump.ovpl –u system –p mypassword –source\ 10.2.121.254 > /tmp/trapdump.txt
Your output should appear similar to the following example nnmtrapdump.ovpl output. As shown in the example output, each entry begins with the Trap ID, and then provides additional information.
Trap .1.3.6.1.4.1.9.9.41.2.0.1 at October 31, 2008 3:20:30 PM MDT from cisco6509.cnd.hp.com
Version: SNMPv1
Enterprise OID: .1.3.6.1.4.1.9.9.41.2
Agent address: 10.2.121.254
Generic trap: 6
Specific trap: 1
Timeticks: 1,358,199,695
Varbinds:
<VB state='0' type='4' id='.1.3.6.1.4.1.9.9.41.1.2.3.1.2.2865238' value='SNMP' />
<VB state='0' type='2' id='.1.3.6.1.4.1.9.9.41.1.2.3.1.3.2865238' value='4' />
<VB state='0' type='4' id='.1.3.6.1.4.1.9.9.41.1.2.3.1.4.2865238' value='AUTHFAIL' />
<VB state='0' type='4' id='.1.3.6.1.4.1.9.9.41.1.2.3.1.5.2865238' value='Authentication failure for SNMP req from host 16.157.128.85' />
<VB state='0' type='67' id='.1.3.6.1.4.1.9.9.41.1.2.3.1.6.2865238' value='1358199695' />
You can conclude that the traps of your interest are arriving at the NNMi Trap Service storage (Trap Store) if you can see them in the output.
Note
After arriving at the Trap Store, if an SNMP trap is filtered out, you cannot see the trap in the NNMi console.
-
Use the nnmtrapconfig.ovpl command to determine whether your expected trap is being blocked:
nnmtrapconfig.ovpl -dumpBlockList -u system -p mypassword
When examining the output, note the following:
-
The allowed OIDs are from the SNMP traps configured in the NNMi incident configuration.
-
The blocked OIDs are from the nnmtrapd.conf file.
-
Caches are dynamic.
-
If a trap comes in and does not pass the filters, its OID is added to the blocked cache.
An abbreviated version of a typical output is shown here.
An easy way to check if a trap is allowed is to look in the first section List of allowed trap OIDs as highlighted in the following example. In our particular case, the OID .1.3.6.1.4.1.9.9.41.2.0.1 is not listed.
Filter Configuration:
List of allowed trap OIDs:
.1.3.6.1.4.1.9.9.13.3.0.6
.1.3.6.1.4.1.9.10.106.2.1
.1.3.6.1.4.1.2272.1.21.41
Blocking Caches:
Cache of blocked OIDs:
.1.3.6.1.6.3.1.1.5.5.1.3.6.1.4.1.9.1.400
.1.3.6.1.2.1.47.2.0.1
.1.3.6.1.4.1.9.0.1
Cache of trap OID's blocked from specific source addresses:
In our example, we determined the following:
- The SNMP trap is not blocked by the NNMi Trap Service.
- The SNMP trap is not in the allowed list.
This means that the SNMP trap of interest must be influenced by the NNMi incident configuration.
-
-
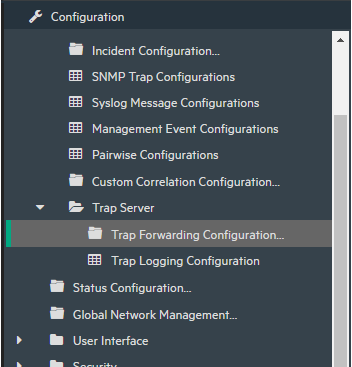
Navigate to the Incident Configuration form and look for the SNMP trap of interest:
-
From the workspace navigation panel, select the Configuration workspace.
-
Expand Incidents.
-
Select SNMP Trap Configurations.

-
If the trap is not loaded, it is filtered out by the NNMi Trap Service. You can load the trap by using the nnmincidentcfg.ovpl -loadTraps command.
-
If the trap is loaded, check whether the SNMP trap is enabled. If it is not enabled, it is filtered by the NNMi database.
In our case, we see that the trap is loaded.
-
-
-
Check whether the SNMP trap is enabled:
-
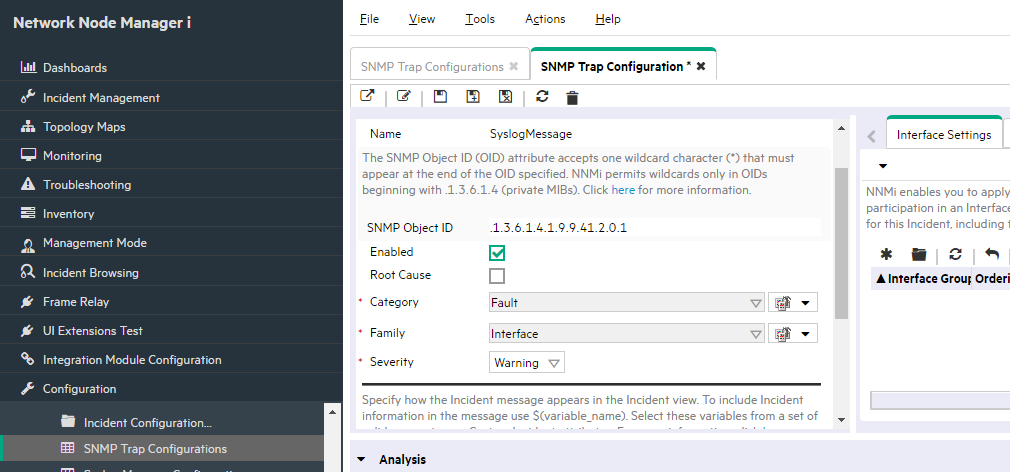
Select the SyslogMessage trap configuration.
-
Open the SNMP Trap Configuration form for the SyslogMessage trap configuration and verify that the Enable box is selected.
As shown in the following example, the Enable attribute indicates that the SNMP trap configuration is enabled.
-
Save and close the SNMP Trap Configuration form.
-
Save and close the Incident Configuration form.
-
To confirm that the changes have taken effect, use the nnmtrapconfig.ovpl tool to view the list of allowed SNMP trap OIDs:
nnmtrapconfig.ovpl -dumpBlockList -u system -p mypassword
You should see the OID for the SNMP trap that you just enabled.
List of allowed trap OIDs:
.1.3.6.1.4.1.9.9.13.3.0.6
.1.3.6.1.4.1.9.10.106.2.1
.1.3.6.1.4.1.2272.1.21.41
.1.3.6.1.4.1.9.9.41.2.0.1
-
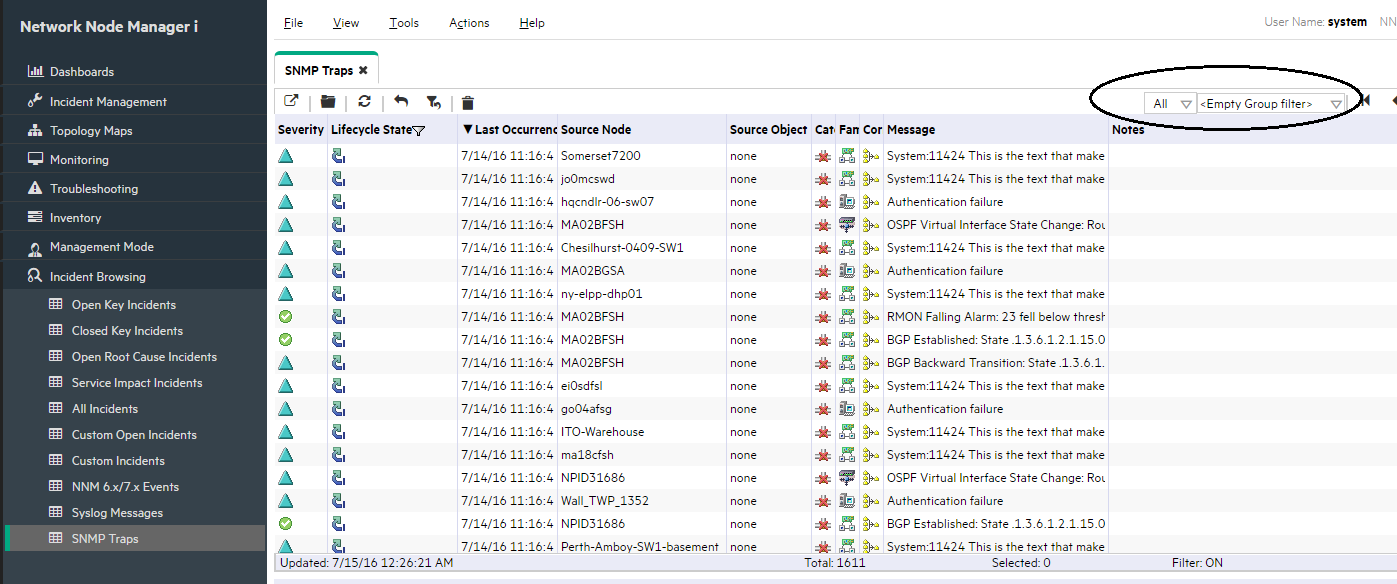
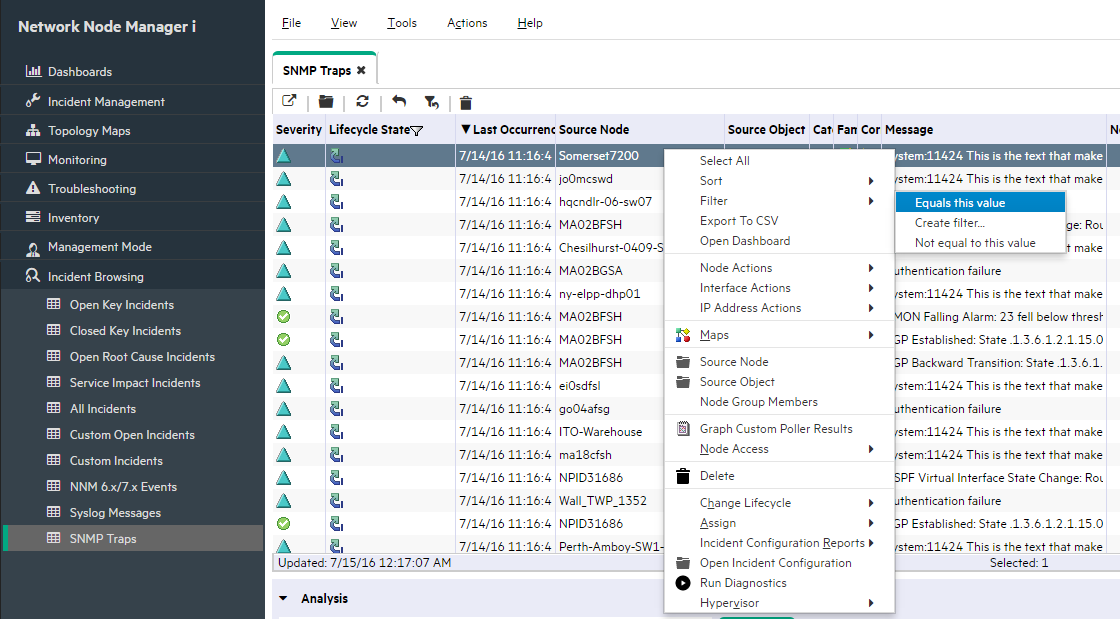
To make sure that the traps are arriving, navigate to the SNMP Traps view:
-
From the workspace navigation panel, select the Incident Browsing workspace.
- Select SNMP Traps.
-
You should begin to see the traps.
As shown in the following example, the top of the SNMP Traps view includes a “time” filter and a Node Group filter. Make sure that these are set appropriately for your testing. Sometimes these filters are set to show only the last hour or a certain group of nodes that does not include the node of interest.
Step 2 - Manage the Number of Incoming SNMP Traps
This example steps through troubleshooting the following scenario:
You are receiving too many traps into the NNMi console and you want to reduce the number of incoming traps.
Analysis done against the SNMP Trap Service storage (Trap Store) can be different than what is shown in the NNMi console, which reflects the NNMi database contents. This scenario uses both the SNMP Trap Service storage (Trap Store) and the NNMi database. Therefore, carefully check whether the step described is using data from the NNMi database or from the SNMP Trap Service storage (Trap Store).
When working with SNMP trap limits, note the following:
-
NNMi allows 100,000 traps to be stored in the NNMi database. The 100,000 trap limit applies only to the NNMi database. After this limit is reached, no additional traps are stored in the NNMi database.
-
The NNMi Trap Service storage (Trap Store) continues to receive traps after the 100,000 SNMP Trap limit is reached. When the NNMi Trap Service storage has “filled up”, it uses the FIFO (First In, First Out) model, deleting the oldest traps and saving the newest ones.
When using results from the NNMi database, note the following:
- Although the NNMi console provides a visual inspection of the traps stored in the database, use nnmtrapdump.ovpl and nnmtrapconfig.ovpl to analyze the data as described in this section of the document.
- Use caution when viewing the SNMP trap information in the NNMi console. The Source Node displayed in the NNMi console is not necessarily the SNMP trap source address. Instead, the trap could be coming from any address on the Source Node.
NNMi generates an incident when you are near or at the limit of total SNMP traps allowed in the NNMi database as shown in the following example:
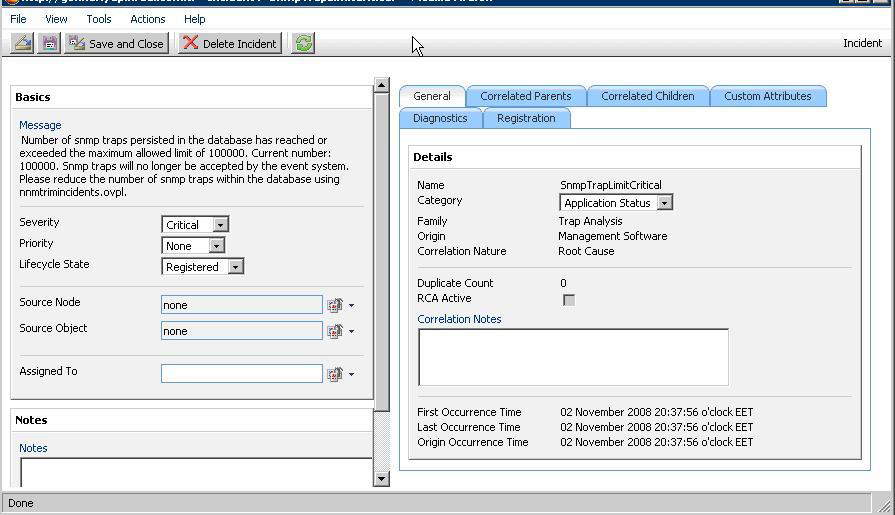
See Step 3: Periodically Trim the NNMi Database of SNMP Traps for information about how to remove traps from the database.
To manage the number of SNMP traps, start by determining which nodes are generating most of the traps.
To determine which nodes are generating most of the traps, begin by viewing information in the Custom Attributes tab for the SNMP Trap configuration of interest. The Custom Attributes tab is an excellent source of information about a particular trap in the NNMi console. This tab shows all of the information about a selected trap, including the Source Address as shown in the following example:

When looking at the SNMP Traps view, it can be difficult to get a sense of which nodes are generating most of the SNMP traps. You can try the filters provided to see which Source Node is generating most of the SNMP traps.
You can also use the nnmtrimincidents.ovpl command to export the trap information from the NNMi console to a comma-separated file for easier analysis. This file can then be imported into a tool such as Microsoft Excel.
The following example generates a file with all traps greater than one day old that are in the NNMi database (not the NNMi Trap Service storage (Trap Store)):
nnmtrimincidents.ovpl -age 1 -incr days -origin SnmpTrap –archiveOnly -u system -p mypassword
The –archiveOnly option does NOT trim incidents from the database.
When importing the file into Excel, note the following:
-
Before importing the file, delete the first few lines of the output file that describe the file contents. (These lines begin with #.)
-
Specify that the file is comma-separated.
An example output file that can be used for analysis is shown below:

Alternatively, you can work with the archive file from the command line. For example, to get a list of the trap OIDs:
# cut -f 20 -d ',' incidentArchive.txt | sort -rn | uniq -c
In the example output below, the left column represents the count.
254 .1.3.6.1.6.3.1.1.5.5.1.3.6.1.4.1.9
3 .1.3.6.1.6.3.1.1.5.4.1.3.6.1.4.1.9
8 .1.3.6.1.6.3.1.1.5.3.1.3.6.1.4.1.9
4 .1.3.6.1.6.3.1.1.5.1.1.3.6.1.4.1.9
From this example, you can see that you might want to disable the Cisco Authentication Failure trap (.1.3.6.1.6.3.1.1.5.5.1.3.6.1.4.1.9).
To get a list of the source addresses and occurrence count:
# cut -f 23 -d ',' incidentArchive.txt | sort -rn | uniq -c
From the example output below, you can see that you might want to block traps from the node 10.25.203.67.
269 10.25.203.67
10 10.18.10.2
The next two sections — “Blocking Traps Using the Node IP Address” and “Blocking Traps Using the Trap OID” — describe how to block traps using the nnmtrapd.conf file.
For the remainder of this example, instead of working with the SNMP trap information in the NNMi database, we analyze the SNMP traps in the NNMi Trap Service storage (Trap Store).
Advantages of analyzing the SNMP traps in the NNMi Trap Service storage include the following:
-
The tools provide information that you cannot obtain using the NNMi database.
-
You can determine which nodes and traps are the most verbose (even when they are filtered out at the NNMi Incident level).
-
If you can discard the trap at the NNMi Trap Service level, NNMi performs more efficiently.
A disadvatage of using the NNMi Trap Service data is that you might get information about SNMP traps that are dropped before arriving at the NNMi console.
When using the NNMi Trap Service data, you can analyze your existing SNMP Trap information by using the node’s IP Address or the SNMP Traps OID.
Block Traps Using the Node IP Address
-
Obtain a list of all the Source Addresses for SNMP traps in the NNMi Trap Service storage (Trap Store).
-
Send the contents of the NNMi Trap Service storage (Trap Store) to a file by using the nnmtrapdump.ovpl tool:
nnmtrapdump.ovpl -u system -p mypassword > /tmp/trapdump.txt
-
Find all occurrences of “Agent address” and delete extra words so that only the IP addresses are included. For example, on Linux:
grep "Agent address" /tmp/trapdump.txt | cut -f 3 -d ' ' > /tmp/a
-
Sort the IP addresses, obtain a unique count for each IP address, and then sort the results in order of the most occurrences to least occurrences. For example, on Linux:
sort -rn /tmp/a | uniq -c | sort -rn > /tmp/trapcount.txt
The file /tmp/trapcount.txt should look similar to the following.
The column on the left is the unique count. The column on the right is the source address.
60109 10.168.201.16
5064 10.98.112.2
5061 10.98.110.2
1089 10.130.252.90
63 10.168.129.19
52 10.104.252.7
36 10.106.252.19
36 10.103.252.18
16 10.108.130.37
16 10.102.252.14
12 10.105.252.8
12 10.102.130.12
From this output, you can see that most traps are coming from the node 10.168.201.16.
-
Block the traps from node 10.168.201.16 by editing the blocking filters in the file nnmtrapd.conf. The location of this file is:
Linux:
/var/opt/OV/shared/nnm/conf/nnmtrapd.conf
Windows:
data_dir\shared\nnm\conf\nnmtrapd.conf
This file contains examples and documentation.
When working with your own data, before blocking traps from the node, first evaluate the node and its traps and determine whether it is useful to retain the traps.
-
To block all traps using the node’s address, add the following line to the end of the nnmtrapd.conf file.
<10.168.201.16,.*>
Notice the use of wildcards (.*) to catch all traps from this source address.
-
Use the nnmtrapconfig.ovpl command to indicate the NNMi Trap Service should read the filter file again:
nnmtrapconfig.ovpl -readFilter -u system -p mypassword
-
Confirm that the change took effect:
nnmtrapconfig.ovpl -dumpBlockList -u system -p mypassword
You should see the following entry to verify that the traps are blocked from this source address:
List of blocked source addresses:
10.168.201.16
Block Traps Using the Trap OID
You can perform a similar task with trap OIDs rather than source addresses.
-
Run the following commands to determine the highest number of SNMP traps per OID:
nnmtrapdump.ovpl -u system -p mypassword > /tmp/trapdump.txt
grep Trap /tmp/trapdump.txt | cut -f 2 -d ' ' > /tmp/b
sort –rn /tmp/b | uniq -c | sort –rn > trapOID.txt
For example, we determine that the trap OID .1.3.6.1.2.1.10.21.2.0.1 is occurring frequently and is filling the NNMi console with traps, and therefore, we do not want to receive this trap.
You can block the trap in one of the following ways:
-
Use the NNMi console
Assuming you have this trap defined in NNMi, navigate to the incident configuration view, find the definition of this trap, and then uncheck the Enable box as described in Step 1: Determine why SNMP Traps are not appearing in the NNMi console.
-
Use the nnmtrapd.conf file
The NNMi Trap Service storage (Trap Store) continues to receive the trap even after blocking the trap by using this method.
An advantage of this method is that you could consider only blocking this trap when it originates from a specific IP Address. This is not possible in the NNMi console.
For example, if you wish to block this trap when it is received from any address in the subnet 10.6.3.*, edit the nnmtrapd.conf file to include the following line:
<10.6.3.*, .1.3.6.1.2.1.10.21.2.0.1>
You can also mix and match IP address ranges and wildcards as well as OID ranges and wildcards.
Additional Tips for Managing Your SNMP Trap Numbers
A common error when working with the nnmtrapd.conf file is to have two lines that match the same IP address. The parser works from the top to the bottom. The parser stops when it finds an IP address match.
For example, only the first line is effective if the nnmtrapd.conf file contains the following two lines:
<10.6.3.*, .1.3.6.1.2.1.14.16.0.6>
<10.6.3.*, .1.3.6.1.2.1.10.21.2.0.1>
Because the node address matches this first line, the second line is never matched.
To enable nnmtrapd.conf to match each specified filter, use a syntax similar to the following:
<10.6.3.*, .1.3.6.1.2.1.14.16.0.6,.1.3.6.1.2.1.10.21.2.0.1>
As a general rule, use the NNMi console to block traps unless you only want to block traps from specific IP addresses.
To ensure all of the specific filters are enabled, include all the specific filters above a general “catch all” filter at the bottom of the nnmtrapd.conf file. For example, if the trapd.conf file included an OID filter in our previous example, and it occurred below the IP address filters in the trapd.conf file, the OID filter might never be matched.
If you have the MIB loaded in the NNMi database for the traps that you wish to block, you could load the trap definition, and then block the trap by simply disabling the trap in the NNMi console. Using the NNMi console does not reduce performance and you might find it easier to manage.
The benefit of using the nnmtrapd.conf file is that you get finer granularity for controlling traps because you can use the wildcard character and specify nodes and SNMP trap OIDs together.
SNMP traps appear in the NNMi Trap Service storage even if they are blocked. Therefore, ignore statistics on traps that you know you are blocking.
Step 3 - Periodically Trim the NNMi Database of SNMP Traps
This section explains how to use the nmtrimincidents.ovpl command to trim the database of traps that are no longer needed. This practice helps you avoid reaching the trap limit in the NNMi database.
Note
The nmtrimincidents.ovpl command applies to the NNMi database and not the NNMi Trap Service storage (Trap Store).
The nnmtrimincidents.ovpl command has a rich set of options to help you trim the database.
Run the nnmtrimincidents.ovpl command regularly in a cron job (Linux) or a scheduled task (Windows).
The following command deletes any traps that are older than one week:
nnmtrimincidents.ovpl –u system –p mypassword -age 1 -incr weeks -origin SnmpTrap –trimOnly -quiet
You can adjust the example to fit your trap rate.
When using nnmtrimincidents.ovpl, note the following:
-
The example options do not keep an archive of the trimmed traps. You can easily do this by using the -archiveOnly option. See the nnmtrimincidents.ovpl reference page (Help --> Documentation Library --> Reference Pages) for more information.
-
The -quiet mode does not prompt for user confirmation. (This option is ideal for a cron job.)