Searching the Help
To search for information in the Help, type a word or phrase in the Search box. When you enter a group of words, OR is inferred. You can use Boolean operators to refine your search.
Results returned are case insensitive. However, results ranking takes case into account and assigns higher scores to case matches. Therefore, a search for "cats" followed by a search for "Cats" would return the same number of Help topics, but the order in which the topics are listed would be different.
| Search for | Example | Results |
|---|---|---|
| A single word | cat
|
Topics that contain the word "cat". You will also find its grammatical variations, such as "cats". |
|
A phrase. You can specify that the search results contain a specific phrase. |
"cat food" (quotation marks) |
Topics that contain the literal phrase "cat food" and all its grammatical variations. Without the quotation marks, the query is equivalent to specifying an OR operator, which finds topics with one of the individual words instead of the phrase. |
| Search for | Operator | Example |
|---|---|---|
|
Two or more words in the same topic |
|
|
| Either word in a topic |
|
|
| Topics that do not contain a specific word or phrase |
|
|
| Topics that contain one string and do not contain another | ^ (caret) |
cat ^ mouse
|
| A combination of search types | ( ) parentheses |
|
Create and Delete User Accounts Using the Security Wizard
For more information about User Accounts, see About User Accounts.
Tip NNMi administrators can also use the User Accounts view or command line to complete this task. See Configure User Accounts (User Account Form) or nnmsecurity.ovpl.
- From the Security Wizard main page, select the Map User Accounts and User Groups option.
- Navigate to the User Accounts table.
- Click
 New.
New. -
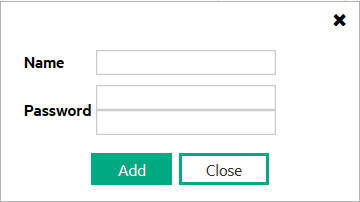
In the Create User Account dialog box, enter the following:

-
Username: Enter the user name to be assigned to this user:
Type up to 40 alpha-numeric characters. Other valid characters include periods (.), underscores (_), the @ symbol, and hyphens (-).
Tip Although additional characters and spaces are valid, not all systems accept such values. As a best practice, avoid including spaces and other punctuation in user names.
-
Password: Enter the Password value.
Type any amount of printable alpha-numeric characters or symbols.
Note The Security Wizard is unable to create accounts for use with LDAP or PKI user authentication. These accounts may be created using the User Accounts Form or the
nnmsecurity.ovplcommand. See Configure User Accounts (User Account Form). - Click Add.
- Repeat to add each User Account.
- When you finish adding User Accounts in the Create User Account dialog box, click Close.
-
- When you finish your security configuration, click Save and Close to save your security configuration.
To modify a User Account: see Change Password, Name.
- Select a row in the User Accounts table.
-
Click
 Delete.
 -
When you finish, click the Save and Close button to save your security configuration.
Caution If you remove the User Account for a user who is currently signed into the NNMi console, the change does not take effect until the next time the user signs in. By default, the NNMi timeout limit is 18 hours. If a user has not signed out within 18 hours, NNMi forces the user to sign out. To change the Console Timeout value, see Configure the NNMi User Interface
Access the Incident Browsing workspace. Open the All Incidents view. Sort this view using the Assigned To (AT) column. Reassign all Incidents associated with any user you deleted (see Assign an Incident).
NNMi User Accounts can be assigned to one or more User Groups. You must assign each User Account to one of the following NNMi User Groups so users can access the NNMi console:
- NNMi Administrators
- NNMi Level 2 Operators
- NNMi Level 1 Operators (with more limited access privileges than Level 2 Operators)
- NNMi Guest Users
See Assign User Accounts to User Groups Using the Security Wizard Page for more information.
We welcome your comments!
To open the configured email client on this computer, open an email window.
Otherwise, copy the information below to a web mail client, and send this email to network-management-doc-feedback@hpe.com.
Help Topic ID:
Product:
Topic Title:
Feedback:


