Configure node settings for a Syslog message incident

Node Settings override any other Suppression, Enrichment, Dampen, Action, or Diagnostics Selections configuration settings, except those configured on the Interface Settings tab.

NNMi enables you to apply an incident configuration to a Source Node based on the Source Node's participation in a Node Group. If the Source Node is not a member of the Node Group specified, the incident is neither displayed nor stored in the NNMi database.

To apply an incident configuration to a Source Node based on the Source Node's Node Group:

  1. Navigate to the Syslog Message Configuration form:

    1. From the workspace navigation panel, select the Configuration workspace.
    2. Expand the Incidents folder.
    3. Select Syslog Message Configurations.
    4. Do one of the following:
      1. To create an incident configuration, click the New icon, and continue.
      2. To edit an incident configuration, select a row, click the Open icon, and continue.
      3. To delete an incident configuration, select a row, and click the  Delete icon.
  2. Select the Node Settings tab.
  3. Do one of the following:

    1. To create a new configuration, click the  New icon.
    2. To edit an existing configuration, double-click the row representing the configuration you want to edit.
  4. Configure the desired Node Settings (see table).
  5. Click  Save and Close to save your changes and return to the previous form.
Node Group Attributes
Name Description
Node Group Click the Lookup icon and select  Quick Find to select the Node Group you want to use.
Ordering Determines the priority order for those nodes that appear in multiple Node Groups. The lower the number, the higher the priority. For example, 1 is the highest priority. If a node is in multiple Node Groups and more than one of those Node Groups have been specified in an incident configuration, only the incident configuration with the highest priority will be applied to the node.
Enable

Use this attribute to temporarily disable an incident's suppression settings:

Disable  = Temporarily disable the selected configuration.

Enable  = Enable the selected configuration.

Configure incident suppression settings for a node group

[This is the Context-Sensitive Help topic for the Incident Config: Suppress Tab for Node Settings Tab.]

Node Settings override any other Suppression settings for this incident, except those configured on the Interface Settings tab. NNMi enables you to suppress a specified incident configuration based on the Source Node's participation in a Node Group.

You can also suppress the incident configuration based on the Source Object's participation in an Interface Group.

To suppress an incident configuration based on a Node Group:

  1. Navigate to the Syslog Message Configuration form:

    1. From the workspace navigation panel, select the Configuration workspace.
    2. Expand the Incidents folder.
    3. Select Syslog Message Configurations.

      1. To create an incident configuration, click the New icon, and continue.
      2. To edit an incident configuration, select a row, click the Open icon, and continue.
      3. To delete an incident configuration, select a row, and click the  Delete icon.
  2. Select the Node Settings tab.
  3. Make sure you configure the basic Node Setting behavior.

Select the Suppression tab, configure the desired Suppression behavior (see the table sbelow), and then click  Save and Close to save your changes and return to the previous form.

Node Settings Suppression Attributes
Name Description
Enable

Use this attribute to temporarily disable an incident's suppression settings:

Disable  = Temporarily disable the selected configuration.

Enable  = Enable the selected configuration.

Payload Filter

The Payload Filter Editor enables you to create expressions that further refine the filters used to select the incidents to be suppressed, enriched, or dampened. Make sure to design any complex Payload Filters offline as a Boolean expression first. This method can help to minimize errors when entering your expressions using the Payload Filter editor.

When creating a Payload Filter, note the following:

  • Payload Filter expressions for the like and not like operators use the syntax defined for java regular expressions (java.util.regex Pattern class).
  • You must use a ciaName that already exists in the trap or event you are configuring.
  • Each set of expressions associated with a Boolean Operator is treated as if it were enclosed in parentheses and evaluated together.
  • View the expression displayed under Filter String to see the logic of the expression as it is created.
  • The AND and OR Boolean Operators must contain at least two expressions as shown in the example below.

    The following example filters incidents on voltage state:

    AND
        ciaName = .1.3.6.1.4.1.9.9.13.1.2.1.7
        ciaValue = 5

    NNMi evaluates the expression above as follows:

    (ciaName = .1.3.6.1.4.1.9.9.13.1.2.1.7 AND ciaValue = 5)

    NNMi finds all incidents with a varbind .1.3.6.1.4.1.9.9.13.1.2.1.7 value of 5.

    When you use ciaName and ciaValue in a Payload Filter, you must enter the ciaName and ciaValue as a pair as shown in the preceding example.

  • The placement of your cursor and the subsequent text that is selected is important when performing operations using the Payload Filter Editor. For example, you append to, replace, or change the indentation of the expression that is selected.
  • The placement of your cursor and the subsequent text that is selected is especially important when adding your Boolean operators.
  • You can include more than one varbind in the same Payload Filter expression as shown in the following example:

    ((ciaName like \Q.1.3.6.1.4.1.9.9\E.* AND ciaValue = 25) AND (ciaName like \Q.1.3.6.1.2.1.2.2.1.1.3\E.* AND ciaValue = 3))

    In this example, a given trap must meet each of the following criteria:

    • Contain a varbind whose Object Identifier (OID) matches the regular expression \Q.1.3.6.1.4.1.9.9\E.* and has a value of 25.
    • Contain a varbind whose OID matches the regular expression \Q.1.3.6.1.2.1.2.2.1.1.3\E.* and has a value of 3.


Payload Filter Editor Settings
Attribute Description
Attribute

The attribute name on which NNMi searches. Filterable attributes include the following:

  • ciaName
  • ciaValue
  • sourceName

When you use ciaName and ciaValue in a Payload Filter, you must enter the ciaName and ciaValue as a pair. For example: (ciaName =.1.3.6.1.4.1.9.9.13.1.2.1.7 ) AND ( (ciaValue = 4) OR ( ciaValue = 5)) is not supported.

The sourceName value must be the name of the node as displayed on the node form and not the host name or management address.

Operator

Valid operators are described below.

  • = Finds all values equal to the value specified.

    Example: ciaName=.1.3.6.1.4.1.9.9.13.1.2.1.7 matches any incident that contains a varbind with the name value of .1.3.6.1.4.1.9.9.13.1.2.1.7.

  • != Finds all values not equal to the value specified.

    Example: ciaName! = .1.3.6.1.4.1.9.9.13.1.2.1.7 matches any incident that contains a varbind with a name value other than 1.3.6.1.4.1.9.9.13.1.2.1.7.

  • < Finds all values less than the value specified.

    Example: ciaValue < 6 matches any incident that contains a varbind with a value less than 6.

  • <= Finds all values less than or equal to the value specified.

    Example: ciaValue <= 6 matches any incident that contains a varbind with a value less than or equal to 6.

  • > Finds all values greater than the value specified.

    Example: ciaValue > 4 matches any incident that contains a varbind with a value greater than 4.

  • >= Finds all values greater than or equal to the value specified.

    Example: ciaValue >= 4 matches any incident that contains a varbind with values greater than or equal to 4.

  • between Finds all values equal to and between the two values specified.

    Example: ciaValue between

    matches any incident that contains a varbind value equal to or greater than 1 and equal to or less than 4.

    As shown in the example, each value must be entered on a separate line.

  • in Finds any match to at least one value in a list of values.

    Example:

    ciaValue in

    matches any incident with a varbind value of either 4 or 5.

    As shown in the example, each value must be entered on a separate line.

    NNMi displays the list of attributes using comma-separated values enclosed in parentheses, for example (4, 5). However, the comma-separated list is used only for display purposes. The actual delimiter is the new line.

  • is not null Finds all non-blank values.

    Example: ciaValue is not null matches any incident with a varbind that contains a value.

  • is null Finds all blank values.

    Example: ciaValue is null matches any incident with a varbind that does not contain a value.

  • like Finds matches using the syntax defined for java regular expressions. See the Pattern (Java Platform SE6) API documentation at:
    http://download.oracle.com/javase/6/docs/api/java/util/regex/Pattern.html for more information. Click here for more information.

    The period asterisk (.*) characters mean any number of characters of any type at this location.

    The period (.) character means any single character of any type at this location.

    To include literal string values in the Value attribute, enclose the string value in \Q<literal_value>\E as shown in the Examples listed below.

    Example:

    ciaName like \Q.1.3.6.1.4.1.9.9\E.* matches any incident that contains a varbind name value that begins with 1.3.6.1.4.1.9.9 and (optionally) ends with any number of characters.

    ciaValue like .*Chicago.* finds all traps or events that contain a varbind value that includes the string Chicago.

  • not between Finds all values except those between the two values specified.

    Example: ciaValue not between 5 8 matches an incident that contains a varbind with the values less than 5 or greater than 8 .

  • not in Finds all values except those included in the list of values.

    Example:

    ciaValue not in

    matches any incident that contains a varbind with values other than 1 and 2.

    As shown in the example, each value must be entered on a separate line.

    NNMi displays the list of attributes using comma-separated values enclosed in parentheses, for example, (1, 2). However, the comma-separated list is used only for display purposes. The actual delimiter is the new line.

  • not like Finds all that do not have the values specified using the syntax defined for Java regular expressions. See the Pattern (Java Platform SE6) API documentation at:
    http://download.oracle.com/javase/6/docs/api/java/util/regex/Pattern.html for more information.

    The period asterisk (.*) characters mean any number of characters of any type at this location.

    The period (.) character means any single character of any type at this location.

    To include literal string values in the Value attribute, enclose the string value in \Q<literal_value>\E as shown in the Examples listed below.

    Example:

    ciaName not like \Q.1.3.6.1.4.1.9.9\E.* matches any incident that contains a varbind name value that does not begin with .1.3.6.1.4.1.9.9 and (optionally) ends with any number of characters.

    ciaValue not like .*Chicago.* finds all traps or events that do not contain a varbind value that includes the string Chicago.

Value

The value for which you want NNMi to search.

Note the following:

  • The values you enter are case sensitive.

  • NNMi displays a variable number of value fields depending on the Operator selected. For example, the between Operator causes two value fields to be displayed.
  • The between, in and not in operators require that each value be entered on a separate line.


Payload Filter Editor Buttons
Button Description
Append Appends the current expression (Attribute, Operator,and Value) to the selected expression already included in the filter string.
Insert Inserts the current expression (Attribute, Operator,and Value) in front of the cursor location within the Filter String.
Replace Replaces the selected expression with the expression displayed in the Attribute, Operator, and Value fields.
AND

Inserts the AND Boolean Operator in the selected cursor location.

View the expression displayed under Filter String to see the logic of the expression as it is created.

OR

Inserts the OR Boolean Operator in the current cursor location.

View the expression displayed under Filter String to see the logic of the expression as it is created.

NOT

Can be used in any part of the Filter String to specify that NNMi should exclude interfaces with values that pass the expression that immediately follows the NOT.

For example, when evaluating the following expression, NNMi includes interfaces with (interface description) ifDesc containing VLAN, and excludes any Interfaces that have VLAN10 for the (interface name) ifName value: 

(ifDesc like VLAN AND NOT (ifName=VLAN10)) 

View the expression displayed under Filter String to see the logic of the expression as it is created.

EXISTS

Used for filters that include Capabilities or Custom Attribute names and values in the Filer String.

Indicates that you want NNMi to consider interfaces that have Capabilities or Custom Attributes when evaluating the Filter String.

Tip When creating complex Filter Strings that include customAttrName and customAttrValue pairs as one component of an "or" statement, to prevent NNMi from excluding Nodes that have zero Custom Attributes, use EXISTS or NOT EXISTS criteria for the customAttrName and customAttrValue pair definitions.

Otherwise Nodes that do not have any Custom Attributes are automatically excluded even if they have values that pass other aspects of your filter.

For example, when evaluating the following Filter String, NNMi includes interfaces with (interface description) ifDesc containing VLAN, as well as any Interfaces Custom Attribute Role value is LAN Connection to Oracle Server

(ifDesc like VLAN OR EXISTS((customAttrName=Role AND customAttrValue=LAN Connection to Oracle Server)))

View the expression displayed under Filter String to see the logic of the expression as it is created.

NOT EXISTS

Used for filters that include Capabilities or Custom Attribute names and values in the Filer String. Indicates that you want NNMi to consider interfaces that do not have any Capabilities or Custom Attributes when evaluating the Filter String, but exclude the interfaces that match the expression that follows the NOT EXISTS.

Tip When creating complex Filter Strings that include customAttrName and customAttrValue pairs as one component of an "or" statement, to prevent NNMi from excluding Nodes that have zero Custom Attributes, use EXISTS or NOT EXISTS criteria for the customAttrName and customAttrValue pair definitions.

Otherwise Nodes that do not have any Custom Attributes are automatically excluded even if they have values that pass other aspects of your filter.

For example, when evaluating the following expression, NNMi includes interfaces with (interface description) ifDesc containing VLAN, and excludes any Interfaces that have the Custom Attribute Role and that Role value is LAN Connection to Oracle Server

(ifDesc like VLAN OR NOT EXISTS((customAttrName=Role AND customAttrValue=LAN Connection to Oracle Server)))

View the expression displayed under Filter String to see the logic of the expression as it is created.

Delete

Deletes the selected expression.

If the Boolean Operator is selected, the Payload Filter Editor deletes all expressions associated with the Boolean Operator.

Configure incident enrichment settings for a node group

[This is the Context-Sensitive Help topic for the Incident Config: Enrichment Tab and form for Interface Settings.]

Node Settings override any other Enrichment settings for this incident, except those configured on the Interface Settings tab.

NNMi enables you to enhanced a specified incident configuration based on the Source Node's participation in a Node Group. The types of items you can fine tune and enhance for a selected incident configuration, include:

  • Category
  • Family
  • Severity
  • Priority
  • Correlation Nature
  • Message
  • Assigned To

You can also enhance the incident configuration based on the Source Object's participation in an Interface Group.

To configure Enrichment settings for a Node Group:

  1. Navigate to the Syslog Message Configuration form:

    1. From the workspace navigation panel, select the Configuration workspace.
    2. Select the Incidents folder.
    3. Select Syslog Message Configurations.
    4. Do one of the following:

      1. To create an incident configuration, click the New icon, and continue.
      2. To edit an incident configuration, select a row, click the Open icon, and continue.
      3. To delete an incident configuration, select a row, and click the  Delete icon.
  1. Select the Node Settings tab.
  2. Do one of the following:
    1. To create a new configuration, click the  New icon.
    2. To edit an existing configuration, select a row, click the Open icon, and continue.
  3. Make sure you configure the basic Node Setting behavior.
  1. Select the Enrichment tab.
  2. Do one of the following:

    1. To create an Enrichment configuration, click the New icon and continue.
    2. To edit an Enrichment configuration, select a row, click the Open icon, and continue.
    3. To delete an Enrichment configuration, select a row and click the  Delete icon.
  3. Configure the desired Enrichment behavior (see the "Enrich Configuration Attributes" table)
  4. Click  Save and Close to save your changes and return to the previous form.
Node Settings Enrichment Configuration Attributes
Name Description
Category

Use the Category attribute to customize the category for this incident configuration. Possible values include:

  • Accounting
  • Application Status
  • Configuration
  • Fault
  • Performance
  • Security
  • Status
Family

Use the Family attribute to customize the Family for this incident configuration. Select from the drop-down list or create a new value. For example, some of the values provided by NNMi include:

  • Address
  • Aggregated Port (Interfaces using Link Aggregation or Split Link Aggregation protocol.)
  • Card
  • Connection
  • Correlation
  • Interface
  • Node
Severity

The incident Severity represents the seriousness calculated for the incident. Use the Severity attribute to specify the severity that should be assigned to the incident you are configuring. Possible values are described below:

Normal - Indicates there are no known problems related to the associated object. This Severity is meant to be informational. Generally, no action is needed for these incidents.

Warning - Indicates there might be a problem related to the associated object.

Minor - Indicates NNMi has detected problems related to the associated object that require further investigation.

Major - Indicates NNMi has detected problems related to the associated object to be resolved before they become critical.

Critical - Indicates NNMi has detected problems related to the associated object that require immediate attention.

Priority

Used to communicate the urgency of resolving the selected incident. You control this value. NNMi sets this value to null by default. The lower the number the higher the priority.

Possible values are:

None

Low 

Medium

High 

Top

Note: The icons are displayed only in table views.

Correlation Nature

Use the Correlation Nature to customize the Correlation Nature for this incident configuration. Possible values include:

  • Info
  • None
  • Root Cause (or User Root Cause)

    Tip When using Incident views:

    •  Root Cause value = determined by NNMi's Causal Engine
    •  User Root Cause = your NNMi administrator configured NNMi to always treat this Incident as Correlation Nature: Root Cause
  • Secondary Root Cause
  • Symptom
  • Stream Correlation
  • Service Impact
  • Dedup Stream Correlation
  • Rate Stream Correlation
Message Format

When configuring an incident, specify how the incident message appears in the incident view. The string you specify in the Message Format attribute is visible in an incident view.

The incident message limit is 1024 characters. If you exceed this limit, NNMi truncates the value starting from the right.

You can use any combination of default and custom attributes.

Assigned To

Use to specify the owner of any incident generated for this incident configuration.

Click the  Lookup icon and select  Quick Find to select a valid user name.

Note You can also begin to type a valid user name and use the auto-complete feature to select the user name of interest.

Description

Use the Description attribute to provide additional information that you want to note about the current enhancement configuration. This description applies only to the enhancement configuration and does not appear when NNMi displays any associated incident.

Type a maximum of 1024 characters. Alpha-numeric and special characters (~ ! @ # $ % ^ & * ( ) _+ -) are permitted.

Configure custom incident attributes to enrich an incident configuration

The Custom Incident Attributes (CIAs) tab enables you to specify additional CIAs to be saved with an incoming incident. The persisted data might then be used as an argument to an action for the incident.

When creating a CIA for an incident configuration, you can specify any of the following values:

  • Custom Attribute on the source node
  • Custom Attribute on the interface (source object)

You also specify the Custom Incident Attribute name that will store this information.

To create a Custom Incident Attribute to enrich an incident configuration:

  1. Navigate to the Syslog Message Configuration form:

    1. From the workspace navigation panel, select the Configuration workspace.
    2. Expand the Incidents folder.
    3. Select Syslog Message Configurations.
    4. Do one of the following:
      1. To create an incident configuration, click the New icon, and continue.
      2. To edit an incident configuration, select a row, click the Open icon, and continue.
      3. To delete an incident configuration, select a row, and click the  Delete icon.
  1. Select the Node Settings tab.
  2. Do one of the following:

    1. To create a new configuration, click the  New icon.
    2. To edit an existing configuration, select a row, click the Open icon, and continue.
  3. Make sure you configure the basic Node Setting behavior.
  1. Select the Enrichment tab.
  2. Do one of the following:

    1. To create an Enrichment configuration, click the New icon, and continue.
    2. To edit an Enrichment configuration, select a row, click the  Open icon, and continue.
    3. To delete an Enrichment configuration, select a row and click the  Delete icon.
  1. Make sure the Enrichment settings are configure.
  1. Navigate to the Custom Incident Attributes tab.
  2. Do one of the following:

    1. To create a Custom Incident Attribute, click the New icon, and continue.
    2. To edit a Custom Incident Attribute, select a row, click the  Open icon, and continue.
    3. To delete a Custom Incident Attribute, select a row and click the  Delete icon.
  3. Configure the Custom Incident Attribute (see the "Custom Incident Attribute" table).
  4. Click  Save and Close to save your changes and return to the previous form.
Custom Incident Attribute
Name Description
Custom Incident Attribute Name

Name used to identify the Custom Incident Attribute you are configuring. The name limit is 255 characters. Alpha-numeric characters are permitted. No spaces or special characters (~ ! @ # $ % ^ & * ( ) _+ -) are permitted.

Make sure to note this name if you plan to filter on the value using the Payload Filter tab.

Type

Specifies whether you are using a Custom Attribute on a node or a Custom Attribute on an interface. Possible values are:

  • Node Custom Attribute
  • Interface Custom Attribute
Custom Attribute Name

Used to determine the value to be assigned to the Custom Incident Attribute you are configuring. Enter either of the following:

  • Name of the Custom Attribute on the source node
  • Name of the Custom Attribute on the interface (source object)

Configure a Payload filter to enrich an incident configuration

The Payload Filter Editor enables you to create expressions that further refine the filters used to select the incidents to be enriched. Make sure to design any complex Payload Filters offline as a Boolean expression first. This method can help to minimize errors when entering your expressions using the Payload Filter editor.

To create a Payload Filter expression:

  1. Navigate to the Syslog Message Configuration form:

    1. From the workspace navigation panel, select the Configuration workspace.
    2. Expand the Incidents folder.
    3. Select Syslog Message Configurations.
    4. Do one of the following:

      1. To create an incident configuration, click the New icon, and continue.
      2. To edit an incident configuration, select a row, click the  Open icon, and continue.
      3. To delete an incident configuration, select a row, and click the  Delete icon.
  2. Select the Node Settings tab.
  3. Do one of the following:

    1. To create a new configuration, click the   New icon.
    2. To edit an existing configuration, double-click the row representing the configuration you want to edit.
  4. Make sure you configure the basic Node Setting behavior.
  1. Select the Enrichment tab.
  2. Do one of the following:

    1. To create an Enrichment configuration, click the New icon, and continue.
    2. To edit an Enrichment configuration, select a row, click the  Open icon, and continue.
    3. To delete an Enrichment configuration, select a row and click the  Delete icon.
  1. Make sure you configure the Enrichment settings.
  1. Select the Payload Filter tab.
  2. Define your Payload Filter (see table).

    1. Plan out the logic needed for your Filter String.
    2. Use the buttons on the bottom half of the Additional Filters Editor to establish the logic structure.

      For example, to establish the following structure, click AND, then AND, and then OR:

      (( ) AND ( ))

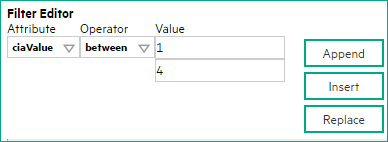
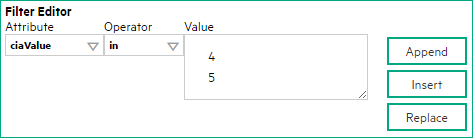
    3. Now place your cursor in a location within the displayed Filter String, and use the top half of the filter editor to define the parameters of the highlighted filter requirement.

      For example, select a set of parentheses and use the Insert button to specify the filter requirement within those parentheses:

  3. Click  Save and Close.
  4. Click  Save and Close to save your changes and return to the previous form.
Payload Filter Editor Settings
Attribute Description
Attribute

The attribute name on which NNMi searches. Filterable attributes include the following:

  • ciaName
  • ciaValue

Note When you use ciaName and ciaValue in a Payload Filter, you must enter the ciaName and ciaValue as a pair. For example: (ciaName =.1.3.6.1.4.1.9.9.13.1.2.1.7 ) AND ( (ciaValue = 4) OR ( ciaValue = 5)) is not supported.

Operator

Valid operators are described below.

  • = Finds all values equal to the value specified.

    Example: ciaName = .1.3.6.1.4.1.9.9.13.1.2.1.7 matches any incident that contains a varbind with the name value .1.3.6.1.4.1.9.9.13.1.2.1.7.

  • != Finds all values not equal to the value specified.

    Example: ciaName != .1.3.6.1.4.1.9.9.13.1.2.1.7 matches any incident that contains a varbind with the name value other than 1.3.6.1.4.1.9.9.13.1.2.1.7.

  • < Finds all values less than the value specified.

    Example: ciaValue < 6 matches any incident with a varbind value less than 6.

  • <= Finds all values less than or equal to the value specified.

    Example: ciaValue <= 6 matches any incident with a varbind value less than or equal to 6.

  • > Finds all values greater than the value specified.

    Example: ciaValue > 4 matches any incident with a varbind value greater than 4.

  • >= Finds all values greater than or equal to the value specified.

    Example: ciaValue >= 4 matches any incident that contains a varbind with values greater than or equal to 4.

  • between Finds all traps or events that include a varbind with a value equal to and between the two values specified.

    Example: ciaValue between

    matches any incident that contains a varbind value equal to or greater than 1 and equal to or less than 4.

    As shown in the example, each value must be entered on a separate line.

  • in Finds any match to at least one value in a list of values.

    Example:

    ciaValue in

    matches any incident with a varbind value of either 4 or 5.

    As shown in the example, each value must be entered on a separate line.

    NNMi displays the list of attributes using comma-separated values enclosed in parentheses, for example (4, 5). However, the comma-separated list is used only for display purposes. The actual delimiter is the new line.

  • is not null Finds all non-blank values.

    Example: ciaValue is not null matches any incident with a varbind that contains a value.

  • is null Finds all blank values.

    Example: ciaValue is null matches any incident with a varbind that does not have a value.

  • like Finds matches using wildcard characters. Click here for more information about using wildcard characters.

    The period asterisk (.*) characters mean any number of characters of any type at this location.

    The period (.) character means any single character of any type at this location.

    Note To include literal string values in the Value attribute, enclose the string value in \Q<literal_value>\E as shown in the Examples listed below.

    Examples:

    ciaName like  \Q.1.3.6.1.4.1.9.9\E.* finds all traps or events that contain varbind names that begin with .1.3.6.1.4.1.9.9 and (optionally) end with any number of characters.

    ciaValue like .*Chicago.* finds all traps or events that contain a varbind value that includes the string Chicago.

  • not between Finds all values except those between the two values specified.

    Example: ciaValue not between 5 8 matches an incident that contains a varbind with the values less than 5 or greater than 8.

  • not in Finds all values except those included in the list of values.

    Example:

    ciaValue not in

    matches any incident that contains a varbind with values other than 1 and 2.

    As shown in the example, each value must be entered on a separate line.

    NNMi displays the list of attributes using comma-separated values enclosed in parentheses, for example, (1, 2). However, the comma-separated list is used only for display purposes. The actual delimiter is the new line.

  • not like Finds all that do not have the values specified (using wildcard strings).

    The period asterisk (.*) characters mean any number of characters of any type at this location.

    The period (.) character means any single character of any type at this location.

    Note To include literal string values in the Value attribute, enclose the string value in \Q<literal_value>\E as shown in the Examples listed below.

    Example:

    ciaName not like \Q.1.3.6.1.4.1.9.9\E.* matches any incident that contains a varbind name value that does not begin with .1.3.6.1.4.1.9.9.

    ciaValue not like .*Chicago.* finds all traps or events that do not contain a varbind value that includes the string Chicago.

Value

The value for which you want NNMi to search.

  • The values you enter are case sensitive.
  • NNMi displays a variable number of value fields depending on the Operator selected. For example, the between Operator causes two value fields to be displayed.
  • The between, in and not in operators require that each value be entered on a separate line.
Additional Filters Editor Buttons
Button Description
Append Appends the current expression (Attribute, Operator, and Value) to the selected expression already included in the Filter String.
Insert Inserts the current expression (Attribute, Operator, and Value) in front of the cursor location within the Filter String.
Replace Replaces the selected expression with the expression displayed in the Attribute, Operator, and Value fields.
AND

Appends, inserts, or replaces the AND Boolean Operator in the selected cursor location.

View the expression displayed under Filter String to see the logic of the expression as it is created.

OR

Appends, Inserts, or replaces the OR Boolean Operator in the current cursor location.

View the expression displayed under Filter String to see the logic of the expression as it is created.

NOT

Can be used in any part of the Filter String to specify that NNMi should exclude interfaces with values that pass the expression that immediately follows the NOT.

For example, when evaluating the following expression, NNMi includes interfaces with (interface description) ifDesc containing VLAN, and excludes any Interfaces that have VLAN10 for the (interface name) ifName value:

(ifDesc like VLAN AND NOT (ifName=VLAN10))

View the expression displayed under Filter String to see the logic of the expression as it is created .

EXISTS

Used for filters that include Capabilities or Custom Attribute names and values in the Filer String.

Indicates that you want NNMi to consider interfaces that have Capabilities or Custom Attributes when evaluating the Filter String.

Tip When creating complex Filter Strings that include customAttrName and customAttrValue pairs as one component of an "or" statement, to prevent NNMi from excluding Nodes that have zero Custom Attributes, use EXISTS or NOT EXISTS criteria for the customAttrName and customAttrValue pair definitions.

Otherwise Nodes that do not have any Custom Attributes are automatically excluded even if they have values that pass other aspects of your filter.

For example, when evaluating the following Filter String, NNMi includes interfaces with (interface description) ifDesc containing VLAN, as well as any Interfaces Custom Attribute Role value is LAN Connection to Oracle Server:

(ifDesc like VLAN OR EXISTS((customAttrName=Role AND customAttrValue=LAN Connection to Oracle Server)))

View the expression displayed under Filter String to see the logic of the expression as it is created.

NOT EXISTS

Used for filters that include Capabilities or Custom Attribute names and values in the Filer String. Indicates that you want NNMi to consider interfaces that do not have any Capabilities or Custom Attributes when evaluating the Filter String, but exclude the interfaces that match the expression that follows the NOT EXISTS.

Tip When creating complex Filter Strings that include customAttrName and customAttrValue pairs as one component of an "or" statement, to prevent NNMi from excluding Nodes that have zero Custom Attributes, use EXISTS or NOT EXISTS criteria for the customAttrName and customAttrValue pair definitions.

Otherwise Nodes that do not have any Custom Attributes are automatically excluded even if they have values that pass other aspects of your filter.

For example, when evaluating the following expression, NNMi includes interfaces with (interface description) ifDesc containing VLAN, and excludes any Interfaces that have the Custom Attribute Role and that Role value is LAN Connection to Oracle Server:

(ifDesc like VLAN OR NOT EXISTS((customAttrName=Role AND customAttrValue=LAN Connection to Oracle Server)))

View the expression displayed under Filter String to see the logic of the expression as it is created.

Delete

Deletes the selected expression.

If the Boolean Operator is selected, the Additional Filters Editor deletes all expressions associated with the Boolean Operator.

Configure incident dampening settings for a node group

Node Settings override any other Dampening settings for this incident, except those configured on the Interface Settings tab.

NNMi enables you to delay the following for an incident configuration based on the Source Node's participation in a Node Group:

  • Execution of Incident Actions
  • Execution of Diagnostics

    Requires Network Node Manager iSPI Network Engineering Toolset Software (NNM iSPI NET) and requires installation of a Diagnostic Server.
  • Appearance within Incident views in the NNMi Console

You can configure the Dampening settings based on the Source Object's participation in an Interface Group.

When using the Dampening configuration, note the following: 

  • NNMi initially assigns incidents with Dampening settings configured a Lifecycle State of DAMPENED.
  • After the dampen interval has passed, NNMi changes the Lifecycle State to REGISTERED.

To configure the Dampening settings based on a Node Group:

  1. Navigate to the Syslog Message Configuration form:

    1. From the workspace navigation panel, select the Configuration workspace.
    2. Expand the Incidents folder.
    3. Select Syslog Message Configurations.
    4. Do one of the following:

      1. To create an incident configuration, click the New icon, and continue.
      2. To edit an incident configuration, select a row, click the Open icon, and continue.
      3. To delete an incident configuration, select a row, and click the  Delete icon.
  2. Select the Node Settings tab.
  1. Do one of the following:
    1. To create a new configuration, click the  New icon.
    2. To edit an existing configuration, select a row, click the Open icon, and continue.
  2. Make sure you configure the basic Node Setting behavior.
  1. Select the Dampen tab.
  2. Configure the desired Dampen behavior (see the table below).
  3. Click  Save and Close to save your changes and return to the previous form.
Node Settings Dampen Attributes
Name Description
Enable

Use this attribute to temporarily disable an incident's Dampening settings:

Disable  = Temporarily disable the selected configuration.

Enable  = Enable the selected configuration.

Hour Specifies the number of hours to be used for the dampen interval.
Minutes

Specifies the number of minutes to be used for the dampen interval.

The maximum dampen interval is 60 minutes.

Seconds Specifies the number of seconds to be used for the dampen interval.
Payload Filter

The Payload Filter Editor enables you to create expressions that further refine the filters used to select the incidents to be suppressed, enriched, or dampened. Make sure to design any complex Payload Filters offline as a Boolean expression first. This method can help to minimize errors when entering your expressions using the Payload Filter editor.

When creating a Payload Filter, note the following:

  • Payload Filter expressions for the like and not like operators use the syntax defined for java regular expressions (java.util.regex Pattern class).
  • You must use a ciaName that already exists in the trap or event you are configuring.
  • Each set of expressions associated with a Boolean Operator is treated as if it were enclosed in parentheses and evaluated together.
  • View the expression displayed under Filter String to see the logic of the expression as it is created.
  • The AND and OR Boolean Operators must contain at least two expressions as shown in the example below.

    The following example filters incidents on voltage state:

    AND
        ciaName = .1.3.6.1.4.1.9.9.13.1.2.1.7
        ciaValue = 5

    NNMi evaluates the expression above as follows:

    (ciaName = .1.3.6.1.4.1.9.9.13.1.2.1.7 AND ciaValue = 5)

    NNMi finds all incidents with a varbind .1.3.6.1.4.1.9.9.13.1.2.1.7 value of 5.

    When you use ciaName and ciaValue in a Payload Filter, you must enter the ciaName and ciaValue as a pair as shown in the preceding example.

  • The placement of your cursor and the subsequent text that is selected is important when performing operations using the Payload Filter Editor. For example, you append to, replace, or change the indentation of the expression that is selected.
  • The placement of your cursor and the subsequent text that is selected is especially important when adding your Boolean operators.
  • You can include more than one varbind in the same Payload Filter expression as shown in the following example:

    ((ciaName like \Q.1.3.6.1.4.1.9.9\E.* AND ciaValue = 25) AND (ciaName like \Q.1.3.6.1.2.1.2.2.1.1.3\E.* AND ciaValue = 3))

    In this example, a given trap must meet each of the following criteria:

    • Contain a varbind whose Object Identifier (OID) matches the regular expression \Q.1.3.6.1.4.1.9.9\E.* and has a value of 25.
    • Contain a varbind whose OID matches the regular expression \Q.1.3.6.1.2.1.2.2.1.1.3\E.* and has a value of 3.


Payload Filter Editor Settings
Attribute Description
Attribute

The attribute name on which NNMi searches. Filterable attributes include the following:

  • ciaName
  • ciaValue
  • sourceName

When you use ciaName and ciaValue in a Payload Filter, you must enter the ciaName and ciaValue as a pair. For example: (ciaName =.1.3.6.1.4.1.9.9.13.1.2.1.7 ) AND ( (ciaValue = 4) OR ( ciaValue = 5)) is not supported.

The sourceName value must be the name of the node as displayed on the node form and not the host name or management address.

Operator

Valid operators are described below.

  • = Finds all values equal to the value specified.

    Example: ciaName=.1.3.6.1.4.1.9.9.13.1.2.1.7 matches any incident that contains a varbind with the name value of .1.3.6.1.4.1.9.9.13.1.2.1.7.

  • != Finds all values not equal to the value specified.

    Example: ciaName! = .1.3.6.1.4.1.9.9.13.1.2.1.7 matches any incident that contains a varbind with a name value other than 1.3.6.1.4.1.9.9.13.1.2.1.7.

  • < Finds all values less than the value specified.

    Example: ciaValue < 6 matches any incident that contains a varbind with a value less than 6.

  • <= Finds all values less than or equal to the value specified.

    Example: ciaValue <= 6 matches any incident that contains a varbind with a value less than or equal to 6.

  • > Finds all values greater than the value specified.

    Example: ciaValue > 4 matches any incident that contains a varbind with a value greater than 4.

  • >= Finds all values greater than or equal to the value specified.

    Example: ciaValue >= 4 matches any incident that contains a varbind with values greater than or equal to 4.

  • between Finds all values equal to and between the two values specified.

    Example: ciaValue between

    matches any incident that contains a varbind value equal to or greater than 1 and equal to or less than 4.

    As shown in the example, each value must be entered on a separate line.

  • in Finds any match to at least one value in a list of values.

    Example:

    ciaValue in

    matches any incident with a varbind value of either 4 or 5.

    As shown in the example, each value must be entered on a separate line.

    NNMi displays the list of attributes using comma-separated values enclosed in parentheses, for example (4, 5). However, the comma-separated list is used only for display purposes. The actual delimiter is the new line.

  • is not null Finds all non-blank values.

    Example: ciaValue is not null matches any incident with a varbind that contains a value.

  • is null Finds all blank values.

    Example: ciaValue is null matches any incident with a varbind that does not contain a value.

  • like Finds matches using the syntax defined for java regular expressions. See the Pattern (Java Platform SE6) API documentation at:
    http://download.oracle.com/javase/6/docs/api/java/util/regex/Pattern.html for more information. Click here for more information.

    The period asterisk (.*) characters mean any number of characters of any type at this location.

    The period (.) character means any single character of any type at this location.

    To include literal string values in the Value attribute, enclose the string value in \Q<literal_value>\E as shown in the Examples listed below.

    Example:

    ciaName like \Q.1.3.6.1.4.1.9.9\E.* matches any incident that contains a varbind name value that begins with 1.3.6.1.4.1.9.9 and (optionally) ends with any number of characters.

    ciaValue like .*Chicago.* finds all traps or events that contain a varbind value that includes the string Chicago.

  • not between Finds all values except those between the two values specified.

    Example: ciaValue not between 5 8 matches an incident that contains a varbind with the values less than 5 or greater than 8 .

  • not in Finds all values except those included in the list of values.

    Example:

    ciaValue not in

    matches any incident that contains a varbind with values other than 1 and 2.

    As shown in the example, each value must be entered on a separate line.

    NNMi displays the list of attributes using comma-separated values enclosed in parentheses, for example, (1, 2). However, the comma-separated list is used only for display purposes. The actual delimiter is the new line.

  • not like Finds all that do not have the values specified using the syntax defined for Java regular expressions. See the Pattern (Java Platform SE6) API documentation at:
    http://download.oracle.com/javase/6/docs/api/java/util/regex/Pattern.html for more information.

    The period asterisk (.*) characters mean any number of characters of any type at this location.

    The period (.) character means any single character of any type at this location.

    To include literal string values in the Value attribute, enclose the string value in \Q<literal_value>\E as shown in the Examples listed below.

    Example:

    ciaName not like \Q.1.3.6.1.4.1.9.9\E.* matches any incident that contains a varbind name value that does not begin with .1.3.6.1.4.1.9.9 and (optionally) ends with any number of characters.

    ciaValue not like .*Chicago.* finds all traps or events that do not contain a varbind value that includes the string Chicago.

Value

The value for which you want NNMi to search.

Note the following:

  • The values you enter are case sensitive.

  • NNMi displays a variable number of value fields depending on the Operator selected. For example, the between Operator causes two value fields to be displayed.
  • The between, in and not in operators require that each value be entered on a separate line.


Payload Filter Editor Buttons
Button Description
Append Appends the current expression (Attribute, Operator,and Value) to the selected expression already included in the filter string.
Insert Inserts the current expression (Attribute, Operator,and Value) in front of the cursor location within the Filter String.
Replace Replaces the selected expression with the expression displayed in the Attribute, Operator, and Value fields.
AND

Inserts the AND Boolean Operator in the selected cursor location.

View the expression displayed under Filter String to see the logic of the expression as it is created.

OR

Inserts the OR Boolean Operator in the current cursor location.

View the expression displayed under Filter String to see the logic of the expression as it is created.

NOT

Can be used in any part of the Filter String to specify that NNMi should exclude interfaces with values that pass the expression that immediately follows the NOT.

For example, when evaluating the following expression, NNMi includes interfaces with (interface description) ifDesc containing VLAN, and excludes any Interfaces that have VLAN10 for the (interface name) ifName value: 

(ifDesc like VLAN AND NOT (ifName=VLAN10)) 

View the expression displayed under Filter String to see the logic of the expression as it is created.

EXISTS

Used for filters that include Capabilities or Custom Attribute names and values in the Filer String.

Indicates that you want NNMi to consider interfaces that have Capabilities or Custom Attributes when evaluating the Filter String.

Tip When creating complex Filter Strings that include customAttrName and customAttrValue pairs as one component of an "or" statement, to prevent NNMi from excluding Nodes that have zero Custom Attributes, use EXISTS or NOT EXISTS criteria for the customAttrName and customAttrValue pair definitions.

Otherwise Nodes that do not have any Custom Attributes are automatically excluded even if they have values that pass other aspects of your filter.

For example, when evaluating the following Filter String, NNMi includes interfaces with (interface description) ifDesc containing VLAN, as well as any Interfaces Custom Attribute Role value is LAN Connection to Oracle Server

(ifDesc like VLAN OR EXISTS((customAttrName=Role AND customAttrValue=LAN Connection to Oracle Server)))

View the expression displayed under Filter String to see the logic of the expression as it is created.

NOT EXISTS

Used for filters that include Capabilities or Custom Attribute names and values in the Filer String. Indicates that you want NNMi to consider interfaces that do not have any Capabilities or Custom Attributes when evaluating the Filter String, but exclude the interfaces that match the expression that follows the NOT EXISTS.

Tip When creating complex Filter Strings that include customAttrName and customAttrValue pairs as one component of an "or" statement, to prevent NNMi from excluding Nodes that have zero Custom Attributes, use EXISTS or NOT EXISTS criteria for the customAttrName and customAttrValue pair definitions.

Otherwise Nodes that do not have any Custom Attributes are automatically excluded even if they have values that pass other aspects of your filter.

For example, when evaluating the following expression, NNMi includes interfaces with (interface description) ifDesc containing VLAN, and excludes any Interfaces that have the Custom Attribute Role and that Role value is LAN Connection to Oracle Server

(ifDesc like VLAN OR NOT EXISTS((customAttrName=Role AND customAttrValue=LAN Connection to Oracle Server)))

View the expression displayed under Filter String to see the logic of the expression as it is created.

Delete

Deletes the selected expression.

If the Boolean Operator is selected, the Payload Filter Editor deletes all expressions associated with the Boolean Operator.

Configure incident actions for a node group

Node Settings override any other Actions settings for this incident, except those configured on the Interface Settings tab. NNMi enables you to configure incident actions based on a Source Node's participation in a Node Group.

You can configure actions to automatically run at any point in the incident lifecycle. For example, you might want to configure an action to occur when an incident of the type you are configuring is generated (Registered). When an incident is generated, you might want to automatically open a trouble ticket or send email or page your network operator. After the incident is Closed, you might want to automatically close the trouble ticket.

Note Your actions will not be executed until you enable the Actions configuration by either clicking Enable on the Actions tab or using the Actions → Enable Configuration option.

You can configure actions for incidents generated from SNMP traps, Syslog Messages (ArcSight only) and the NNMi Management Events. Any time an incident configuration changes, the action directory is rescanned and any Jython files are reloaded to the NNMi database.

Tip Copy any required Jython files to the NNMi actions directory before you configure an incident action. New or updated actions are loaded into NNMi only when an incident configuration is updated or created.

When the defined Incident Action runs, output is logged to the incidentActions.*.*.log file.

To configure an automatic action for an incident: 

  1. Navigate to the Syslog Message Configuration tab.

    1. From the workspace navigation panel, select the Configuration workspace.
    2. Select the Incidents folder.
    3. Select Syslog Message Configurations.
    4. Do one of the following:

      1. To create a new incident configuration, click the  New icon.
      2. To edit an existing incident configuration, select a row, click the Open icon, and continue.
  2. Select the Node Settings tab.
  3. Do one of the following:

    1. To create a new configuration, click the  New icon.
    2. To edit an existing configuration, double-click the row representing the configuration you want to edit.
  4. Make sure you configure the basic Node Setting behavior.
  5. Select the Actions tab.
  6. From the Lifecycle Actions table toolbar, do one of the following:

    • To create an Action configuration, click the  New icon, and continue.
    • To edit an Action configuration, double-click the row representing the configuration you want to edit, and continue.
    • To delete an Action configuration, select a row, and click the  Delete icon.
  7. In the Lifecycle Transition Action Form (Management Events), provide the required information. 
  8. Click  Save and Close to save your changes and return to the Syslog Message Configuration form.

    The next time the lifecycle changes, NNMi launches the action associated with the lifecycle for the incident of that type.

Configure diagnostics selections for a node group

Requires Network Node Manager iSPI Network Engineering Toolset Software (NNM iSPI NET) and requires installation of a Diagnostic Server.

Node Settings override any other Diagnostics Selections settings for this incident, except those configured on the Interface Settings tab.

The Diagnostic Selections form enables you to configure NNMi to automatically gather NNM iSPI NET diagnostic information for the Incident you are configuring. When using this form, you specify the diagnostics you want to run on each applicable node in the specified Node Group.

To configure Diagnostics to run on a Source Node for an incident:

  1. Navigate to the Diagnostics Selection form.

    1. From the workspace navigation panel, select the Configuration workspace.
    2. Expand the Incidents folder.
    3. Select Syslog Message Configurations.
    4. Do one of the following:

      • To create an Incident configuration, click the  New icon.
      • To edit an Incident configuration, select a row, click the Open icon, and continue.
    5. Navigate to Node Settings tab, and do one of the following:

      • To create a Node Settings configuration, click the  New icon.
      • To edit a Node Settings configuration, select a row, click the Open icon, and continue.
      • To delete a Node Settings configuration, select the Node setting, and click the  Delete icon.
    6. Navigate to the Diagnostic Selection tab, and do one of the following:

      • To create a Diagnostic Selection setting, click the  New icon, and continue.
      • To edit a Diagnostic Selection setting, select a row, click the Open icon, and continue.
      • To delete a Diagnostic Selection setting, select a row, and click the  Delete icon.
  2. Provide the required information (see table).
  3. Click  Save and Close to save your changes and return to the previous form.

After you configure the Diagnostic for the incident and Node Group, the Diagnostic must match the following criteria before the Diagnostic runs:

  • The Source Node must be in the specified Node Group.
  • The Diagnostic must be valid for the Source Node. (For example, only Nortel switch Diagnostics are run on Nortel switches.)
  • The incident’s current lifecycle state must match a lifecycle state for which it was configured. (For example, if you configure the Incident to run a specified Diagnostic when the incident is Closed, then if the current Incident's Lifecycle State is Closed, NNMi runs that Diagnostic.)

If a Source Node is in more than one Node Group, the Diagnostic is only run on the node the first time NNMi finds a match for that Source Node based on  the configuration Ordering field.

If these criteria are met, NNM iSPI NET runs the Diagnostics and generates Diagnostic reports to help you solve the problem on the Source Node.

After you configure Diagnostics for an incident, you can also run Diagnostics and access the Diagnostics reports on demand, using Actions > Run Diagnostics in the Incident form. The same criteria apply (see the criteria above).

You can also right-click any object in a table or map view to access the items available within the Actions menu.

You can also run and access Diagnostics reports from a Node form.

Diagnostic Settings Attributes
AttributeDescription
Flow Definition

Select the Diagnostic (Flow Definition) you want to use for the specified Node Group.

Click the Lookup icon and choose one of the following options:

  •  Show Analysis to display Analysis Pane information for the Flow Definition name displayed.
  •  Quick Find to view the list of possible diagnostic Flow Definitions.

NNMi provides diagnostics for the following types of devices:  

    • Cisco switch
    • Cisco router
    • Cisco switch/router
    • Nortel switch
Lifecycle State

Incident Lifecycle State of the target Incident.

If the incident's Lifecycle State matches the value specified here, the Diagnostic runs.

The Diagnostic automatically runs on each applicable Source Node in the specified Node Group if the incident has the Lifecycle State currently configured in this attribute of the Diagnostic (Flow Definition - set of automated commands).

Enable

Use this attribute to temporarily disable an incident's Diagnostics settings:

Disable  = Temporarily disable the selected configuration.

Enable  = Enable the selected configuration.

Related topics