


Pairwise Batch Incident Configuration
This topic includes the following sections:
Introduction
This whitepaper uses examples to document pairwise functionality and batch incident configuration tools available in NNMi.
Pairwise
This section includes two examples that document pairwise functionality. The first example involves trap pairing using the same trap yet having different varbinds to differentiate the meaning of the trap. The second example describes a trap pairing with two other traps. (Prior to NNMi 9.20, a trap could only be involved in a single pairing.) This example includes the use of the “time duration” feature and the “delete when canceled” feature.
Pairwise Example 1 (Same Trap with Different Varbinds)
Initial Preparation
Set up the NNMi management server to receive the traps of interest. This example uses traps from Ascend Communications. This was selected because it is a MIB not shipped with NNMi, which allows this example to illustrate many preparation steps. The sequence of traps and varbinds shown may not represent an actual sequence. All traps are sent using NNMi command line scripts rather than an actual network device.
Load the MIBs and the Traps
-
Load the dependent MIBs using the nnmloadmib.ovpl command. The dependent MIBs include the following:
– IF-MIB.mib
– RFC1213-MIB.mib
– ASCEND-MIB.mib
– ASCEND-CHASSIS-MIB.mib
– ASCEND-RADIUS-MIB.mib
– ASCEND-MCAST-MIB.mib
– ASCEND-LANMODEM-MIB.mib
– ASCEND-SESSION-MIB.mib
– ASCEND-POWER-SUPPLY-MIB.mib
– ASCEND-MULTI-SHELF-MIB.mib
– ASCEND-ATMP-MIB.mib
– ASCEND-RESOURCES-MIB.mib
– ASCEND-WATCHDOG-MIB.mib
– ASCEND-CALL-LOGGING-MIB.mib
– ASCEND-VOIP-MIB.mib
– ASCEND-CALL-LOGGING-MIB.mib
– ASCEND-ADVANCED-AGENT-MIB.mib
– RFC-1215.mib
– ASCEND-MGSTAT-MIB.mib
– ASCEND-SPARING-MIB.mib
-
After loading the dependent MIBs, load the desired MIB (ASCEND-TRAP.mib) as shown.
# nnmloadmib.ovpl -load ASCEND-TRAP.mib Successfully completed operation LoadMib.
45 Traps were loaded.
-
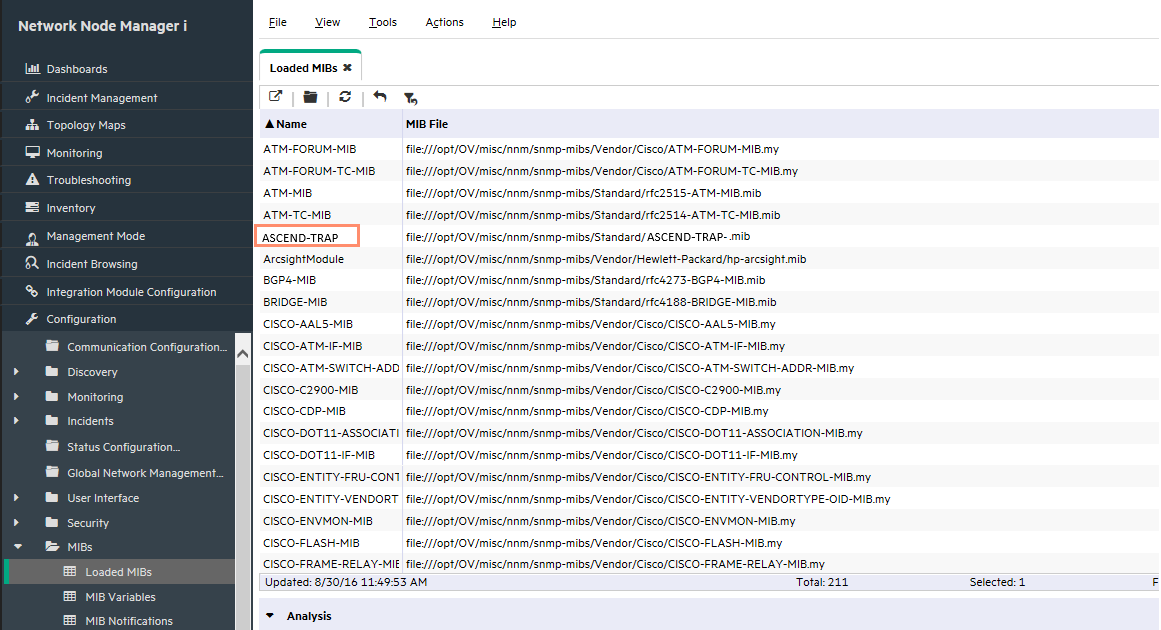
The output indicates that 45 traps were loaded; however, they are not completely ready for use. You must first obtain the name of the MIB module using the NNMi console. Navigate to the Configuration workspace and select Loaded MIBs. Then locate the module name associated with the MIB file just loaded. You can see in the following figure that the module name is ASCEND-TRAP.
-
Load the traps using the nnmincidentcfg.ovpl command along with the module name as shown in the following:
# nnmincidentcfg.ovpl -loadTraps ASCEND-TRAP
SNMP trap(s) from mib module loaded: ASCEND-TRAP.
Number of traps: 45.
The following traps were added to incident configuration:
wanLineStateChange - .1.3.6.1.4.1.529.0.40
portConnected - .1.3.6.1.4.1.529.0.7
callLogDroppedPkt - .1.3.6.1.4.1.529.0.41
multicastHeartBeatMonitor - .1.3.6.1.4.1.529.0.19
maxTelnetAttempts - .1.3.6.1.4.1.529.0.15
powerSupplyStateChange - .1.3.6.1.4.1.529.0.23
atmpAgentErrorRecvTrap - .1.3.6.1.4.1.529.0.29
portWaiting - .1.3.6.1.4.1.529.0.6
radiusServerChange - .1.3.6.1.4.1.529.0.18
powerSupplyOperationalStateChange - .1.3.6.1.4.1.529.0.24
consoleStateChange - .1.3.6.1.4.1.529.0.12
dirdoListFailure - .1.3.6.1.4.1.529.0.21
portAcrPending - .1.3.6.1.4.1.529.0.10
lanModemMovedToSuspectList - .1.3.6.1.4.1.529.0.20
atmpMaxTunnelExceeded - .1.3.6.1.4.1.529.0.27
sysSlotStateChange - .1.3.6.1.4.1.529.0.22
suspectAccessResource - .1.3.6.1.4.1.529.0.34
portWaitSerial - .1.3.6.1.4.1.529.0.2
portCollectDigits - .1.3.6.1.4.1.529.0.5
sdtnPrimaryListEmptyTrap - .1.3.6.1.4.1.529.0.31
megacoLinkStatusTrap - .1.3.6.1.4.1.529.0.42
portCarrier - .1.3.6.1.4.1.529.0.8
portUseExceeded - .1.3.6.1.4.1.529.0.13
sparingIfStatusChange - .1.3.6.1.4.1.529.0.44
portRinging - .1.3.6.1.4.1.529.0.4
portLoopback - .1.3.6.1.4.1.529.0.9
controllerSwitchoverTrap - .1.3.6.1.4.1.529.0.37
voipGkChange - .1.3.6.1.4.1.529.0.39
portDteNotReady - .1.3.6.1.4.1.529.0.11
watchdogWarningTrap - .1.3.6.1.4.1.529.0.35
callLogServChange - .1.3.6.1.4.1.529.0.38
eventTableOverwrite - .1.3.6.1.4.1.529.0.16
portDualDelay - .1.3.6.1.4.1.529.0.1
systemUseExceeded - .1.3.6.1.4.1.529.0.14
sysConfigChangeTrap - .1.3.6.1.4.1.529.0.30
portInactive - .1.3.6.1.4.1.529.0.0
cntrReduAvailTrap - .1.3.6.1.4.1.529.0.45
atmpAgentErrorSentTrap - .1.3.6.1.4.1.529.0.28
sysLastRestartReasonTrap - .1.3.6.1.4.1.529.0.26
sparingSlotStatusChange - .1.3.6.1.4.1.529.0.43
slotCardResetTrap - .1.3.6.1.4.1.529.0.36
systemClockDrifted - .1.3.6.1.4.1.529.0.33
sdtnSecondaryListEmptyTrap - .1.3.6.1.4.1.529.0.32
multiShelfStateChange - .1.3.6.1.4.1.529.0.25
portHaveSerial - .1.3.6.1.4.1.529.0.3
The traps are now completely loaded into NNMi.
Configure Trap Format
In this section, you can see that the different varbind values differentiate the pairwise behavior.
-
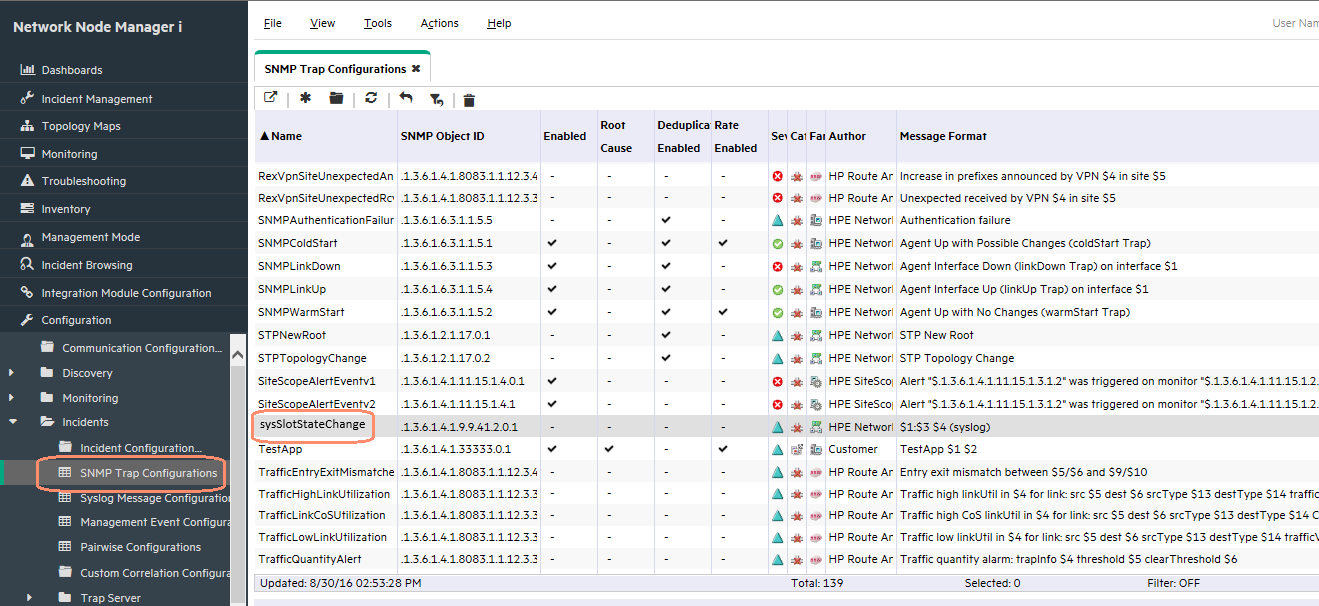
Configure the format of the sysSlotStateChange trap (the example trap) to better see the varbind values. In the Configuration workspace, expand the Incidents folder, select SNMP Trap Configurations, and double-click sysSlotStateChange.
-
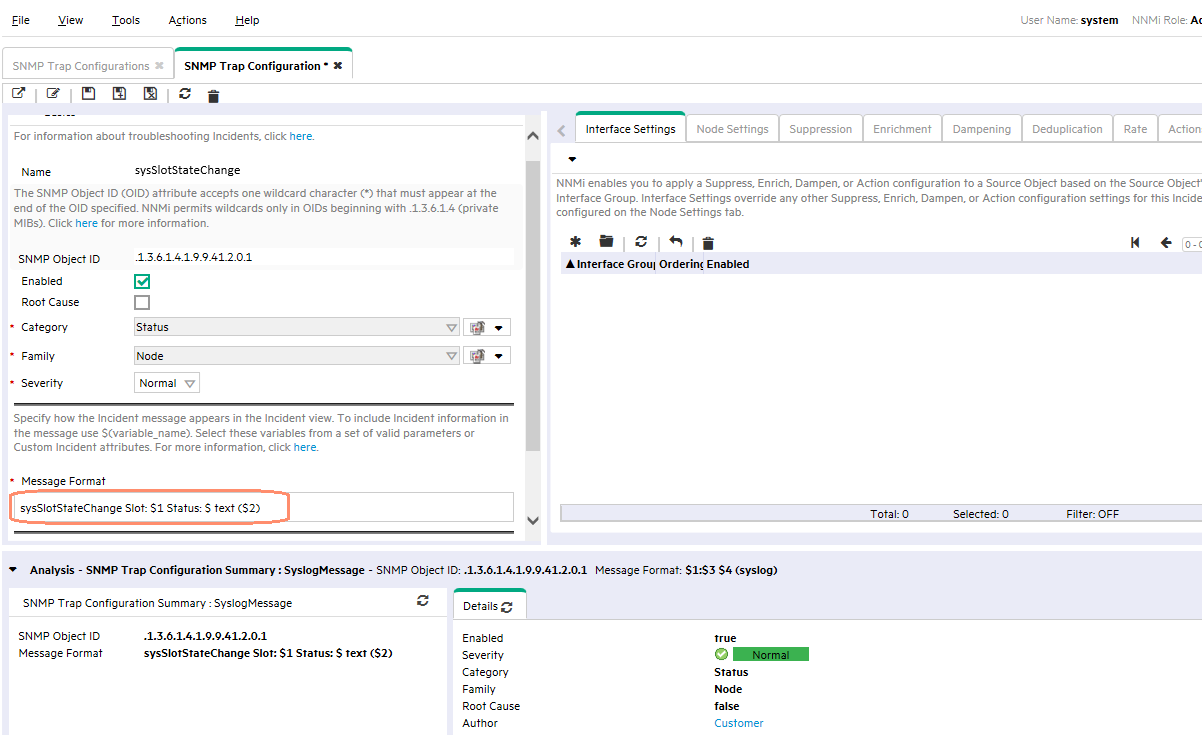
Change the format to include the slot number and the current state as shown in the following figure. Notice in the Message Format area the following text: “Slot: $1 Status: $ text ($2)”. The first part, “$1”, represents the first varbind. The second part, “$ text ($2)”, tells NNMi to print the textual representation of the second varbind rather than the number. This makes the traps more readable in the NNMi console. Click Save and Close.
-
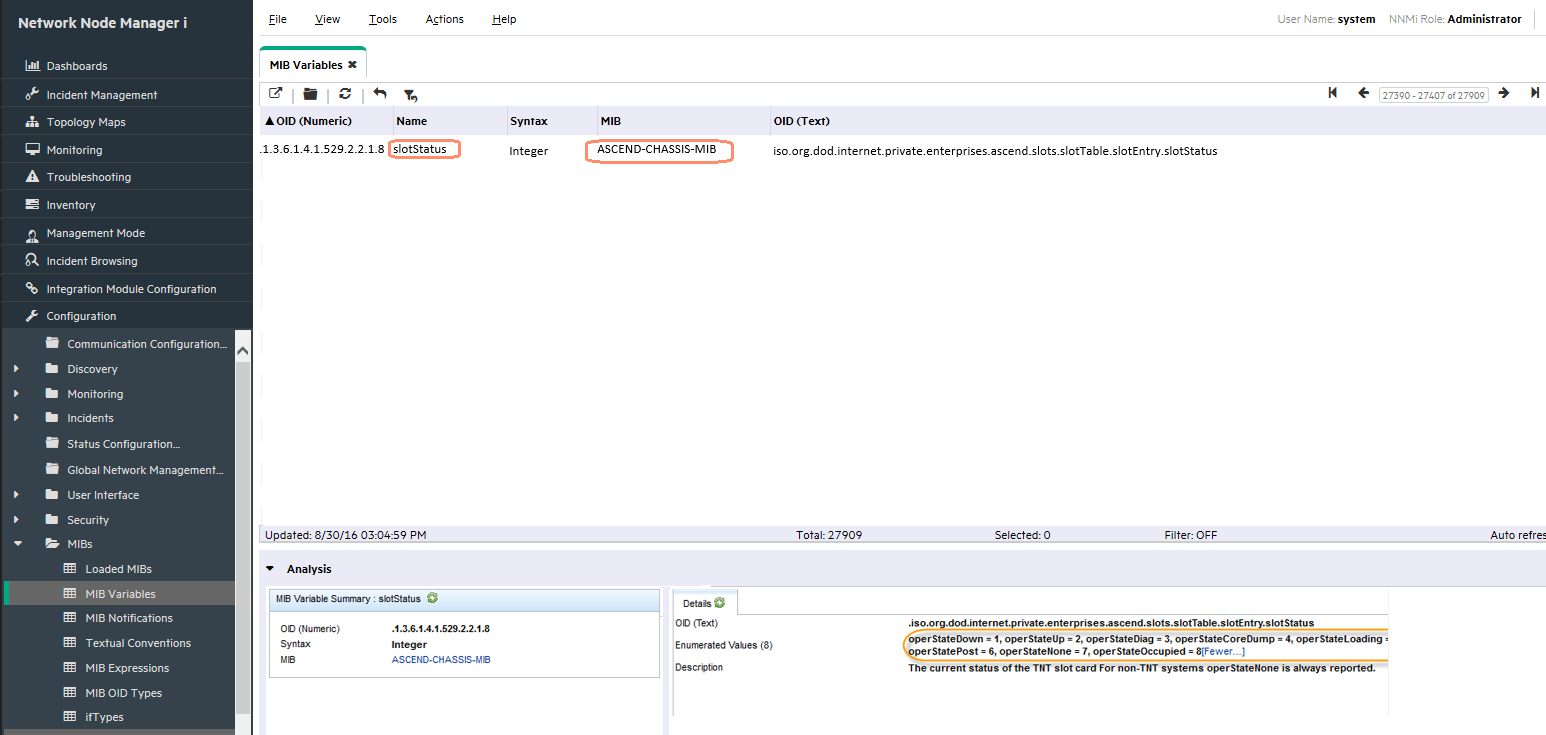
To see the values of slot status, you can look up slotStatus in the MIB variables. Go to Configuration -> MIBs -> MIB Variables and search for slotStatus. In the Analysis pane shown in figure below, you can see that the enumerated values include the following:
operStateDown = 1,
operStateUp = 2,
operStateDiag = 3,
operStateCoreDump = 4,
operStateLoading = 5,
operStatePost = 6,
operStateNone = 7,
operStateOccupied = 8
Now NNMi is configured to be able to receive the traps and easily read them in the NNMi console.
Manually Sending the Traps
For this example, there is not a device sending the traps, so you must manually create and send them.
It is always best to use traps sent directly from a device in the network but manually sending them is a good way to develop and test your solution.
For this example, use the nnmsnmpnotify.ovpl command to format the trap that is sent. See the following format of the command used to send the operStateUp for slot 1 (note that this command must all be on one line rather than the three lines shown in the following sample).
See the nnmsnmpnotify.ovpl reference page or the UNIX manpage for more information.
Make sure your source node (in this case, ciscope6524) is already discovered in NNMi to receive the trap.
nnmsnmpnotify.ovpl -v 1 -a ciscope6524 localhost .1.3.6.1.4.1.529.0.22
.1.3.6.1.4.1.529.2.2.1.1 integer 1
.1.3.6.1.4.1.529.2.2.1.8 integer 2
You can send status messages to ensure traps are coming in successfully by changing the second varbind value to one represents a different state. For example, you can change the value to 8, which represents operStateOccupied.
nnmsnmpnotify.ovpl -v 1 -a ciscope6524 localhost .1.3.6.1.4.1.529.0.22
.1.3.6.1.4.1.529.2.2.1.1 integer 1
.1.3.6.1.4.1.529.2.2.1.8 integer 8
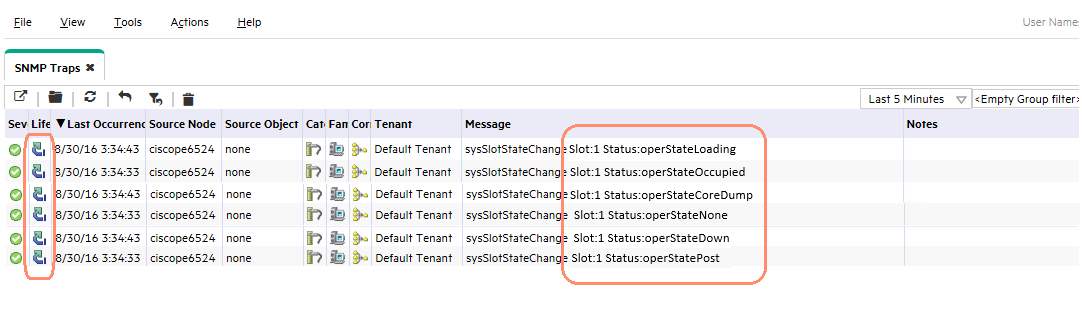
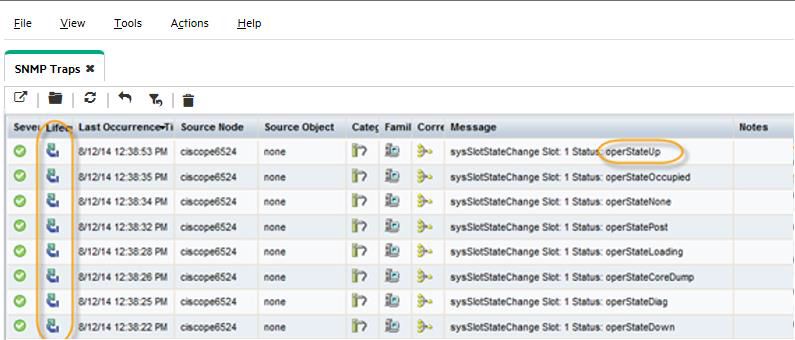
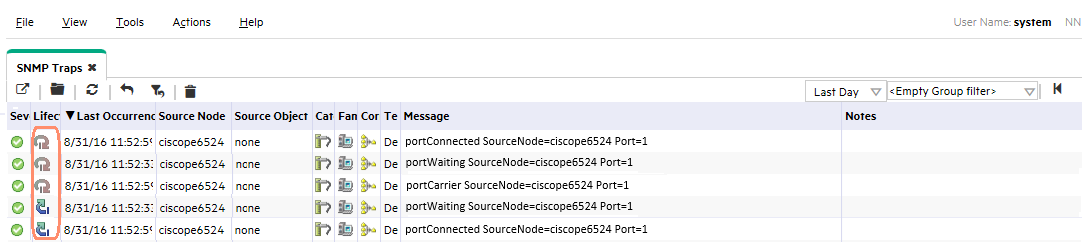
As indicated in the figure below, traps containing all of the supported values 1-8 have been sent. To see these traps, go to Incident Browsing -> SNMP Traps. When looking for these traps in the SNMP Traps table, make sure that you have selected an appropriate time filter to include the traps you want to see.
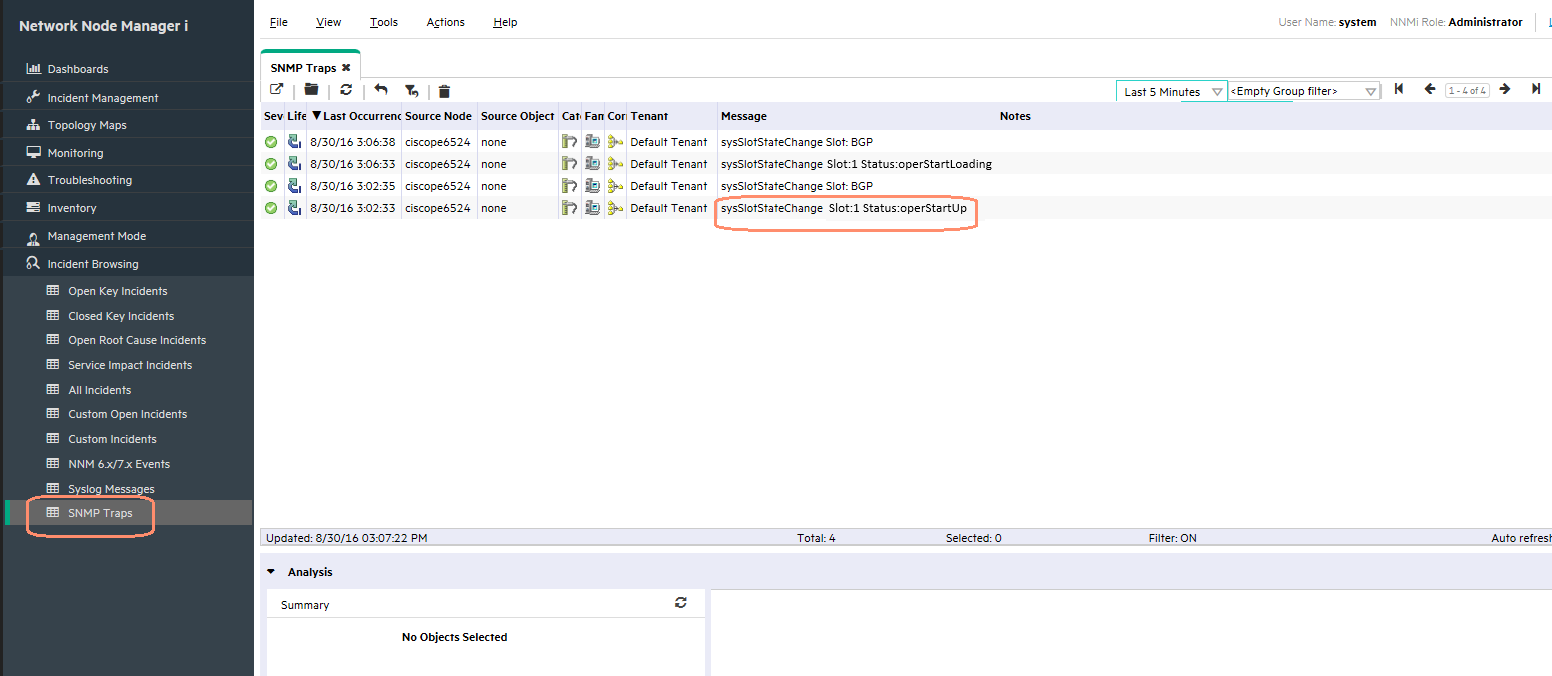
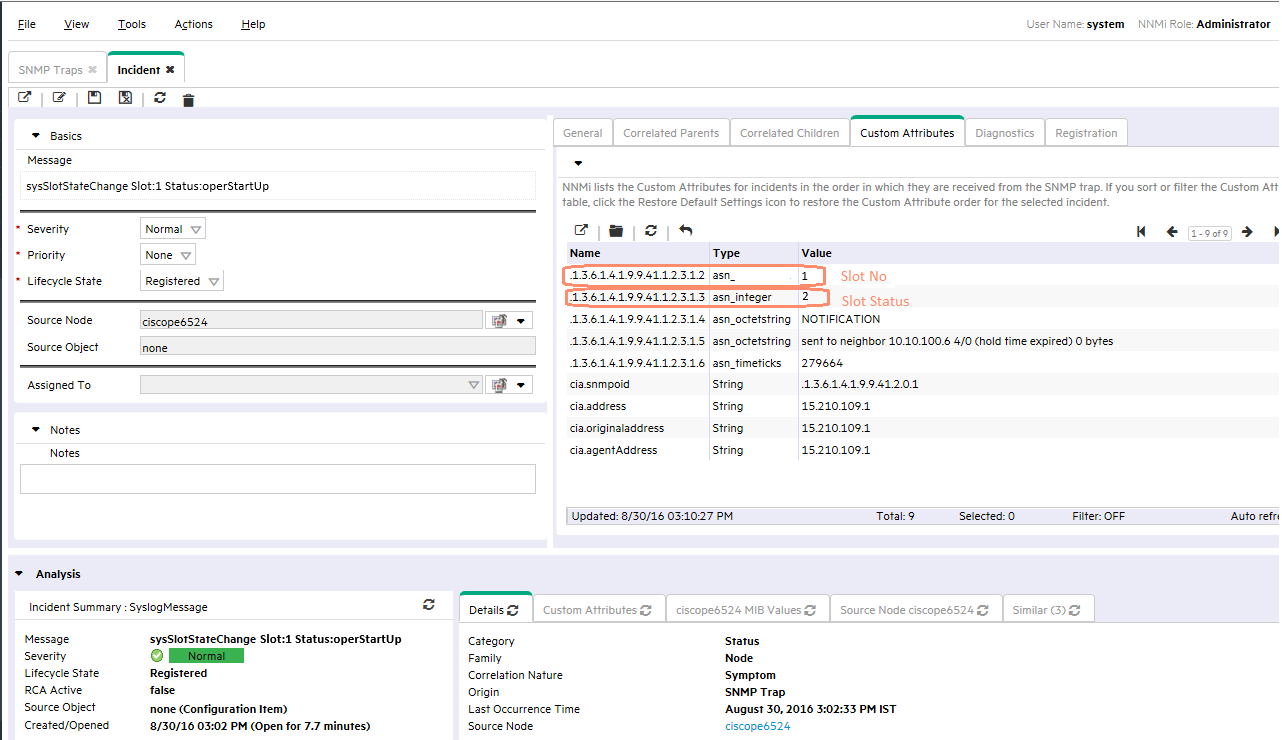
If you open (double-click) one of these traps, you can see the varbinds associated with the trap. See the following figure.
Same Trap, Different Varbinds Pairwise Configuration
Suppose that when a status of operStateUp arrives, you want to cancel any of the other state traps for this node. The correlation searches back in time for up to 24 hours for any incidents to cancel. For example, an operStateUp value cancels any traps that have any of the other statuses for the same source node and slot number for the past 24 hours (this is an example scenario only). You can also require that the Source Node and the Slot Number be the same on both traps.
-
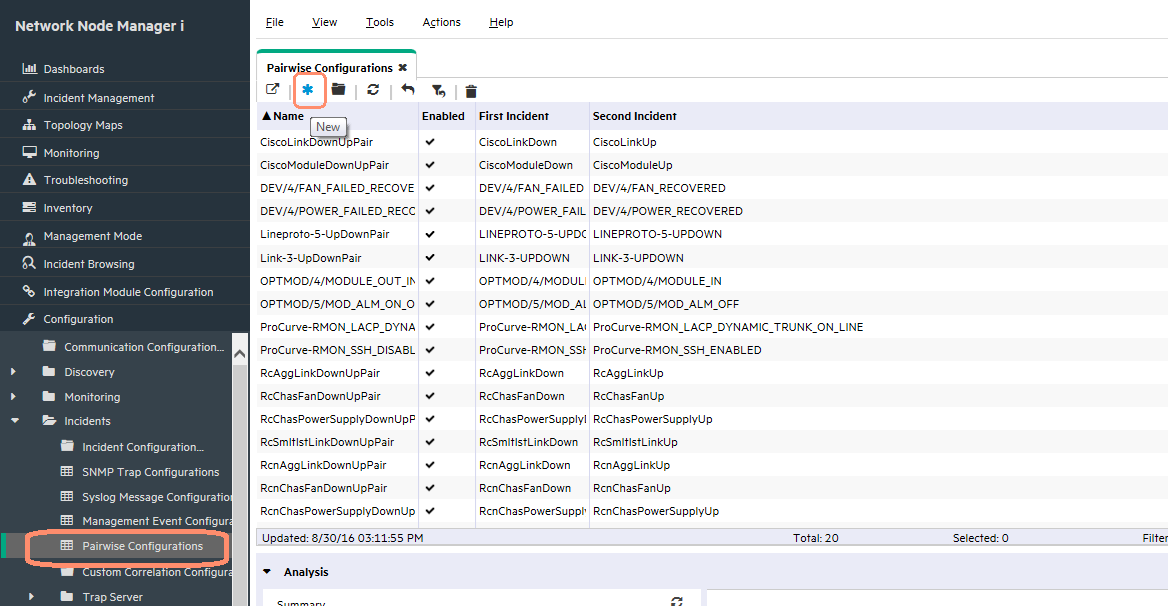
Go to Incidents -> Pairwise Configurations and click the icon.
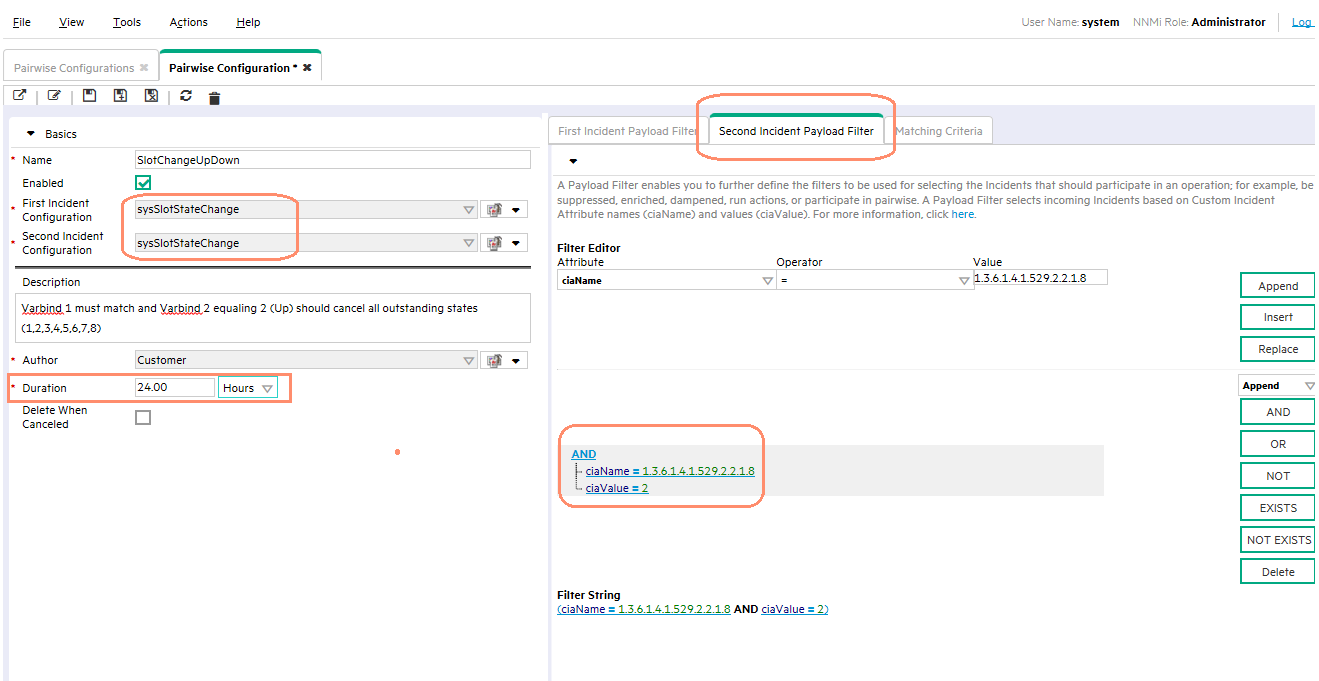
- Set the First Incident and Second Incident to be sysSlotStateChange. In this case, these are the same trap. Only the varbind value differentiates them.
-
Set the duration time to 24 hours.
- Because this is not just a simple pair of traps, it might be best to start with defining the Second Incident Payload Filter. The second incident is the trap that closes the other traps on the back end.
-
Build an AND condition using ciaName and ciaValue. (Custom Incident Attributes (CIAs) are varbinds in NNMi). Create the condition where the varbind Object ID (OID) equals .1.3.6.1.4.1.529.2.2.1.8 and the varbind value equals 2. Remember that the value of 2 represents operStateUp.
-
Next, define the First Incident Payload Filter. This represents any traps that are to be closed as part of this pairing. Be careful entering values with the “in” operator (do not use commas; instead, put each value on a separate line). The AND condition shown in figure below, represents any of the traps with a varbind value of operStateDown, operStateDiag, operStateCoreDump, operStateLoading, operStatePost, operStateNone, or operStateOccupied (1, 3, 4, 5, 6, 7 or 8).

-
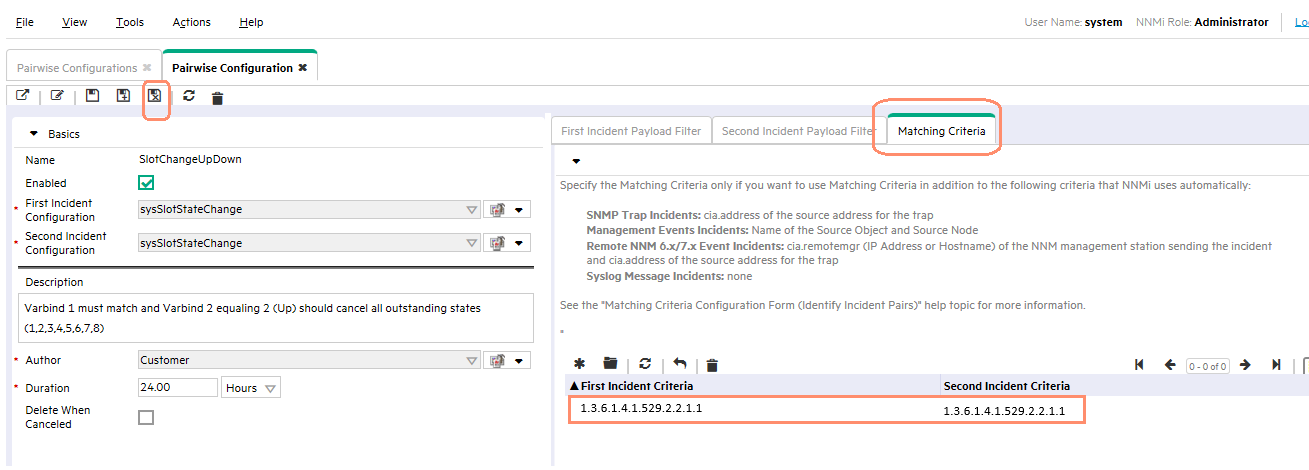
Finally, enter the Matching Criteria. NNMi automatically performs a source node match for all pairwise operations, so we do not need to specify the source node as part of the matching criteria. We enter the OID for the slot number since that must be the same for the match to be valid. Click Save and Close to finish this pairwise configuration.
Testing
-
Test the pairwise configuration by manually sending the traps. All of the traps are sent except the one with a value of 2 (operStateUp).
# nnmsnmpnotify.ovpl -v 1 -a ciscope6524.ind.hp.com localhost
.1.3.6.1.4.1.529.0.22 .1.3.6.1.4.1.529.2.2.1.1 integer 1
.1.3.6.1.4.1.529.2.2.1.8 integer 1
# nnmsnmpnotify.ovpl -v 1 -a ciscope6524.ind.hp.com localhost
.1.3.6.1.4.1.529.0.22 .1.3.6.1.4.1.529.2.2.1.1 integer 1
.1.3.6.1.4.1.529.2.2.1.8 integer 3
# nnmsnmpnotify.ovpl -v 1 -a ciscope6524.ind.hp.com localhost
.1.3.6.1.4.1.529.0.22 .1.3.6.1.4.1.529.2.2.1.1 integer 1
.1.3.6.1.4.1.529.2.2.1.8 integer 4
# nnmsnmpnotify.ovpl -v 1 -a ciscope6524.ind.hp.com localhost
.1.3.6.1.4.1.529.0.22 .1.3.6.1.4.1.529.2.2.1.1 integer 1
.1.3.6.1.4.1.529.2.2.1.8 integer 5
# nnmsnmpnotify.ovpl -v 1 -a ciscope6524.ind.hp.com localhost
.1.3.6.1.4.1.529.0.22 .1.3.6.1.4.1.529.2.2.1.1 integer 1
.1.3.6.1.4.1.529.2.2.1.8 integer 6
# nnmsnmpnotify.ovpl -v 1 -a ciscope6524.ind.hp.com localhost
.1.3.6.1.4.1.529.0.22 .1.3.6.1.4.1.529.2.2.1.1 integer 1
.1.3.6.1.4.1.529.2.2.1.8 integer 7
# nnmsnmpnotify.ovpl -v 1 -a ciscope6524.ind.hp.com localhost
.1.3.6.1.4.1.529.0.22 .1.3.6.1.4.1.529.2.2.1.1 integer 1
.1.3.6.1.4.1.529.2.2.1.8 integer 8
-
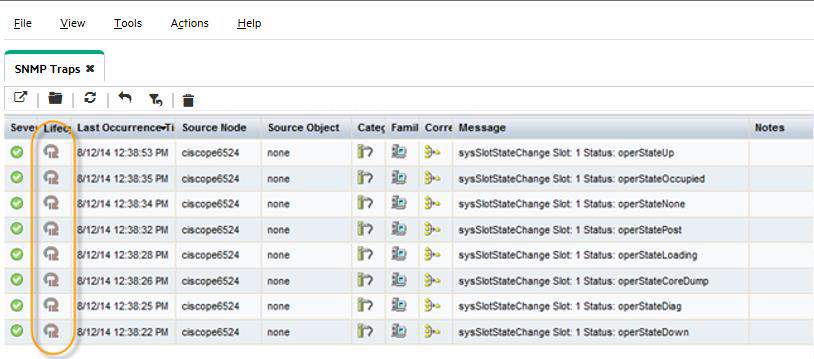
Look in the trap table to see the traps.
-
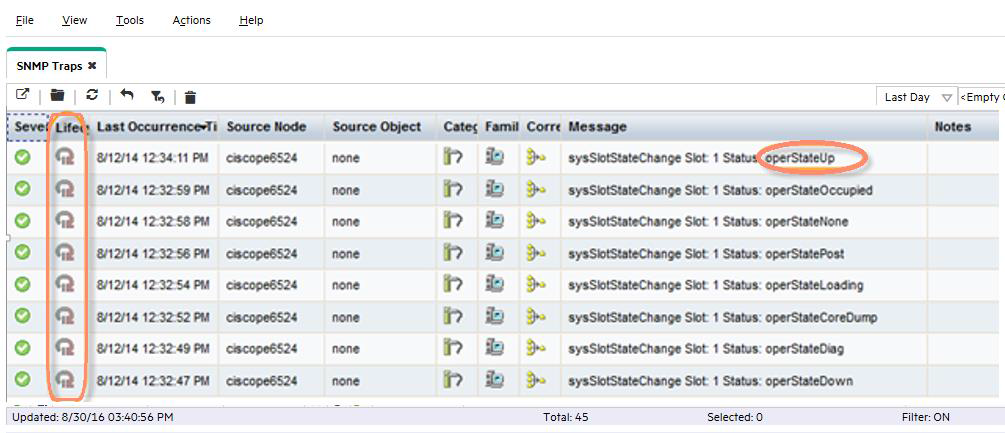
Send the “up” trap and it should close all the other traps that happened within the last 24 hours. Note that you may not see this happen immediately in the NNMi console. The pairwise thread runs every 30 seconds (or when a certain count is reached, if that happens sooner than 30 seconds). So you may not see the correlations for 30 seconds after sending the trap. Note that if you are using northbound integration with NNMi, this pairwise feature will not keep the correlated traps from “going north”. You can prevent them from going north by using the dampening feature.
-
If you double-click the “up” trap and look at the Correlated Children tab, you can see all of the traps that were closed due to the pairwise correlation.

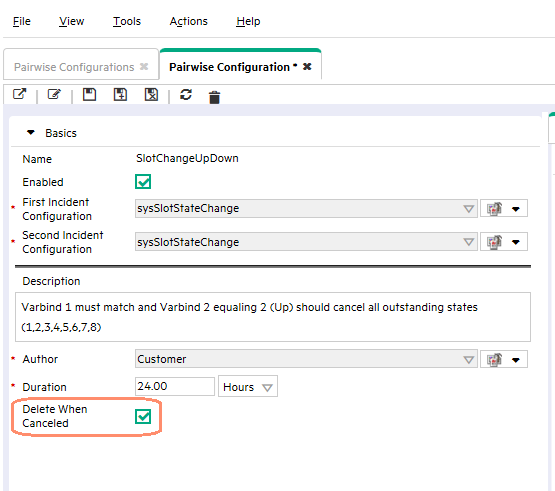
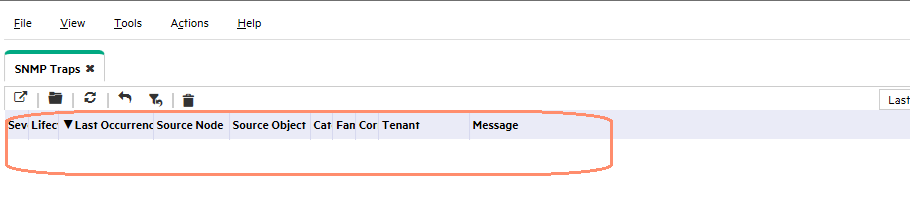
You can configure NNMi to delete traps when they are canceled (closed). See the following figure.
The deleting of events from the pairwise operation is done by another thread that runs every 2 minutes, so you might first see the traps in the browser.
Then you might see them close.
Then you will see them get deleted.
Pairwise Example 2 (Three Traps)
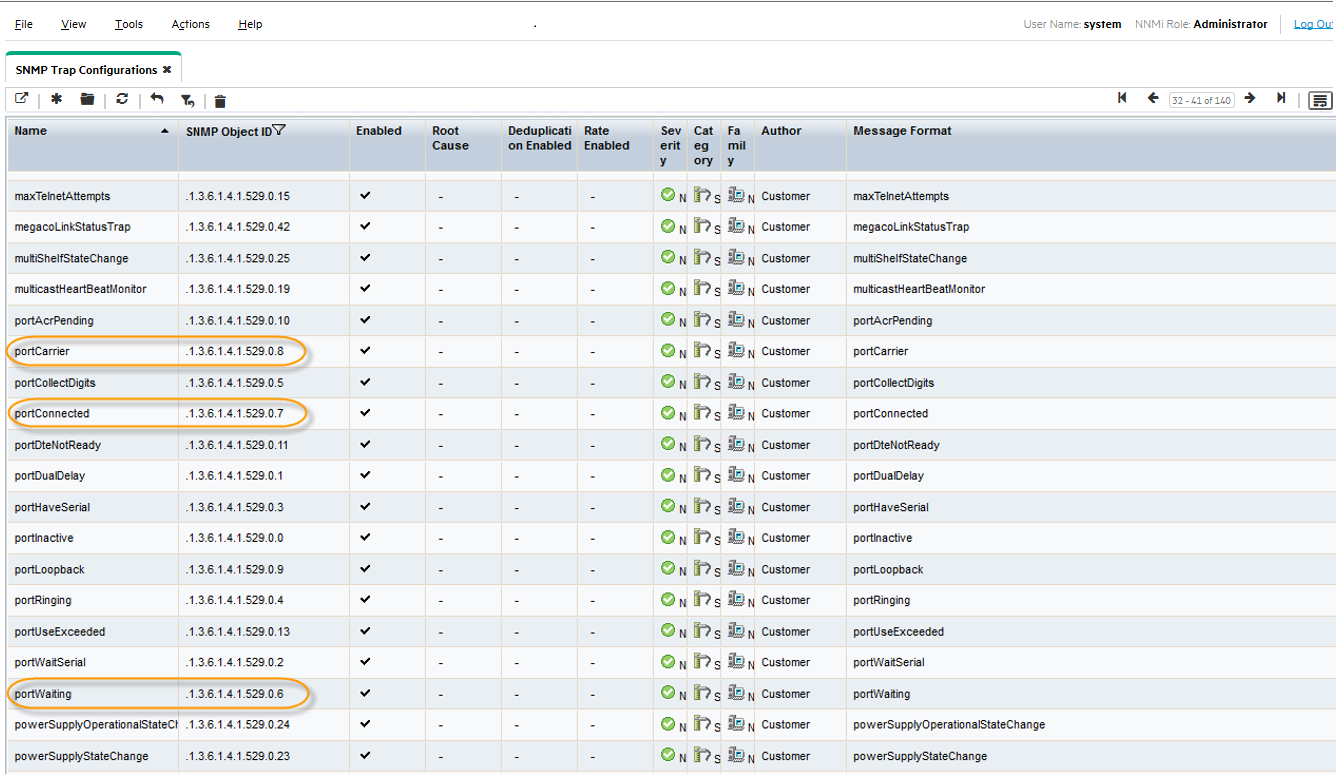
You can construct sophisticated pairwise filters involving multiple traps. For example, you might have three different traps (X, Y, and Z). You could have Z close both X and Y. To do this with different traps, you would need to create separate pairwise configurations for each relationship: Z closing X, and Z closing Y. Suppose that when you receive a portCarrier trap, you want to cancel both the portConnected and portWaiting traps.
-
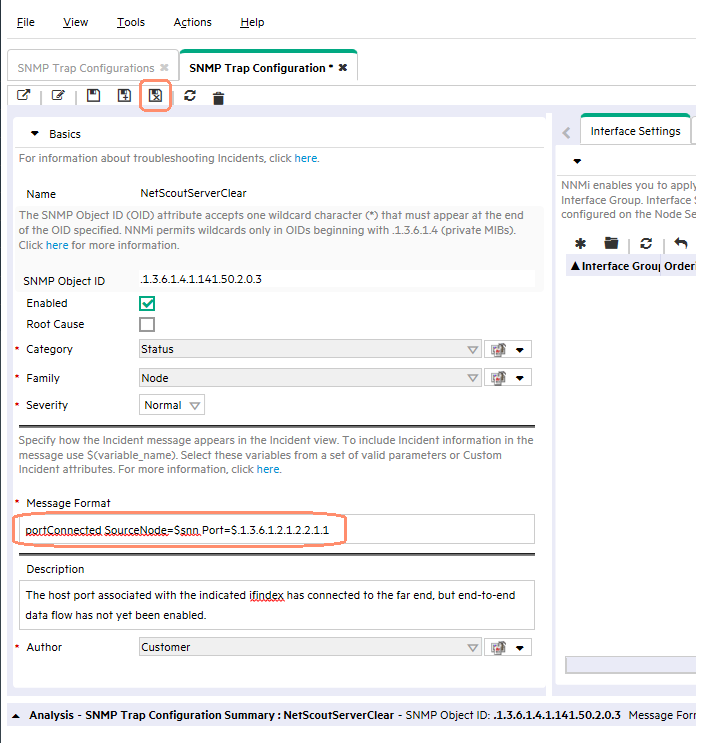
Edit the trap configuration to include the source node and the port in the format for easier reading. Do this for all 3 trap mentioned above – an example snapshot is shown in following figure.
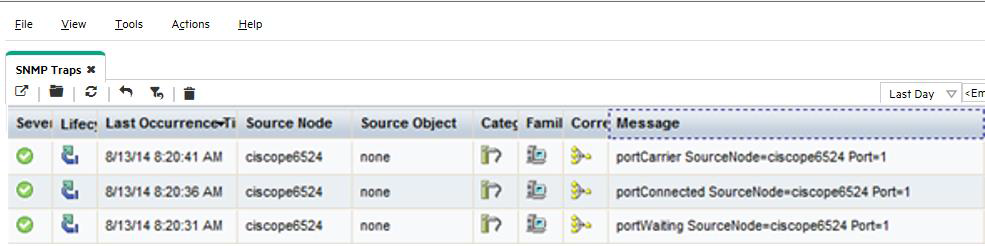
Here is what the three trap look like when they are sent:
# nnmsnmpnotify.ovpl -v 1 -a ciscope6524.ind.hp.com localhost
.1.3.6.1.4.1.529.0.6 .1.3.6.1.2.1.2.2.1.1 integer 1
# nnmsnmpnotify.ovpl -v 1 -a ciscope6524.ind.hp.com localhost
.1.3.6.1.4.1.529.0.7 .1.3.6.1.2.1.2.2.1.1 integer 1
# nnmsnmpnotify.ovpl -v 1 -a ciscope6524.ind.hp.com localhost
.1.3.6.1.4.1.529.0.8 .1.3.6.1.2.1.2.2.1.1 integer 1
-
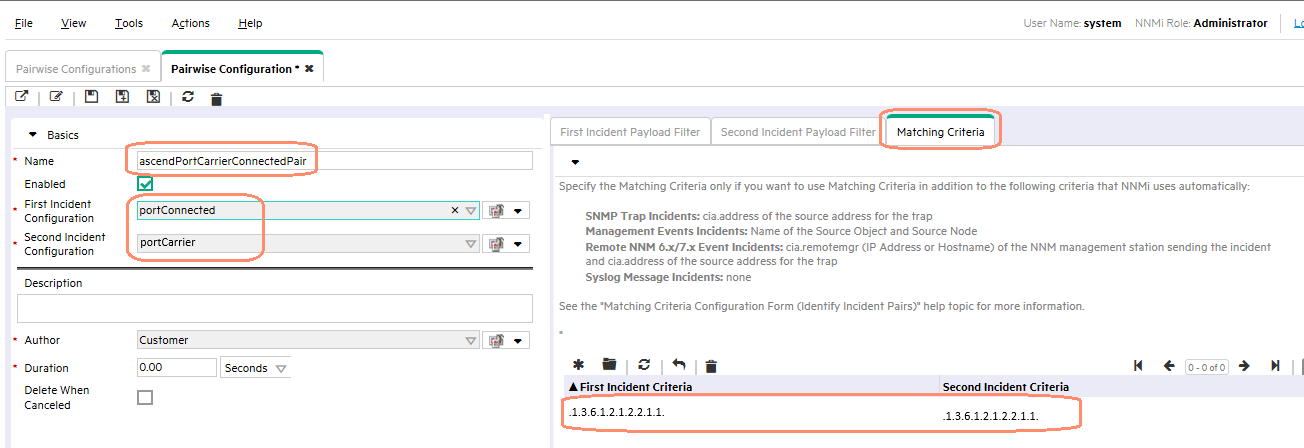
Build two pairwise correlations.
-
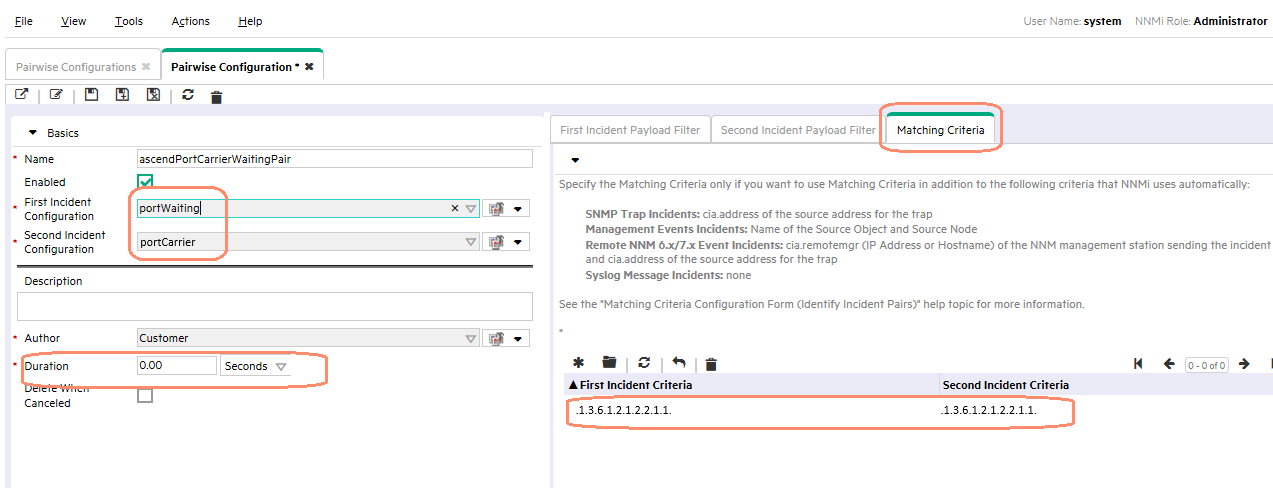
Select the Second Incident Configuration as portConnected and the First Incident Configuration as portCarrier. You do not need to define any payload filters but you must define matching criteria. Remember that there is a built-in criterion for Source Node. In addition, you must match against the port as defined by the varbind .1.3.6.1.2.1.2.2.1.1. You could also use $1 but it is usually better to use explicit OIDs rather than position numbers. Note that the duration has been set to zero. This means that NNMi searches back through the entire incident database to find the match, but after it finds a match, it stops correlating. This results in a single pairing. This may not be desired but is shown as an example here.
-
Receive the first two traps. Nothing is correlated.

-
When you receive the portCarrier trap, it closes the other two traps.

-
Because the duration is set to zero, only the first pairings are closed. If there were other traps in the database that had potential matches, as shown below, those traps are not closed
-
Batch Incident Configuration
NNMi 10.00 allows you to make modifications to collections of incident configurations using a file. This facilitates the process of making many similar changes without having to use the NNMi console for each incident configuration. For example, suppose you want to add the same action to a set of incidents. With batch incident configuration, you can export the current configuration, modify the file, and then import the modified configuration in just a few simple steps.
There are two new tools introduced in NNMi 9.20 which are available in NNMi 10.x as well: nnmincidentcfgdump.ovpl and nnmincidentcfgload.ovpl. You use nnmincidentcfgdump.ovpl to export the current configuration and you use nnmincidentcfgload.ovpl to import the new configuration. These tools use a tag formatted file (not XML or free-form text).
This document does not give the complete syntax for these tools. There are a number of very good examples in the following directory:
- UNIX: /opt/OV/examples/nnm/incidentcfg
- Windows: <drive>\Program Files (x86)\HP\HP BTO Software\examples\nnm\incidentcfg
One of the easiest ways to use the nnmincidentcfgload.ovpl tool is to generate an example and compare the differences. Then you can carry these differences over to other incidents. Consider the following example.
Suppose you want to load the F5-BIGIP-COMMON-MIB file to get some new traps defined in NNMi for F5 BIG-IP.
-
Load the MIB with the nnmloadmib.ovpl command:
# nnmloadmib.ovpl -load F5-BIGIP-COMMON-MIB.mib
Successfully completed operation LoadMib.
16 MIB Variables were loaded.
134 Traps were loaded.
-
Load the traps into the trap configuration using the nnmincidentcfg.ovpl command.
# nnmincidentcfg.ovpl -loadTraps F5-BIGIP-COMMON-MIB
SNMP trap(s) from mib module loaded: F5-BIGIP-COMMON-MIB. Number of traps: 134.
The following traps were added to incident configuration: bigipNodeUp - .1.3.6.1.4.1.3375.2.4.0.13
bigipAgentStart - .1.3.6.1.4.1.3375.2.4.0.1
bigipStandby - .1.3.6.1.4.1.3375.2.4.0.14
... (many traps not shown here)
bigipDiskPartitionGrowth - .1.3.6.1.4.1.3375.2.4.0.26
bigipAsmRequestBlocked - .1.3.6.1.4.1.3375.2.4.0.38
bigipGtmAppAvail - .1.3.6.1.4.1.3375.2.4.0.71
Suppose you want to apply an action to all of these traps. Because there are 134 traps, it would take much effort to open each trap configuration individually and add the action. So you will take advantage of the batch configuration.
-
Before going any further, it is a good idea to export the incident configuration before making changes. This allows you to revert to this same place using the nnmconfigimport.ovpl command, if necessary. (Alternatively, you could perform a backup of NNMi.)
# nnmconfigexport.ovpl -c incident -f /var/tmp Successfully exported /var/tmp/incident.xml.
-
Dump one trap to provide an example. Use the trap bigipAgentStart and specify the dump command to only dump this trap configuration based on the OID .1.3.6.1.4.1.3375.2.4.0.1.
# nnmincidentcfgdump.ovpl -dump bigipAgentStart_before.tag -oid
.1.3.6.1.4.1.3375.2.4.0.1
Starting a user transaction with a timeout of: 3,600 seconds.
Here is the file it created:
# cat bigipAgentStart_before.tag
*ConfigurationType=SnmpTrapConfig
*Name bigipAgentStart
*Oid .1.3.6.1.4.1.3375.2.4.0.1
-
Author
-Key com.customer.author
-
Category
-Key com.hp.nms.incident.category.Status
- Enable true
-
ActionConfiguration
-Enable false
-
DampenConfiguration
-Enable false
-HourInterval 0
-MinuteInterval 0
-SecondInterval 0
-
DedupConfiguration
-ComparisonCriteria NAME
-DedupCount 2
-Enable false
-HourInterval 0
-MinuteInterval 0
-SecondInterval 0
- Description An indication that the agent has started running.
-
Family
-Key com.hp.nms.incident.family.Node
-
GeoCentralForwardConfiguration
-Enable false
-
MessageFormat bigipAgentStart
-
Severity NORMAL
-
EnrichConfiguration
-Enable false
-
SuppressConfiguration
Enable false
-
RateConfiguration
-ComparisonCriteria NAME
-Enable false
-HourInterval 0
-MinuteInterval 0
-RateCount 0
-SecondInterval 0
-
UserRootCause false
-
-
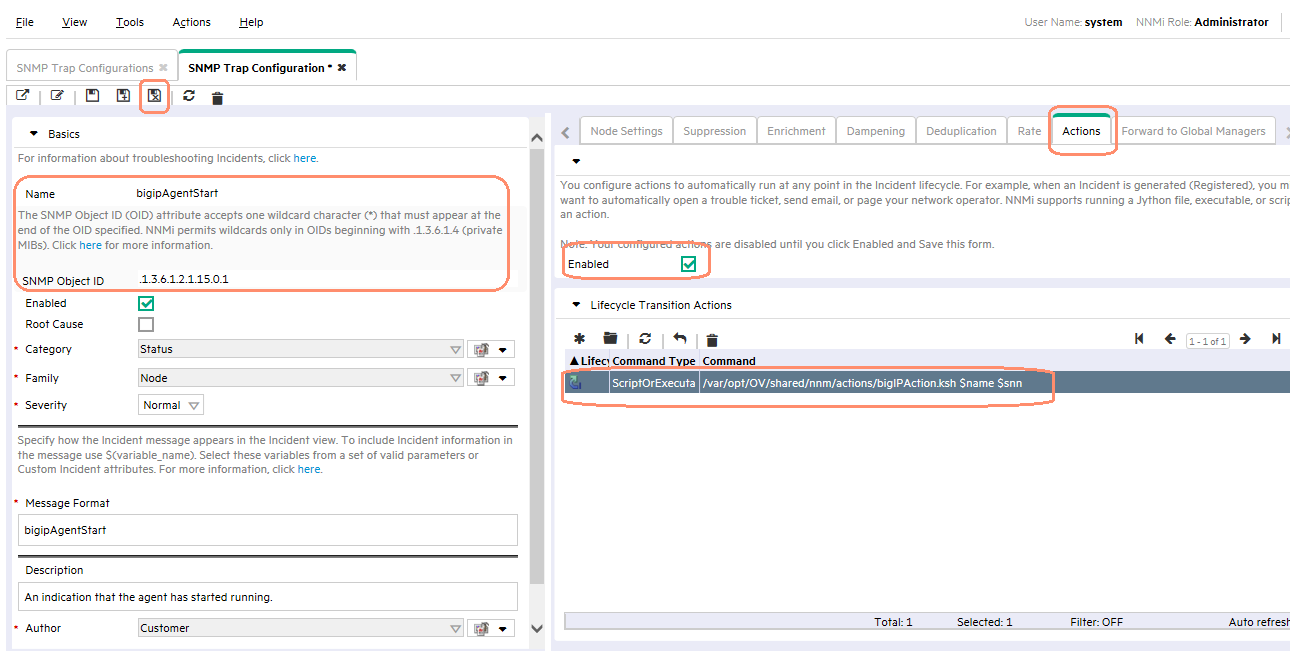
Go into the NNMi console and add the action to this trap configuration. Save the trap configuration after making the change.
-
Dump the configuration again with the action added.
# nnmincidentcfgdump.ovpl -dump bigipAgentStart_after.tag -oid
.1.3.6.1.4.1.3375.2.4.0.1
Starting a user transaction with a timeout of: 3,600 seconds.
Here is the file it created with the newly added lines highlighted. Notice the relatively simple format that was added.
# cat bigipAgentStart_after.tag
*ConfigurationType=SnmpTrapConfig
*Name bigipAgentStart
*Oid .1.3.6.1.4.1.3375.2.4.0.1
-
Author
-Key com.customer.author
-
Category
-Key com.hp.nms.incident.category.Status
-
Enable true
-
ActionConfiguration
-Enable true
-Actions
-
Action
-Command /var/opt/OV/shared/nnm/actions/bigIPAction.ksh $name $snn
-CommandType SCRIPT_OR_EXECUTABLE
-LifecycleState Registered
-DampenConfiguration
-
-Enable false
-
-HourInterval 0
-
-MinuteInterval 0
-
-SecondInterval 0
-DedupConfiguration
-
-ComparisonCriteria NAME
-
-DedupCount 2
-
-Enable false
-
-HourInterval 0
-
-MinuteInterval 0
-
-SecondInterval 0
-
-
Description An indication that the agent has started running.
-
Family
-Key com.hp.nms.incident.family.Node
-
GeoCentralForwardConfiguration
-Enable false
-
MessageFormat bigipAgentStart
-
Severity NORMAL
-
EnrichConfiguration
-Enable false
-
SuppressConfiguration
-Enable false
-
RateConfiguration
-ComparisonCriteria NAME
-Enable false
-HourInterval 0
-MinuteInterval 0
-RateCount 0
-SecondInterval 0
-
UserRootCause false
-
-
Now that you have learned the format of the lines you must add, dump all 134 traps. You can dump the whole family of traps using an OID wildcard .1.3.6.1.4.1.3375.*.
# nnmincidentcfgdump.ovpl -dump bigip_before.tag -oid .1.3.6.1.4.1.3375.* Starting a user transaction with a timeout of: 3,600 seconds.
-
Edit this file and add the highlighted lines to all the traps. Save the file as bigip_after.tag, and then load this file into NNMi using nnmincidentcfgload.ovpl as shown.
# nnmincidentcfgload.ovpl -load bigip_after.tag Translated: 134 configurations, now attempting import.
Starting a user transaction with a timeout of: 3,600 seconds.
-
Go to any of the BIG-IP traps in the NNMi console and notice that the action has been added.
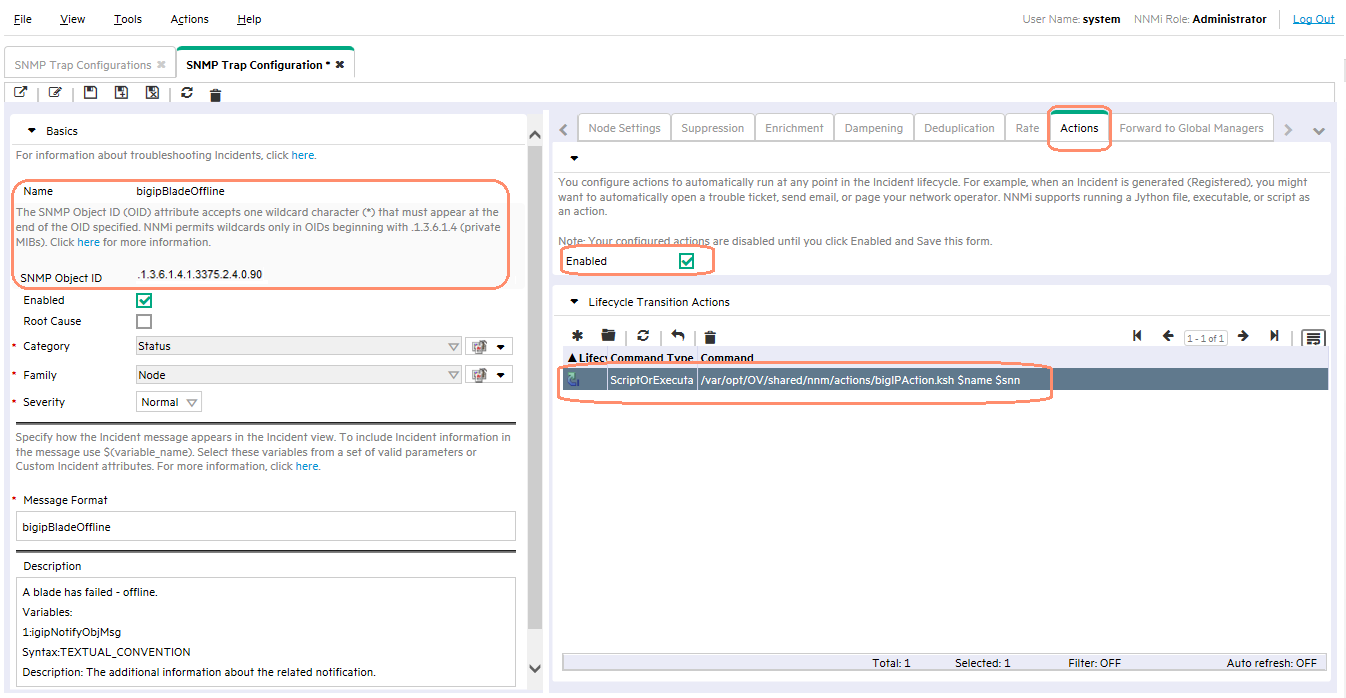
You have now added an action to all 134 traps at one time.
If you wanted to revert back to the earlier configuration, there are two ways you could do this. First, you could import the configuration snapshot that you took earlier as shown here:
# nnmconfigimport.ovpl -f incident.xml We have sorted the list like: incident,
Successfully imported incident.xml.
Or you could load the configuration of the earlier file, which represents the traps before you made your modifications:
# nnmincidentcfgload.ovpl -load bigip_before.tag Translated: 134 configurations, now attempting import.
Starting a user transaction with a timeout of: 3,600 seconds.