Searching the Help
To search for information in the Help, type a word or phrase in the Search box. When you enter a group of words, OR is inferred. You can use Boolean operators to refine your search.
Results returned are case insensitive. However, results ranking takes case into account and assigns higher scores to case matches. Therefore, a search for "cats" followed by a search for "Cats" would return the same number of Help topics, but the order in which the topics are listed would be different.
| Search for | Example | Results |
|---|---|---|
| A single word | cat
|
Topics that contain the word "cat". You will also find its grammatical variations, such as "cats". |
|
A phrase. You can specify that the search results contain a specific phrase. |
"cat food" (quotation marks) |
Topics that contain the literal phrase "cat food" and all its grammatical variations. Without the quotation marks, the query is equivalent to specifying an OR operator, which finds topics with one of the individual words instead of the phrase. |
| Search for | Operator | Example |
|---|---|---|
|
Two or more words in the same topic |
|
|
| Either word in a topic |
|
|
| Topics that do not contain a specific word or phrase |
|
|
| Topics that contain one string and do not contain another | ^ (caret) |
cat ^ mouse
|
| A combination of search types | ( ) parentheses |
|
To ensure that NNMi successfully discovers Nodes in your network environment, verify the following:
-
Prerequisites are met for well-configured:
- SNMP, DNS, and IP address configuration.
- Web Agent protocols (for example Shell and VMware)
-
Communication Configuration settings permit NNMi to communicate with all important Nodes using any or all of the following:
- SNMP
- ICMP
- Web Agent protocols
- Global Default settings reflect reality for your network environment.
You have total control over which Nodes are discovered by configuring a Discovery Seed for each Node. To define a Discovery Seed, you provide one of the following sets of information:
- hostname (not case-sensitive) and Tenant
- IP address and Tenant
NNMi uses the Discovery Seed to make initial contact. Discovery seeds are only relevant during initial discovery. NNMi requests each Node's current Management Address (the address from which the node's SNMP Agent responds) and uses that IP address for all communication after initial discovery.
If you choose to use Auto-Discovery, NNMi automatically gathers Hints from each discovered Node and uses that information to find any neighboring devices within your Default Tenant's address range. You simply configure one or both of the following:
- Provide a Discovery Seed for one or more devices
- Enable Ping Sweep and let Auto-Discovery find every device that responds
Discovery seeds are required if any of the following are true:
- You want NNMi to discover only what you specify.
- You want to use discovery seeds as starting points for Auto-Discovery Rules.
-
Your network includes nodes with addresses provided by any of the following protocols:
- Static Network Address Translation (NAT)
- Dynamic Network Address Translation (NAT)
- Dynamic Port Address Translation (PAT/NAPT)
- You want to control which Nodes each NNMi user sees.
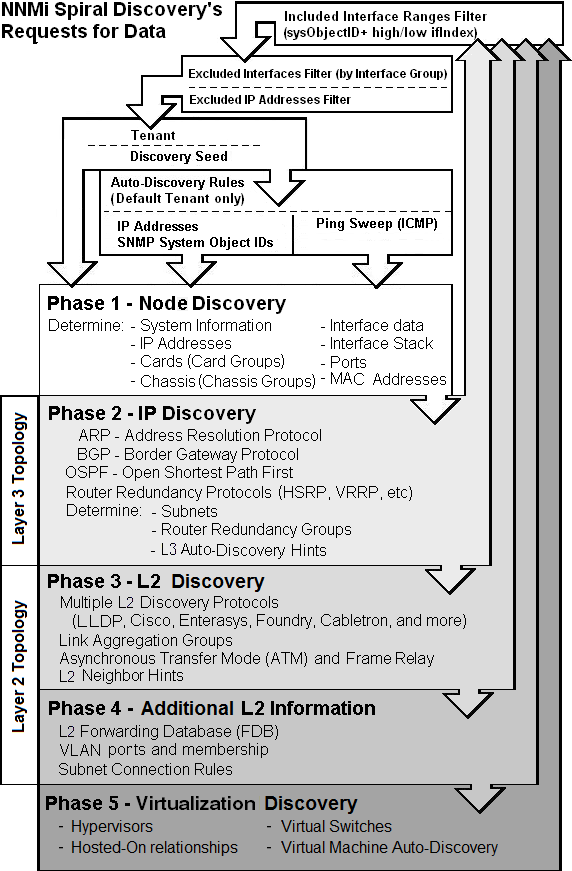
For details about how Spiral Discovery works:
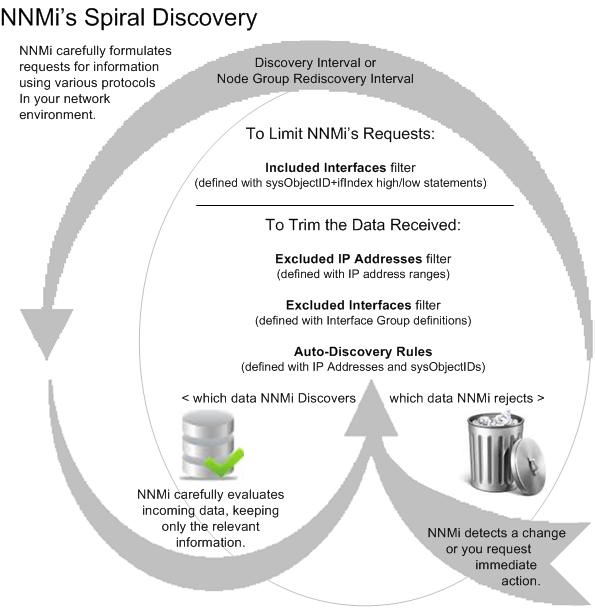
NNMi displays the real-time accumulation of information about each Node as it is collected, rather than waiting until Spiral Discovery scans your entire network environment. Spiral Discovery uses a variety of network protocols (read-only queries) within your defined network management domain to gather information about each discovered Node and that Node's connections to other Nodes (see diagram):
-
Information about the node.
NNMi gathers detailed information about each device. You can review this data on the device's Node form. Examples of configuration details include Tenant, IP address, subnet information, system object ID (RFC 1213, MIB-II
sysObjectID), number of interfaces, version of SNMP supported, and any hypervisor hosted-by / hosted-on relationship information.(NNMi Ultimate or NOM Ultimate only). When a node is managed by multiple agents (for example an SNMP Agent and a managing Web Agent), NNMi collects discovery data as described in the following table:
Example data collected from the SNMP Agent that might also be collected from a managing Web Agent for a VM node hosted on an ESXi server includes node name, interface data, and IP address information.
Scenario Precedence The SNMP agent and the Web Agent are both enabled and responsive. The SNMP Agent data takes precedence over any similar Web Agent data. The SNMP agent becomes unresponsive while the Web Agent remains responsive. Data continues to be collected from the Web Agent. The stored data from the SNMP agent is preserved and takes precedence over any similar Web Agent data. The SNMP agent is responsive however the Web Agent becomes unresponsive. The SNMP based data is used for the node and updates relevant data from the current SNMP responses. The SNMP agent is administratively flagged as disabled and its configuration Locked by the administrator. The currently stored data from the SNMP agent remains present for the node and takes precedence over any similar Web Agent data returned in current processing Tip NNMi does not collect data from Dynamic Host Configuration Protocol (DHCP). Instead, NNMi uses the Media Access Control address (MAC address) of the Node's interfaces to determine a positive ID when hostname changes.
-
Connectivity details.
NNMi gathers information about how devices are connected to each other on Layer 2 and Layer 3 of your network.
Devices that belong to the Default Tenant can have Layer 2 Connections to any device in any Tenant. Devices within any Tenant other than Default Tenant can have Layer 2 Connections only to devices within the same Tenant or the Default Tenant.
Tip NNMi's Tenant configuration settings are useful for a variety of situations. Review the Tenant information so you know about all your options.
During discovery, NNMi reads the Forwarding Database (FDB) tables from Ethernet switches within a network to help NNMi determine communication paths between network devices. NNMi searches these FDB tables for information about discovered nodes. When an NNMi management server finds FDB references to duplicate MAC addressesThe Media Access Control address (hardware address or physical address) that the factory burns into a network adapter or device with built-in networking capability. A MAC address has six pairs of hexadecimal digits, separated by colons or dashes. For example 02:1F:33:16:BC:55:
-
If two or more discovered nodes contain an interface associated with the same Media Access Control (MAC) address within the same Tenant or with one of those nodes in Default Tenant and one in any other Tenant, NNMi disregards the communication paths reported for those duplicate MAC addresses in the FDB. This might result in missing connections on NNMi maps in network areas that include those duplicate MAC addresses.
(NNMi Advanced - Global Network Management feature) If two NNMi management servers discover nodes that contain an interface associated with the same Media Access Control (MAC) address, the Global NNMi management server's maps could be missing connections that are visible on the Regional NNMi management server's maps.
- If a single node contains multiple interfaces that have the same MAC address, NNMi gathers all communication path information for those interfaces and displays that information on NNMi maps.
Forwarding Database (FDB) information can cause NNMi to establish wrong Layer 2 Connections in the following cases:
- When the FDB is configured as cache and contains obsolete data.
- In network environments with hardware from a variety of vendors, when each vendor generates different and sometimes conflicting FDB data.
Optional: NNMi administrators can configure Spiral Discovery to ignore the FDB data from one Node Group when calculating Layer 2 Connections (the FDB data is still included in other calculations).
To create connections that NNMi cannot detect, use IPv4 Subnet Connection Rules.
-
Sometimes it is useful to monitor Layer 2 Connections in the following categories:
- Point-to-point or point-to-multipoint connections between interfaces.
- Virtual IPv4 tunnel connections within your management domain.
- Connections to remote sites (across a Service Provider's network or a WAN).
- Connections among Provider Edge (PE) devices in the Default Tenant and Customer Edge (CE) devices in Tenants defined by the NNMi administrator.
NNMi accomplishes this by following special rules for subnets with prefix lengths between 28 and 31. These special rules are called Subnet Connection Rules.
If you configure a Subnet Connection Rule, the rule independently applies to each Tenant. The members of Subnets must be unique Tenant/Node pairs (each Node assigned to only one Tenant). A Subnet Connection Rule can establish a link between the Default Tenant and another Tenant. However, links between two Tenants are not permitted unless one of them is the Default Tenant. See Configure tenants.
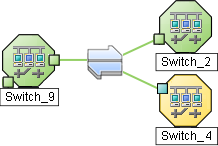
These Subnet Connections Rules enable NNMi to draw arbitrary connections on maps where none would otherwise be detected. If the connection is between two nodes, NNMi draws a standard line on maps. For example:

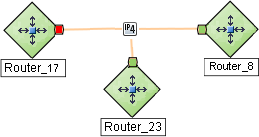
If the connection is between more than two nodes, NNMi displays an ![]() icon (in prior NNMi releases the
icon (in prior NNMi releases the ![]() icon):
icon):

Tip NNMi uses Subnet Connection Rules to prevent incorrect connection calculations to Provider Edge (PE) interfaces.
If you double-click the line or the ![]() icon, the Layer 2 Connection form opens and the Topology Source value is
icon, the Layer 2 Connection form opens and the Topology Source value is SUBNETCONNECTION.
NNMi provides a group of predefined Subnet Connection Rules. You can edit an existing Subnet Connection Rule or create your own.
If you limit Spiral Discovery to only your Discovery Seeds, NNMi uses the Subnet Connection Rules to detect connections among those devices.
If you use Auto-Discovery rules to configure Spiral Discovery, when NNMi detects a subnet prefix between 28 and 31, NNMi uses the Subnet Connection Rules:
- NNMi checks for an applicable Subnet Connection Rule.
-
If a match is found, Spiral Discovery checks the topology database for existing data about each IP address in the subnet. If no data is found for a particular IP address, NNMi issues an SNMP query to the new IP address. The number of available IP addresses for each valid prefix length is described in the following table:
Valid Minimum Prefix Length Values (Subnet Mask Length) Valid Minimum IP Prefix Length Values Number of Usable IPv4 Addresses 28 14 (16-2=14)* 29 6 (8-2=6)* 30 2 (4-2=2)* 31 2 127 2 * Two IP addresses are reserved in each subnet. The first IP address is used for the network itself and the last IP address is reserved for broadcast.
A prefix length shorter than 32 is used only for IPv4 subnets and a prefix length longer than 32 is used only for IPv6 subnets.
- NNMi checks the Excluded IP Addresses list. Any addresses in the list are dropped.
- New IP addresses that respond to SNMP are added to the topology database and available for monitoring purposes. New IPv4 addresses that do not respond to SNMP are ignored.
-
If the IP address on each end of a connection has an associated interface, NNMi uses the subnet connection rule to display the connection on map views.
In a Layer 3 Neighbor View map, if NNMi discovers an interface that is connected to more than one interface, the results of your subnet connection rule look like the following:

In a Layer 2 Neighbor View map, if NNMi discovers an interface that is connected to more than one interface, the results of your subnet connection rule look like the following:

Often your network environment has devices with thousands of interfaces and you want NNMi to discover and monitor only a subset of the interfaces in these devices. To keep SNMP traffic and Web protocol traffic to a minimum, use the Included Interfaces filter. This filter instructs Spiral Discovery to request information about only the subset of interfaces you specify for each vendor/make/model.
Tip You can configure NNMi to never send SNMP Web protocol, or ICMP requests to specific IP addresses or hostnames.
If you choose to use Auto-Discovery within your Default Tenant's address range, Auto-Discovery Rules provide a wide range of controls.

Initial Discovery
When you add a discovery seed, NNMi immediately tries to discover that device. If discovery is not successful, NNMi tries again 10 minutes later, and continues trying. The time between each attempt is doubled until the time reaches 1 week or equals your current schedule for Rediscovery Interval.
Nodes configured as discovery seeds are always discovered and added to the topology database. If you change your mind and delete a discovery seed configuration, the node is not automatically deleted from the topology database.
Auto-Discovery
If you choose to use Auto-Discovery, NNMi automatically gathers Hints from each discovered Node and uses that information to find any neighboring devices within your Default Tenant's address range. This happens automatically each time a Hint is detected or an Auto-Discovery Rule includes Ping Sweep to let Auto-Discovery find every device that responds.
Rediscovery
After NNMi completes initial discovery of your network, Spiral Discovery checks for changes according to the current Schedule Settings for Rediscovery Interval:
-
If a discovered Node's configuration settings or status changes, NNMi dynamically updates the database and maps to reflect the changes.
The only exception is when non-SNMP nodes that had the same DNS hostname are changed to have separate DNS hostnames, NNMi must completely rediscover the non-SNMP nodes to correctly update the database objects (node, interface, address, connection, and incidents). The NNMi administrator must delete the old non-SNMP node object and force NNMi to rediscover the new node configurations.
- If a new node is added to your network within the Default Tenant address range and your team uses Auto-Discovery, NNMi dynamically discovers that Node, updates the topology database, and updates the maps. The details of the new node appear in the Node form. The maps reflect the new node's connectivity information.
If a node has not been rediscovered within the current Rediscovery Interval, then NNMi initiates a rediscovery after the Rediscovery Interval time frame has been reached. For example, if you set the Rediscovery Interval to 1 day, NNMi rediscovers all nodes that have not been rediscovered for other reasons after the 1 day interval has passed. NNMi strategically batches groups of nodes over time to reduce the volume of network traffic generated.
On-Going Discovery in Response to Changes
NNMi collects and analyzes data about each Node’s Tenant assignment, IP Addresses, MAC Addresses, DNS and system information to determine any change. NNMi collects this data according to the currently configured Discovery Interval value or when polling results or traps indicate that something changed.
Spiral Discovery rediscovers Nodes for a variety of reasons between the scheduled discovery interval:
-
If NNMi's State Poller detects the following, NNMi rediscovers the node:
- An SNMP-enabled Node rebooted (based on detected SNMPv2 MIB
sysUpTimevalues). - An object associated with the Node (such as an IP address, interface, or CPU) no longer exists within a previously monitored SNMP-enabled Node.
-
NNMi is configured to use SNMP for detecting
ifNumberandentLastChangeTimevalue changes (indicating interface renumbering, new interfaces, or interfaces being removed).
- An SNMP-enabled Node rebooted (based on detected SNMPv2 MIB
-
If certain traps are received from network devices, these traps indicate that the network topology under NNMi's management potentiality changed. Spiral Discovery rediscovers the Node involved. For example:
SNMPColdStart
SNMPWarmStart
SNMPLinkDown
SNMPLinkUp
CiscoColdStart
CiscoWarmStart
CiscoFRUInserted
CiscoFRURemoved
CiscoLinkDown
CiscoLinkUp
and other vendor-equivalent traps
- (NNMi Advanced) If hypervisor changes are detected, such as virtual devices being added, deleted, or moved to another hypervisor.
Your Rediscovery Requests
At any time, you can initiate a request to rediscover information about a previously discovered node. Select a node in any table or map view, then click the Actions > Polling > Configuration Poll command.
You can also use the nnmnoderediscover.ovpl or nnmconfigpoll.ovpl command to issue requests about rediscovering multiple nodes.
Related topics
We welcome your comments!
To open the configured email client on this computer, open an email window.
Otherwise, copy the information below to a web mail client, and send this email to network-management-doc-feedback@hpe.com.
Help Topic ID:
Product:
Topic Title:
Feedback:


