


Examine Discovery Results
This section provides the steps to view the results of NNMi's device discovery.
Check initial progress of discovery
During initial NNMi discovery of your network, you can check Spiral Discovery's progress in the following ways:
-
Click Help > System Information :
- Navigate to the Database tab to find the real-time list of discovery's progress.
- Navigate to the State Poller tab to see a report of the health of the State Poller Service.
- NNMi administrators can use the command line on any NNMi management server to generate a report about NNMi health. See the nnmhealth.ovpl Reference Page for more information.
Check this several times during a one hour period. The numbers in the Nodes, SNMP agents, Interfaces, IP addresses, and Layer 2 Connections fields stabilize when initial discovery is complete
If you configure one or more Auto-Discovery Rules and you get unexpected results, check your ordering numbers.
You can verify the current discovery state for a node.
To see the current Discovery State for a node:
-
Navigate to a Node form.
- From the workspaces navigation panel, select the workspace of interest. For example,
 Inventory.
 - Select the node view of interest. For example Nodes.
- Select the row representing the configuration you want to see.
- From the workspaces navigation panel, select the workspace of interest. For example,
-
Locate the Discovery State attribute (in the Discovery section on the left side of the form).
Possible values include:
- Newly Created – Indicates the node and its IP addresses are in the NNMi database, but further information needs to be collected before state and status are determined.
- Discovery Completed – Indicates that discovery gathered all required information for the node.
- Rediscovery in Process – Indicates discovery is updating the information collected for the node.
Verify success of discovery seeds
The discovery seeds provide the starting point for discovery.
To verify that each discovery seed was successfully discovered:
-
Navigate to the Seeds view.
- From the workspace navigation panel, select the
 Configuration workspace.
 - Expand Discovery.
- Select Seeds.
- From the workspace navigation panel, select the
- Check the value in the Discovery Seed Results column on each row of the table. A value of Node Created indicates the successful discovery of each discovery seed. S
When you add a discovery seed, the Discovery Service immediately tries to discover it (without waiting until the next regularly scheduled discovery interval). If discovery is not successful, NNMi tries again 10 minutes later, and continues trying. The time between each try is doubled until it reaches 1 week or equals your current discovery interval.
To see the current discovery results for each specified discovery seed:
-
Navigate to the Seeds view
- From the workspace navigation panel, select the Configuration workspace.
- Expand Discovery.
- Select Seeds.
- From the workspace navigation panel, select the
- The table lists each discovery seed and the result that NNMi gathered from the discovery seed. Check the value in the Discovery Seed Results column on each row of the table.
Discovery Seed Results Values Discovery Results Description New seed You just entered a new discovery seed. When discovery begins, Discovery Results changes to "In progress". If the "New seed" value does not change, check to see if the Discovery Service needs to be restarted. In progress Discovery is in progress. Node created The discovery seed is successfully discovered and a new Node is created in the database.
When NNMi first discovers a seeded node, the seed address (provided by the NNMi administrator) is used for initial SNMP/ICMP communication. After NNMi builds an inventory of all IP addresses associated with the node, NNMi follows a set of rules to determine which address is the best choice for each node's Management Address. NNMi then uses the Management Address for all communication with the node.
Node created (non-SNMP device) The hostname or IP address you provided is a non-SNMP device. The Node was discovered and added to the database, but no SNMP information is available because no SNMP agent responded.
If this result is unexpected, the device might currently be down. Initiate an on-demand discovery poll using Actions > Polling > Configuration Poll
Try the following:
You can also right-click any object in a table or map view to access the items available within the Actions menu.Check whether the IP address is accessible
- Type the following command to verify that the address is accessible:
ping <nodename>
Check the Access Control List
- Access the Node, and open the Access Control List (ACL).
- Verify that the NNMi management server address is in the list.
Ensure that SNMP is working
Use the nnmsnmpwalk.ovpl command. Type the following to verify that the address has an SNMP agent. Supply one specific MIB variable to limit network traffic to one object rather than requesting all possible SNMP values. For example, use the VendorID prefix:
SNMPv1 or SNMPv2c:
nnmsnmpwalk –c <communityString> <nodename or IP address> <VendorID>SNMPv3:
nnmsnmpwalk –c <v3u> <UserName> <VendorID>- If the nnmsnmpwalk.ovpl fails:
- Use telnet to check the device's SNMP configuration to verify that SNMP is enabled.
- Verify that the address of the NNMi management server is listed in the SNMP Agent's Access list.
Check your communication configuration
- Verify that SNMP communication is enabled for this device.
- Verify that the device has a properly configured SNMPv1 or SNMPv2c read community string, or that the device has a properly configured SNMPv3 USM security setting.
After you correct the problem that caused NNMi to specify the seed as a non-SNMP device, NNMi updates the Node record during the next discovery cycle.
The Discovery Results value does not change, because NNMi makes only one attempt to contact each discovery seed. However, everything is working properly once the Communication Configuration settings are corrected.
Node not created (DNS name resolution failed) The Domain Name System (DNS) protocol could not match the hostname you provided for this discovery seed with a valid IP address. Node not created (duplicate seed) The address or hostname you provided is a Node that already exists in the database. Node not created (IPv6 disabled) (NNMi Advanced) The address you provided is an IPv6 address. The hostname you provided has only IPv6 addresses.
Check the following:
- Are you using NNMi Advanced (required for IPv6 support)?
- Did your NNMi Administrator disable NNMi Advanced's IPv6 feature?
(NNMi Advanced) Node not created (IPv6 link local address is invalid seed) The address you provided is an IPv6 link-local address, or the hostname you provided has only one address (an IPv6 link-local address). IPv6 link-local addresses cannot be used as seeds. Node not created
(license exceeded)Discovery rejected this discovery seed because the number of devices previously discovered reached your licensed capacity limit. Failed Contact with this discovery seed failed due to an internal NNMi error. The problem might be related to discovery or to a system wide issue, such as running out of memory or having trouble with database access. Check the discovery log file:
- Windows:
%NnmDataDir%\log\nnm\nnm.0.0.log - Linux:
$NnmDataDir/log/nnm/nnm.0.0.log
Examine discovery inventory
The best method for examining your discovered inventory depends on how you configure discovery.
To examine your discovery inventory:
- In the Workspace navigation panel, open the Inventory workspace.
- Select the Nodes view.
- Verify that each important Node is listed.
- Select the IP Addresses view.
- Verify that each IP address that you identified as a discovery seed is listed.
- Verify that the IP addresses you expect to see are visible (based on any Auto-Discovery Rule configurations).
If you configure one or more Auto-Discovery Rules and you get unexpected results, check your ordering numbers.
Examine Layer 2 discovery results
Layer 2 represents your network's physical connections and LAN switch traffic routes.
Devices that belong to the Default Tenant can have Layer 2 Connections to any device in any Tenant. Devices within any Tenant other than Default Tenant can have Layer 2 Connections only to devices within the same Tenant or the Default Tenant.
A cloud
 icon (in prior NNMi releases, the
 icon) on the NNMi map may represent a missing node. Consider using a router command such as Cisco
show cdp neighborsto help identify those missing Nodes. Check the Access Control List (ACL) configurations in your network environment to fix the problems.To examine Layer 2 inventory and connectivity results:
- In the Workspace navigation panel, open the Inventory workspace.
- Select the Nodes view.
- Select the row representing the node of interest.
-
Select Actions > Layer 2 Neighbor View.
You can also right-click any object in a table or map view to access the items available within the Actions menu. -
Use the Number of Hops field to expand the area shown on the map.

-
Examine your network connectivity to ensure it is as expected.
If you configure one or more Auto-Discovery Rules and you get unexpected results:
- Check your ordering numbers.
- Check the Layer 2 protocol configuration at each end of the problem connection.
- Check each Node's assignment for Tenant. Subnets are calculated independently within each Tenant.
To examine VLAN results:
- In the Workspace navigation panel, open the Inventory workspace.
- Select the VLANs view.
- Double-click the row representing the VLAN of interest.
-
Verify that the list includes all nodes and ports assigned to this VLAN.
If you configure one or more Auto-Discovery Rules and you get unexpected results, check your ordering numbers.
To examine Router Redundancy Group results:
- In the Workspace navigation panel, open the Inventory workspace.
- Select the Router Redundancy Groups view.
- Use the Tenant assignment column to Sort the view, and verify that all members of each group are assigned to the same Tenant.
- To correct any problems, change the Tenant assignments.
Troubleshoot Layer 2 connections
If you get unexpected results for Layer 2 Connections in your network environment, review the following information.
A network device's interfaces can be configured with proprietary Layer 2 discovery protocols, instead of or in addition to the industry standard LLDP (see the list of Topology Source protocols in Layer 2 Connection Form).
By default, NNMi checks the interface for standard LLDP and vendor-specific IEEE 802 Layer 2 protocol. NNMi uses data from both protocols to calculate the Layer 2 Connection, but by default prefers the data provided through LLDP.
Forwarding Database (FDB) information can cause NNMi to establish wrong Layer 2 Connections in the following cases:
- When the FDB is configured as cache and contains obsolete data.
- In network environments with hardware from a variety of vendors, when each vendor generates different and sometimes conflicting FDB data.
Optional: NNMi administrators can configure Spiral Discovery to ignore the FDB data from one Node Group when calculating Layer 2 Connections (the FDB data is still included in other calculations).
(NNMi Advanced - Global Network Management feature) NNMi must read the Forwarding Database (FDB) tables from Ethernet switches within the network before accurate communication paths between these network devices can be calculated. Because the FDB data is involved, NNMi can produce different results on a Regional Manager as opposed to the Global Manager.
If NNMi discovers more than one IEEE 802 Layer 2 protocol being used by a particular device's interface, the Device Profile's setting controls NNMi's protocol preference:
 Prefer LLDP = Enabled: NNMi gives priority to the LLDP data.
 Prefer LLDP = Disabled: NNMi gives priority to the vendor-specific IEEE 802 Layer 2 protocol data.
NNMi cannot detect accurate Layer 2 Connections under the following circumstances:
NNMi does not support the following scenario. Switch-56 has interfaces with one Layer 2 protocol enabled. The devices at the other end of Switch-56's Layer 2 Connections have a different Layer 2 protocol enabled:
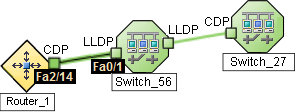
NNMi detects a false connection directly from Router-1 to Switch-27.
To fix the problem, configure both sides of each Layer 2 Connection exactly the same (both interfaces enable either the same protocol or dual protocols).
Examine Layer 3 discovery results
Layer 3 represents your network's router traffic.
To examine Layer 3 inventory results:
- In the Workspace navigation panel, open the Inventory workspace.
- Select the Nodes view.
- Select the row representing the router of interest.
-
Select Actions > Layer 3 Neighbor View.
You can also right-click any object in a table or map view to access the items available within the Actions menu. -
Use the Number of Hops field to expand the area shown on the map.
-
Examine your network connectivity to ensure it is as expected. If changes are required, try the following:
- Use Actions > Polling > Configuration Poll.
- Manually add or delete the connection.
- Verify that the addresses on each end of the connection are not listed in the Excluded IP Address filter.
If you configure one or more Auto-Discovery Rules and you get unexpected results, check your ordering number for each rule.