


Use Rate configuration to track incident patterns based on the number of incident reoccurrences within a specified time period. After the count within the specified time period is reached, NNMi emits a Rate Correlation incident and continues to update the Correlation Notes with the number of occurrences within that rate.
Suppression, Enrichment, and Dampening are not supported for Rate incidents.
As long as your defined criteria (Count and Hours, Minutes, Seconds) is sustained, the following information is updated in the Correlation Notes of the Rate Correlation incident:
- the actual number of occurrences of incidents for that sustained rate (Count)
- the sustained time interval (Hours, Minutes, Seconds)
For example, you can set a Rate configuration to track when a link is intermittently down at least three times in 30 minutes. NNMi shows the first occurrence of the rate incident in the incident view and uses Correlation Notes to update the number of incidents and time interval to reflect all the incremental incident occurrences and time periods. To continue the example, if the rate of three times in 30 minutes is sustained for 90 minutes, NNMi updates the Correlation Notes to specify that 9 incidents occurred in 90 minutes.
NNMi provides preconfigured Rate correlations. You can add new Rate correlations.
When you open the Incident form of the newest instance:
-
On the General tab, two fields notify you that the Rate correlation is working:
- Correlation Nature: Rate Stream Correlation
- Count: x
- On the Correlated Children tab, each incident is listed in the table.
-
If a Rate Correlation Incident is dampened, note the following:
- Rate Correlation Incidents inherit the Dampening configuration settings from its Correlated Children.
-
NNMi always retains the Parent Rate Correlation Incident, even if its Child Incidents are Closed and subsequently deleted.
To establish a rate correlation within an incident configuration:
-
Navigate to the Rate tab.
- From the workspace navigation panel, select the Configuration workspace.
- Expand the Incidents folder.
- Select Management Event Configurations.
-
Do one of the following:
- To create a new configuration, click the
 New icon.
 - To edit an existing configuration, select a row, click the
 Open icon, and continue.
- To create a new configuration, click the
- On the form that opens, locate the Rate tab.
- Provide the definition for this Rate Configuration (see the "Rate Configuration Definition" table).
- Optional. If your Comparison Criteria includes custom incident attributes (CIA) to identify one specific incident, use the Comparison Parameter List table to define each CIA.
- Click
 Save and Close to save your changes and return to the previous form.
 = Temporarily disable the selected configuration.
 = Enable the selected configuration.
 icon and select
  Quick Find. Select Rate Correlation from the list.
Rate Comparison Parameters form
[This is the Context-Sensitive Help topic for the Incident Config >>> Comparison Params form. Used in six contexts.]
Custom Incident Attributes (CIAs) are used as parameter values. Parameter values enable accurate identification of duplicate incidents. There are two categories of CIAs:
- SNMP trap varbind values (Name = the MIB varbind identifier, Type = asn_*)
- Custom attributes provided by NNMi (Name = cia.*, Type=String).
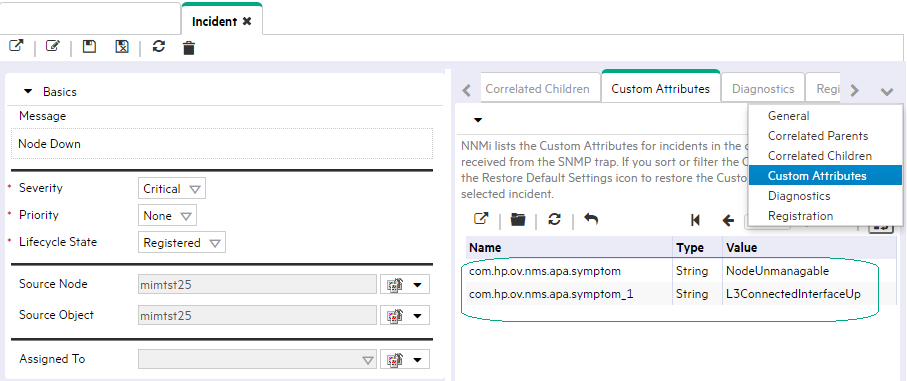
The group of available CIAs depends on which incident you are configuring for this Rate (for example, CiscoLinkDown). To see which CIAs are available, navigate to an Incident view, double-click an instance of that incident-type to open the Incident form, and navigate to the Custom Attributes tab. The items listed in the table are the CIAs for that particular incident-type. For example, all CiscoLinkDown incidents would have the same group of CIAs shown in the illustration below.
You can also use the CIA (varbind) position number.
To specify a CIA to use in the identification criteria for duplicate incidents:
-
Navigate to the Rate Comparison Params form.
- From the workspace navigation panel, select the Configuration workspace.
- Expand the Incidents folder.
- Select Management Event Configurations .
-
Do one of the following:
- To create a new configuration, click the New icon.
- To edit an existing configuration, select a row, click the Open icon, and continue.
- To create a new configuration, click the
- On the form that opens, navigate to the Rate tab.
- Locate the Rate Comparison Parameters table.
-
Do one of the following to specify which CIA:
- To add a Custom Incident Attribute parameter specification, click the New icon.
- To edit an existing Custom Incident Attribute parameter specification, select a row, click the Open icon, and continue.
- To add a Custom Incident Attribute parameter specification, click the
-
In the Parameter Value field, type (or copy and paste) the exact text string from the Incident form, Custom Attribute tab, Name attribute value:
- NNMi-provided CIA value.
- SNMP trap varbind identified by the Abstract Syntax Notation value (ASN.1).
- Click Save and Close to save your changes and return to the previous configuration form.