


You can configure actions to automatically run at any point in the incident lifecycle. For example, you might want to configure an action to occur when an incident of the type you are configuring is generated (Registered). When an incident is generated, you might want to automatically open a trouble ticket or send email or page your network operator. After the incident is Closed, you might want to automatically close the trouble ticket.
Note Your actions will not be executed until you enable the Actions configuration by either clicking Enable  on the Actions tab or using the Actions → Enable Configuration option.
Note If the NNMi management server is running on a Windows operating system, NNMi runs each action that you configure using the Local System account. If the NNMi management server is running on a Linux operating system, NNMi runs each action that you configure using the bin user name.
You can configure actions for incidents generated from SNMP Trap Incidents, Syslog Messages Incidents and the NNMi Management Event Incidents. Any time an incident configuration changes, the action directory is rescanned and any Jython files are reloaded to the NNMi database.
Tip Copy any required Jython files to the NNMi actions directory before you configure an incident action. New or updated actions are loaded into NNMi only when an incident configuration is updated or created.
When the defined Incident Action runs, output is logged to the incidentActions.*.*.log file. To view the contents of the Actions log, use the Tools > Incident Actions Log menu option.
NNMi sets the default values described in the following table.
| Property | Description | Value |
|---|---|---|
| numProcess | Number of actions that can be run at one time. | 10 |
| numJythonThreads | Number of threads the action server uses to run Jython scripts. | 10 |
| userName | User name under which the action server runs. | bin |
To configure an automatic action for an incident:
-
Navigate to the Actions tab.
- From the workspace navigation panel, select the Configuration workspace.
- Expand the Incidents folder.
- Select Management Event Configurations.
-
Do one of the following:
- To create an incident configuration, click the
 New icon, and continue.
 - To edit an incident configuration, select a row, click the
 Open icon, and continue.
 - To delete an incident configuration, select a row, and click the
 Delete icon.
- To create an incident configuration, click the
- Select the Actions tab.
- From the Lifecycle Actions table toolbar, do one of the following:
- To create an Action configuration, click the New icon, and continue.
- To edit an Action configuration, select a row, click the Open icon, and continue.
- To delete an Action configuration, select a row, and click the Delete icon.
- In the Lifecycle Transition Action Form (Management Events), provide the required information.
-
Click
 Save and Close to save your changes and return to the previous form.
 The next time the lifecycle changes, NNMi launches the action associated with the lifecycle for the incident of that type.
Lifecycle Transition Action form
Use this form to enter the command you want to run when an incident of the type you are configuring is at a particular Lifecycle State. For example, when an incident is generated (Registered), you might want to automatically open a trouble ticket or email or page your network operator.
Your actions will not be executed until you enable the Actions configuration by either clicking Enable on the Actions tab or using the Actions > Enable Configuration option.
To configure an action for an incidents:
-
Navigate to the Lifecycle Transition Actions form:
- From the workspace navigation pane, select the Configuration workspace.
- Expand the Incidents folder.
- Select Management Event Configurations.
- Select the Actions tab.
-
From the Lifecycle Transition Action table toolbar, do one of the following:
- To create an Action configuration, click the New icon, and continue.
- To edit an Action configuration, select a row, click the Open icon, and continue.
- To delete an Action configuration, select a row, and click the Delete icon.
- To create an Action configuration, click the
-
Make your configuration choices (see table).
NNMi reloads the configuration information anytime the incident configuration is changed.
- Click Save and Close to save your changes and return to the previous form.
The Payload Filter Editor enables you to create expressions that further refine the filters used to select the incidents that cause the configured action to run. Make sure to design any complex Payload Filters offline as a Boolean expression first. This method can help to minimize errors when entering your expressions using the Payload Filter editor.
To create a Payload Filter expression:
-
Navigate to the Management Event Configuration form:
- From the workspace navigation panel, select the Configuration workspace.
- Expand the Incidents folder.
- Select Management Event Configurations.
-
Do one of the following:
- To create an incident configuration, click the New icon, and continue.
- To edit an incident configuration, select a row, click the Open icon, and continue.
- To delete an incident configuration, select a row, and click the Delete icon.
- To create an incident configuration, click the
- Select the Actions tab.
-
Do one of the following:
- To create a new configuration, click the New icon.
- To edit an existing configuration, select a row, click the Open icon, and continue.
- To create a new configuration, click the
- Select the Payload Filter tab.
-
Define your Payload Filter.
- Plan out the logic needed for your Filter String.
-
Use the buttons on the bottom half of the Additional Filters Editor to establish the logic structure.
For example, to establish the following structure, click AND, then AND, and then OR:
(( ) AND ( )) -
Now place your cursor in a location within the displayed Filter String, and use the top half of the filter editor to define the parameters of the highlighted filter requirement.
For example, select a set of parentheses and use the Insert button to specify the filter requirement within those parentheses:

- Click Save and Close.
- Click Save and Close to save your changes and return to the previous form.
When creating a Payload Filter, note the following:
- Payload Filter expressions for the
likeandnot likeoperators use the syntax defined for java regular expressions (java.util.regex Pattern class) - You must use a
ciaNamethat already exists in the trap or event you are configuring. - Each set of expressions associated with a Boolean Operator is treated as if it were enclosed in parentheses and evaluated together.
- View the expression displayed under Filter String to see the logic of the expression as it is created.
-
The
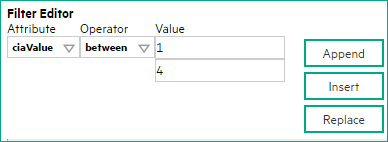
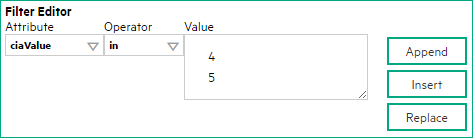
ANDandORBoolean Operators must contain at least two expressions as shown in the example below.The following example filters incidents on voltage state. Using this Payload Filter, you could then configure the Basics settings of the Enrichment Configuration to set the severity and message format to all incidents that return a state value of
4or5.ORciaName = .1.3.6.1.4.1.9.9.13.1.2.1.7ciaValue = 4ANDciaName = .1.3.6.1.4.1.9.9.13.1.2.1.7ciaValue = 5NNMi evaluates the expression above as follows:
(ciaName = .1.3.6.1.4.1.9.9.13.1.2.1.7 AND ciaValue = 4) OR (ciaName = .1.3.6.1.4.1.9.9.13.1.2.1.7 AND ciaValue = 5)NNMi finds all incidents with a varbind value of
.1.3.6.1.4.1.9.9.13.1.2.1.7and CIA value of 4 or 5.When you use
ciaNameandciaValuein a Payload Filter, you must enter theciaNameandciaValueas a pair as shown in the preceding example. - The placement of your cursor and the subsequent text that is selected is important when performing operations using the Payload Filter Editor. For example, you append to, replace, or change the indentation of the expression that is selected.
- The placement of your cursor and the subsequent text that is selected is especially important when adding your Boolean operators.

Valid parameters for configuring incident actions
When configuring incident actions, consider using incident information as part of the action. NNMi provides the following parameter values. Use these parameters as variables in your Jython or executable files.
Tip If a value is not stored for a parameter, it is returned as “null”.
| Parameter Value | Description |
|---|---|
| $category, $cat | Value of the Category attribute in the Incident form. |
| $count, $cnt | Value representing the number of Custom Incident Attributes that appear in the Incident form. |
| $family, $fam | Value from the Family attribute in the Incident form. |
| $firstOccurrenceTime, $fot | Value from the First Occurrence Time attribute in the incident form. |
| $lastOccurrenceTime, $lot | Value from the Last Occurrence Time attribute in the incident form. |
| $lifecycleState, $lcs | Value from the Lifecycle State attribute in the Incident form. |
| $name | Value of the Name attribute from the incident configuration. |
| $nature, $nat | Value from the Nature attribute in the Incident form. |
| $origin, $ori | Value from the Origin attribute in the Incident form. |
| $originOccurrenceTime, $oot | Value from the Origin Occurrence Time attribute in the incident form. |
| $priority, $pri | Value from the Priority attribute in the Incident form. |
| $severity, $sev | Value of the Severity attribute of the Incident form. |
| Parameter Value | Description |
|---|---|
| $managementAddress, $mga | Value from the Management Address attribute of the incident's source Node's form or SNMP Agent form. |
| $otherSideOfConnectionManagementAddress, $oma | If the incident's Source Node is part of a Layer 2 Connection, this attribute is the value of the Management Address of a node on the other side of the Layer 2 Connection. |
| $sourceNodeLongName, $sln | The fully-qualified DNS name as displayed in the Hostname attribute of the incident's source Node's form. |
| $sourceNodeName, $snn | Value from the Name attribute of the incident's source Node's form. |
| $sysContact, $sct | Value from the System Contact attribute of the incident's source Node form: General tab. |
| $sysLocation, $slc | Value from the System Location attribute of the incident's source Node form: General tab. |
| Parameter Value | Description |
|---|---|
| $ifAlias, $ifa | Value from the IfAlias attribute for the interface that is the incident's source object. |
| $ifConfigDupSetting, $icd | Configured Duplex Setting on the port associated with the interface that is the incident's source object. |
| $ifDesc, $idc | Value from the ifDesc attribute for the interface that is the incident's source object. |
| $ifIndex, $idx | Value from the ifIndex attribute for the interface that is the incident's source object. |
| $ifIpAddr, $iia | IP Address values associated with the interface that is the incident's source object. If multiple IPaddresses are associated with the interface, this parameter returns a comma-separated list. |
| $ifName, $ifn | Value from the ifName attribute for the interface that is the incident's source object. |
| $ifPhysAddr, $ipa | Value from the Physical Address attribute for the interface that is the incident's source object. |
| $ifSpeed, $isp | Value from the ifSpeed attribute for the interface that is the incident's souce object. |
| $ifType, $itp | Value from the ifType attribute for the interface that is the incident's souce object. |
| Parameter Value | Description |
|---|---|
| $otherSideOfConnectionConfigDupSetting, $ocd | If the incident's source Node is part of a Layer 2 Connection, this parameter contains the Configured Duplex Setting on the port associated with the interface on the other side of the connection. |
| $otherSideOfConnectionIfAlias, $oia | If the incident's Source Node is part of a Layer 2 Connection, this parameter is the value of the ifAlias of one of the interfaces on the other side of the Layer 2 Connection. |
| $otherSideOfConnectionIfDesc, $odc | If the incident's Source Node is part of a Layer 2 Connection, this parameter contains the ifDescr attribute value for the interface on the other side of the Layer 2 Connection. |
| $otherSideOfConnectionIfIndex, $odx | If the incident's Source Node is part of a Layer 2 Connection, this parameter contains the ifIndex attribute value for the interface on the other side of the connection. |
| $otherSideOfConnectionIfName, $ofn | If the incident's Source Node is part of a Layer 2 Connection, this parameter contains the ifName attribute value for the interface on the other side of the connection. |
| Parameter Value | Description |
|---|---|
| $impVlanIds, $ivi | Value from the VLAN Id attribute associated with the interface that is the incident's source object. To access this information from an interface form, navigate to the VLAN Port tab and open the form for the VLAN of interest. If the interface is part of more than one VLAN, this parameter returns a comma-separated list. |
| $impVlanNames, $ivn | Value from the Global VLAN Name attribute associated with the interface that is the incident's source object. To access this information from a Node form or Interface form, navigate to the VLAN Ports tab. If the node or interface is part of more than one VLAN, this parameter returns a comma-separated list. |
| Parameter Value | Description |
|---|---|
| $<position_number> |
Value of the custom incident attribute (CIA) position number for any CIA that originated from a varbind or was added by NNMi. For example, to indicate you want to use the varbind in position 1, enter: NNMi stores varbind values as Custom Incident Attributes. If you know the varbind position number, use this parameter. |
| $<CIA_name> |
Value of the name that is used for the custom incident attribute. For example, |
| $<CIA_oid> | Value of the object identifier for any custom incident attribute that originated as a varbind. For example, $.1.3.6.1.6.3.1.1.5.1. Use this parameter when you are not certain of a custom incident attribute (varbind) position number. |
| $* | Used to indicate you want all of the custom incident attribute values originating as varbinds, to be passed to the action configuration. Each varbind is returned in the following format: $<CIA_name>:<CIA_value> in which the custom incident attribute name appears followed by the custom incident attribute value. |
The function described in the following table replaces the specified numeric value with the associated text value stored in the CIA.
Note The associated MIB must have been loaded using the nnmloadmib.ovpl command.
| Function | Description |
|---|---|
| $text($<position_number>) |
The <position_number> argument specifies the numeric value of the custom incident attribute (CIA) position number for any CIA that originated from a varbind or was added by NNMi. For example, to indicate you want to use the varbind in position 1, enter: After the function runs, NNMi replaces the numeric value with the text value stored in the CIA. If a text value is not available, NNMi returns the numeric value. |
| $text($<CIA_oid>) |
The <CIA_oid> argument specifies the object identifier for any custom incident attribute that originated as a varbind. For example, After the function runs, NNMi replaces the numeric value with the text value stored in the CIA. If a text value is not available, NNMi returns the following message as the value: |