


Use Security Groups
This topic discusses some Security Group concepts and provides an example of how to use Security Groups. It also provides an example of how to use Tenants and Security Groups in Global Network Management. It includes the following sections:
- Use Security Groups
- Security Concepts
- Security Groups Model
- Security Groups Example
- Tenants
- Tenant Example
- Tenants and Security Groups in Global Network Management (GNM)
Introduction
NNMi includes a security model that provides restrictions to object access based on group membership (similar to Access Control Lists (ACLs), though different in implementation). This document discusses some Security Group concepts and gives a specific example of using Security Groups. This paper also discusses another feature of NNMi, Multi-Tenancy, which is closely related to Security Groups.
Using Security Groups and Multi-Tenancy you can configure NNMi to enable different operators to view items specific to their assignments and privileges. This restriction applies to nodes (and indirectly, to all subcomponents like interfaces, addresses, cards controlled at the node level) as well as incidents, maps, lists, and other views.
Security Concepts
Consider two types of groups: User Groups and Security Groups. User Groups combine users (user accounts) into groups. Users can belong to multiple User Groups. For example, a user could be a member of two different regional Level1 Operator groups.
Security Groups control which User Groups can access nodes. Each node (for instance, a switch, router, load balancer, or server) is a member of only one Security Group. An example of a Security Group would be nodes in a specific region, such as a data center.
A User Group mapping maps users to User Groups.
Security Group mapping establishes a relationship between User Groups and Security Groups, effectively granting permission for User Group members to access nodes in the Security Group. Security Group mapping also controls the level of action User Group members can perform on the nodes.
NNMi Administrator accounts can always access all nodes because Security Groups do not apply to NNMi Administrator accounts.
User interface access determines what actions and menu items are visible to User Group members while viewing the graphical user interface. This is achieved using predefined User Groups shipped along with the product. In most cases, you make the Security Group access level match the user interface access level; although this is not required.
Figure 1 provides a graphical representation of the groups and their relationships. The asterisks indicate that one or more mappings are permitted. The only restriction is that nodes must be in only one Security Group.

Security Groups Model
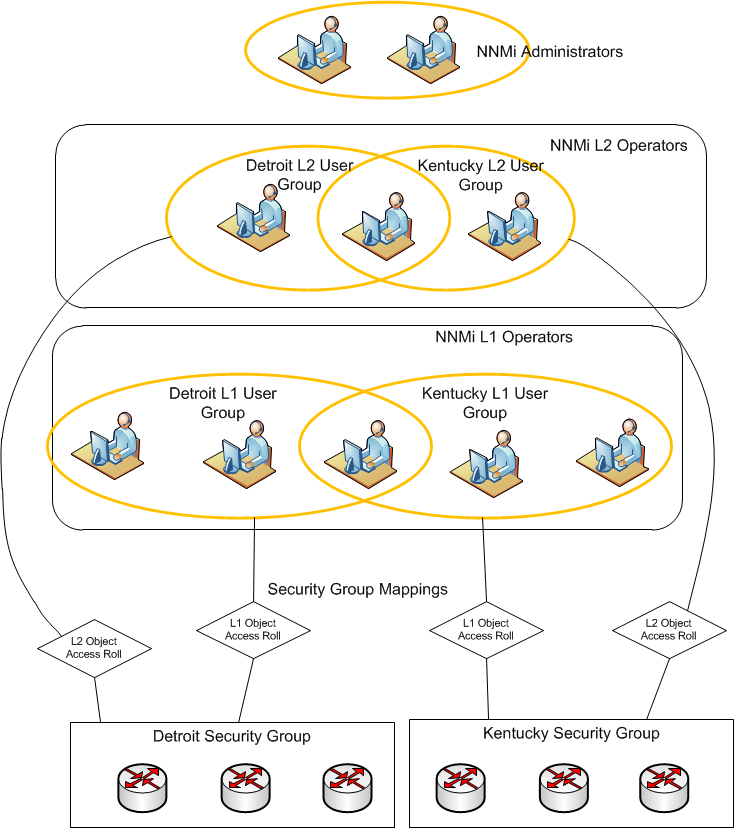
Consider the following scenario. Suppose you want to divide responsibility of your network monitoring based on geography. You have one set of operators that are in charge of monitoring nodes in the Kentucky region (a state with multiple cities). In addition, you have another set of operators in charge of monitoring nodes in the Detroit region (a large city). You also have one operator that needs to access nodes from both regions. You also have two NNMi administrators that maintain the NNMi system.
Error! Reference source not found. depicts the NNMi model of the scenario just described.

Figure 2:
Security Groups Example
Consider the following example of the model previously discussed. In this implementation, there are the following users:
• A single NNMi administrator (Ringo)
• Level 1 and Level 2 operators (John, Paul, and George). One of the users, Paul, has access to both regions.
Error! Reference source not found. shows the responsibilities of each user.
Tip: While it is possible for a user to be a Level 1 Operator for one set of nodes and a Level 2 Operator on another set of nodes within the security model, the NNMi console does not have the same level of separation. Therefore, do not mix levels for individual operators (unless you want to give some users additional capabilities).
TABLE 2. Users and Roles
|
Geography |
User |
User Group |
Security Role |
|
All |
Ringo |
N/A |
NNMi Administrator |
|
Detroit |
John |
Detroit Oper1 |
Level 1 Operator |
|
Paul |
Detroit Oper2 |
Level 2 Operator |
|
|
Kentucky |
George |
Kentucky Oper1 |
Level 1 Operator |
|
Paul |
Kentucky Oper2 |
Level 2 Operator |
The following list is the summary of the steps in this example. This example uses the Security Wizard but you could also use the Cli option of nnmsecurity.ovpl comprising arguments for below actions & also workspaces in the console.
-
Remove default User Group mappings
-
Create users
-
Create User Groups
-
Kentucky Oper1
-
Kentucky Oper2
-
Detroit Oper1
-
Detroit Oper2
-
- Map Users to User Groups
-
Create Security Groups
- Kentucky Security Group
- Detroit Security Group
- Map User Groups to Security Groups
- Assign nodes to Security Groups
In this example, two User Groups, NNMi L1 Operators and NNMi L2 Operators, have been predefined to access the user interface.
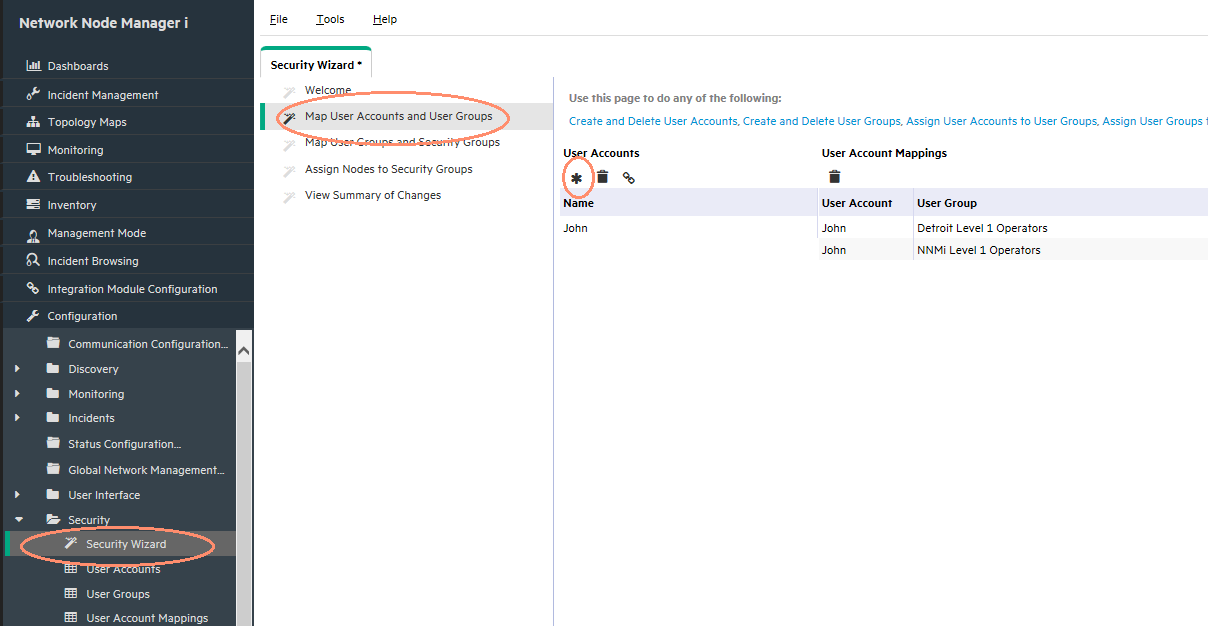
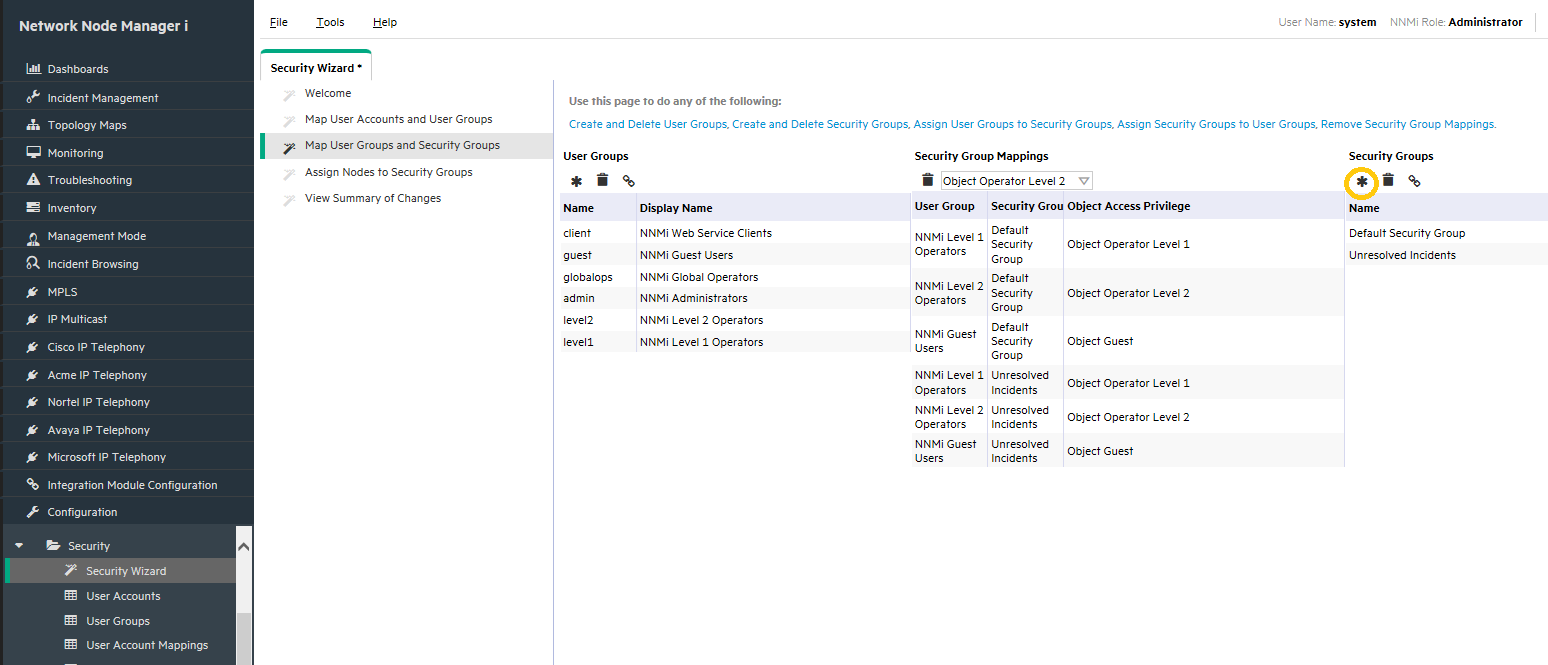
Remove Default User Group Mappings
Remove the default User Group mappings (provided for backwards compatibility) so that no operator sees any nodes initially:
-
From the workspace navigation panel, select the Configuration workspace.
- Expand the Security folder.
-
Click Security Group Mappings.
-
Select all the current mappings and delete them as shown in Figure 2

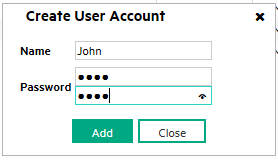
Create Users
-
From the workspace navigation panel, select the Configuration workspace.
-
Expand the Security folder.
-
Click Security Wizard.
-
Click Map User Accounts and User Groups.
-
Click the Create User Account icon as shown in Figure 3.
-
Enter the Name and Password for each user
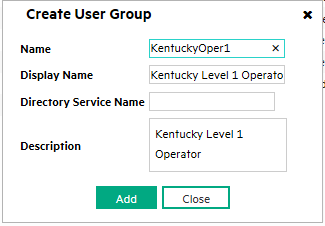
Create User Groups
-
Click the Create User Group icon as shown in Figure 5.
-
Complete the Create User Group dialog box for each User Group.
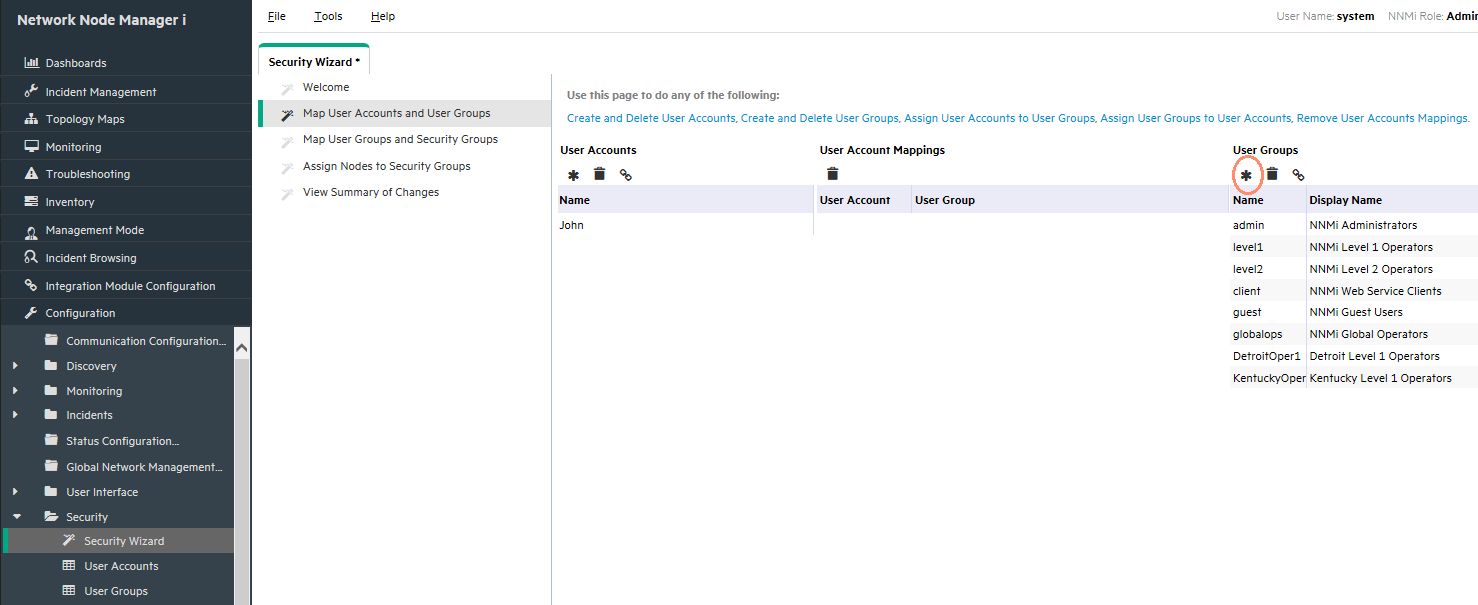
Map Users to User Groups
For each user, create a User Account Mapping as follows:
-
In the Security Wizard, click the user Name, then click the icon beside the desired level to define the mapping assignment as shown in Figure 7. Be sure to include both the special NNMi User Group for the user interface (Level 1, Level 2) and the custom User Group (for example, Detroit Level 1 Operators).
-
After creating all the User Account Mappings, click the Next button.
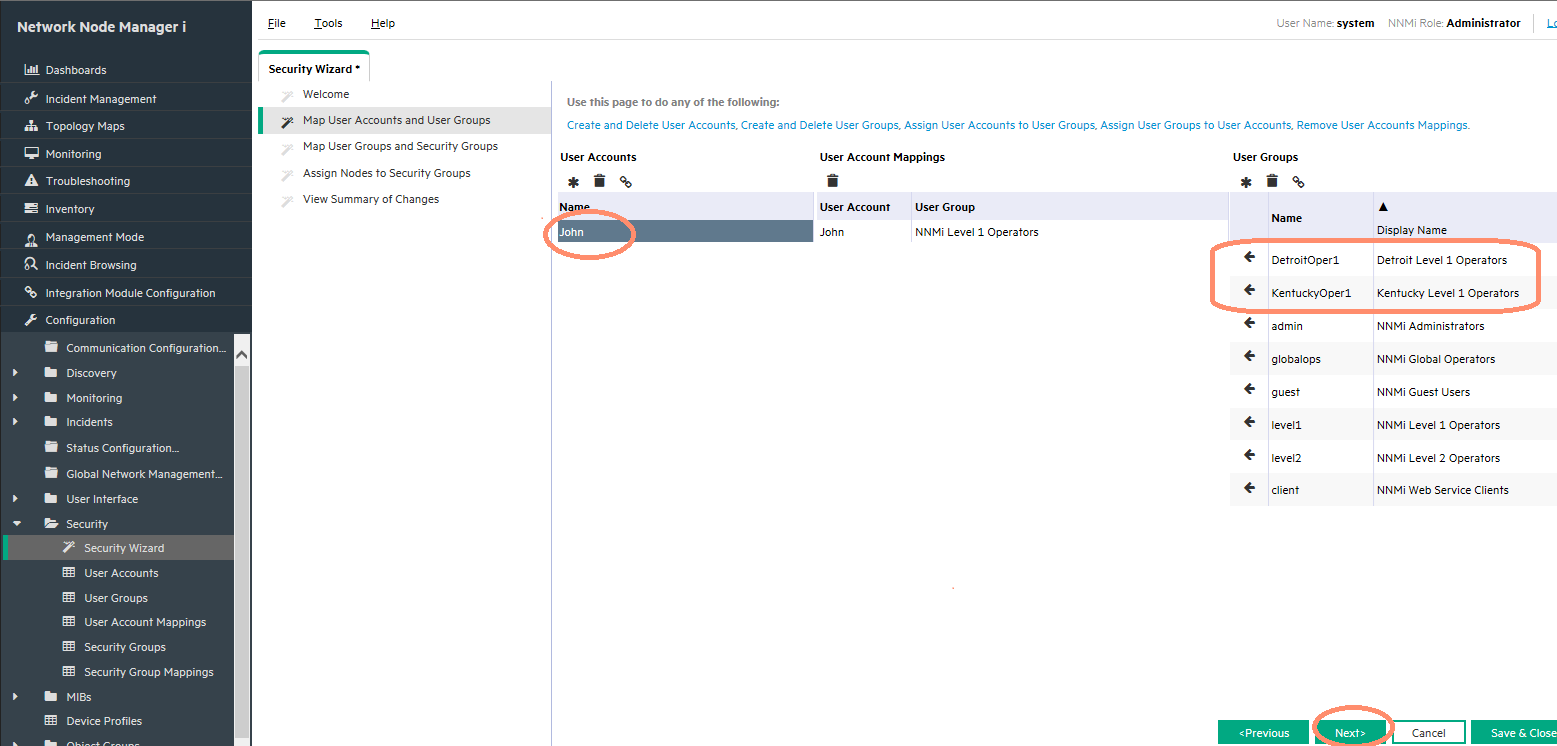
Figure 8 indicates the items completed to this point (shown in yellow).
Create Security Groups
Create two Security Groups, one for Kentucky and one for Detroit:
-
In the Security Wizard, click the Create Security Group icon as shown in Figure 9.
-
Enter the information for each Security Group in the Create Security Group dialog box as shown in Figure 10.

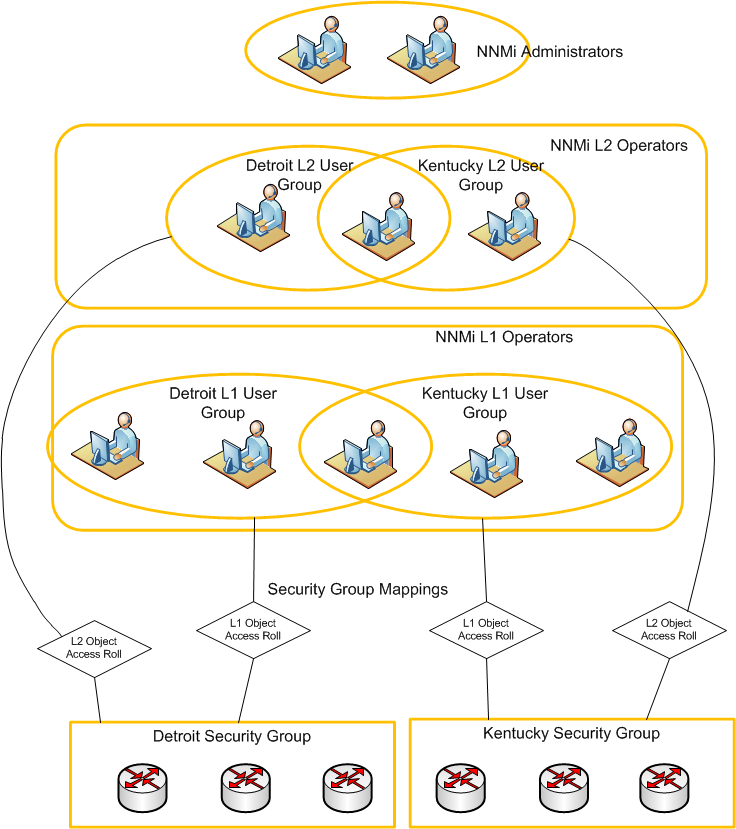
Figure 11 indicates the items now completed (shown in yellow):
Map User Groups to Security Groups
For each User Group, do the following as shown in Figure 12:
-
Click the User Group.
-
Click the appropriate object level in the Security Group Mappings pull-down list.
-
Click the icon beside the desired Security Group.
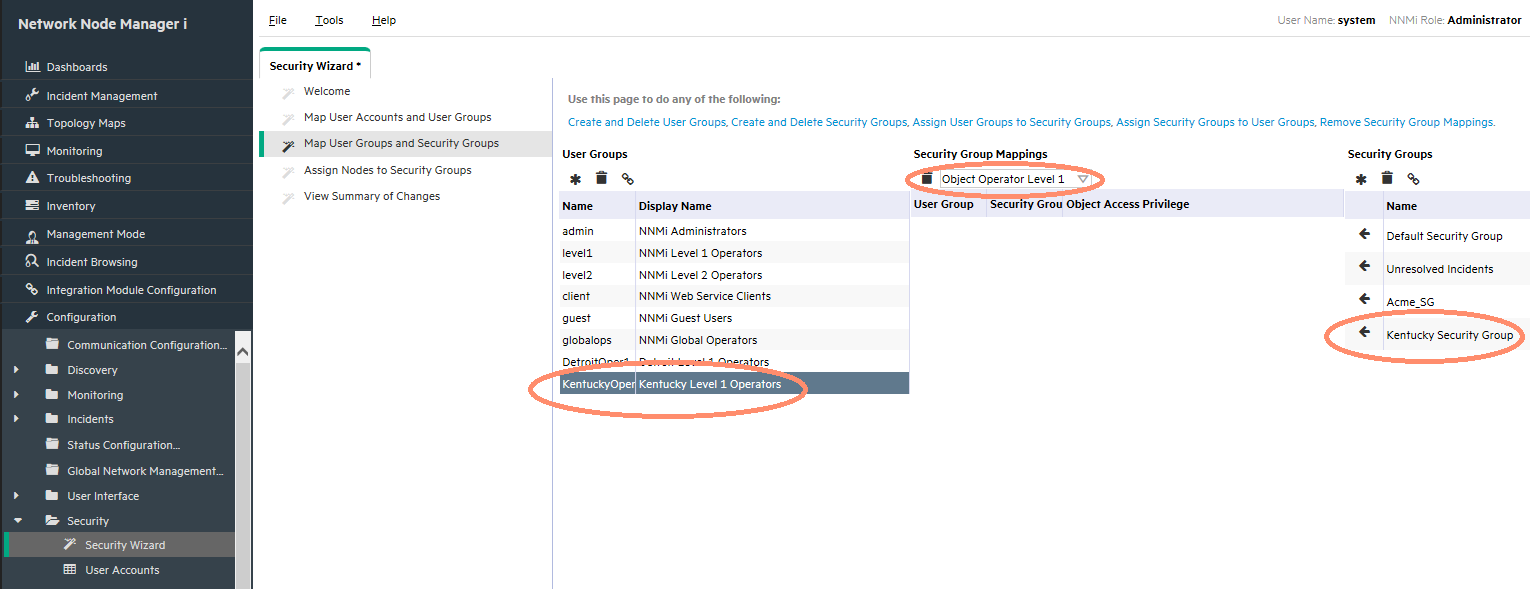
-
After you have defined all of the Security Group Mappings, click the Next button as shown in Figure 13.
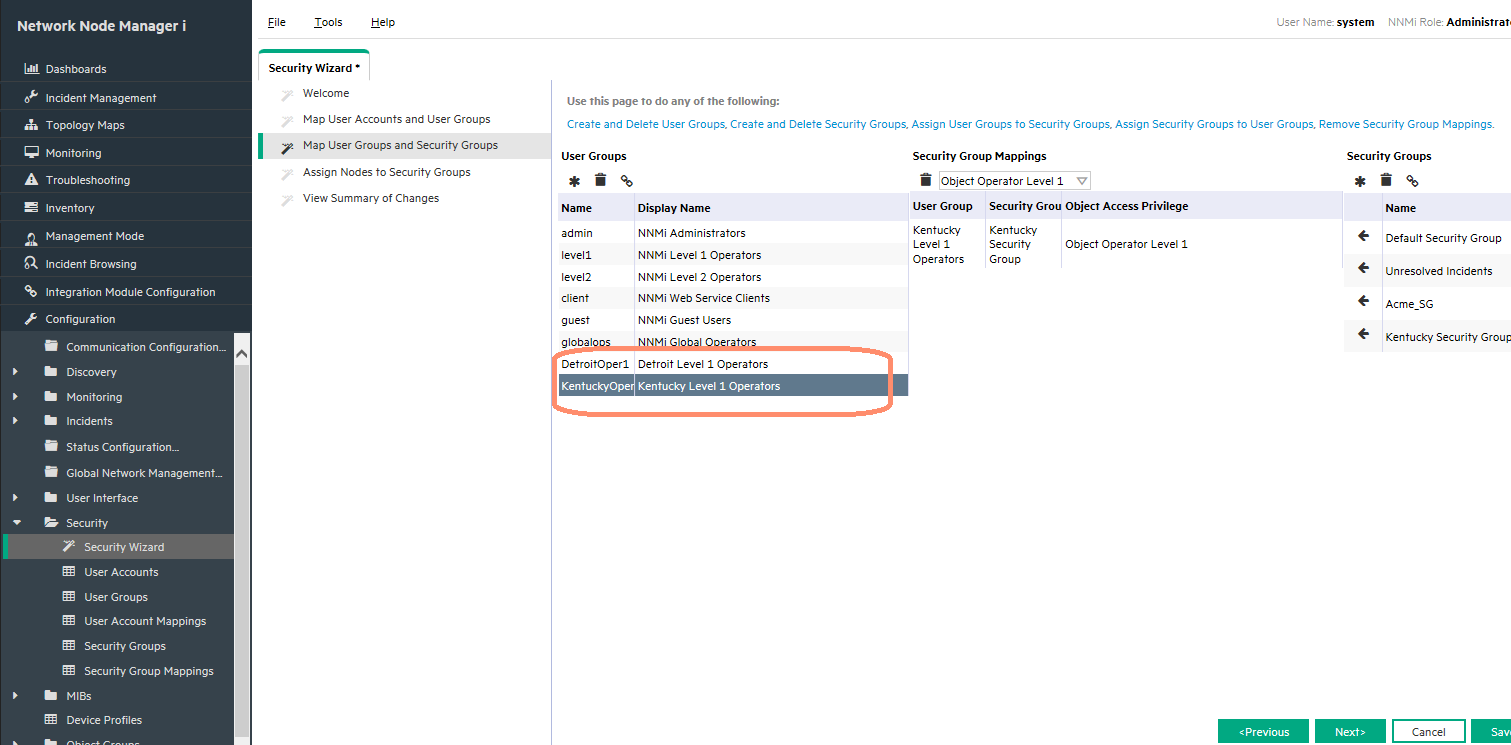
Figure 14 indicates the items now completed (shown in yellow).

Assign Nodes to Security Groups
You can assign previously discovered nodes to Security Groups either in the Security Wizard, the Node form, or with the nnmsecurity.ovpl script. If you want to automatically assign nodes to a Security Group as they are discovered, use a “seeded discovery” along with the Tenant feature (discussed later in the Tenants section of this document).
This example includes the following assumptions:
-
The nodes have already been discovered.
-
You have created a Node Group that corresponds to each Security Group (Kentucky Nodes and Detroit Nodes).
Assign nodes to Security Groups as follows:
-
Click the Security Group to which you want to assign nodes (Kentucky Security Group in this example) as shown in Figure 15.
-
Click the nodes that needs to be assigned to the Security Group in the bottom portion of the wizard.
To facilitate the process of assigning nodes, you can use the Node Group Filter pull-down if a node group comprising Kentucky nodes is already created.
If there are many nodes in the Node Group, use the CTRL+A shortcut to select all of the nodes in the group.
-
Click the Assign Selected Nodes to Selected Security Group icon.
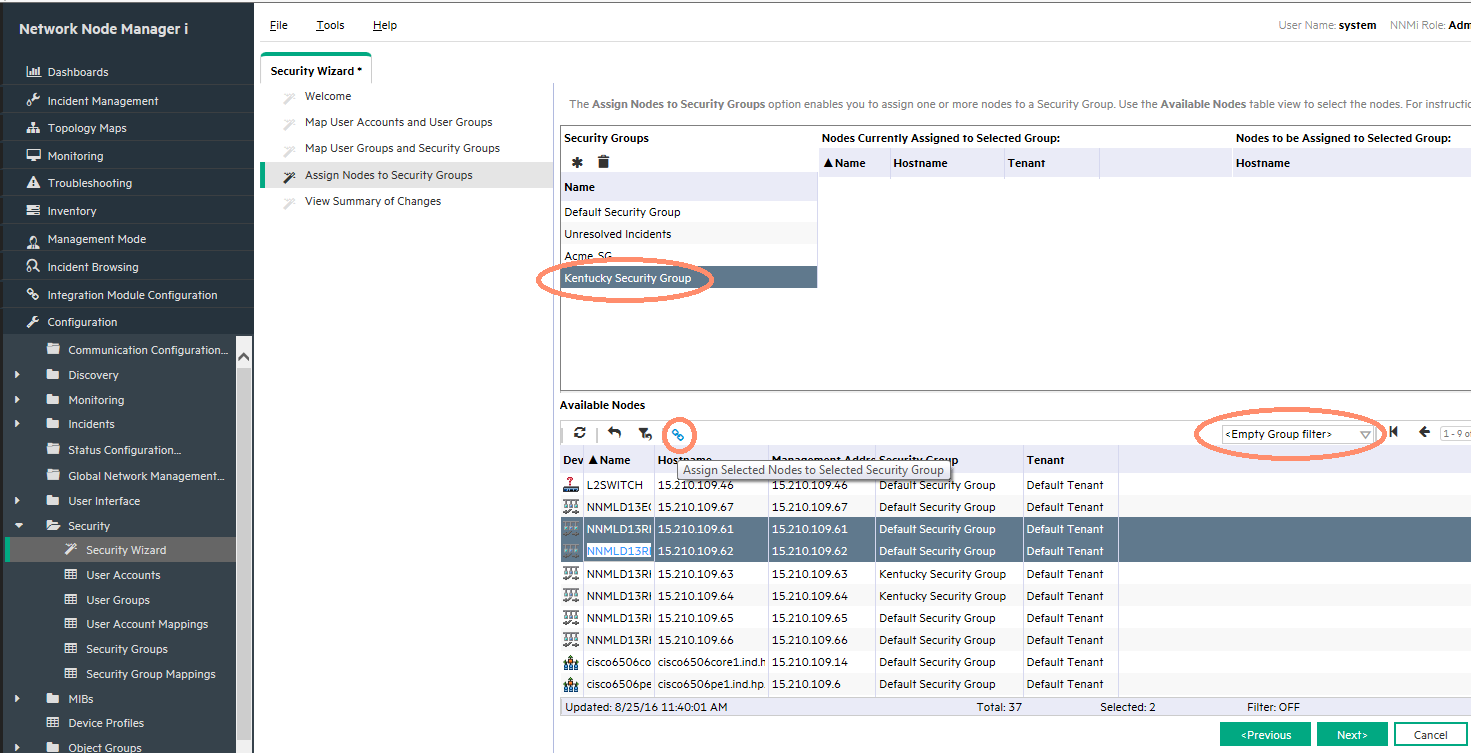
-
After you have assigned all the nodes, check to see that they are marked to be assigned; then click Next.
-
Finally, review the summary of changes as shown in Figure 16. After verifying the changes, click Save and Close.

Watch out for the red sentence before you click on Save & Close. This alerts the administrators configuring security model to re-visit if any configuration is missing. In the example above there have been no users who have been directly assigned only to User groups of level1, level 2, guest & globalops and hence the alert can be ignored and clicked on Save & Close.
Verify Example
Verify the previous example as follows:
-
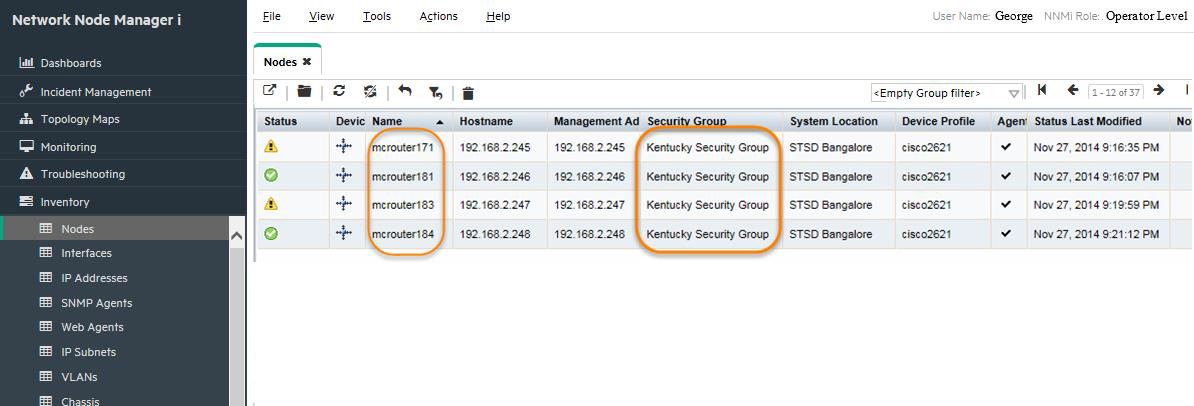
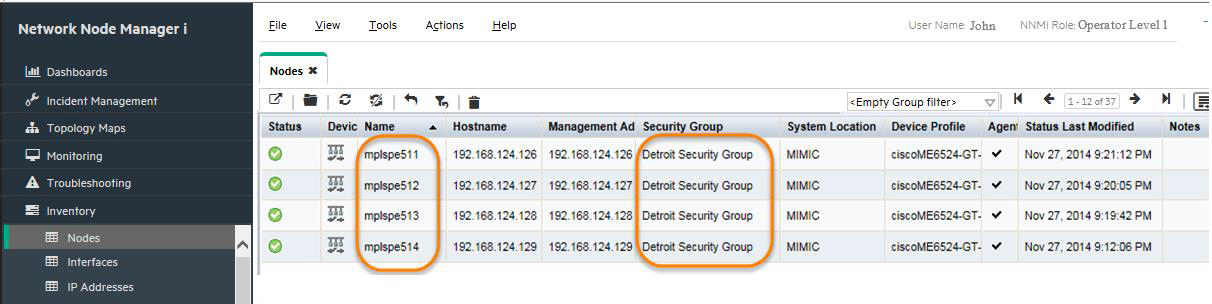
Sign in to NNMi as George. You should see only Kentucky nodes as well as incidents on Kentucky nodes as shown in Figure 17.
-
Sign in to NNMi as John. You should see only Detroit nodes as shown in Figure 18. You will also only see incidents related to nodes from Detroit Security group.
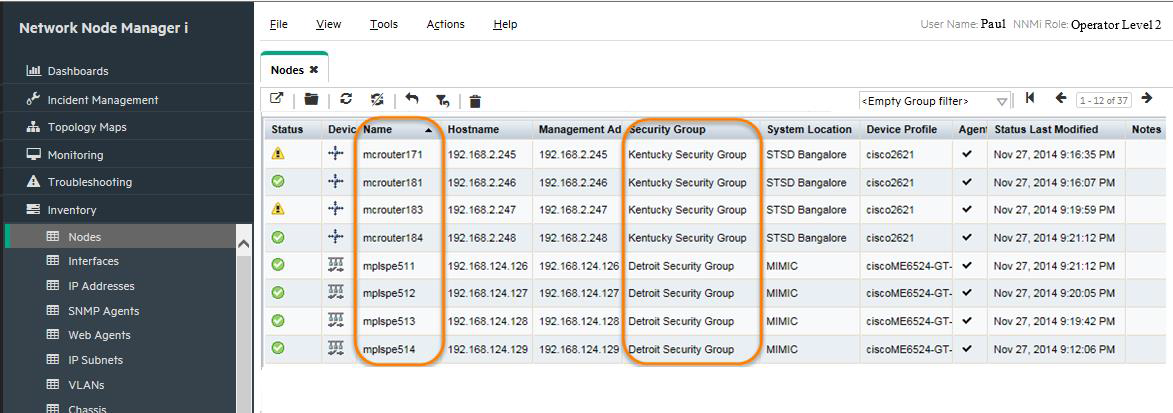
-
Sign in to NNMi as Paul. You should see the nodes and incidents from both Detroit and Kentucky as shown in Figure 19.
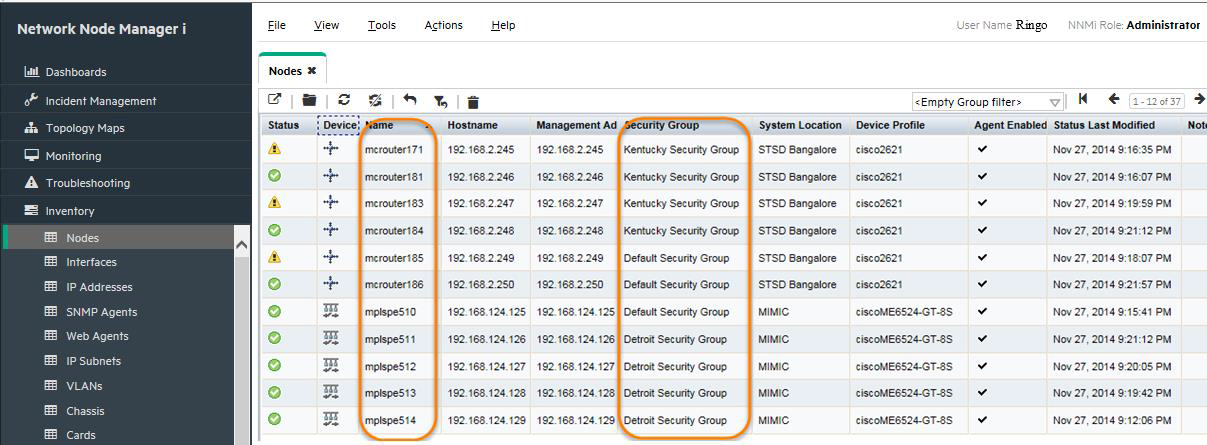
-
Sign in to NNMi as Ringo. You should see all nodes (including nodes that are in the Default Security Group) as shown in Figure 20 because you are an administrator.
Tenants
NNMi includes a feature called a Tenant (which may also be referred to as a customer or an organization). Each node is permitted one and only one Tenant assignment. Tenants are not Security Groups but they can be used in conjunction with Security Groups. The Tenant model provides a logical separation of nodes and is designed to be used with a “seeded discovery”. A Tenant can have an Initial Discovery Security Group assigned to it. When discovering a node into NNMi using a seed, you can specify the Tenant assignment. This means that if a node is discovered with a Tenant assigned, it can automatically be assigned into a Security Group. Thus, there is never a risk of accidentally having nodes visible to operators that are not supposed to see those nodes.
This model is appropriate for use by large enterprises and service providers, especially managed service providers that have multiple customers (tenants) managed from the same NNMi management server.
NNMi provides a cli script, nnmsecurity.ovpl. (See the nnmsecurity.ovpl reference page, or the UNIX manpage for more information.) The following example uses the NNMi console for most actions but be aware that all of these same actions are available using the nnmsecurity.ovpl script. Consider using the nnmsecurity.ovpl script for large deployments with many Tenants.
Tenant Example
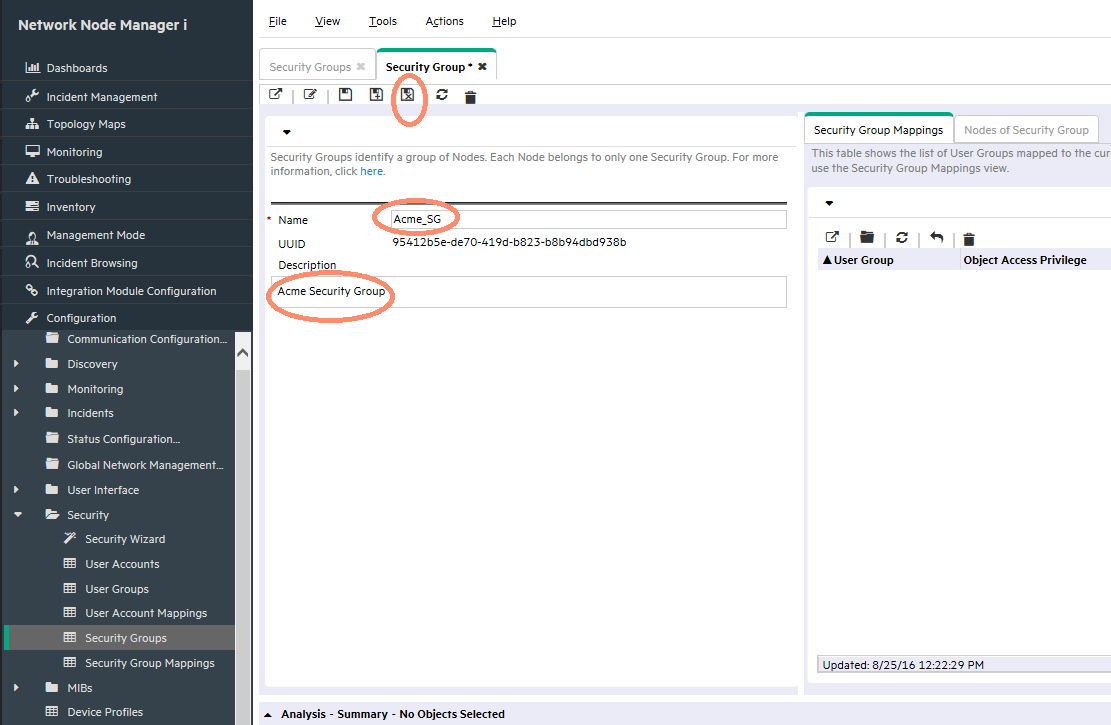
Consider the following example. Begin by creating a Security Group for the Tenant.
This example does not build on any of the previous examples.
-
From the workspace navigation panel, select the Configuration workspace as shown in Figure 21.
-
Expand the Security folder.
-
Click Security Groups.
-
Click the New icon.
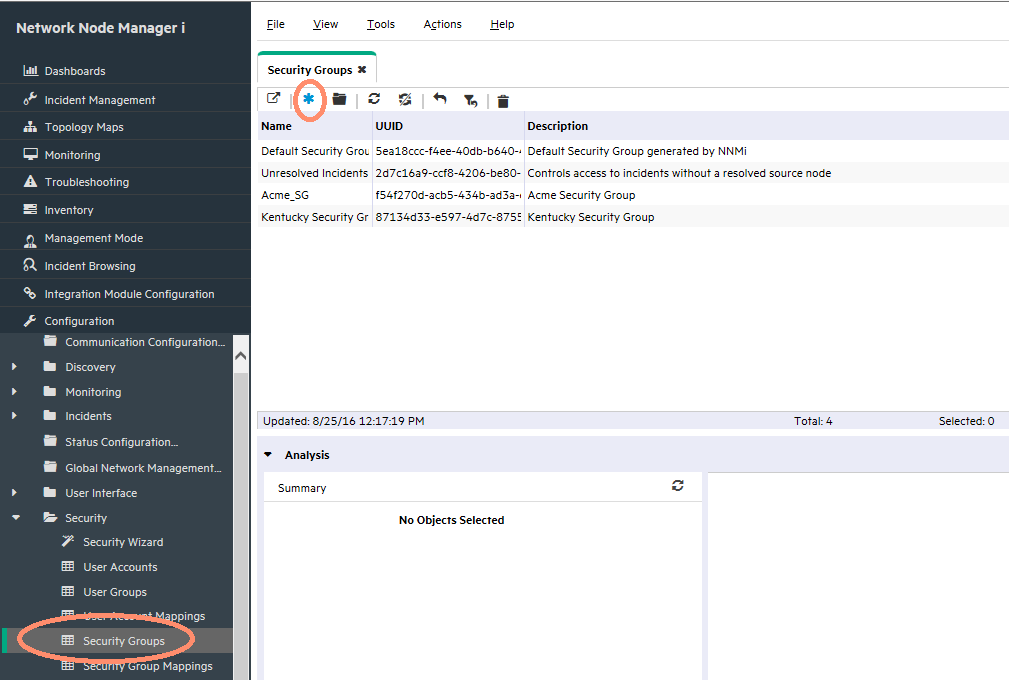
-
Complete the form and save the Security Group as shown in Figure 22.
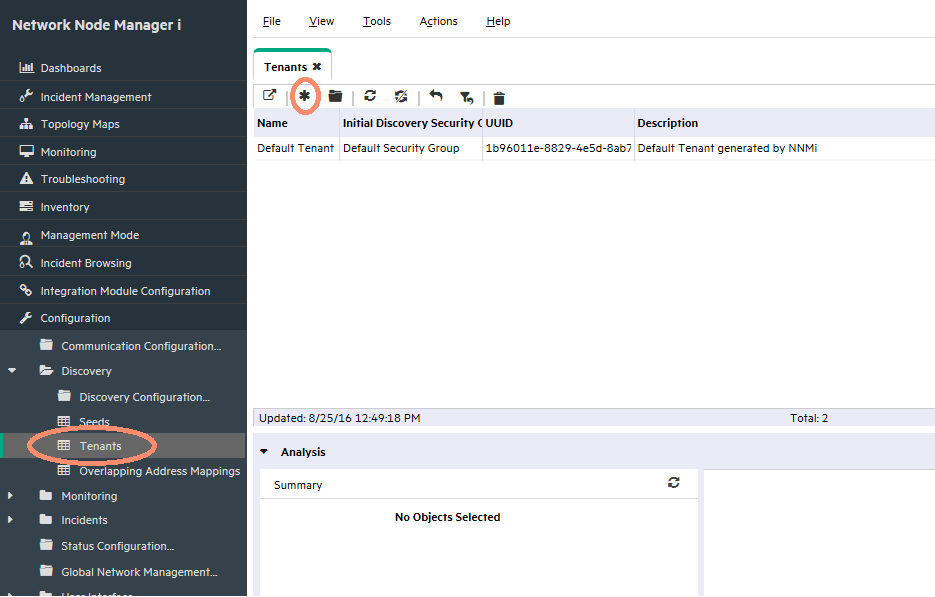
Next, create a Tenant as follows:
-
From the workspace navigation panel, select the Configuration workspace as shown in Figure 23.
-
Expand the Discovery folder.
-
Click Tenants.
-
Click the New icon.
-
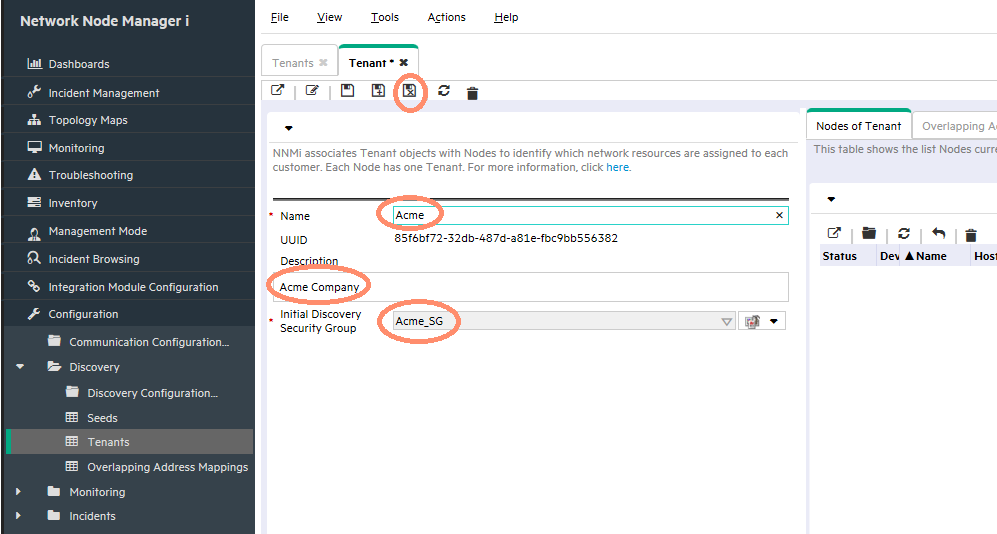
Complete the Tenant form as shown in Figure 24 (Remember to assign an Initial Discovery Security Group).
-
Click the Save and Close button.
-
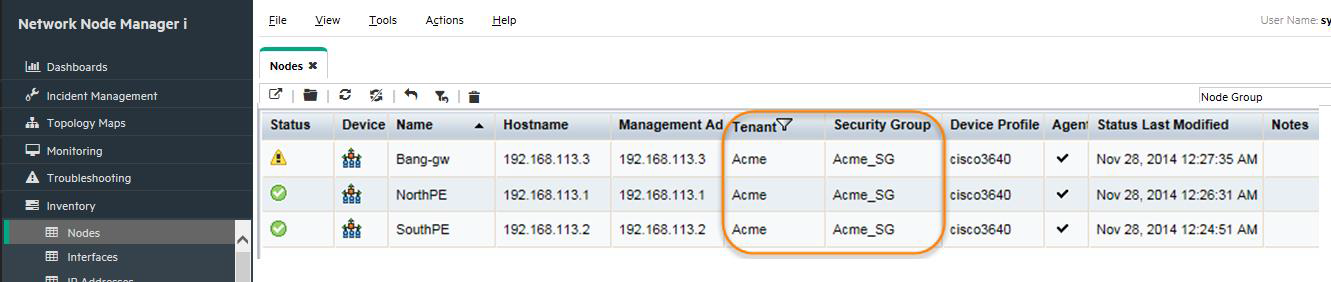
Finally, use the nnmloadseeds.ovpl script to load seeds into NNMi. (For this example, there is a seed file, acme_nodes.txt, already created for the nodes to be loaded.) Use the –t option to assign the Tenant for the nodes, as shown in the following example:
nnmloadseeds.ovpl -t Acme -f acme_nodes.txt
The nodes are assigned a Tenant and a Security Group as they are discovered as shown in Figure 25. Now the normal Security Group restrictions apply as previously discussed in this document.
You can use Tenants as filter criteria for Node Groups.
Tenants and Security Groups in Global Network Management (GNM)
Tenants and Security Groups are uniquely identified by their Universally Unique Identifier (UUID). When using Tenants (Multi-Tenancy) and Security Groups in a GNM environment, you must keep the Tenant UUIDs identical between the Global NNMi management server and the Regional NNMi management server; the same is true for Security Groups if you want to share the security restrictions between the servers.
Consider the following example.
This example does not build on any of the previous examples.
-
Use the command line to create a Security Group and Tenant at the Global NNMi station for Customer2.
When you create a Tenant from the command line using the nnmsecurity.ovpl script as a convenience, if you do not specify a default Security Group, the tool creates a matching Security Group of the same name.
The first UUID in the output is the Tenant UUID and the second UUID is the Security Group UUID. The return values in the following example are highlighted in different colors to show how the values are used at the Regional NNMi station.
nnmsecurity.ovpl -createTenant Customer2
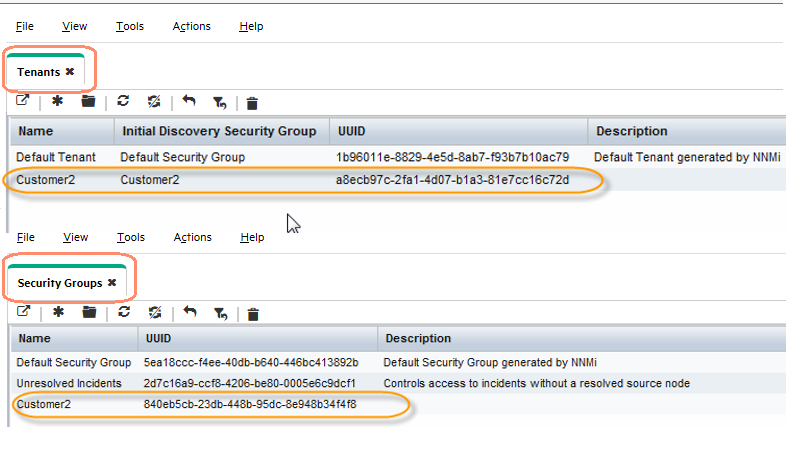
a8ecb97c-2fa1-4d07-b1a3-81e7cc16c72d : 840eb5cb-23db-448b-95dc-8e948b34f4f8 : Customer2 :
In Figure 26, notice that the Global NNMi management server has created a Tenant and a Security Group with corresponding UUIDs.
Figure 26: Tenants Form: Tenant and Security Group for Customer2 at the Global NNMi Management Server
-
Now, at the Regional NNMi management server, use the nnmsecurity.ovpl script to create a Tenant and Security Group (include the return values from the command output when the script was previously run at the Global NNMi management server). Specifying the UUIDs causes NNMi to create a Tenant and a Security Group with these same UUIDs, allowing for proper synchronization.
See the following sample command line:
nnmsecurity.ovpl -createTenant Customer2 -tenantUuid a8ecb97c-2fa1-4d07-b1a3-81e7cc16c72d -securityGroupUuid 840eb5cb-23db-448b-95dc-8e948b34f4f8
a8ecb97c-2fa1-4d07-b1a3-81e7cc16c72d : 840eb5cb-23db-448b-95dc-8e948b34f4f8 : Customer2 :
-
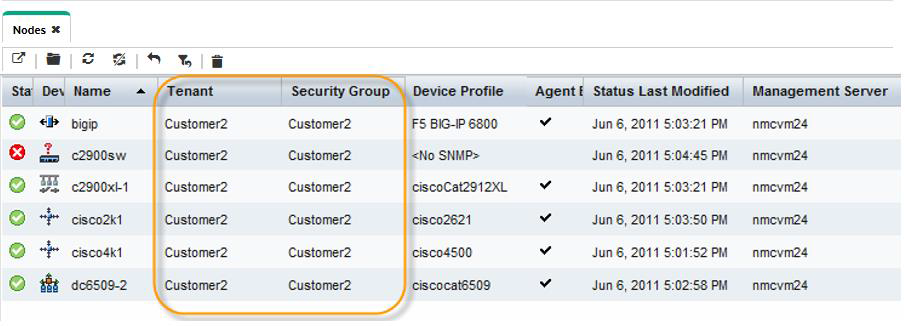
Now you can load seeds at the Regional NNMi management server with the Tenant specified using the following command line syntax:
nnmloadseeds.ovpl -t Customer2 –f <seedfile>
All of these seeds are created on the Regional NNMi management server with the Tenant as Customer2 and the associated Security Group as Customer2. These nodes are synchronized to the Global NNMi management server using the same Tenant and Security Group UUID, as shown in Figure 27.
-
At the Global NNMi management server (and at the Regional NNMi management server, as necessary), create users and User Groups, and then map the User Groups to the Security Groups. You do not need to do this at the Regional NNMi management server if your users are signing into the Global NNMi management server only. Users and User Groups are private to each NNMi management server and are not synchronized.